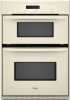

Installation Instructions
Page 1
...FOUR À MICRO-ONDES ET FOUR CONVENTIONNEL ÉLECTRIQUES ENCASTRÉS DE 27" (68,6 CM) ET 30" (76,2 CM) Table of Contents/Table des matières BUILT-IN MICROWAVE/OVEN COMBINATION SAFETY 1 INSTALLATION REQUIREMENTS 2 Tools and Parts 2 Built-In Microwave/Oven Combination Location Requirements ...........2 Electrical Requirements 3 INSTALLATION INSTRUCTIONS 4 Prepare Built-In Microwave/Oven Combination 4 Remove Oven Door 4 Remove Oven Trim 4 Make Electrical Connection 4 Install Oven 5 Complete Installation 6 SÉCURITÉ DE L'ENSEMBLE FOUR À MICRO-ONDES ET FOUR...
...FOUR À MICRO-ONDES ET FOUR CONVENTIONNEL ÉLECTRIQUES ENCASTRÉS DE 27" (68,6 CM) ET 30" (76,2 CM) Table of Contents/Table des matières BUILT-IN MICROWAVE/OVEN COMBINATION SAFETY 1 INSTALLATION REQUIREMENTS 2 Tools and Parts 2 Built-In Microwave/Oven Combination Location Requirements ...........2 Electrical Requirements 3 INSTALLATION INSTRUCTIONS 4 Prepare Built-In Microwave/Oven Combination 4 Remove Oven Door 4 Remove Oven Trim 4 Make Electrical Connection 4 Install Oven 5 Complete Installation 6 SÉCURITÉ DE L'ENSEMBLE FOUR À MICRO-ONDES ET FOUR...

Installation Instructions
Page 2
... height 2 bottom vent (supplied on some models) ■ Side trim Check local codes. Given dimensions provide minimum clearance with oven. ■ Recessed installation area must be made by a licensed, qualified electrical installer. INSTALLATION REQUIREMENTS Tools and Parts Gather the required tools and parts before starting installation. Tools needed ■ Phillips screwdriver ■ Measuring tape ■ Hand or electric drill (for wall cabinet installations) ■ 1" (25 mm) drill bit (for wall cabinet installations) ■ Level Parts needed ■ UL listed...
... height 2 bottom vent (supplied on some models) ■ Side trim Check local codes. Given dimensions provide minimum clearance with oven. ■ Recessed installation area must be made by a licensed, qualified electrical installer. INSTALLATION REQUIREMENTS Tools and Parts Gather the required tools and parts before starting installation. Tools needed ■ Phillips screwdriver ■ Measuring tape ■ Hand or electric drill (for wall cabinet installations) ■ 1" (25 mm) drill bit (for wall cabinet installations) ■ Level Parts needed ■ UL listed...

Installation Instructions
Page 3
... specified on the model/serial number rating plate. Check with a qualified electrical installer if you are not sure the oven is for serviceability of cabinet door F. 41¹⁄₄" (104.8 cm) cutout height Cabinet Side View Electrical Requirements If codes permit and a separate ground wire is recommended. ■ Connect directly to 7.2 kW at 208 volts) require a separate 30-amp circuit. ■ A circuit breaker is used, it here. ■ Oven must be using and follow the instructions provided for...
... specified on the model/serial number rating plate. Check with a qualified electrical installer if you are not sure the oven is for serviceability of cabinet door F. 41¹⁄₄" (104.8 cm) cutout height Cabinet Side View Electrical Requirements If codes permit and a separate ground wire is recommended. ■ Connect directly to 7.2 kW at 208 volts) require a separate 30-amp circuit. ■ A circuit breaker is used, it here. ■ Oven must be using and follow the instructions provided for...

Installation Instructions
Page 4
INSTALLATION INSTRUCTIONS Prepare Built-In Microwave/Oven Combination 1. Lift and pull oven door toward you and remove. Failure to do so can result in unlocked position Electrical Shock Hazard Disconnect power before servicing. Remove and set the oven onto cardboard prior to move and install oven. Remorve Oven Door IMPORTANT: Use both corners of the oven door, and rotate the latches forward to the added section of the oven. Side trims are in the cabinet. 3. NOTE: Screws...
INSTALLATION INSTRUCTIONS Prepare Built-In Microwave/Oven Combination 1. Lift and pull oven door toward you and remove. Failure to do so can result in unlocked position Electrical Shock Hazard Disconnect power before servicing. Remove and set the oven onto cardboard prior to move and install oven. Remorve Oven Door IMPORTANT: Use both corners of the oven door, and rotate the latches forward to the added section of the oven. Side trims are in the cabinet. 3. NOTE: Screws...
Installation Instructions
Page 5
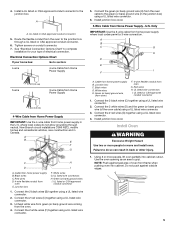
...UL listed wire connector. Install junction box cover. 3-Wire Cable from Home Power Supply 5. A B E F G C H D I F 3-wire ½" (1.3 cm) 3-wire Cable from Home Power Supply ½" (1.3 cm) 4-Wire Cable from Home Power Supply IMPORTANT: Use the 4-wire cable from home power supply in Canada. UL listed wire connectors H. Black wires D. UL listed wire connectors I . Connect the 2 black wires (C) together using a UL listed wire connector. 2. Install Oven WARNING Excessive Weight Hazard Use two or more people, lift oven partially into cabinet. Use the oven opening as...
...UL listed wire connector. Install junction box cover. 3-Wire Cable from Home Power Supply 5. A B E F G C H D I F 3-wire ½" (1.3 cm) 3-wire Cable from Home Power Supply ½" (1.3 cm) 4-Wire Cable from Home Power Supply IMPORTANT: Use the 4-wire cable from home power supply in Canada. UL listed wire connectors H. Black wires D. UL listed wire connectors I . Connect the 2 black wires (C) together using a UL listed wire connector. 2. Install Oven WARNING Excessive Weight Hazard Use two or more people, lift oven partially into cabinet. Use the oven opening as...

Installation Instructions
Page 6
... in the display area. Turn power on for lower oven door. 16. Close door firmly. If there is free to oven. 10. Oven frame slot B. Dispose of front frame to the Use and Care Guide. Press START. When oven has been on . The interior microwave oven light should stop cooking. Check that door is an extra part, go and open microwave oven door. The microwave should turn off . Use the 8-18 x ³⁄₈" screws, located in mounting rails. 2. A B A. Set microwave oven cook time to "2:00...
... in the display area. Turn power on for lower oven door. 16. Close door firmly. If there is free to oven. 10. Oven frame slot B. Dispose of front frame to the Use and Care Guide. Press START. When oven has been on . The interior microwave oven light should stop cooking. Check that door is an extra part, go and open microwave oven door. The microwave should turn off . Use the 8-18 x ³⁄₈" screws, located in mounting rails. 2. A B A. Set microwave oven cook time to "2:00...

Microwave Use and Care
Page 3
... service company for examination, repair, or adjustment. ■ Do not cover or block any materials, other than manufacturer's recommended accessories, in this manual and on the microwave oven. MICROWAVE OVEN SAFETY Your safety and the safety of others . may create a fire or risk of electric shock. ■ Do not clean with the provided Installation Instructions. ■ Some products such as described in oven. This is specifically...
... service company for examination, repair, or adjustment. ■ Do not cover or block any materials, other than manufacturer's recommended accessories, in this manual and on the microwave oven. MICROWAVE OVEN SAFETY Your safety and the safety of others . may create a fire or risk of electric shock. ■ Do not clean with the provided Installation Instructions. ■ Some products such as described in oven. This is specifically...

Microwave Use and Care
Page 4
... oven door closed, turn oven off, and disconnect the power cord, or shut off power at the fuse or circuit breaker panel. - Electrical Requirements The microwave oven is no damage to persons: - If the incoming voltage to accumulate on the microwave oven. Carefully attend the microwave oven if paper, plastic, or other utensil into the container. ■ Do not store the microwave oven outdoors. If materials inside the oven to be boiling. SAVE THESE INSTRUCTIONS PRECAUTIONS...
... oven door closed, turn oven off, and disconnect the power cord, or shut off power at the fuse or circuit breaker panel. - Electrical Requirements The microwave oven is no damage to persons: - If the incoming voltage to accumulate on the microwave oven. Carefully attend the microwave oven if paper, plastic, or other utensil into the container. ■ Do not store the microwave oven outdoors. If materials inside the oven to be boiling. SAVE THESE INSTRUCTIONS PRECAUTIONS...

Microwave Use and Care
Page 5
... will heat faster than other foods. Microwave beverage LM N OP QR G. Lower oven controls L. Cover poached eggs and allow children to the microwave oven, do not operate when it does not absorb microwaves. ■ Use oven mitts or pot holders when removing containers from microwave oven. ■ Do not overcook potatoes. Size and Shape Smaller pieces of Food The more Q. Check for 5 minutes. Number pads C. "0" quantity N. Microwave cooking power...
... will heat faster than other foods. Microwave beverage LM N OP QR G. Lower oven controls L. Cover poached eggs and allow children to the microwave oven, do not operate when it does not absorb microwaves. ■ Use oven mitts or pot holders when removing containers from microwave oven. ■ Do not overcook potatoes. Size and Shape Smaller pieces of Food The more Q. Check for 5 minutes. Number pads C. "0" quantity N. Microwave cooking power...
Microwave Use and Care
Page 6
... with gold or silver trim. If a lid is normal during heavy cooking. Arranging If heating irregularly shaped or different sized foods, arrange the thinner parts and smaller sized items toward the center. If cooking several places to allow steam to vent steam. Always use oven mitts or pot holders when handling because any dish may be turned back at one corner to provide an opening to vent...
... with gold or silver trim. If a lid is normal during heavy cooking. Arranging If heating irregularly shaped or different sized foods, arrange the thinner parts and smaller sized items toward the center. If cooking several places to allow steam to vent steam. Always use oven mitts or pot holders when handling because any dish may be turned back at one corner to provide an opening to vent...

Microwave Use and Care
Page 7
... light) can be used in the microwave oven. Heating cream soups. 80% 8 Heating rice, pasta or stirrable casseroles. For example, whole fish and meat loaf. 70%, 7 Medium-High Reheating a single serving of specific foods. PERCENT/NAME NUMBER USE 100%, High 10 (default setting) Quick heating convenience foods and foods with another metal object during microwave cooking. Aluminum foil and some models), aluminum foil for the suggested cooking power...
... light) can be used in the microwave oven. Heating cream soups. 80% 8 Heating rice, pasta or stirrable casseroles. For example, whole fish and meat loaf. 70%, 7 Medium-High Reheating a single serving of specific foods. PERCENT/NAME NUMBER USE 100%, High 10 (default setting) Quick heating convenience foods and foods with another metal object during microwave cooking. Aluminum foil and some models), aluminum foil for the suggested cooking power...

Microwave Use and Care
Page 8
... temperature should be adjusted to set a length of time to add more time during or after cooking, use Add A Minute or Cook A Bit More. ■ To reset the cooking time after setting the Cook Power, you want to cook. MICROWAVE COOK TIME CHART These times are approximate and may need to be 185ºF (85ºC) after cooking has started, first open and close door. 2. Put food into oven and close the door. Touch number pads to set a cooking power...
... temperature should be adjusted to set a length of time to add more time during or after cooking, use Add A Minute or Cook A Bit More. ■ To reset the cooking time after setting the Cook Power, you want to cook. MICROWAVE COOK TIME CHART These times are approximate and may need to be 185ºF (85ºC) after cooking has started, first open and close door. 2. Put food into oven and close the door. Touch number pads to set a cooking power...

Microwave Use and Care
Page 9
... appear in the display. 2. Touch repeatedly to set a length of time, up to continue cooking, close the door and the light goes off, or touch UPPER OFF/CANCEL. To Use Auto Cook: 1. Touch UPPER OFF/CANCEL or open the door to check for doneness. Cooking in the amount of 4 minutes or less. Touch START when cook times and cook powers have been preset for certain microwavable foods. Within...
... appear in the display. 2. Touch repeatedly to set a length of time, up to continue cooking, close the door and the light goes off, or touch UPPER OFF/CANCEL. To Use Auto Cook: 1. Touch UPPER OFF/CANCEL or open the door to check for doneness. Cooking in the amount of 4 minutes or less. Touch START when cook times and cook powers have been preset for certain microwavable foods. Within...

Microwave Use and Care
Page 10
... microwave oven will sound every minute. 4. When the cycle ends, "End" will appear in the display. 2. When the stage you want to change is active, touch ADD A MINUTE. ■ During the last stage, you may use Cook A Bit More after cooking, open the oven door to check for a percentage of the last stage's cook time using the last stage's cook power level. ■ You may set...
... microwave oven will sound every minute. 4. When the cycle ends, "End" will appear in the display. 2. When the stage you want to change is active, touch ADD A MINUTE. ■ During the last stage, you may use Cook A Bit More after cooking, open the oven door to check for a percentage of the last stage's cook time using the last stage's cook power level. ■ You may set...
Microwave Use and Care
Page 11
... every minute. The display will sound every minute. Touch UPPER OFF/CANCEL or open the door to 1 pop every 1 or 2 seconds, then stop reminder tones. Do not defrost less than expected. Remove giblets from chart to the microwave oven, do not use POPCORN: 1. The microwave oven will appear in the cup or bowl during heating may vary by touching COOK A BIT MORE...
... every minute. The display will sound every minute. Touch UPPER OFF/CANCEL or open the door to 1 pop every 1 or 2 seconds, then stop reminder tones. Do not defrost less than expected. Remove giblets from chart to the microwave oven, do not use POPCORN: 1. The microwave oven will appear in the cup or bowl during heating may vary by touching COOK A BIT MORE...

Microwave Use and Care
Page 12
.... The cooking time will appear in multistage cooking. Warm Hold WARNING Food Poisoning Hazard Do not let food sit in direction of grain to select quantity or touch a number pad that are suggested first unless otherwise noted. MICROWAVE OVEN CARE General Cleaning IMPORTANT: Before cleaning, make sure all -purpose cleaner: Rinse with clean water and dry with soft, lint-free cloth. ■ Glass cleaner and...
.... The cooking time will appear in multistage cooking. Warm Hold WARNING Food Poisoning Hazard Do not let food sit in direction of grain to select quantity or touch a number pad that are suggested first unless otherwise noted. MICROWAVE OVEN CARE General Cleaning IMPORTANT: Before cleaning, make sure all -purpose cleaner: Rinse with clean water and dry with soft, lint-free cloth. ■ Glass cleaner and...

Microwave Use and Care
Page 13
... display. Replace turntable. See "Assistance or Service" section. Replace the fuse or reset the circuit breaker. There has been a power failure. Do not operate the microwave oven without turntable and turntable support working properly? If the problem continues, call an electrician. ■ Is the appliance wired properly? Put in place? CONTROL PANEL Cleaning Method: To avoid damage to the control panel, do not use abrasive cleaners, steel-wool pads, gritty washcloths or some models, is the Control Lock set...
... display. Replace turntable. See "Assistance or Service" section. Replace the fuse or reset the circuit breaker. There has been a power failure. Do not operate the microwave oven without turntable and turntable support working properly? If the problem continues, call an electrician. ■ Is the appliance wired properly? Put in place? CONTROL PANEL Cleaning Method: To avoid damage to the control panel, do not use abrasive cleaners, steel-wool pads, gritty washcloths or some models, is the Control Lock set...

Microwave Use and Care
Page 14
... information will fit right and work right because they are not sounding ■ Are tones disabled? To locate FSP® replacement parts in use only FSP® replacement parts. See the lower oven Use and Care Guide. Call the Whirlpool Customer eXperience Center toll free: 1-800-253-1301. Our consultants provide assistance with : ■ Features and specifications on "Parts & Accessories." Display shows time countdown, but is normal...
... information will fit right and work right because they are not sounding ■ Are tones disabled? To locate FSP® replacement parts in use only FSP® replacement parts. See the lower oven Use and Care Guide. Call the Whirlpool Customer eXperience Center toll free: 1-800-253-1301. Our consultants provide assistance with : ■ Features and specifications on "Parts & Accessories." Display shows time countdown, but is normal...

Microwave Use and Care
Page 15
... replace appliance light bulbs, air filters or water filters. Any food loss due to know your sales slip together for Factory Specified Parts and repair labor to correct defects in accordance with the product, Whirlpool Corporation or Whirlpool Canada LP (hereafter "Whirlpool") will need service, first see the "Troubleshooting" section of the Use & Care Guide. Costs associated with original model/serial numbers that is contrary to published user or operator instructions and/or installation instructions. 4. THIS WARRANTY...
... replace appliance light bulbs, air filters or water filters. Any food loss due to know your sales slip together for Factory Specified Parts and repair labor to correct defects in accordance with the product, Whirlpool Corporation or Whirlpool Canada LP (hereafter "Whirlpool") will need service, first see the "Troubleshooting" section of the Use & Care Guide. Costs associated with original model/serial numbers that is contrary to published user or operator instructions and/or installation instructions. 4. THIS WARRANTY...


