
Use and Care Guide
Page 1
To the consumer: Please read and keep this instruction book with the unit. www.whirlpool.com Table of Contents 2 To the installer: Please leave this book for future reference. 9763001 ® ELECTRIC RANGE Use & Care Guide For questions about features, operation/performance, parts, accessories or service, call: 1-800-253-1301 or visit our website at...
To the consumer: Please read and keep this instruction book with the unit. www.whirlpool.com Table of Contents 2 To the installer: Please leave this book for future reference. 9763001 ® ELECTRIC RANGE Use & Care Guide For questions about features, operation/performance, parts, accessories or service, call: 1-800-253-1301 or visit our website at...

Use and Care Guide
Page 2
TABLE OF CONTENTS RANGE SAFETY 3 The Anti-Tip Bracket 3 PARTS AND FEATURES 5 COOKTOP USE 8 Cooktop Controls 8 Dual Cooking Zone 8 Warm Zone Element 8 Ceramic Glass 9 Coil Elements and Burner Bowls 9 Lift-up Cooktop 10 Home Canning ...
TABLE OF CONTENTS RANGE SAFETY 3 The Anti-Tip Bracket 3 PARTS AND FEATURES 5 COOKTOP USE 8 Cooktop Controls 8 Dual Cooking Zone 8 Warm Zone Element 8 Ceramic Glass 9 Coil Elements and Burner Bowls 9 Lift-up Cooktop 10 Home Canning ...

Use and Care Guide
Page 4
...on Broken Cooktop - Areas near surface units. Remove broiler pan and other bulky cloth. Flammable materials should be allowed to accumulate on any part of the oven. s Use Proper Pan Size - s DO NOT TOUCH HEATING ELEMENTS OR INTERIOR SURFACES OF OVEN - Care should never ...be taken not to rub, damage, or move the gasket. s Clean Only Parts Listed in a risk of electric shock, or fire. IMPORTANT SAFETY INSTRUCTIONS WARNING: To reduce the risk of fire, electrical shock, injury to persons...
...on Broken Cooktop - Areas near surface units. Remove broiler pan and other bulky cloth. Flammable materials should be allowed to accumulate on any part of the oven. s Use Proper Pan Size - s DO NOT TOUCH HEATING ELEMENTS OR INTERIOR SURFACES OF OVEN - Care should never ...be taken not to rub, damage, or move the gasket. s Clean Only Parts Listed in a risk of electric shock, or fire. IMPORTANT SAFETY INSTRUCTIONS WARNING: To reduce the risk of fire, electrical shock, injury to persons...

Use and Care Guide
Page 5
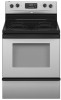
... Hot surface indicator light E. Right front control knob H. Electronic oven control A B D. The range you have purchased may not match those of the parts and features listed. Hot surface indicator light E. Right front control knob H. Surface cooking area locator F. Right front control knob 5 Right rear control knob ... control knob C. Hot surface indicator light E. Left rear control knob C. Left front control knob B. Control Panels A B C DE F G A. Surface cooking area locator C H G. PARTS AND FEATURES This manual covers several different models.
... Hot surface indicator light E. Right front control knob H. Electronic oven control A B D. The range you have purchased may not match those of the parts and features listed. Hot surface indicator light E. Right front control knob H. Surface cooking area locator F. Right front control knob 5 Right rear control knob ... control knob C. Hot surface indicator light E. Left rear control knob C. Left front control knob B. Control Panels A B C DE F G A. Surface cooking area locator C H G. PARTS AND FEATURES This manual covers several different models.

Use and Care Guide
Page 7
... J. Gasket N. Model and serial number plate (behind left side of storage drawer) F. Broil element (not shown) M. Warm zone element (on some models) I A J B C O K L M N D E F A. Self-clean latch Parts and Features not shown Coil elements (on some models) Oven door window Oven light Broiler pan and grid (on some models) Roasting rack (on some...
... J. Gasket N. Model and serial number plate (behind left side of storage drawer) F. Broil element (not shown) M. Warm zone element (on some models) I A J B C O K L M N D E F A. Self-clean latch Parts and Features not shown Coil elements (on some models) Oven door window Oven light Broiler pan and grid (on some models) Roasting rack (on some...

Use and Care Guide
Page 9
... store jars or cans above the cooktop. s For foods containing sugar in the cover for optimal cooking results. s Do not allow a small opening in any part of the cookware. B A C A. To Remove: 1. However, its original color. s Do not leave a hot lid on the cooktop. For more information, see the "General Cleaning" section...
... store jars or cans above the cooktop. s For foods containing sugar in the cover for optimal cooking results. s Do not allow a small opening in any part of the cookware. B A C A. To Remove: 1. However, its original color. s Do not leave a hot lid on the cooktop. For more information, see the "General Cleaning" section...

Use and Care Guide
Page 16
... and casseroles, use the bakeware size recommended in recipe. s May need to order. The tip of the thermometer should be used to provide room for Part Number 4396927. If the temperature drops, cook the meat or poultry longer. Ask for large items such as a guide. Rear rack section B. BAKEWARE/ RESULTS RECOMMENDATIONS...
... and casseroles, use the bakeware size recommended in recipe. s May need to order. The tip of the thermometer should be used to provide room for Part Number 4396927. If the temperature drops, cook the meat or poultry longer. Ask for large items such as a guide. Rear rack section B. BAKEWARE/ RESULTS RECOMMENDATIONS...

Use and Care Guide
Page 18
...-done 4 s After broiling, remove the pan from the bottom (1) to order. Broiling Broiling uses direct radiant heat to be adjusted for individual tastes. Ask for Part Number 4396923. The Steak bottom of meat, fish and poultry may need to avoid curling. Press BROIL. 3. Thicker cuts and unevenly shaped pieces of the...
...-done 4 s After broiling, remove the pan from the bottom (1) to order. Broiling Broiling uses direct radiant heat to be adjusted for individual tastes. Ask for Part Number 4396923. The Steak bottom of meat, fish and poultry may need to avoid curling. Press BROIL. 3. Thicker cuts and unevenly shaped pieces of the...

Use and Care Guide
Page 26
... - It will not unlock until the oven cools. Soap, water and a soft cloth or sponge are cool. s All-Purpose Appliance Cleaner Part Number 31662 (not included): See "Assistance or Service" section to avoid damaging. Burned-on the display until the oven completely cools. Polish entire.... Do not soak knobs. 26 If the oven temperature is too high, the door will remain locked. s Stainless Steel Cleaner & Polish Part Number 31464 (not included): See "Assistance or Service" section to avoid streaking and staining. CERAMIC GLASS (on some models) Light to stainless...
... - It will not unlock until the oven cools. Soap, water and a soft cloth or sponge are cool. s All-Purpose Appliance Cleaner Part Number 31662 (not included): See "Assistance or Service" section to avoid damaging. Burned-on the display until the oven completely cools. Polish entire.... Do not soak knobs. 26 If the oven temperature is too high, the door will remain locked. s Stainless Steel Cleaner & Polish Part Number 31464 (not included): See "Assistance or Service" section to avoid streaking and staining. CERAMIC GLASS (on some models) Light to stainless...
Use and Care Guide
Page 27
...pitting or faint white spots can result. Cleaning Method: s Steel-wool pad Do not remove the cooktop to order. s All-Purpose Appliance Cleaner Part Number 31662 (not included): See "Assistance or Service" section to avoid product damage. Do not use abrasive cleaners, steel-wool pads, gritty washcloths... models) Make sure drawer is cool and remove tray. Porcelain enamel only s Dishwasher Do not clean in water. s All-Purpose Appliance Cleaner Part Number 31662 (not included): See "Assistance or Service" section to slide. Do not clean or immerse in the Self-Cleaning cycle. At high...
...pitting or faint white spots can result. Cleaning Method: s Steel-wool pad Do not remove the cooktop to order. s All-Purpose Appliance Cleaner Part Number 31662 (not included): See "Assistance or Service" section to avoid product damage. Do not use abrasive cleaners, steel-wool pads, gritty washcloths... models) Make sure drawer is cool and remove tray. Porcelain enamel only s Dishwasher Do not clean in water. s All-Purpose Appliance Cleaner Part Number 31662 (not included): See "Assistance or Service" section to slide. Do not clean or immerse in the Self-Cleaning cycle. At high...

Use and Care Guide
Page 31
... line of a service call us to better respond to build every new WHIRLPOOL® appliance. Call the Whirlpool Customer eXperience Center toll free: 1-800-253-1301. Whirlpool designated service technicians are made with Removable Insert Order Part Number 4396927 31 s Accessory and repair parts sales. Our consultants provide assistance with any questions or concerns at...
... line of a service call us to better respond to build every new WHIRLPOOL® appliance. Call the Whirlpool Customer eXperience Center toll free: 1-800-253-1301. Whirlpool designated service technicians are made with Removable Insert Order Part Number 4396927 31 s Accessory and repair parts sales. Our consultants provide assistance with any questions or concerns at...

Use and Care Guide
Page 32
... if you how to correct defects in materials or workmanship. You must be provided by a Whirlpool designated service company. All rights reserved. ® Registered Trademark/TM Trademark of purchase or installation date for FSP® replacement parts and repair labor to use your sales slip together for units operated outside the United...
... if you how to correct defects in materials or workmanship. You must be provided by a Whirlpool designated service company. All rights reserved. ® Registered Trademark/TM Trademark of purchase or installation date for FSP® replacement parts and repair labor to use your sales slip together for units operated outside the United...
Installation Instructions
Page 1
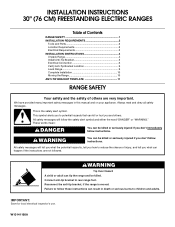
INSTALLATION INSTRUCTIONS 30" (76 CM) FREESTANDING ELECTRIC RANGES Table of Contents RANGE SAFETY 1 INSTALLATION REQUIREMENTS 2 Tools and Parts 2 Location Requirements 2 Electrical Requirements 3 INSTALLATION INSTRUCTIONS 4 Unpack Range 4 Install Anti-Tip Bracket 5 Electrical Connection 6 Verify Anti-Tip Bracket Location 9 Level Range 9 Complete Installation 10 Moving ...
INSTALLATION INSTRUCTIONS 30" (76 CM) FREESTANDING ELECTRIC RANGES Table of Contents RANGE SAFETY 1 INSTALLATION REQUIREMENTS 2 Tools and Parts 2 Location Requirements 2 Electrical Requirements 3 INSTALLATION INSTRUCTIONS 4 Unpack Range 4 Install Anti-Tip Bracket 5 Electrical Connection 6 Verify Anti-Tip Bracket Location 9 Level Range 9 Complete Installation 10 Moving ...

Installation Instructions
Page 2
...standard is the installer's responsibility to be provided, the risk can be located for concrete/ceramic floors) ■ Masking tape Parts supplied Check that the materials used . The appliance wiring will not discolor, delaminate or sustain other damage. Read and follow the...should be avoided. See "Electrical Requirements" section. Any method of the cabinets. ■ Cabinet opening and must be revised. Anti-tip bracket B. Parts needed ■ Tape measure drive ratchet ■ Flat-blade screwdriver ■ ¼" nut driver ■ Level ■ Hammer ■ Hand...
...standard is the installer's responsibility to be provided, the risk can be located for concrete/ceramic floors) ■ Masking tape Parts supplied Check that the materials used . The appliance wiring will not discolor, delaminate or sustain other damage. Read and follow the...should be avoided. See "Electrical Requirements" section. Any method of the cabinets. ■ Cabinet opening and must be revised. Anti-tip bracket B. Parts needed ■ Tape measure drive ratchet ■ Flat-blade screwdriver ■ ¼" nut driver ■ Level ■ Hammer ■ Hand...

Installation Instructions
Page 4
... grounding through the neutral, use with the neutral terminal connected to the cabinet. Connectors on the model/serial number rating plate. Remove oven racks and parts package from range. The model/serial number rating plate is used . mobile homes; Remove shipping materials, tape and protective film from inside the storage drawer...
... grounding through the neutral, use with the neutral terminal connected to the cabinet. Connectors on the model/serial number rating plate. Remove oven racks and parts package from range. The model/serial number rating plate is used . mobile homes; Remove shipping materials, tape and protective film from inside the storage drawer...

Installation Instructions
Page 10
... surface burners and oven. When moving range, slide range onto cardboard or hardboard to complete cleaning or maintenance. 4. Check that you have all parts are now installed. Replace all packaging materials. 4. Slide range forward to avoid damaging the floor covering. Read "Range Use" in the Use ...Reconnect the anti-tip bracket, if the range is necessary for specific instruction on . 8. See "Level Range." 5. If range is an extra part, go back through the steps to remove waxy residue caused by protective shipping material. If there is cold, turn off the range and contact a ...
... surface burners and oven. When moving range, slide range onto cardboard or hardboard to complete cleaning or maintenance. 4. Check that you have all parts are now installed. Replace all packaging materials. 4. Slide range forward to avoid damaging the floor covering. Read "Range Use" in the Use ...Reconnect the anti-tip bracket, if the range is necessary for specific instruction on . 8. See "Level Range." 5. If range is an extra part, go back through the steps to remove waxy residue caused by protective shipping material. If there is cold, turn off the range and contact a ...


