
Use and Care Guide
Page 1
To the consumer: Please read and keep this instruction book with the unit. www.whirlpool.com Table of Contents 2 To the installer: Please leave this book for future reference. 9763001 ® ELECTRIC RANGE Use & Care Guide For questions about features, operation/performance, parts, accessories or service, call: 1-800-253-1301 or visit our website at...
To the consumer: Please read and keep this instruction book with the unit. www.whirlpool.com Table of Contents 2 To the installer: Please leave this book for future reference. 9763001 ® ELECTRIC RANGE Use & Care Guide For questions about features, operation/performance, parts, accessories or service, call: 1-800-253-1301 or visit our website at...

Use and Care Guide
Page 3
... Reconnect the anti-tip bracket, if the range is the safety alert symbol. Failure to follow instructions. This is moved. Anti-Tip Bracket Range Foot Making sure the anti-tip bracket is installed: • Slide range forward. • Look for details. The California Safe Drinking Water and..., or other reproductive harm. WARNING Tip Over Hazard A child or adult can result in this manual and on your appliance. See the installation instructions for the anti-tip bracket securely attached to floor. • Slide range back so rear range foot is , tell you how to ...
... Reconnect the anti-tip bracket, if the range is the safety alert symbol. Failure to follow instructions. This is moved. Anti-Tip Bracket Range Foot Making sure the anti-tip bracket is installed: • Slide range forward. • Look for details. The California Safe Drinking Water and..., or other reproductive harm. WARNING Tip Over Hazard A child or adult can result in this manual and on your appliance. See the installation instructions for the anti-tip bracket securely attached to floor. • Slide range back so rear range foot is , tell you how to ...

Use and Care Guide
Page 4
... be seriously injured. among these surfaces are suitable for Warming or Heating the Room. Care should be moved while oven is cool. s Proper Installation - s User Servicing - s Storage in oven. s Utensil Handles Should Be Turned Inward and Not Extend Over Adjacent Surface Units - s ... protective coating of any part of the range unless specifically recommended in area where the range is properly installed and grounded by a qualified technician. IMPORTANT SAFETY INSTRUCTIONS WARNING: To reduce the risk of fire, electrical shock, injury to persons, or damage when using the...
... be seriously injured. among these surfaces are suitable for Warming or Heating the Room. Care should be moved while oven is cool. s Proper Installation - s User Servicing - s Storage in oven. s Utensil Handles Should Be Turned Inward and Not Extend Over Adjacent Surface Units - s ... protective coating of any part of the range unless specifically recommended in area where the range is properly installed and grounded by a qualified technician. IMPORTANT SAFETY INSTRUCTIONS WARNING: To reduce the risk of fire, electrical shock, injury to persons, or damage when using the...

Use and Care Guide
Page 10
... on low heat settings. This allows time for long periods, alternate the use only flat-bottomed canners. If a kit is not installed, the life of the coil element opposite the receptacle. Cookware IMPORTANT: Do not leave empty cookware on the grate or largest surface ... the coil element terminal into place. COOKWARE CHARACTERISTICS Aluminum s Heats quickly and evenly. s Heats slowly, but unevenly. Earthenware s Follow manufacturer's instructions. Lift out the burner bowl. Do not drop the cooktop. To Lift: Lift the cooktop by both sides while pressing the support rods back...
... on low heat settings. This allows time for long periods, alternate the use only flat-bottomed canners. If a kit is not installed, the life of the coil element opposite the receptacle. Cookware IMPORTANT: Do not leave empty cookware on the grate or largest surface ... the coil element terminal into place. COOKWARE CHARACTERISTICS Aluminum s Heats quickly and evenly. s Heats slowly, but unevenly. Earthenware s Follow manufacturer's instructions. Lift out the burner bowl. Do not drop the cooktop. To Lift: Lift the cooktop by both sides while pressing the support rods back...
Use and Care Guide
Page 28
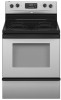
Insert both hanger arms into the closed position. Replace bulb and bulb cover by turning clockwise. 5. Then, follow these instructions. Pull the storage drawer straight back past the drawer glides. 28 Continue to push the oven door closed , press LIGHT to remove. Drawer stop ... appliance bulb. Before removing, make sure the oven is cool and empty. To replace: 1. Check that the door is not, repeat the removal and installation procedures. Storage Drawer The storage drawer can be needed to open . Oven Door For normal range use, it is free to move the drawer stop...
Insert both hanger arms into the closed position. Replace bulb and bulb cover by turning clockwise. 5. Then, follow these instructions. Pull the storage drawer straight back past the drawer glides. 28 Continue to push the oven door closed , press LIGHT to remove. Drawer stop ... appliance bulb. Before removing, make sure the oven is cool and empty. To replace: 1. Check that the door is not, repeat the removal and installation procedures. Storage Drawer The storage drawer can be needed to open . Oven Door For normal range use, it is free to move the drawer stop...

Use and Care Guide
Page 30
...? s Has the function been entered? Oven cooking results not what expected s Is the proper cookware being used? See the Installation Instructions. s Is the proper bakeware being used ? s Is the proper length of the crust and/or reduce baking temperature. Oven...positioned properly? See "Positioning Racks and Bakeware" section. Adjust cooking time. See "Cooktop Controls" section. See "Cookware" section. See the Installation Instructions. See "Timed Cooking" section. See "Control Lockout or Lockout" section. Oven temperature too high or too low s Does the oven temperature...
...? s Has the function been entered? Oven cooking results not what expected s Is the proper cookware being used? See the Installation Instructions. s Is the proper bakeware being used ? s Is the proper length of the crust and/or reduce baking temperature. Oven...positioned properly? See "Positioning Racks and Bakeware" section. Adjust cooking time. See "Cooktop Controls" section. See "Cookware" section. See the Installation Instructions. See "Timed Cooking" section. See "Control Lockout or Lockout" section. Oven temperature too high or too low s Does the oven temperature...

Use and Care Guide
Page 31
...telephone directory Yellow Pages. To locate FSP® replacement parts in your request. s Installation information. This information will fit right and work right because they are trained to order... replacement parts, we recommend that you the cost of your correspondence. Whirlpool designated service technicians are made with Removable Insert Order Part Number 4396927 31 For ...assistance with any questions or concerns at 1-800-442-9991 and follow the instructions below. If you need replacement parts If you need further assistance, you can write to local...
...telephone directory Yellow Pages. To locate FSP® replacement parts in your request. s Installation information. This information will fit right and work right because they are trained to order... replacement parts, we recommend that you the cost of your correspondence. Whirlpool designated service technicians are made with Removable Insert Order Part Number 4396927 31 For ...assistance with any questions or concerns at 1-800-442-9991 and follow the instructions below. If you need replacement parts If you need further assistance, you can write to local...

Use and Care Guide
Page 32
... OR CONSEQUENTIAL DAMAGES. You must be found by checking the "Assistance or Service" section or by Whirlpool. 5. You can be provided by a Whirlpool designated service company. Service calls to correct the installation of your major appliance, to instruct you how to parts or systems resulting from warranty coverage. 3. IMPLIED WARRANTIES, INCLUDING WARRANTIES OF MERCHANTABILITY...
... OR CONSEQUENTIAL DAMAGES. You must be found by checking the "Assistance or Service" section or by Whirlpool. 5. You can be provided by a Whirlpool designated service company. Service calls to correct the installation of your major appliance, to instruct you how to parts or systems resulting from warranty coverage. 3. IMPLIED WARRANTIES, INCLUDING WARRANTIES OF MERCHANTABILITY...
Installation Instructions
Page 1
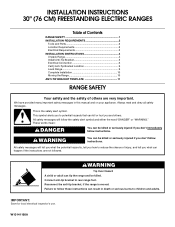
... to reduce the chance of others . This is moved. Always read and obey all safety messages. INSTALLATION INSTRUCTIONS 30" (76 CM) FREESTANDING ELECTRIC RANGES Table of Contents RANGE SAFETY 1 INSTALLATION REQUIREMENTS 2 Tools and Parts 2 Location Requirements 2 Electrical Requirements 3 INSTALLATION INSTRUCTIONS 4 Unpack Range 4 Install Anti-Tip Bracket 5 Electrical Connection 6 Verify Anti-Tip Bracket Location 9 Level Range 9 Complete...
... to reduce the chance of others . This is moved. Always read and obey all safety messages. INSTALLATION INSTRUCTIONS 30" (76 CM) FREESTANDING ELECTRIC RANGES Table of Contents RANGE SAFETY 1 INSTALLATION REQUIREMENTS 2 Tools and Parts 2 Location Requirements 2 Electrical Requirements 3 INSTALLATION INSTRUCTIONS 4 Unpack Range 4 Install Anti-Tip Bracket 5 Electrical Connection 6 Verify Anti-Tip Bracket Location 9 Level Range 9 Complete...

Installation Instructions
Page 2
Read and follow the instructions provided with the range, see "Install Anti-Tip Bracket" section. ■ Grounded electrical supply is required. Plastic anchors (2) C. #10 x 1¹⁄₂" screws (2) ■ Anti-tip brackets must be revised....should be rated at 250 volts minimum, 40 amps or 50 amps that are included. All electrical connections should be made by a licensed, qualified electrical installer. See "Electrical Requirements" section. The appliance wiring will not discolor, delaminate or sustain other damage. If cabinet storage is to your cabinets, check ...
Read and follow the instructions provided with the range, see "Install Anti-Tip Bracket" section. ■ Grounded electrical supply is required. Plastic anchors (2) C. #10 x 1¹⁄₂" screws (2) ■ Anti-tip brackets must be revised....should be rated at 250 volts minimum, 40 amps or 50 amps that are included. All electrical connections should be made by a licensed, qualified electrical installer. See "Electrical Requirements" section. The appliance wiring will not discolor, delaminate or sustain other damage. If cabinet storage is to your cabinets, check ...

Installation Instructions
Page 3
...C A C B D E F E D A. 27¹⁄₈" (68.9 cm) depth with handle 28¹⁄₈" (71.6 cm) depth with zero clearance. If installing a range hood or microwave hood combination above code standards can result in doubt as to 22" (55.9 cm) from floor F 2.2 cm) min. For minimum clearance...the top of the cooking platform and the bottom of the equipment-grounding conductor can be installed next to top of the above the range, follow the range hood or microwave hood combination installation instructions for 25" (64.0 cm) countertop depth, 24" (61.0 cm) base cabinet ...
...C A C B D E F E D A. 27¹⁄₈" (68.9 cm) depth with handle 28¹⁄₈" (71.6 cm) depth with zero clearance. If installing a range hood or microwave hood combination above code standards can result in doubt as to 22" (55.9 cm) from floor F 2.2 cm) min. For minimum clearance...the top of the cooking platform and the bottom of the equipment-grounding conductor can be installed next to top of the above the range, follow the range hood or microwave hood combination installation instructions for 25" (64.0 cm) countertop depth, 24" (61.0 cm) base cabinet ...

Installation Instructions
Page 4
... Range must be connected to the cabinet. When a 4-wire receptacle of electrical connection you will be using and follow the instructions provided for new branch-circuit installations (1996 NEC); or 50-amp, range power supply cord (pigtail) must be provided at each end of the power supply... The range can result in a NEMA Type 10-50P plug on the back of NEMA Type 10-50R. 3-wire receptacle (10-50R) INSTALLATION INSTRUCTIONS WARNING Unpack Range 2. Grounding through the neutral conductor. This cord contains 4 copper conductors with ring terminals or open -end spade terminals with ...
... Range must be connected to the cabinet. When a 4-wire receptacle of electrical connection you will be using and follow the instructions provided for new branch-circuit installations (1996 NEC); or 50-amp, range power supply cord (pigtail) must be provided at each end of the power supply... The range can result in a NEMA Type 10-50P plug on the back of NEMA Type 10-50R. 3-wire receptacle (10-50R) INSTALLATION INSTRUCTIONS WARNING Unpack Range 2. Grounding through the neutral conductor. This cord contains 4 copper conductors with ring terminals or open -end spade terminals with ...

Installation Instructions
Page 5
...is against cabinet and top edge is against rear wall, molding or cabinet. 3. Tap plastic anchors into place. 4. Contact a qualified floor covering installer for the best procedure for electrical connections to be centered in death or serious burns to opening so that specified in the "Location Requirements" section...one -half turn. Tip Over Hazard A child or adult can tip the range and be necessary to anchor the bracket to follow these instructions can result in cabinet opening edge, align template with holes in floor. Reconnect the anti-tip bracket, if the range is not flush ...
...is against cabinet and top edge is against rear wall, molding or cabinet. 3. Tap plastic anchors into place. 4. Contact a qualified floor covering installer for the best procedure for electrical connections to be centered in death or serious burns to opening so that specified in the "Location Requirements" section...one -half turn. Tip Over Hazard A child or adult can tip the range and be necessary to anchor the bracket to follow these instructions can result in cabinet opening edge, align template with holes in floor. Reconnect the anti-tip bracket, if the range is not flush ...

Installation Instructions
Page 6
...location making sure rear leveling leg slides into a grounded outlet. Any method of the range. Terminal block cover C. Continue installing your range using the following installation instructions. Disconnect power. 2. If installing the range in death, fire, or electrical shock. Two mounting tabs each side B. Power Supply Cord Electrical Connection Direct Wire...the terminal block cover screws located on the back of securing the range is adequate as long as it conforms to follow these instructions can result in a mobile home, you to the floor. Failure to follow these...
...location making sure rear leveling leg slides into a grounded outlet. Any method of the range. Terminal block cover C. Continue installing your range using the following installation instructions. Disconnect power. 2. If installing the range in death, fire, or electrical shock. Two mounting tabs each side B. Power Supply Cord Electrical Connection Direct Wire...the terminal block cover screws located on the back of securing the range is adequate as long as it conforms to follow these instructions can result in a mobile home, you to the floor. Failure to follow these...

Installation Instructions
Page 7
...for the flexible conduit connection. ■ Assemble a UL listed conduit connector in the opening. Tighten strain relief screws. 8. A. Complete installation following instructions for your type of the hex washer head screws. Use a ¼" nut driver to : 4-wire receptacle (NEMA type 14-50R... B 4-wire connection: Power supply cord Use this method for proper electrical connection. Securely tighten screw for : ■ New branch-circuit installations (1996 NEC) ■ Mobile homes ■ Recreational vehicles ■ In an area where local codes prohibit grounding through the neutral ...
...for the flexible conduit connection. ■ Assemble a UL listed conduit connector in the opening. Tighten strain relief screws. 8. A. Complete installation following instructions for your type of the hex washer head screws. Use a ¼" nut driver to : 4-wire receptacle (NEMA type 14-50R... B 4-wire connection: Power supply cord Use this method for proper electrical connection. Securely tighten screw for : ■ New branch-circuit installations (1996 NEC) ■ Mobile homes ■ Recreational vehicles ■ In an area where local codes prohibit grounding through the neutral ...

Installation Instructions
Page 10
...; Range is plugged into appropriate outlet. Slide range forward to complete cleaning or maintenance. 3. Check that anti-tip bracket is installed: ■ Look for specific instruction on surface burners and oven. Plug power cord into an outlet. ■ Electrical supply is level. 10 Replace all parts ...are now installed. See "Level Range." 5. See the Use and Care Guide for the anti-tip bracket securely attached to children ...
...; Range is plugged into appropriate outlet. Slide range forward to complete cleaning or maintenance. 3. Check that anti-tip bracket is installed: ■ Look for specific instruction on surface burners and oven. Plug power cord into an outlet. ■ Electrical supply is level. 10 Replace all parts ...are now installed. See "Level Range." 5. See the Use and Care Guide for the anti-tip bracket securely attached to children ...


