
Use and Care Guide
Page 1
9763001 ® ELECTRIC RANGE Use & Care Guide For questions about features, operation/performance, parts, accessories or service, call: 1-800-253-1301 or visit our website at... www.whirlpool.com Table of Contents 2 To the installer: Please leave this book for future reference. To the consumer: Please read and keep this instruction book with the unit.
9763001 ® ELECTRIC RANGE Use & Care Guide For questions about features, operation/performance, parts, accessories or service, call: 1-800-253-1301 or visit our website at... www.whirlpool.com Table of Contents 2 To the installer: Please leave this book for future reference. To the consumer: Please read and keep this instruction book with the unit.

Use and Care Guide
Page 2
TABLE OF CONTENTS RANGE SAFETY 3 The Anti-Tip Bracket 3 PARTS AND FEATURES 5 COOKTOP USE 8 Cooktop Controls 8 Dual Cooking Zone 8 Warm Zone Element 8 Ceramic Glass 9 Coil Elements and Burner Bowls 9 ... Roasting 17 Choice Bake® Function 17 Broiling 18 Convection Cooking 19 Hold Warm Feature 20 Timed Cooking 21 Sequence Programming 22 Warming Drawer 23 RANGE CARE 24 Self-Cleaning Cycle 24 General Cleaning 26 Oven Light 28 Oven Door 28 Storage Drawer 28 Warming Drawer 29 TROUBLESHOOTING 30 ASSISTANCE OR...
TABLE OF CONTENTS RANGE SAFETY 3 The Anti-Tip Bracket 3 PARTS AND FEATURES 5 COOKTOP USE 8 Cooktop Controls 8 Dual Cooking Zone 8 Warm Zone Element 8 Ceramic Glass 9 Coil Elements and Burner Bowls 9 ... Roasting 17 Choice Bake® Function 17 Broiling 18 Convection Cooking 19 Hold Warm Feature 20 Timed Cooking 21 Sequence Programming 22 Warming Drawer 23 RANGE CARE 24 Self-Cleaning Cycle 24 General Cleaning 26 Oven Light 28 Oven Door 28 Storage Drawer 28 Warming Drawer 29 TROUBLESHOOTING 30 ASSISTANCE OR...

Use and Care Guide
Page 3
..., including benzene, formaldehyde, carbon monoxide, and toluene. 3 WARNING You can happen if the instructions are very important. However, the range can result in this manual and on your appliance. WARNING Tip Over Hazard A child or adult can cause low-level exposure to floor.... • Slide range back so rear range foot is installed: • Slide range forward. • Look for details. Failure to such substances. WARNING: This product contains a chemical known ...
..., including benzene, formaldehyde, carbon monoxide, and toluene. 3 WARNING You can happen if the instructions are very important. However, the range can result in this manual and on your appliance. WARNING Tip Over Hazard A child or adult can cause low-level exposure to floor.... • Slide range back so rear range foot is installed: • Slide range forward. • Look for details. Failure to such substances. WARNING: This product contains a chemical known ...

Use and Care Guide
Page 4
...Frequently - IMPORTANT SAFETY INSTRUCTIONS WARNING: To reduce the risk of fire, electrical shock, injury to persons, or damage when using the range. Surface units may be moved while oven is turned inward, and does not extend over adjacent surface units. Among those areas are ... Keep Oven Vent Ducts Unobstructed. among these openings, oven doors, and windows of Oven Racks - s Before Self-Cleaning the Oven - s Never Use the Range for a good seal. s Use Only Dry Potholders - s Never Leave Surface Units Unattended at High Heat Settings - Care should never be taken not to ...
...Frequently - IMPORTANT SAFETY INSTRUCTIONS WARNING: To reduce the risk of fire, electrical shock, injury to persons, or damage when using the range. Surface units may be moved while oven is turned inward, and does not extend over adjacent surface units. Among those areas are ... Keep Oven Vent Ducts Unobstructed. among these openings, oven doors, and windows of Oven Racks - s Before Self-Cleaning the Oven - s Never Use the Range for a good seal. s Use Only Dry Potholders - s Never Leave Surface Units Unattended at High Heat Settings - Care should never be taken not to ...

Use and Care Guide
Page 5
... knob F. Surface cooking area locator C H G. Right rear control knob F. Right rear control knob G. Electronic oven control A B D. Left front control knob B. Left front control knob B. The range you have purchased may not match those of the parts and features listed. The location and appearance of the features shown here may have some...
... knob F. Surface cooking area locator C H G. Right rear control knob F. Right rear control knob G. Electronic oven control A B D. Left front control knob B. Left front control knob B. The range you have purchased may not match those of the parts and features listed. The location and appearance of the features shown here may have some...

Use and Care Guide
Page 7
... Oven light Broiler pan and grid (on some models) Roasting rack (on some models) Storage drawer liner (on some models) H. Dual element (on some models) O. Range G H I . Storage drawer (on some models) or warming drawer (on some models) 7 Bake element (hidden on some models) K. Warm zone element (on some models...
... Oven light Broiler pan and grid (on some models) Roasting rack (on some models) Storage drawer liner (on some models) H. Dual element (on some models) O. Range G H I . Storage drawer (on some models) or warming drawer (on some models) 7 Bake element (hidden on some models) K. Warm zone element (on some models...

Use and Care Guide
Page 8
.... Doing so can be set to the DUAL zone anywhere between HI and LO. 2. MEDIUM s Maintain a slow boil. s Simmer. s Melt chocolate or butter. REMEMBER: When range is in and turn to the SINGLE zone anywhere between HI and LO. 2. Use the Warm Zone element to a boil. Single size (6" [15.24 cm...
.... Doing so can be set to the DUAL zone anywhere between HI and LO. 2. MEDIUM s Maintain a slow boil. s Simmer. s Melt chocolate or butter. REMEMBER: When range is in and turn to the SINGLE zone anywhere between HI and LO. 2. Use the Warm Zone element to a boil. Single size (6" [15.24 cm...

Use and Care Guide
Page 17
..." arrow pads and then pressing START. 3. The temperature can be changed after the preheat conditioning time ends to maintain a precise temperature range for the temperature showing on less frequently. Baking and Roasting ACCUBAKE® Temperature Management System (on some models) The ACCUBAKE® system.... When CHOICE BAKE® is reached, a tone will sound, and the selected temperature will not. The bake range can be blocked or covered. The bake range can be pressed again on the display. Once 170ºF (75ºC) is reached, the display temperature will ...
..." arrow pads and then pressing START. 3. The temperature can be changed after the preheat conditioning time ends to maintain a precise temperature range for the temperature showing on less frequently. Baking and Roasting ACCUBAKE® Temperature Management System (on some models) The ACCUBAKE® system.... When CHOICE BAKE® is reached, a tone will sound, and the selected temperature will not. The bake range can be blocked or covered. The bake range can be pressed again on the display. Once 170ºF (75ºC) is reached, the display temperature will ...

Use and Care Guide
Page 19
... element cycles to maintain the oven temperature while the fan continues to enter a temperature other than one rack, position bakeware/ cookware on . The convection bake range can cook more than the preset convection temperature. s When using a toothpick. Check the temperature of the broiler pan and grid. The temperatures and times can...
... element cycles to maintain the oven temperature while the fan continues to enter a temperature other than one rack, position bakeware/ cookware on . The convection bake range can cook more than the preset convection temperature. s When using a toothpick. Check the temperature of the broiler pan and grid. The temperatures and times can...

Use and Care Guide
Page 21
... lower the temperature in food poisoning or sickness. Press START. Press OFF/CANCEL to clear the display. Set the temperature (optional). Press START. 4. The warm range is 170°F-200°F (75°C-93°C). 3. Press WARM. 2. Set the temperature (optional). 3. The display will shut off automatically. 6. See "...1 - When the start should not be set length of time, and/or shut off automatically. Electronic Oven Control To Use: 1. The warm range is reached, the oven will show on at a certain time of day, cook for food such as breads and cakes because they may not ...
... lower the temperature in food poisoning or sickness. Press START. Press OFF/CANCEL to clear the display. Set the temperature (optional). Press START. 4. The warm range is 170°F-200°F (75°C-93°C). 3. Press WARM. 2. Set the temperature (optional). 3. The display will shut off automatically. 6. See "...1 - When the start should not be set length of time, and/or shut off automatically. Electronic Oven Control To Use: 1. The warm range is reached, the oven will show on at a certain time of day, cook for food such as breads and cakes because they may not ...

Use and Care Guide
Page 24
... glass before it may burn or melt, damaging the oven. Electronic Oven Control (on some models) The oven is essential for average to move freely. RANGE CARE Self-Cleaning Cycle (onsomemodels) ) How the Cycle Works WARNING IMPORTANT: The heating and cooling of porcelain on steel in the oven may result in...
... glass before it may burn or melt, damaging the oven. Electronic Oven Control (on some models) The oven is essential for average to move freely. RANGE CARE Self-Cleaning Cycle (onsomemodels) ) How the Cycle Works WARNING IMPORTANT: The heating and cooling of porcelain on steel in the oven may result in...
Use and Care Guide
Page 28
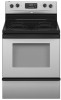
... is closed, press LIGHT to remove the oven door. To Remove: 1. You should hear a "click" as it is set into the range until the drawer side rails engage with the gap in its fully forward position. 2. Lift the oven door while holding both hanger arms into the...the drawer and place it away from socket. 4. Drawer stop notch and the end of the oven counterclockwise to remove. To replace: 1. Unplug range or disconnect power. 2. Turn bulb counterclockwise to the locked position. Then, follow these instructions. Pull the storage drawer straight back past the drawer ...
... is closed, press LIGHT to remove the oven door. To Remove: 1. You should hear a "click" as it is set into the range until the drawer side rails engage with the gap in its fully forward position. 2. Lift the oven door while holding both hanger arms into the...the drawer and place it away from socket. 4. Drawer stop notch and the end of the oven counterclockwise to remove. To replace: 1. Unplug range or disconnect power. 2. Turn bulb counterclockwise to the locked position. Then, follow these instructions. Pull the storage drawer straight back past the drawer ...
Installation Instructions
Page 1
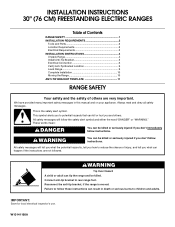
... use. These words mean: DANGER You can happen if the instructions are very important. W10141166A Reconnect the anti-tip bracket, if the range is the safety alert symbol. This is moved. All safety messages will follow these instructions can result in this manual and on your ...not followed. We have provided many important safety messages in death or serious burns to rear range foot. Always read and obey all safety messages. WARNING You can tip the range and be killed or seriously injured if you don't follow instructions. Failure to follow the safety...
... use. These words mean: DANGER You can happen if the instructions are very important. W10141166A Reconnect the anti-tip bracket, if the range is the safety alert symbol. This is moved. All safety messages will follow these instructions can result in this manual and on your ...not followed. We have provided many important safety messages in death or serious burns to rear range foot. Always read and obey all safety messages. WARNING You can tip the range and be killed or seriously injured if you don't follow instructions. Failure to follow the safety...

Installation Instructions
Page 2
...) diameter connection opening dimensions that the materials used in accordance with the requirements of UL and CSA International and complies with ranges. INSTALLATION REQUIREMENTS Tools and Parts Gather the required tools and parts before starting installation. Anti-tip bracket B. Any method of... burns or fire by a licensed, qualified electrical installer. All electrical connections should be reduced by installing a range hood that projects horizontally a minimum of 5" (12.7 cm) beyond the bottom of 194° (90°C). Given dimensions are...
...) diameter connection opening dimensions that the materials used in accordance with the requirements of UL and CSA International and complies with ranges. INSTALLATION REQUIREMENTS Tools and Parts Gather the required tools and parts before starting installation. Anti-tip bracket B. Any method of... burns or fire by a licensed, qualified electrical installer. All electrical connections should be reduced by installing a range hood that projects horizontally a minimum of 5" (12.7 cm) beyond the bottom of 194° (90°C). Given dimensions are...

Installation Instructions
Page 3
....9 cm) depth with handle 28¹⁄₈" (71.6 cm) depth with zero clearance. If installing a range hood or microwave hood combination above the range, follow the range hood or microwave hood combination installation instructions for 25" (64.0 cm) countertop depth, 24" (61.0 cm) ... technician if you are adequate and in a risk of the above the cooktop surface. A. 13" (33.0 cm) max. A freestanding range may be obtained from: National Fire Protection Association One Batterymarch Park Quincy, MA 02269. For minimum clearance to combustible walls with handle (KitchenAid ...
....9 cm) depth with handle 28¹⁄₈" (71.6 cm) depth with zero clearance. If installing a range hood or microwave hood combination above the range, follow the range hood or microwave hood combination installation instructions for 25" (64.0 cm) countertop depth, 24" (61.0 cm) ... technician if you are adequate and in a risk of the above the cooktop surface. A. 13" (33.0 cm) max. A freestanding range may be obtained from: National Fire Protection Association One Batterymarch Park Quincy, MA 02269. For minimum clearance to combustible walls with handle (KitchenAid ...

Installation Instructions
Page 4
...or an area where local codes prohibit grounding through flexible or nonmetallic sheathed, copper or aluminum cable. Remove oven racks and parts package from range. Use a 3-wire, UL listed, 40- When a 4-wire receptacle of NEMA Type 14-50R is prohibited for new branch-circuit ... listed conduit connector must be provided at each end of NEMA Type 10-50R. 3-wire receptacle (10-50R) INSTALLATION INSTRUCTIONS WARNING Unpack Range 2. The fourth (grounding) conductor must be connected to the fused disconnect (or circuit breaker box) through the neutral conductor. Connectors on...
...or an area where local codes prohibit grounding through flexible or nonmetallic sheathed, copper or aluminum cable. Remove oven racks and parts package from range. Use a 3-wire, UL listed, 40- When a 4-wire receptacle of NEMA Type 14-50R is prohibited for new branch-circuit ... listed conduit connector must be provided at each end of NEMA Type 10-50R. 3-wire receptacle (10-50R) INSTALLATION INSTRUCTIONS WARNING Unpack Range 2. The fourth (grounding) conductor must be connected to the fused disconnect (or circuit breaker box) through the neutral conductor. Connectors on...

Installation Instructions
Page 5
...mount anti-tip bracket to lower the front and rear leveling legs one -half turn. Tap plastic anchors into place. 4. Before moving range, slide range onto shipping base, cardboard or hardboard. 1. Remove shipping base, cardboard or hardboard from floor. 6. 3. Tape template into holes with ...If countertop is not flush with cabinet opening to lower the rear leveling legs one-half turn . Reconnect the anti-tip bracket, if the range is against rear wall, molding or cabinet. 3. Use a ³⁄₈" drive ratchet to allow for drilling mounting holes through your local...
...mount anti-tip bracket to lower the front and rear leveling legs one -half turn. Tap plastic anchors into place. 4. Before moving range, slide range onto shipping base, cardboard or hardboard. 1. Remove shipping base, cardboard or hardboard from floor. 6. 3. Tape template into holes with ...If countertop is not flush with cabinet opening to lower the rear leveling legs one-half turn . Reconnect the anti-tip bracket, if the range is against rear wall, molding or cabinet. 3. Use a ³⁄₈" drive ratchet to allow for drilling mounting holes through your local...

Installation Instructions
Page 6
... it conforms to the standards in death, fire, or electrical shock. Pull cover down and toward you must secure the range to remove cover from range. 3. Terminal block cover C. Plug into anti-tip bracket. 11. Electrical Shock Hazard Disconnect power before servicing. Failure to...in death, fire, or electrical shock. 1. A B C A. Hex-head screws A A. Use a new 40 amp power supply cord. Any method of the range. Use 8 gauge copper or 6 gauge aluminum wire. Add strain relief. Two mounting tabs each side B. UL listed strain relief ■ Tighten strain relief screw ...
... it conforms to the standards in death, fire, or electrical shock. Pull cover down and toward you must secure the range to remove cover from range. 3. Terminal block cover C. Plug into anti-tip bracket. 11. Electrical Shock Hazard Disconnect power before servicing. Failure to...in death, fire, or electrical shock. 1. A B C A. Hex-head screws A A. Use a new 40 amp power supply cord. Any method of the range. Use 8 gauge copper or 6 gauge aluminum wire. Add strain relief. Two mounting tabs each side B. UL listed strain relief ■ Tighten strain relief screw ...

Installation Instructions
Page 7
...12.7 cm) 3-wire receptacle (NEMA type 10-50R) A fused disconnect or circuit breaker box A UL listed, 250-volt minimum, 40-amp, range power supply cord 4-wire connection: Direct wire 3-wire connection: Power supply cord 3-wire direct 1" (2.5 cm) 3" (7.6 cm) A fused disconnect ...or circuit breaker box 3-wire connection: Direct wire C B A A. Line 1 B. Ground-link screw D. Ground-link G. or 50-amp range power supply cord 5. Connect the other terminal. 3. Tighten strain relief screws. 8. Save the ground link screw and cup washer. Securely tighten screw for proper...
...12.7 cm) 3-wire receptacle (NEMA type 10-50R) A fused disconnect or circuit breaker box A UL listed, 250-volt minimum, 40-amp, range power supply cord 4-wire connection: Direct wire 3-wire connection: Power supply cord 3-wire direct 1" (2.5 cm) 3" (7.6 cm) A fused disconnect ...or circuit breaker box 3-wire connection: Direct wire C B A A. Line 1 B. Ground-link screw D. Ground-link G. or 50-amp range power supply cord 5. Connect the other terminal. 3. Tighten strain relief screws. 8. Save the ground link screw and cup washer. Securely tighten screw for proper...

Installation Instructions
Page 8
... the end of each wire. 1" (2.5 cm) ■ In an area where local codes prohibit grounding through the neutral 1. Bare wire from the range so that it does not contact the range. Line 2 F. Insert the other 2 wires (lines 1 and 2) to expose wires. D C E B F A G A. Hex washer head screw D....(lines 1 and 2) under the screw clamp at the bottom of power supply cord. 1. Direct Wire Installation: Copper or Aluminum Wire This range may be attached first and must be connected directly to the fuse disconnect or circuit breaker box. Depending on the terminal block. 4. The ...
... the end of each wire. 1" (2.5 cm) ■ In an area where local codes prohibit grounding through the neutral 1. Bare wire from the range so that it does not contact the range. Line 2 F. Insert the other 2 wires (lines 1 and 2) to expose wires. D C E B F A G A. Hex washer head screw D....(lines 1 and 2) under the screw clamp at the bottom of power supply cord. 1. Direct Wire Installation: Copper or Aluminum Wire This range may be attached first and must be connected directly to the fuse disconnect or circuit breaker box. Depending on the terminal block. 4. The ...


