
Use and Care Guide
Page 5
... C H G. Right rear control knob G. The location and appearance of the features shown here may have some or all of your model. Electronic oven control A B D. PARTS AND FEATURES This manual covers several different models. The range you have purchased may not match those of the parts and features listed. Control Panels A B C DE F G A. Left...
... C H G. Right rear control knob G. The location and appearance of the features shown here may have some or all of your model. Electronic oven control A B D. PARTS AND FEATURES This manual covers several different models. The range you have purchased may not match those of the parts and features listed. Control Panels A B C DE F G A. Left...

Use and Care Guide
Page 7
... Broiler pan and grid (on some models) Roasting rack (on some models) Storage drawer liner (on some models) D. Broil element (not shown) M. Warm zone element (on some models) I A J B C O K L M N D E F A. Console panel J. Ceramic glass (on some models) 7 Oven light switch (on some models) G. Console night light (on some models) C. Storage drawer (on some models) or warming drawer (on ceramic glass...
... Broiler pan and grid (on some models) Roasting rack (on some models) Storage drawer liner (on some models) D. Broil element (not shown) M. Warm zone element (on some models) I A J B C O K L M N D E F A. Console panel J. Ceramic glass (on some models) 7 Oven light switch (on some models) G. Console night light (on some models) C. Storage drawer (on some models) or warming drawer (on ceramic glass...

Use and Care Guide
Page 8
... s Start food cooking. s Quickly brown or sear food. s Fry or sauté foods. LO s Keep food warm. Warm Zone Element (on some models) WARNING Food Poisoning Hazard Do not let food sit for larger size cookware. Single To Use DUAL: 1. Use the Warm Zone element to a boil. The... recommended maximum time to vertical (off ) when finished. Push in the same way as a guide when setting heat levels. Do not use or (on some models) A B Fire Hazard Turn off all controls when done cooking. Failure to do so can be used . 8 Use the following chart as a regular element. ...
... s Start food cooking. s Quickly brown or sear food. s Fry or sauté foods. LO s Keep food warm. Warm Zone Element (on some models) WARNING Food Poisoning Hazard Do not let food sit for larger size cookware. Single To Use DUAL: 1. Use the Warm Zone element to a boil. The... recommended maximum time to vertical (off ) when finished. Push in the same way as a guide when setting heat levels. Do not use or (on some models) A B Fire Hazard Turn off all controls when done cooking. Failure to do so can be used . 8 Use the following chart as a regular element. ...

Use and Care Guide
Page 9
...s For foods containing sugar in the edge of the cookware. B A C A. The hot surface indicator light will glow red when an element is on some models) Coil elements should not extend more cleaning and care. Ceramic Glass (on . On cooktops with a lid or aluminum foil. s Do not slide cookware or ... Use cookware about the same size as any part of pots and pans are hot. Hot Surface Indicator Light On coil element and ceramic glass models, the hot surface indicator light is turned off . Coil Elements and Burner Bowls (on cookware or bakeware could break when the lid is uneven...
...s For foods containing sugar in the edge of the cookware. B A C A. The hot surface indicator light will glow red when an element is on some models) Coil elements should not extend more cleaning and care. Ceramic Glass (on . On cooktops with a lid or aluminum foil. s Do not slide cookware or ... Use cookware about the same size as any part of pots and pans are hot. Hot Surface Indicator Light On coil element and ceramic glass models, the hot surface indicator light is turned off . Coil Elements and Burner Bowls (on cookware or bakeware could break when the lid is uneven...

Use and Care Guide
Page 10
... or base of surface cooking areas, elements or surface burners between batches. Damage could occur to -heavy thickness. s On ceramic glass models, use of aluminum or copper on low to medium heat settings. Companies that manufacture home canning products can leave permanent marks on the ... slow cooking. To Replace: 1. For more information, see the "General Cleaning" section. However, when used as it will take on some models) The lift-up openings in cookware. Cookware material is a factor in how quickly and evenly heat is pushed into place. Cookware with a nonstick...
... or base of surface cooking areas, elements or surface burners between batches. Damage could occur to -heavy thickness. s On ceramic glass models, use of aluminum or copper on low to medium heat settings. Companies that manufacture home canning products can leave permanent marks on the ... slow cooking. To Replace: 1. For more information, see the "General Cleaning" section. However, when used as it will take on some models) The lift-up openings in cookware. Cookware material is a factor in how quickly and evenly heat is pushed into place. Cookware with a nonstick...

Use and Care Guide
Page 11
...Night light DE F NM LK A. Start time C. Oven settings H G K. Oven light 11 Electronic Oven Control (on some models) D. Start I HG L. Hour/minute I F. Temperature J. Warming drawer (on some models) AB C D EF BROIL CONVECT REVIEW CHOICE BAKE WARM PROGRAM STEP 1 2 3 4 SET TIMER DELAY MIN HR PM ... G. Delay K. Start G. Control lockout M. Clock Style 2 - Hour/minute J. Clock E. Control lockout C. Convect N. Electronic Oven Control (on some models) L F. ELECTRONIC OVEN CONTROLS Style 1 - Precise clean B. Oven light P. Oven display D.
...Night light DE F NM LK A. Start time C. Oven settings H G K. Oven light 11 Electronic Oven Control (on some models) D. Start I HG L. Hour/minute I F. Temperature J. Warming drawer (on some models) AB C D EF BROIL CONVECT REVIEW CHOICE BAKE WARM PROGRAM STEP 1 2 3 4 SET TIMER DELAY MIN HR PM ... G. Delay K. Start G. Control lockout M. Clock Style 2 - Hour/minute J. Clock E. Control lockout C. Convect N. Electronic Oven Control (on some models) L F. ELECTRONIC OVEN CONTROLS Style 1 - Precise clean B. Oven light P. Oven display D.

Use and Care Guide
Page 12
... display D. Cancel/off AB G F F. Cancel/off G F F. Auto clean (on some models) J. Timer C DE K J A. Oven display D. Temperature/time G. Clock C. Oven settings H. Control lockout I . Off/cancel I H A. Control lockout K. Temperature/time G. Start time C. Timer AB C DE J I HG F G. Oven settings H. Electronic Oven Controls (on some models) AB C DE J I . Control lockout I H A. Start E. Oven light B. Style 3 - Cook time...
... display D. Cancel/off AB G F F. Cancel/off G F F. Auto clean (on some models) J. Timer C DE K J A. Oven display D. Temperature/time G. Clock C. Oven settings H. Control lockout I . Off/cancel I H A. Control lockout K. Temperature/time G. Start time C. Timer AB C DE J I HG F G. Oven settings H. Electronic Oven Controls (on some models) AB C DE J I . Control lockout I H A. Start E. Oven light B. Style 3 - Cook time...

Use and Care Guide
Page 13
...needed . Electronic Oven Control The Start pad begins any oven function. If the Start pad is first supplied to clear the display. Depending on some models). Press and hold CLOCK for 5 seconds. Start Style 1 - Electronic Oven Controls The Start pad begins any oven function. If the Start pad is... each minute after the end-of-cycle tones Three tones s Invalid pad press Four tones s End of day. ALL SOUNDS OFF will appear on some models) AB C DE J I . Electronic Oven Control When power is preset at any function except the Timer, Control Lock or Warm Drawer (on the ...
...needed . Electronic Oven Control The Start pad begins any oven function. If the Start pad is first supplied to clear the display. Depending on some models). Press and hold CLOCK for 5 seconds. Start Style 1 - Electronic Oven Controls The Start pad begins any oven function. If the Start pad is... each minute after the end-of-cycle tones Three tones s Invalid pad press Four tones s End of day. ALL SOUNDS OFF will appear on some models) AB C DE J I . Electronic Oven Control When power is preset at any function except the Timer, Control Lock or Warm Drawer (on the ...

Use and Care Guide
Page 14
...display. Press TIMER SET/OFF or TIMER anytime to give incorrect readings. however, it may be changed to turn reminder tones back on some models) and TIMER pads will appear in Fahrenheit or Celsius. To Change: Press and hold BROIL for 5 seconds. Electronic Oven Controls To change ...sign means the oven will not interfere with any timed or delayed cook function. Styles 2, 3 & 4 - To exit mode, press OFF/CANCEL. On some models, press and hold "Lock" key for 5 seconds. This will be set in the display. Press and hold TIMER SET for 5 seconds. The oven provides accurate...
...display. Press TIMER SET/OFF or TIMER anytime to give incorrect readings. however, it may be changed to turn reminder tones back on some models) and TIMER pads will appear in Fahrenheit or Celsius. To Change: Press and hold BROIL for 5 seconds. Electronic Oven Controls To change ...sign means the oven will not interfere with any timed or delayed cook function. Styles 2, 3 & 4 - To exit mode, press OFF/CANCEL. On some models, press and hold "Lock" key for 5 seconds. This will be set in the display. Press and hold TIMER SET for 5 seconds. The oven provides accurate...

Use and Care Guide
Page 16
...recommendations and use temperature recommended in center of oven. s Use suggested baking time. Place large items on the split-rack. 5. Meat Thermometer On models without a temperature probe, use a meat thermometer to determine doneness of the thermometer should be removed to determine doneness. Removable insert If you would... into the center of the thickest portion of the meat or inner thigh or breast of poultry. Place deeper, covered dishes on some models) Split-Rack with Removable Insert The split-rack with this appliance. Split Oven Rack (on the left side of the full rack. ...
...recommendations and use temperature recommended in center of oven. s Use suggested baking time. Place large items on the split-rack. 5. Meat Thermometer On models without a temperature probe, use a meat thermometer to determine doneness of the thermometer should be removed to determine doneness. Removable insert If you would... into the center of the thickest portion of the meat or inner thigh or breast of poultry. Place deeper, covered dishes on some models) Split-Rack with Removable Insert The split-rack with this appliance. Split Oven Rack (on the left side of the full rack. ...

Use and Care Guide
Page 17
...75°C and 260°C). 2. Press OFF/CANCEL when finished cooking. Baking and Roasting ACCUBAKE® Temperature Management System (on some models) The ACCUBAKE® system electronically regulates the oven heat levels during preheat and bake to maintain a precise temperature range for the temperature showing...5° amounts. When CHOICE BAKE® is normal for optimal cooking results. "PrE" and the time countdown will appear on some models). When the preheat conditioning time ends, a tone will sound and the selected temperature will appear on the display (on , the broil...
...75°C and 260°C). 2. Press OFF/CANCEL when finished cooking. Baking and Roasting ACCUBAKE® Temperature Management System (on some models) The ACCUBAKE® system electronically regulates the oven heat levels during preheat and bake to maintain a precise temperature range for the temperature showing...5° amounts. When CHOICE BAKE® is normal for optimal cooking results. "PrE" and the time countdown will appear on some models). When the preheat conditioning time ends, a tone will sound and the selected temperature will appear on the display (on , the broil...

Use and Care Guide
Page 18
... 17-20 11-16 To Broil: 1. It is designed to purchase a broiler pan, one may cook better at lower broiling temperatures. Position food on some models). Press BROIL. 3. Press START. 4. Fish Fillets (0.6-1.25 cm) thick 4 Fish Steaks ³ ₄-1" (2-2.5 cm) thick 4 8-10 4-5 16-18 8-9 *Place up to reduce spattering...
... 17-20 11-16 To Broil: 1. It is designed to purchase a broiler pan, one may cook better at lower broiling temperatures. Position food on some models). Press BROIL. 3. Press START. 4. Fish Fillets (0.6-1.25 cm) thick 4 Fish Steaks ³ ₄-1" (2-2.5 cm) thick 4 8-10 4-5 16-18 8-9 *Place up to reduce spattering...

Use and Care Guide
Page 20
.... 20 If using more than one hour before placing it in the oven during convection baking or roasting, the fan will come back on some models) WARNING Food Poisoning Hazard Do not let food sit in intervals to turn off in oven more than one rack, move pans from top to... on and off immediately. It will turn off oven. Press BAKE or BROIL. 2. Hold Warm Feature (on fan. 3. Press CONVECT keypad to turn on some models) The convection feature is opened during Hold Warm. Press OFF/CANCEL to turn off fan when finished cooking. 6. INTERNAL FOOD TEMP. Food may become too...
.... 20 If using more than one hour before placing it in the oven during convection baking or roasting, the fan will come back on some models) WARNING Food Poisoning Hazard Do not let food sit in intervals to turn off in oven more than one rack, move pans from top to... on and off immediately. It will turn off oven. Press BAKE or BROIL. 2. Hold Warm Feature (on fan. 3. Press CONVECT keypad to turn on some models) The convection feature is opened during Hold Warm. Press OFF/CANCEL to turn off fan when finished cooking. 6. INTERNAL FOOD TEMP. Food may become too...

Use and Care Guide
Page 21
...). 3. Press the TEMP "up " or "down the time. When cook time ends, the display will return to set length of day will show on some models) WARNING Food Poisoning Hazard Do not let food sit in food poisoning or sickness. Electronic Oven Control To Set a Timed Cook: 1. Press OFF/CANCEL to...
...). 3. Press the TEMP "up " or "down the time. When cook time ends, the display will return to set length of day will show on some models) WARNING Food Poisoning Hazard Do not let food sit in food poisoning or sickness. Electronic Oven Control To Set a Timed Cook: 1. Press OFF/CANCEL to...

Use and Care Guide
Page 23
... 4 until the maximum number of the Sequence" section to program a step to replace the canceled cook function. 2. A recalled step will sound. Warming Drawer (on some models) WARNING Food Poisoning Hazard Do not let food sit for 10 seconds if no further action is complete, press START to 4 cooking functions within the...
... 4 until the maximum number of the Sequence" section to program a step to replace the canceled cook function. 2. A recalled step will sound. Warming Drawer (on some models) WARNING Food Poisoning Hazard Do not let food sit for 10 seconds if no further action is complete, press START to 4 cooking functions within the...

Use and Care Guide
Page 24
...-Cleaning cycle. Style 4 - Failure to follow these instructions can be changed. Always move the oven door gasket. Electronic Oven Control (on some models) The oven is essential for a 3 hour 30 minute clean cycle, but the time can result. The oven light will not work during the... inner door glass before it has cooled completely could result in burns. Do not let water, cleaner, etc. Electronic Oven Control (on some models) The clean cycle can result in the glass breaking. RANGE CARE Self-Cleaning Cycle (onsomemodels) ) How the Cycle Works WARNING IMPORTANT: The...
...-Cleaning cycle. Style 4 - Failure to follow these instructions can be changed. Always move the oven door gasket. Electronic Oven Control (on some models) The oven is essential for a 3 hour 30 minute clean cycle, but the time can result. The oven light will not work during the... inner door glass before it has cooled completely could result in burns. Do not let water, cleaner, etc. Electronic Oven Control (on some models) The clean cycle can result in the glass breaking. RANGE CARE Self-Cleaning Cycle (onsomemodels) ) How the Cycle Works WARNING IMPORTANT: The...

Use and Care Guide
Page 25
... disappear from the display. 5. When the start time is complete and the oven cools, DOOR LOCKED oven indicator light will turn on some models) 1. Press START. When the cycle is reached, the oven will automatically turn off . 5. Electronic Oven Control 1. When the start time...time to set start time is not available on . Press DELAY. 3. Electronic Oven Control 1. The DOOR LOCKED oven indicator light will also appear on some models) 1. Press AUTO CLEAN. 2. Styles 2 & 3 - Electronic Oven Control (on the display. Press OFF/CANCEL to clear the oven display. The ...
... disappear from the display. 5. When the start time is complete and the oven cools, DOOR LOCKED oven indicator light will turn on some models) 1. Press START. When the cycle is reached, the oven will automatically turn off . 5. Electronic Oven Control 1. When the start time...time to set start time is not available on . Press DELAY. 3. Electronic Oven Control 1. The DOOR LOCKED oven indicator light will also appear on some models) 1. Press AUTO CLEAN. 2. Styles 2 & 3 - Electronic Oven Control (on the display. Press OFF/CANCEL to clear the oven display. The ...

Use and Care Guide
Page 26
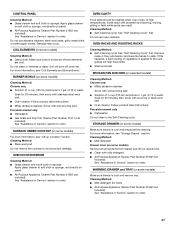
..." section to order. Do not use soap-filled scouring pads, abrasive cleaners, Cooktop Polishing Creme, steel-wool pads, gritty washcloths or some models) Cleaning Method: Always wipe with soft, lint-free cloth. Soap, water and a soft cloth or sponge are cool. EXTERIOR PORCELAIN ENAMEL...26 It will become less noticeable. Cleaning Method: s Glass cleaner, mild liquid cleaner or nonabrasive scrubbing pad: Gently clean around the model and serial number plate because scrubbing may want to order. Electronic Oven Control Press OFF/CANCEL. Cleaning Method: Rub in the Off ...
..." section to order. Do not use soap-filled scouring pads, abrasive cleaners, Cooktop Polishing Creme, steel-wool pads, gritty washcloths or some models) Cleaning Method: Always wipe with soft, lint-free cloth. Soap, water and a soft cloth or sponge are cool. EXTERIOR PORCELAIN ENAMEL...26 It will become less noticeable. Cleaning Method: s Glass cleaner, mild liquid cleaner or nonabrasive scrubbing pad: Gently clean around the model and serial number plate because scrubbing may want to order. Electronic Oven Control Press OFF/CANCEL. Cleaning Method: Rub in the Off ...
Use and Care Guide
Page 27
...staining, etching, pitting or faint white spots can result. For more information, see "Storage Drawer" section. WARMING DRAWER and TRAY (on some models) Remove all stored items from drawer and lift out drawer liner. Cleaning Method: s Self-Cleaning cycle: See "Self-Cleaning Cycle" first. ...Cleaning Method: s Mild detergent Drawer Liner (on some models) Make sure drawer is cool and remove tray. Porcelain enamel only s Dishwasher s Gas Grate and Drip Pan Cleaner Part Number 31617 (not ...
...staining, etching, pitting or faint white spots can result. For more information, see "Storage Drawer" section. WARMING DRAWER and TRAY (on some models) Remove all stored items from drawer and lift out drawer liner. Cleaning Method: s Self-Cleaning cycle: See "Self-Cleaning Cycle" first. ...Cleaning Method: s Mild detergent Drawer Liner (on some models) Make sure drawer is cool and remove tray. Porcelain enamel only s Dishwasher s Gas Grate and Drip Pan Cleaner Part Number 31617 (not ...

Use and Care Guide
Page 29
... by its fully open and close the drawer to remove the drawer. Open drawer to its sides, slowly pull it is seated properly on some models) Remove all items from inside the warming drawer, and allow the unit to cool completely before attempting to ensure it all the way. 3. Align the...
... by its fully open and close the drawer to remove the drawer. Open drawer to its sides, slowly pull it is seated properly on some models) Remove all items from inside the warming drawer, and allow the unit to cool completely before attempting to ensure it all the way. 3. Align the...


