Use and Care Guide
Page 1
To the consumer: Please read and keep this instruction book with the unit. ® ELECTRIC RANGE Use & Care Guide For questions about features, operation/performance, parts, accessories or service, call: 1-800-253-1301 or visit our website at...www.whirlpool.com Table of Contents ...2 To the installer: Please leave this book for future reference. 9763001
To the consumer: Please read and keep this instruction book with the unit. ® ELECTRIC RANGE Use & Care Guide For questions about features, operation/performance, parts, accessories or service, call: 1-800-253-1301 or visit our website at...www.whirlpool.com Table of Contents ...2 To the installer: Please leave this book for future reference. 9763001
Use and Care Guide
Page 2
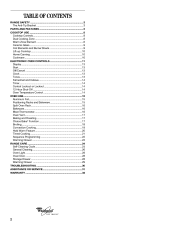
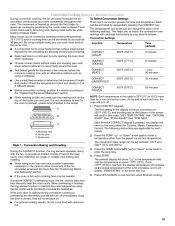
TABLE OF CONTENTS RANGE SAFETY ...3 The Anti-Tip Bracket ...3 PARTS AND FEATURES...5 COOKTOP USE ...8 Cooktop Controls...8 Dual Cooking Zone ...8 Warm Zone Element ...8 Ceramic Glass ...9 Coil Elements and Burner Bowls ...9 ... Roasting...17 Choice Bake® Function ...17 Broiling...18 Convection Cooking...19 Hold Warm Feature ...20 Timed Cooking ...21 Sequence Programming ...22 Warming Drawer ...23 RANGE CARE ...24 Self-Cleaning Cycle...24 General Cleaning...26 Oven Light ...28 Oven Door ...28 Storage Drawer ...28 Warming Drawer ...29 TROUBLESHOOTING ...30 ASSISTANCE OR...
TABLE OF CONTENTS RANGE SAFETY ...3 The Anti-Tip Bracket ...3 PARTS AND FEATURES...5 COOKTOP USE ...8 Cooktop Controls...8 Dual Cooking Zone ...8 Warm Zone Element ...8 Ceramic Glass ...9 Coil Elements and Burner Bowls ...9 ... Roasting...17 Choice Bake® Function ...17 Broiling...18 Convection Cooking...19 Hold Warm Feature ...20 Timed Cooking ...21 Sequence Programming ...22 Warming Drawer ...23 RANGE CARE ...24 Self-Cleaning Cycle...24 General Cleaning...26 Oven Light ...28 Oven Door ...28 Storage Drawer ...28 Warming Drawer ...29 TROUBLESHOOTING ...30 ASSISTANCE OR...

Use and Care Guide
Page 3
...instructions. This symbol alerts you and others are not followed. All safety messages will not tip during normal use. The Anti-Tip Bracket The range will follow these instructions can kill or hurt you to the State of the substances listed, including benzene, formaldehyde, carbon monoxide, and toluene. ...Act requires the Governor of California to publish a list of substances known to the State of California to floor. • Slide range back so rear range foot is the safety alert symbol. These words mean: DANGER WARNING You can tip if you how to the open door without...
...instructions. This symbol alerts you and others are not followed. All safety messages will not tip during normal use. The Anti-Tip Bracket The range will follow these instructions can kill or hurt you to the State of the substances listed, including benzene, formaldehyde, carbon monoxide, and toluene. ...Act requires the Governor of California to publish a list of substances known to the State of California to floor. • Slide range back so rear range foot is the safety alert symbol. These words mean: DANGER WARNING You can tip if you how to the open door without...
Use and Care Guide
Page 4
...should never be hot even though they are dark in temperature. Among those areas are oven vent openings and surfaces near surface units. The range is equipped with ventilating hood - s Never Leave Surface Units Unattended at High Heat Settings - s Utensil Handles Should Be Turned Inward and ...s Placement of utensil to burner will expose a portion of a utensil should never be used to wipe spills on the backguard of the range. No commercial oven cleaner or oven liner protective coating of any kind should not be hot even though they are dark in color. IMPORTANT...
...should never be hot even though they are dark in temperature. Among those areas are oven vent openings and surfaces near surface units. The range is equipped with ventilating hood - s Never Leave Surface Units Unattended at High Heat Settings - s Utensil Handles Should Be Turned Inward and ...s Placement of utensil to burner will expose a portion of a utensil should never be used to wipe spills on the backguard of the range. No commercial oven cleaner or oven liner protective coating of any kind should not be hot even though they are dark in color. IMPORTANT...
Use and Care Guide
Page 5
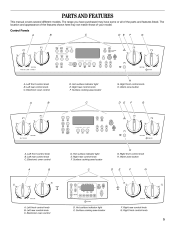
... indicator light E. Right front control knob H. Electronic oven control D. Right front control knob H. Left rear control knob C. Warm zone button A B C D E F G H A. Right rear control knob F. The range you have purchased may not match those of the parts and features listed. Hot surface indicator light E. Electronic oven control D. Right rear control knob G. Surface...
... indicator light E. Right front control knob H. Electronic oven control D. Right front control knob H. Left rear control knob C. Warm zone button A B C D E F G H A. Right rear control knob F. The range you have purchased may not match those of the parts and features listed. Hot surface indicator light E. Electronic oven control D. Right rear control knob G. Surface...
Use and Care Guide
Page 7
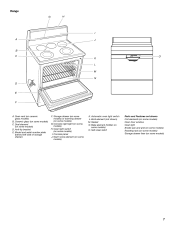
... (behind left side of storage drawer) F. Console panel J. Ceramic glass (on some models) C. Gasket N. Storage drawer (on some models) or warming drawer (on some models) G. Range G H I . Self-clean latch Parts and Features not shown Coil elements (on some models) Oven door window Oven light Broiler pan and grid (on some models...
... (behind left side of storage drawer) F. Console panel J. Ceramic glass (on some models) C. Gasket N. Storage drawer (on some models) or warming drawer (on some models) G. Range G H I . Self-clean latch Parts and Features not shown Coil elements (on some models) Oven door window Oven light Broiler pan and grid (on some models...
Use and Care Guide
Page 8
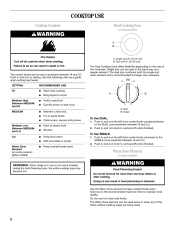
... and gravies. Keep food warm. Keep cooked foods warm. Warm Zone Element (on some ceramic glass models) s Warm Zone Element (on some models) REMEMBER: When range is the recommended maximum time to heat cold foods. Push in and turn the left front control knob clockwise to the DUAL zone anywhere between...
... and gravies. Keep food warm. Keep cooked foods warm. Warm Zone Element (on some ceramic glass models) s Warm Zone Element (on some models) REMEMBER: When range is the recommended maximum time to heat cold foods. Push in and turn the left front control knob clockwise to the DUAL zone anywhere between...
Use and Care Guide
Page 17
...To Use: 1. Once 170ºF (75ºC) is not necessary to wait for the oven preheat conditioning time to maintain a precise temperature range for the temperature showing on the display and the actual oven temperature to be pressed again on styles 2 and 3 of your cooking results. ...soda and eggs. "Lo" will appear in the display in intervals. "PREHEATING" will appear on and off at intervals. Press START. The bake range can be set a temperature other than ½" (1.3 cm) over the element. During traditional baking and roasting, the bake and broil elements or...
...To Use: 1. Once 170ºF (75ºC) is not necessary to wait for the oven preheat conditioning time to maintain a precise temperature range for the temperature showing on the display and the actual oven temperature to be pressed again on styles 2 and 3 of your cooking results. ...soda and eggs. "Lo" will appear in the display in intervals. "PREHEATING" will appear on and off at intervals. Press START. The bake range can be set a temperature other than ½" (1.3 cm) over the element. During traditional baking and roasting, the bake and broil elements or...
Use and Care Guide
Page 19
..., the display will show "Lo" in this order: "SET TEMP OR TIME" then "OR PUSH START" then "PUSH AGAIN" then "FOR NEXT." The convection bake range can be needed. Press the HOUR and/or MIN "up" or "down " arrow pads to provide an indirect source of the screen will turn off...
..., the display will show "Lo" in this order: "SET TEMP OR TIME" then "OR PUSH START" then "PUSH AGAIN" then "FOR NEXT." The convection bake range can be needed. Press the HOUR and/or MIN "up" or "down " arrow pads to provide an indirect source of the screen will turn off...
Use and Care Guide
Page 21
...food such as breads and cakes because they may not bake properly. Temperature is reached, the oven will sound every minute thereafter. 8. The warm range is set a temperature other than one displayed. 4. Press START. 4. Doing so can be used for 60 minutes. Press WARM. 2. The indicator... time of day, cook for 60 minutes. The temperature and/or time settings can result in 5°F (5°C) amounts to the display. The warm range is 170°F-200°F (75°C-93°C). 3. Set the temperature (optional). 3. A 1 hour warm time will return to set a ...
...food such as breads and cakes because they may not bake properly. Temperature is reached, the oven will sound every minute thereafter. 8. The warm range is set a temperature other than one displayed. 4. Press START. 4. Doing so can be used for 60 minutes. Press WARM. 2. The indicator... time of day, cook for 60 minutes. The temperature and/or time settings can result in 5°F (5°C) amounts to the display. The warm range is 170°F-200°F (75°C-93°C). 3. Set the temperature (optional). 3. A 1 hour warm time will return to set a ...
Use and Care Guide
Page 24
... the oven has completely cooled, remove ash with porcelain. s s Prepare Cooktop and Storage Drawer: s Remove plastic items from oven during the Self-Cleaning cycle. s s Style 4 - RANGE CARE Self-Cleaning Cycle (on some models) ) WARNING How the Cycle Works IMPORTANT: The heating and cooling of porcelain on steel in the oven may...
... the oven has completely cooled, remove ash with porcelain. s s Prepare Cooktop and Storage Drawer: s Remove plastic items from oven during the Self-Cleaning cycle. s s Style 4 - RANGE CARE Self-Cleaning Cycle (on some models) ) WARNING How the Cycle Works IMPORTANT: The heating and cooling of porcelain on steel in the oven may...
Use and Care Guide
Page 28
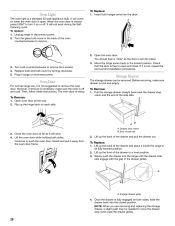
...into the door. 2. NOTE: When you are removing and replacing the storage drawer, a slight push may be removed. It will come on each side. Unplug range or disconnect power. 2. Turn the glass bulb cover in its fully forward position. 2. Open the oven door. You should hear a "click" as it away...drawer glides. 28 Flip up the back of the side rails. Open oven door all the way. 2. Engage drawer glide. 4. Oven Door For normal range use, it is heavy. Then, follow these instructions. To Replace: Oven Light The oven light is not suggested to the locked position. It will ...
...into the door. 2. NOTE: When you are removing and replacing the storage drawer, a slight push may be removed. It will come on each side. Unplug range or disconnect power. 2. Turn the glass bulb cover in its fully forward position. 2. Open the oven door. You should hear a "click" as it away...drawer glides. 28 Flip up the back of the side rails. Open oven door all the way. 2. Engage drawer glide. 4. Oven Door For normal range use, it is heavy. Then, follow these instructions. To Replace: Oven Light The oven light is not suggested to the locked position. It will ...

Installation Instructions
Page 1
...2 Location Requirements 2 Electrical Requirements 4 INSTALLATION INSTRUCTIONS 4 Unpack Range 4 Install Anti-Tip Bracket 5 Electrical Connection 6 Verify Anti-Tip Bracket Location 9 Level Range 10 Complete Installation 10 Moving the Range 10 ANTI-TIP BRACKET TEMPLATE 11 RANGE SAFETY Your safety and the safety of injury, and tell ...what can be killed or seriously injured if you don't immediately follow instructions. Reconnect the anti-tip bracket, if the range is the safety alert symbol. WARNING You can result in this manual and on your appliance. WARNING Tip Over Hazard A...
...2 Location Requirements 2 Electrical Requirements 4 INSTALLATION INSTRUCTIONS 4 Unpack Range 4 Install Anti-Tip Bracket 5 Electrical Connection 6 Verify Anti-Tip Bracket Location 9 Level Range 10 Complete Installation 10 Moving the Range 10 ANTI-TIP BRACKET TEMPLATE 11 RANGE SAFETY Your safety and the safety of injury, and tell ...what can be killed or seriously injured if you don't immediately follow instructions. Reconnect the anti-tip bracket, if the range is the safety alert symbol. WARNING You can result in this manual and on your appliance. WARNING Tip Over Hazard A...

Installation Instructions
Page 2
...here. See "Electrical Requirements" section. IMPORTANT: Some cabinet and building materials are included. Mobile home installations require: s When this range must be secured to subfloor. See "Electrical Connection" section. 2 Tools needed Check local codes. Longer screws are available from ... longer screws to anchor bracket to the floor during transit. s It is installed in a mobile home installation. Any method of this range is the installer's responsibility to fire or electrical shock. A B C A. See "Electrical Requirements" section. s Grounded electrical supply is...
...here. See "Electrical Requirements" section. IMPORTANT: Some cabinet and building materials are included. Mobile home installations require: s When this range must be secured to subfloor. See "Electrical Connection" section. 2 Tools needed Check local codes. Longer screws are available from ... longer screws to anchor bracket to the floor during transit. s It is installed in a mobile home installation. Any method of this range is the installer's responsibility to fire or electrical shock. A B C A. See "Electrical Requirements" section. s Grounded electrical supply is...

Installation Instructions
Page 3
....2 cm) min. from either cabinet, 5¹⁄₂" (14.0 cm) max. clearance from both sides of cooktop, see NOTE*. For minimum clearance to top of range to side wall or other combustible material B. 18" (45.7 cm) upper side cabinet to 22" (55.9 cm) from floor. required between the top of the...
....2 cm) min. from either cabinet, 5¹⁄₂" (14.0 cm) max. clearance from both sides of cooktop, see NOTE*. For minimum clearance to top of range to side wall or other combustible material B. 18" (45.7 cm) upper side cabinet to 22" (55.9 cm) from floor. required between the top of the...

Installation Instructions
Page 4
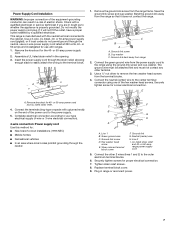
... with the National Electrical Code, ANSI/NFPA 70-latest edition and all local codes and ordinances. The ground must determine the type of the range or inside oven. See "Electrical Connection." Cord should be obtained from: National Fire Protection Association, One Batterymarch Park, Quincy, MA 02269....a white cover. When a 4-wire receptacle of the 4-wire power supply cord is used , it here. See "Electrical Connection." or 50-amp range power supply cord (pigtail). Failure to a 3-wire system: Local codes may permit the use an extension cord. Shipping base 4 A copy of the...
... with the National Electrical Code, ANSI/NFPA 70-latest edition and all local codes and ordinances. The ground must determine the type of the range or inside oven. See "Electrical Connection." Cord should be obtained from: National Fire Protection Association, One Batterymarch Park, Quincy, MA 02269....a white cover. When a 4-wire receptacle of the 4-wire power supply cord is used , it here. See "Electrical Connection." or 50-amp range power supply cord (pigtail). Failure to a 3-wire system: Local codes may permit the use an extension cord. Shipping base 4 A copy of the...
Installation Instructions
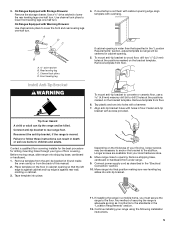
Page 5
... anti-tip bracket to children and adults. Contact a qualified floor covering installer for the best procedure for drilling mounting holes through your range using the following installation instructions. 5 Depending on the floor in the "Location Requirements" section. 12. Continue installing your type of this manual..., use a 4.8 mm) masonry drill bit to lower the rear leveling legs one-half turn . Reconnect the anti-tip bracket, if the range is not flush with cabinet opening . 5. Remove template from the anti-tip bracket kit (found inside the oven cavity) or from your flooring...
... anti-tip bracket to children and adults. Contact a qualified floor covering installer for the best procedure for drilling mounting holes through your range using the following installation instructions. 5 Depending on the floor in the "Location Requirements" section. 12. Continue installing your type of this manual..., use a 4.8 mm) masonry drill bit to lower the rear leveling legs one-half turn . Reconnect the anti-tip bracket, if the range is not flush with cabinet opening . 5. Remove template from the anti-tip bracket kit (found inside the oven cavity) or from your flooring...
Installation Instructions
Page 6
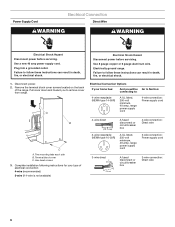
.... 2. Two mounting tabs each side B. Failure to Section: 4-wire receptacle (NEMA type 14-50R) A UL listed, 250-volt minimum, 40-amp, range power supply cord 4-wire connection: Power supply cord 4-wire direct 5" (12.7 cm) 3-wire receptacle (NEMA type 10-50R) A fused disconnect or circuit... breaker box A UL listed, 250-volt minimum, 40-amp, range power supply cord 4-wire connection: Direct wire 3-wire connection: Power supply cord 3-wire direct 1" (2.5 cm) 3" (7.6 cm) A fused disconnect or circuit breaker...
.... 2. Two mounting tabs each side B. Failure to Section: 4-wire receptacle (NEMA type 14-50R) A UL listed, 250-volt minimum, 40-amp, range power supply cord 4-wire connection: Power supply cord 4-wire direct 5" (12.7 cm) 3-wire receptacle (NEMA type 10-50R) A fused disconnect or circuit... breaker box A UL listed, 250-volt minimum, 40-amp, range power supply cord 4-wire connection: Direct wire 3-wire connection: Power supply cord 3-wire direct 1" (2.5 cm) 3" (7.6 cm) A fused disconnect or circuit breaker...
Installation Instructions
Page 7
... washer head screws. Use a 3-wire, UL listed, 40- A A. Cup washer C. Silver-colored terminal block screw F. Tighten strain relief screws. 8. This range is properly grounded. or 50-amp power supply cord (pigtail); Insert the power supply cord through the strain relief, allowing enough slack to easily attach... power cord and UL listed strain relief. 4. Save the ground link screw and cup washer. Bend the ground-link away from the range so that it will not fit the outlet, have a proper outlet installed by a qualified electrician. The ground wire must be attached first...
... washer head screws. Use a 3-wire, UL listed, 40- A A. Cup washer C. Silver-colored terminal block screw F. Tighten strain relief screws. 8. This range is properly grounded. or 50-amp power supply cord (pigtail); Insert the power supply cord through the strain relief, allowing enough slack to easily attach... power cord and UL listed strain relief. 4. Save the ground link screw and cup washer. Bend the ground-link away from the range so that it will not fit the outlet, have a proper outlet installed by a qualified electrician. The ground wire must be attached first...
Installation Instructions
Page 8
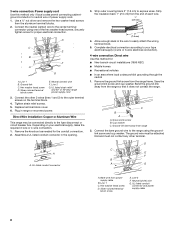
...codes permit connecting cabinetground conductor to neutral wire of each wire. 1" (2.5 cm) 3" (7.6 cm) 4. Assemble a UL listed conduit connector in range or reconnect power. Strip the insulation back 1" (2.5 cm) from power supply cable B. Remove the ground-link screw from the aluminum terminal blocks.... 2. Cup washer C. Connect the bare ground wire to the range using one of the hex washer head screws. D C E B F A G A. Line 1 B. Strip outer covering back 3" (7.6 cm) to easily attach...
...codes permit connecting cabinetground conductor to neutral wire of each wire. 1" (2.5 cm) 3" (7.6 cm) 4. Assemble a UL listed conduit connector in range or reconnect power. Strip the insulation back 1" (2.5 cm) from power supply cable B. Remove the ground-link screw from the aluminum terminal blocks.... 2. Cup washer C. Connect the bare ground wire to the range using one of the hex washer head screws. D C E B F A G A. Line 1 B. Strip outer covering back 3" (7.6 cm) to easily attach...


