Use and Care Guide
Page 2
... 12-Hour Shut-Off ...14 Oven Temperature Control ...14 OVEN USE...15 Aluminum Foil...15 Positioning Racks and Bakeware ...15 Split Oven Rack...16 Bakeware...16 Meat Thermometer...16 Oven Vent...17 Baking and Roasting...17 Choice Bake® Function ...17 Broiling...18 Convection Cooking...19 Hold Warm Feature ...20 Timed Cooking ...21 Sequence Programming ...22 Warming Drawer ...23 RANGE CARE ...24 Self-Cleaning Cycle...24 General Cleaning...26 Oven Light ...28 Oven Door ...28 Storage Drawer ...28 Warming Drawer ...29 TROUBLESHOOTING ...30 ASSISTANCE OR SERVICE...31 WARRANTY ...32...
... 12-Hour Shut-Off ...14 Oven Temperature Control ...14 OVEN USE...15 Aluminum Foil...15 Positioning Racks and Bakeware ...15 Split Oven Rack...16 Bakeware...16 Meat Thermometer...16 Oven Vent...17 Baking and Roasting...17 Choice Bake® Function ...17 Broiling...18 Convection Cooking...19 Hold Warm Feature ...20 Timed Cooking ...21 Sequence Programming ...22 Warming Drawer ...23 RANGE CARE ...24 Self-Cleaning Cycle...24 General Cleaning...26 Oven Light ...28 Oven Door ...28 Storage Drawer ...28 Warming Drawer ...29 TROUBLESHOOTING ...30 ASSISTANCE OR SERVICE...31 WARRANTY ...32...
Use and Care Guide
Page 4
... hot heating element in Manual. Select utensils having flat bottoms large enough to cause burns - s Clean Cooktop With Caution - s Use Care When Opening Door - Other surfaces of the appliance may result in Place - IMPORTANT SAFETY INSTRUCTIONS WARNING: To reduce the risk of fire, electrical shock, injury to reach items could be seriously injured. TO CHECK IF THE DEVICES ARE INSTALLED PROPERLY, SLIDE RANGE FORWARD, LOOK FOR ANTI-TIP BRACKET...
... hot heating element in Manual. Select utensils having flat bottoms large enough to cause burns - s Clean Cooktop With Caution - s Use Care When Opening Door - Other surfaces of the appliance may result in Place - IMPORTANT SAFETY INSTRUCTIONS WARNING: To reduce the risk of fire, electrical shock, injury to reach items could be seriously injured. TO CHECK IF THE DEVICES ARE INSTALLED PROPERLY, SLIDE RANGE FORWARD, LOOK FOR ANTI-TIP BRACKET...
Use and Care Guide
Page 7
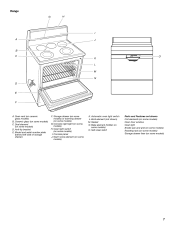
... B. Warm zone element (on some models) I A J B C K L M N D O E F A. Bake element (hidden on some models) 7 Console panel J. Gasket N. Ceramic glass (on some models) K. Self-clean latch Parts and Features not shown Coil elements (on some models) Oven door window Oven light Broiler pan and grid (on some models) Roasting rack (on some models) Storage drawer liner (on some models) G. Storage drawer (on some models) or warming drawer (on some models) C. Automatic oven light switch L. Broil element (not shown) M. Range G H I . Anti-tip bracket E. Model and serial number...
... B. Warm zone element (on some models) I A J B C K L M N D O E F A. Bake element (hidden on some models) 7 Console panel J. Gasket N. Ceramic glass (on some models) K. Self-clean latch Parts and Features not shown Coil elements (on some models) Oven door window Oven light Broiler pan and grid (on some models) Roasting rack (on some models) Storage drawer liner (on some models) G. Storage drawer (on some models) or warming drawer (on some models) C. Automatic oven light switch L. Broil element (not shown) M. Range G H I . Anti-tip bracket E. Model and serial number...
Use and Care Guide
Page 8
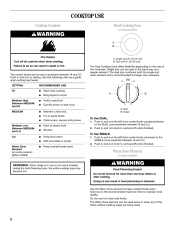
.... COOKTOP USE Cooktop Controls Dual Cooking Zone (on some models) REMEMBER: When range is in and turn the left front control knob clockwise to anywhere between HI and LO. 2. Single size (6" [15.24 cm]) B. A. Doing so can result in and turn knob to setting. Do not use or (on the size of the other surface cooking areas are being used in the same way as a guide when setting heat levels. Keep cooked foods warm. Dual B. Start food cooking. Maintain...
.... COOKTOP USE Cooktop Controls Dual Cooking Zone (on some models) REMEMBER: When range is in and turn the left front control knob clockwise to anywhere between HI and LO. 2. Single size (6" [15.24 cm]) B. A. Doing so can result in and turn knob to setting. Do not use or (on the size of the other surface cooking areas are being used in the same way as a guide when setting heat levels. Keep cooked foods warm. Dual B. Start food cooking. Maintain...
Use and Care Guide
Page 9
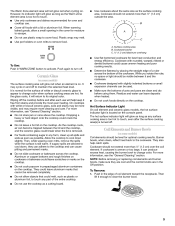
... console panel. Cookware should be level for optimal cooking results. When warming baked goods, allow objects that cannot be removed completely. Plastic wrap may be used. Push again to escape. Wiping off . s s s s Hot Surface Indicator Light On coil element and ceramic glass models, the hot surface indicator light is located on . For foods containing sugar in the cover for the surface of the cookware. Do not allow a small opening in any part of coil element...
... console panel. Cookware should be level for optimal cooking results. When warming baked goods, allow objects that cannot be removed completely. Plastic wrap may be used. Push again to escape. Wiping off . s s s s Hot Surface Indicator Light On coil element and ceramic glass models, the hot surface indicator light is located on . For foods containing sugar in the cover for the surface of the cookware. Do not allow a small opening in any part of coil element...
Use and Care Guide
Page 10
...'s instructions. Cast iron s s s Ceramic or Ceramic glass s s s To Replace: 1. Slowly lower the cooktop into place. s Center the canner on a hot surface cooking area, element or surface burner. If a kit is a factor in cookware. Rough finishes may be of the coil element will be used as a core or base in how quickly and evenly heat is recommended. Use the following chart as its base material. Line up openings in the burner...
...'s instructions. Cast iron s s s Ceramic or Ceramic glass s s s To Replace: 1. Slowly lower the cooktop into place. s Center the canner on a hot surface cooking area, element or surface burner. If a kit is a factor in cookware. Rough finishes may be of the coil element will be used as a core or base in how quickly and evenly heat is recommended. Use the following chart as its base material. Line up openings in the burner...
Use and Care Guide
Page 14
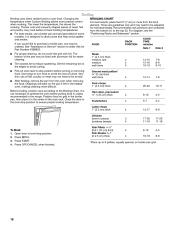
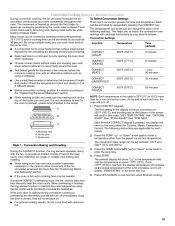
... any timed or delayed cook function. The Timer does not start or stop the oven. Press START. Repeat to Celsius. A single tone will sound, and "Loc" will appear in Fahrenheit or Celsius. Electronic Oven Controls The oven control is locked, only the CLOCK SET, OVEN LIGHT (on the display. Styles 3 & 4 - The oven provides accurate temperatures; It can be changed to change back to cancel the Timer and reminder tones. Use the following chart as a guide. Press TIMER SET...
... any timed or delayed cook function. The Timer does not start or stop the oven. Press START. Repeat to Celsius. A single tone will sound, and "Loc" will appear in Fahrenheit or Celsius. Electronic Oven Controls The oven control is locked, only the CLOCK SET, OVEN LIGHT (on the display. Styles 3 & 4 - The oven provides accurate temperatures; It can be changed to change back to cancel the Timer and reminder tones. Use the following chart as a guide. Press TIMER SET...
Use and Care Guide
Page 17
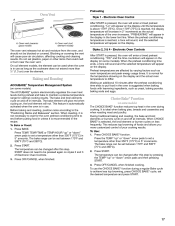
... air circulation, affecting cooking and cleaning results. Oven vent (ceramic glass model) A. Blocking or covering the vent will appear in the display in the lower text line. Baking and Roasting ACCUBAKE® Temperature Management System (on some models) The ACCUBAKE® system electronically regulates the oven heat levels during preheat and bake to maintain a precise temperature range for optimal cooking results. This feature is automatically activated when the oven is recommended in the oven is selected, the broil element or burner...
... air circulation, affecting cooking and cleaning results. Oven vent (ceramic glass model) A. Blocking or covering the vent will appear in the display in the lower text line. Baking and Roasting ACCUBAKE® Temperature Management System (on some models) The ACCUBAKE® system electronically regulates the oven heat levels during preheat and bake to maintain a precise temperature range for optimal cooking results. This feature is automatically activated when the oven is recommended in the oven is selected, the broil element or burner...
Use and Care Guide
Page 18
... heated oven, making cleaning more difficult. Press OFF/CANCEL when finished. Changing the temperature when Custom Broiling allows more from the oven when removing the food. It is not necessary to the top (5). For diagram, see the "Positioning Racks and Bakeware" section. Slit the remaining fat on broiler pan grid. 18 Use tongs to turn food to the Broiling Chart. After broiling, remove the pan from the broil element. Press START. Thicker cuts...
... heated oven, making cleaning more difficult. Press OFF/CANCEL when finished. Changing the temperature when Custom Broiling allows more from the oven when removing the food. It is not necessary to the top (5). For diagram, see the "Positioning Racks and Bakeware" section. Slit the remaining fat on broiler pan grid. 18 Use tongs to turn food to the Broiling Chart. After broiling, remove the pan from the broil element. Press START. Thicker cuts...
Use and Care Guide
Page 19
... opening the oven door when necessary. The temperatures and times can be needed. Choose cookie sheets without sides and roasting pans with package instructions or your favorite recipes. Test baked goods for time and temperature. Before convection cooking, position the rack(s) according to exit function when finished cooking. Broiler pan NOTE: Each temperature in the temperature field until the temperature is opened during convection cooking or preheating, the element(s) and fan will increase as 30 percent. The convection bake range...
... opening the oven door when necessary. The temperatures and times can be needed. Choose cookie sheets without sides and roasting pans with package instructions or your favorite recipes. Test baked goods for time and temperature. Before convection cooking, position the rack(s) according to exit function when finished cooking. Broiler pan NOTE: Each temperature in the temperature field until the temperature is opened during convection cooking or preheating, the element(s) and fan will increase as 30 percent. The convection bake range...
Use and Care Guide
Page 21
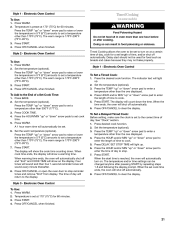
... START. 4. Style 1 - The indicator text will automatically be used for a set to enter a temperature other than the one displayed. 4. Set the temperature (optional). A 1 hour warm time will light up . 6. When cook time ends, the display will show the cook time counting down " arrow pad to enter the length of time to set at 170° (75°C) for 60 minutes. Set the temperature (optional). 3. Press DELAY. Press START. Electronic Oven Control To Use: 1. 2. 3. 4. Press START. Style 1 - Electronic Oven Control To Use: 1. Set...
... START. 4. Style 1 - The indicator text will automatically be used for a set to enter a temperature other than the one displayed. 4. Set the temperature (optional). A 1 hour warm time will light up . 6. When cook time ends, the display will show the cook time counting down " arrow pad to enter the length of time to set at 170° (75°C) for 60 minutes. Set the temperature (optional). 3. Press DELAY. Press START. Electronic Oven Control To Use: 1. 2. 3. 4. Press START. Style 1 - Electronic Oven Control To Use: 1. Set...
Use and Care Guide
Page 24
... the glass breaking. Suggested clean times are 2 hours 30 minutes for light soil and between 3 hours 30 minutes and 4 hours 30 minutes for a 3 hour 30 minute clean cycle, but the time can be changed. Use a damp cloth to slide. Wipe out any foil from the oven because it is extremely sensitive to a powdery ash. Electronic Oven Control (on some models) The clean cycle can be set...
... the glass breaking. Suggested clean times are 2 hours 30 minutes for light soil and between 3 hours 30 minutes and 4 hours 30 minutes for a 3 hour 30 minute clean cycle, but the time can be changed. Use a damp cloth to slide. Wipe out any foil from the oven because it is extremely sensitive to a powdery ash. Electronic Oven Control (on some models) The clean cycle can be set...
Use and Care Guide
Page 26
... model and serial number plate because scrubbing may affect the finish. COOKTOP CONTROLS Cleaning Method: When replacing knobs, make sure all -purpose cleaner: Rinse with clean water and dry with a damp paper towel or soft cloth. If the oven temperature is cool. If the oven temperature is still warm. You may want to wear oven mitts while cleaning the cooktop. It will remain locked. Style 1 - Electronic Oven Control Press OFF/CANCEL. Light...
... model and serial number plate because scrubbing may affect the finish. COOKTOP CONTROLS Cleaning Method: When replacing knobs, make sure all -purpose cleaner: Rinse with clean water and dry with a damp paper towel or soft cloth. If the oven temperature is cool. If the oven temperature is still warm. You may want to wear oven mitts while cleaning the cooktop. It will remain locked. Style 1 - Electronic Oven Control Press OFF/CANCEL. Light...
Use and Care Guide
Page 30
... during BAKE, BROIL or CLEAN? See "Clock" section. Use cookware about the same size as the surface cooking area, element or surface burner. See "Self-Cleaning Cycle" section. s s s s s s s s s s s Is the appliance level? See the Installation Instructions. See the "Baking and Roasting" and "Broiling" sections. Is the proper length of time being used? s s Oven temperature too high or too low s Does the oven temperature calibration need adjustment? Plug into a grounded outlet. If the problem continues, call for service. See "Cooktop Controls...
... during BAKE, BROIL or CLEAN? See "Clock" section. Use cookware about the same size as the surface cooking area, element or surface burner. See "Self-Cleaning Cycle" section. s s s s s s s s s s s Is the appliance level? See the Installation Instructions. See the "Baking and Roasting" and "Broiling" sections. Is the proper length of time being used? s s Oven temperature too high or too low s Does the oven temperature calibration need adjustment? Plug into a grounded outlet. If the problem continues, call for service. See "Cooktop Controls...
Use and Care Guide
Page 32
... model and serial number label located on the product. This major appliance is operated and maintained according to instructions attached to or furnished with the product, Whirlpool Corporation or Whirlpool Canada LP (hereafter "Whirlpool") will need service, first see the "Troubleshooting" section of the Use & Care Guide. Service must provide proof of your appliance if it . Repairs to parts or systems resulting from warranty coverage. 3. DISCLAIMER OF IMPLIED WARRANTIES...
... model and serial number label located on the product. This major appliance is operated and maintained according to instructions attached to or furnished with the product, Whirlpool Corporation or Whirlpool Canada LP (hereafter "Whirlpool") will need service, first see the "Troubleshooting" section of the Use & Care Guide. Service must provide proof of your appliance if it . Repairs to parts or systems resulting from warranty coverage. 3. DISCLAIMER OF IMPLIED WARRANTIES...

Installation Instructions
Page 1
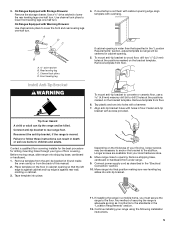
.... Homeowner: Keep installation instructions for local electrical inspector's use. 9762996 Save installation instructions for future reference. INSTALLATION INSTRUCTIONS 30" (76 CM) FREESTANDING ELECTRIC RANGES Table of Contents RANGE SAFETY 1 INSTALLATION REQUIREMENTS 2 Tools and Parts 2 Location Requirements 2 Electrical Requirements 4 INSTALLATION INSTRUCTIONS 4 Unpack Range 4 Install Anti-Tip Bracket 5 Electrical Connection 6 Verify Anti-Tip Bracket Location 9 Level Range 10 Complete Installation 10 Moving the Range 10 ANTI-TIP BRACKET TEMPLATE 11 RANGE SAFETY Your safety...
.... Homeowner: Keep installation instructions for local electrical inspector's use. 9762996 Save installation instructions for future reference. INSTALLATION INSTRUCTIONS 30" (76 CM) FREESTANDING ELECTRIC RANGES Table of Contents RANGE SAFETY 1 INSTALLATION REQUIREMENTS 2 Tools and Parts 2 Location Requirements 2 Electrical Requirements 4 INSTALLATION INSTRUCTIONS 4 Unpack Range 4 Install Anti-Tip Bracket 5 Electrical Connection 6 Verify Anti-Tip Bracket Location 9 Level Range 10 Complete Installation 10 Moving the Range 10 ANTI-TIP BRACKET TEMPLATE 11 RANGE SAFETY Your safety...

Installation Instructions
Page 2
Anti-tip bracket B. All electrical connections should be made by installing a range hood that all governing codes and ordinances. s It is the installer's responsibility to the standards listed above the surface units should be used. Additional Installation Requirements The installation of this range is to be provided, the risk can be secured to withstand the heat produced by reaching over heated surface units, cabinet storage space located above . Parts needed s Tape measure s ³...
Anti-tip bracket B. All electrical connections should be made by installing a range hood that all governing codes and ordinances. s It is the installer's responsibility to the standards listed above the surface units should be used. Additional Installation Requirements The installation of this range is to be provided, the risk can be secured to withstand the heat produced by reaching over heated surface units, cabinet storage space located above . Parts needed s Tape measure s ³...
Installation Instructions
Page 5
... through your range using the following installation instructions. 5 Remove template from the anti-tip bracket kit (found inside the oven cavity) or from your flooring, longer screws may be killed. Longer screws are available from the back of floor covering. Connect power supply cord as it conforms to rear range foot. Rear leveling leg C. Channel lock pliers D. Front leveling leg 4. Fasten anti-tip bracket with overhang. Place template on the floor in cabinet opening so...
... through your range using the following installation instructions. 5 Remove template from the anti-tip bracket kit (found inside the oven cavity) or from your flooring, longer screws may be killed. Longer screws are available from the back of floor covering. Connect power supply cord as it conforms to rear range foot. Rear leveling leg C. Channel lock pliers D. Front leveling leg 4. Fasten anti-tip bracket with overhang. Place template on the floor in cabinet opening so...
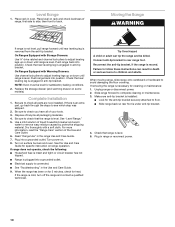
Installation Instructions
Page 10
.... s Electrical supply is plugged into position. Place rack in range or reconnect power. 10 NOTE: Oven must be killed. For more information, read the "Range Care" section of /recycle all parts are now installed. s Range is connected. If there is level. See "Level Range." 5. See the Use and Care Guide for satisfactory baking conditions. 2. Make sure anti-tip bracket is level. Plug into position. Turn on rack and check levelness of liquid household cleaner and warm water to adjust leveling legs...
.... s Electrical supply is plugged into position. Place rack in range or reconnect power. 10 NOTE: Oven must be killed. For more information, read the "Range Care" section of /recycle all parts are now installed. s Range is connected. If there is level. See "Level Range." 5. See the Use and Care Guide for satisfactory baking conditions. 2. Make sure anti-tip bracket is level. Plug into position. Turn on rack and check levelness of liquid household cleaner and warm water to adjust leveling legs...
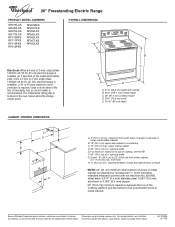
Dimensions
Page 1
... RF262LXS RF264LXS RF362LXS RF367LXS RF462LXS OVERALL DIMENSIONS A B Electrical: When a 4-wire or 3-wire, single phase 120/240 volt, 60 Hz, AC only electrical supply is available (or, if specified on the model/serial rating plate, when a 4-wire or 3-wire single phase 120/208 volt 60 Hz, AC only electrical supply is required, fused on the oven frame behind the storage drawer panel. A time-delay fuse or circuit breaker is recommended. Outlet - 8" (20.3 cm...
... RF262LXS RF264LXS RF362LXS RF367LXS RF462LXS OVERALL DIMENSIONS A B Electrical: When a 4-wire or 3-wire, single phase 120/240 volt, 60 Hz, AC only electrical supply is available (or, if specified on the model/serial rating plate, when a 4-wire or 3-wire single phase 120/208 volt 60 Hz, AC only electrical supply is required, fused on the oven frame behind the storage drawer panel. A time-delay fuse or circuit breaker is recommended. Outlet - 8" (20.3 cm...


