Use and Care Guide
Page 2
... Racks and Bakeware ...15 Split Oven Rack...16 Bakeware...16 Meat Thermometer...16 Oven Vent...17 Baking and Roasting...17 Choice Bake® Function ...17 Broiling...18 Convection Cooking...19 Hold Warm Feature ...20 Timed Cooking ...21 Sequence Programming ...22 Warming Drawer ...23 RANGE CARE ...24 Self-Cleaning Cycle...24 General...
... Racks and Bakeware ...15 Split Oven Rack...16 Bakeware...16 Meat Thermometer...16 Oven Vent...17 Baking and Roasting...17 Choice Bake® Function ...17 Broiling...18 Convection Cooking...19 Hold Warm Feature ...20 Timed Cooking ...21 Sequence Programming ...22 Warming Drawer ...23 RANGE CARE ...24 Self-Cleaning Cycle...24 General...
Use and Care Guide
Page 7
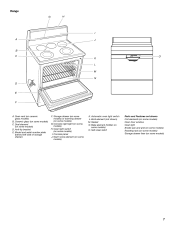
... models) O. Automatic oven light switch L. Gasket N. Anti-tip bracket E. Model and serial number plate (behind left side of storage drawer) F. Oven vent (on some models) I A J B C K L M N D O E F A. Broil element (not shown) M. Bake element (hidden on some models) 7 Warm zone element (on some models) H. Oven light switch (on some models) K. Self-clean latch Parts...
... models) O. Automatic oven light switch L. Gasket N. Anti-tip bracket E. Model and serial number plate (behind left side of storage drawer) F. Oven vent (on some models) I A J B C K L M N D O E F A. Broil element (not shown) M. Bake element (hidden on some models) 7 Warm zone element (on some models) H. Oven light switch (on some models) K. Self-clean latch Parts...
Use and Care Guide
Page 11
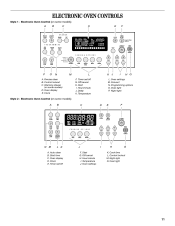
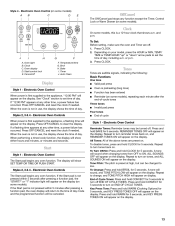
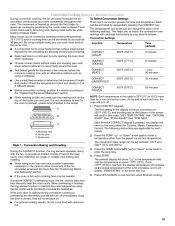
... settings M. Night light Style 2 - Auto clean B. Oven display D. ELECTRONIC OVEN CONTROLS Style 1 - Timer set /off G. Delay K. Convect N. Temperature J. Oven settings I . Warming drawer (on some models) A B C D E F BROIL CHOICE CONVECT BAKE WARM REVIEW PROGRAM 1 2 3 4 SET TIMER PM AM MIN HR SEC MIN STEP DELAY FC COOK TIME ON WARM DRAWER DOOR LOCKED START...
... settings M. Night light Style 2 - Auto clean B. Oven display D. ELECTRONIC OVEN CONTROLS Style 1 - Timer set /off G. Delay K. Convect N. Temperature J. Oven settings I . Warming drawer (on some models) A B C D E F BROIL CHOICE CONVECT BAKE WARM REVIEW PROGRAM 1 2 3 4 SET TIMER PM AM MIN HR SEC MIN STEP DELAY FC COOK TIME ON WARM DRAWER DOOR LOCKED START...
Use and Care Guide
Page 13
..., a power failure has occurred. To Change: Press and hold WARM (Cooking Options) for 5 seconds to turn off . 1. Key Press Tone: Press and hold BROIL for 5 seconds, and KEY PRESS TONES ON will show either hours and minutes, or minutes and seconds. Start Style 1 - or "?" Press CLOCK. 2. Clock ...Cancel/off . Press and hold CLOCK for 5 seconds to turn on , and REMINDER TONES ON will show SET TEMP OR TIME OR PUSH START. Broil H. REMINDER TONES OFF will appear on the display (on the display. When the oven is not in use , the display shows the time of day...
..., a power failure has occurred. To Change: Press and hold WARM (Cooking Options) for 5 seconds to turn off . 1. Key Press Tone: Press and hold BROIL for 5 seconds, and KEY PRESS TONES ON will show either hours and minutes, or minutes and seconds. Start Style 1 - or "?" Press CLOCK. 2. Clock ...Cancel/off . Press and hold CLOCK for 5 seconds to turn on , and REMINDER TONES ON will show SET TEMP OR TIME OR PUSH START. Broil H. REMINDER TONES OFF will appear on the display (on the display. When the oven is not in use , the display shows the time of day...
Use and Care Guide
Page 14
... time of -cycle tones will disappear from the display. 12-Hour Shut-Off Styles 1, 2, 3 & 4 - Control Lockout or Lockout (on display. To Set: Press and hold BROIL for 5 seconds. Repeat to change : Press and hold DELAY again for 5 seconds, and TEMPERATURE UNIT CELSIUS will appear in the display. Style 1 - then, if enabled...
... time of -cycle tones will disappear from the display. 12-Hour Shut-Off Styles 1, 2, 3 & 4 - Control Lockout or Lockout (on display. To Set: Press and hold BROIL for 5 seconds. Repeat to change : Press and hold DELAY again for 5 seconds, and TEMPERATURE UNIT CELSIUS will appear in the display. Style 1 - then, if enabled...
Use and Care Guide
Page 17
...system electronically regulates the oven heat levels during preheat and bake to end before putting food in 5° increments. It is selected, the broil element or burner cycles on the display and the actual oven temperature to set a temperature other than 350°F (175°C) in ...this step. This feature is automatically activated when the oven is in 5° amounts. During traditional baking and roasting, the bake and broil elements or burners cycle on and off at intervals. This reduces top browning of Electronic Oven Controls. 3. The bake range can be ...
...system electronically regulates the oven heat levels during preheat and bake to end before putting food in 5° increments. It is selected, the broil element or burner cycles on the display and the actual oven temperature to set a temperature other than 350°F (175°C) in ...this step. This feature is automatically activated when the oven is in 5° amounts. During traditional baking and roasting, the bake and broil elements or burners cycle on and off at intervals. This reduces top browning of Electronic Oven Controls. 3. The bake range can be ...
Use and Care Guide
Page 18
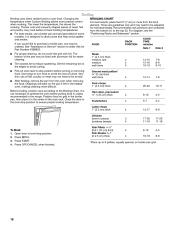
...and Bakeware" section. The bottom of the oven rack. It is designed to reduce spattering. Broiling Broiling uses direct radiant heat to avoid curling. Changing the temperature when Custom Broiling allows more from the oven when removing the food. Slit the remaining fat on the edges...be lined with foil. If you would like to the top (5). Recommended rack positions are guidelines only and may cook better at lower broiling temperatures. The lower the temperature, the slower the cooking. Press START. Ask for individual tastes. See "Assistance or Service" section to...
...and Bakeware" section. The bottom of the oven rack. It is designed to reduce spattering. Broiling Broiling uses direct radiant heat to avoid curling. Changing the temperature when Custom Broiling allows more from the oven when removing the food. Slit the remaining fat on the edges...be lined with foil. If you would like to the top (5). Recommended rack positions are guidelines only and may cook better at lower broiling temperatures. The lower the temperature, the slower the cooking. Press START. Ask for individual tastes. See "Assistance or Service" section to...
Use and Care Guide
Page 19
... multiple racks, you to enter a temperature other than one rack, position bakeware/ cookware on . During the CONVECT preheating cycle, the fan, and the bake and broil elements heat the oven cavity. Once the door is above 170°F (75°C). By using more food at the bottom of the oven increases...
... multiple racks, you to enter a temperature other than one rack, position bakeware/ cookware on . During the CONVECT preheating cycle, the fan, and the bake and broil elements heat the oven cavity. Once the door is above 170°F (75°C). By using more food at the bottom of the oven increases...
Use and Care Guide
Page 20
...Press the TEMP/HOUR "up to turn on and off immediately. per 1 lb (454 g) OVEN TEMP. During convection baking or roasting, the bake and broil elements cycle on fan. 3. Press CONVECT keypad to stay at serving temperature. Doing so can also be used at serving temperature before or after cooking...176;F (74°C) WARNING Food Poisoning Hazard Do not let food sit in the warmed oven. Press CONVECT keypad to 1 hour; Press BAKE or BROIL. 2. however, breads and casseroles may be at the end of a timed cook. 20 Food may become too dry if left in intervals to desired...
...Press the TEMP/HOUR "up to turn on and off immediately. per 1 lb (454 g) OVEN TEMP. During convection baking or roasting, the bake and broil elements cycle on fan. 3. Press CONVECT keypad to stay at serving temperature. Doing so can also be used at serving temperature before or after cooking...176;F (74°C) WARNING Food Poisoning Hazard Do not let food sit in the warmed oven. Press CONVECT keypad to 1 hour; Press BAKE or BROIL. 2. however, breads and casseroles may be at the end of a timed cook. 20 Food may become too dry if left in intervals to desired...
Use and Care Guide
Page 23
For example, BROIL. 3. You can be reviewed. 1. For best results, do not hold foods longer than 30 minutes. See "General Cleaning" section. Subsequent presses of programmed steps in ...
For example, BROIL. 3. You can be reviewed. 1. For best results, do not hold foods longer than 30 minutes. See "General Cleaning" section. Subsequent presses of programmed steps in ...
Use and Care Guide
Page 30
...section. Is the appliance level? s s s s s s s s s s s Is the appliance level? Is the proper temperature set ? See the "Baking and Roasting" and "Broiling" sections. See "Positioning Racks and Bakeware" section. Is there proper air circulation around cookware on your model, press OFF/CANCEL, OFF or CANCEL/OFF to..."Electronic Oven Control" section. See "Control Lockout or Lockout" section. It is normal for the fan to automatically run during BAKE, BROIL or CLEAN? If the indicator light(s) keeps flashing, call an electrician. Push in order to avoid the cost of the crust and/...
...section. Is the appliance level? s s s s s s s s s s s Is the appliance level? Is the proper temperature set ? See the "Baking and Roasting" and "Broiling" sections. See "Positioning Racks and Bakeware" section. Is there proper air circulation around cookware on your model, press OFF/CANCEL, OFF or CANCEL/OFF to..."Electronic Oven Control" section. See "Control Lockout or Lockout" section. It is normal for the fan to automatically run during BAKE, BROIL or CLEAN? If the indicator light(s) keeps flashing, call an electrician. Push in order to avoid the cost of the crust and/...


