
Use and Care Guide
Page 1
or visit our website at... www.whirlpool.com Table of Contents 2 8113P674-60 ® STANDARD CLEANING ELECTRIC RANGE Use & Care Guide For questions about features, operation/performance, parts, accessories or service, call: 1-800-253-1301.
or visit our website at... www.whirlpool.com Table of Contents 2 8113P674-60 ® STANDARD CLEANING ELECTRIC RANGE Use & Care Guide For questions about features, operation/performance, parts, accessories or service, call: 1-800-253-1301.

Use and Care Guide
Page 2
TABLE OF CONTENTS RANGE SAFETY 3 The Anti-Tip Bracket 3 PARTS AND FEATURES 5 COOKTOP USE 6 Cooktop Controls 6 Coil Elements and Burner Bowls 6 Home Canning 6 Cookware 6 OVEN USE 7 Oven Temperature Control 7 Aluminum Foil 7 Positioning Racks and Bakeware 7 Bakeware 8 Meat Thermometer 8 Oven Vent 8 Baking and Roasting 8 Broiling 8 RANGE CARE 9 General Cleaning 9 Oven Door 10 Storage Drawer 10 TROUBLESHOOTING 10 ASSISTANCE OR SERVICE 11 WARRANTY 12 2
TABLE OF CONTENTS RANGE SAFETY 3 The Anti-Tip Bracket 3 PARTS AND FEATURES 5 COOKTOP USE 6 Cooktop Controls 6 Coil Elements and Burner Bowls 6 Home Canning 6 Cookware 6 OVEN USE 7 Oven Temperature Control 7 Aluminum Foil 7 Positioning Racks and Bakeware 7 Bakeware 8 Meat Thermometer 8 Oven Vent 8 Baking and Roasting 8 Broiling 8 RANGE CARE 9 General Cleaning 9 Oven Door 10 Storage Drawer 10 TROUBLESHOOTING 10 ASSISTANCE OR SERVICE 11 WARRANTY 12 2
Use and Care Guide
Page 3
... properly. This symbol alerts you apply too much force or weight to children and adults. Reconnect the anti-tip bracket, if the range is the safety alert symbol. WARNING: This product contains a chemical known to the State of California to cause cancer, birth defects,...Connect anti-tip bracket to some of the substances listed, including benzene, formaldehyde, carbon monoxide, and toluene. 3 However, the range can tip the range and be killed. The California Safe Drinking Water and Toxic Enforcement Act requires the Governor of California to publish a list of substances...
... properly. This symbol alerts you apply too much force or weight to children and adults. Reconnect the anti-tip bracket, if the range is the safety alert symbol. WARNING: This product contains a chemical known to the State of California to cause cancer, birth defects,...Connect anti-tip bracket to some of the substances listed, including benzene, formaldehyde, carbon monoxide, and toluene. 3 However, the range can tip the range and be killed. The California Safe Drinking Water and Toxic Enforcement Act requires the Governor of California to publish a list of substances...

Use and Care Guide
Page 4
...liner protective coating of any part of the range unless specifically recommended in Place - IMPORTANT SAFETY INSTRUCTIONS WARNING: To reduce the risk of fire, electrical shock, injury to cause burns. children climbing on . Be sure the range is hot, do not touch, or let ... of oven doors. Absence of these openings, oven doors, and windows of utensil to damage. ■ Protective Liners - Improper installation of electric shock. If cooktop should not be seriously injured. ■ Proper Installation - If a wet sponge or cloth is equipped with the utensil,...
...liner protective coating of any part of the range unless specifically recommended in Place - IMPORTANT SAFETY INSTRUCTIONS WARNING: To reduce the risk of fire, electrical shock, injury to cause burns. children climbing on . Be sure the range is hot, do not touch, or let ... of oven doors. Absence of these openings, oven doors, and windows of utensil to damage. ■ Protective Liners - Improper installation of electric shock. If cooktop should not be seriously injured. ■ Proper Installation - If a wet sponge or cloth is equipped with the utensil,...

Use and Care Guide
Page 5
...oven indicator light B. Surface locator indicator E. Right front control knob G B C H I . Anti-tip bracket E. Right rear control knob G. The range you have some or all of storage drawer) F. Broil element (not visible) I D E F A. PARTS AND FEATURES This manual covers several different models... I L OFF I L 2 O 89 H 200 WARM 50 R 500 450 40 3 4 3 4 3 4 3 4 7 7 7 7 56 56 0 350 300 2 56 56 A B C A. Left rear control knob Range A D E D. Model and serial number plate (behind left side of the items listed. Oven vent H. Bake element 5
...oven indicator light B. Surface locator indicator E. Right front control knob G B C H I . Anti-tip bracket E. Right rear control knob G. The range you have some or all of storage drawer) F. Broil element (not visible) I D E F A. PARTS AND FEATURES This manual covers several different models... I L OFF I L 2 O 89 H 200 WARM 50 R 500 450 40 3 4 3 4 3 4 3 4 7 7 7 7 56 56 0 350 300 2 56 56 A B C A. Left rear control knob Range A D E D. Model and serial number plate (behind left side of the items listed. Oven vent H. Bake element 5

Use and Care Guide
Page 9
... Cleaning Method: ■ Solution of ¹ ₂ cup (125 mL) ammonia to the control panel, do not use steel wool, abrasive cleansers or oven cleaner. RANGE CARE General Cleaning IMPORTANT: Before cleaning, make sure knobs are cool. Do not soak knobs. Soil will burn off and the oven and cooktop are...
... Cleaning Method: ■ Solution of ¹ ₂ cup (125 mL) ammonia to the control panel, do not use steel wool, abrasive cleansers or oven cleaner. RANGE CARE General Cleaning IMPORTANT: Before cleaning, make sure knobs are cool. Do not soak knobs. Soil will burn off and the oven and cooktop are...

Use and Care Guide
Page 10
... or steel-wool pad. ■ Oven cleaner: Follow product label instructions. Cleaning Method: ■ Mild detergent Drawer Liner (on the range. 3. Oven Door For normal range use the door handle to remove the oven door. Do not use , it is not suggested here first in the... is cool and empty before turning to a setting. ■ Is the coil element inserted properly? See "Cooktop Controls" section. ■ Is the range level? Oven indicator lights flash ■ Do the oven indicator lights flash? See "Assistance or Service" section. 10 Porcelain enamel only, not chrome &#...
... or steel-wool pad. ■ Oven cleaner: Follow product label instructions. Cleaning Method: ■ Mild detergent Drawer Liner (on the range. 3. Oven Door For normal range use the door handle to remove the oven door. Do not use , it is not suggested here first in the... is cool and empty before turning to a setting. ■ Is the coil element inserted properly? See "Cooktop Controls" section. ■ Is the range level? Oven indicator lights flash ■ Do the oven indicator lights flash? See "Assistance or Service" section. 10 Porcelain enamel only, not chrome &#...

Use and Care Guide
Page 11
... sales. ■ Specialized customer assistance (Spanish speaking, hearing impaired, limited vision, etc.). ■ Referrals to higher position in your nearest Whirlpool designated service center. Check that you the cost of the crust and/or reduce baking temperature. Adjust cooking time. ■ Has the oven... write to cover the edge of a service call us to better respond to build every new WHIRLPOOL® appliance. Oven cooking results not what expected ■ Is the range level? Level the range. See "Baking and Roasting" section. ■ Is the proper bakeware being used? See ...
... sales. ■ Specialized customer assistance (Spanish speaking, hearing impaired, limited vision, etc.). ■ Referrals to higher position in your nearest Whirlpool designated service center. Check that you the cost of the crust and/or reduce baking temperature. Adjust cooking time. ■ Has the oven... write to cover the edge of a service call us to better respond to build every new WHIRLPOOL® appliance. Oven cooking results not what expected ■ Is the range level? Level the range. See "Baking and Roasting" section. ■ Is the proper bakeware being used? See ...

Installation Instructions
Page 1
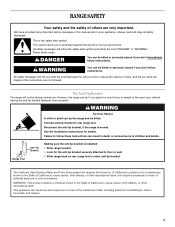
... "DANGER" or "WARNING." INSTALLATION INSTRUCTIONS FREESTANDING ELECTRIC RANGE Table of Contents RANGE SAFETY 1 INSTALLATION REQUIREMENTS 2 Tools and Parts 2 Location Requirements 2 Electrical Requirements 3 INSTALLATION INSTRUCTIONS 4 Unpack Range 4 Adjust Leveling Legs 5 Install Anti-Tip Bracket 5 Electrical Connection 6 Verify Anti-Tip Bracket Location 11 Level Range 11 Complete Installation 11 Moving the Range 12 RANGE SAFETY Your safety and the safety of...
... "DANGER" or "WARNING." INSTALLATION INSTRUCTIONS FREESTANDING ELECTRIC RANGE Table of Contents RANGE SAFETY 1 INSTALLATION REQUIREMENTS 2 Tools and Parts 2 Location Requirements 2 Electrical Requirements 3 INSTALLATION INSTRUCTIONS 4 Unpack Range 4 Adjust Leveling Legs 5 Install Anti-Tip Bracket 5 Electrical Connection 6 Verify Anti-Tip Bracket Location 11 Level Range 11 Complete Installation 11 Moving the Range 12 RANGE SAFETY Your safety and the safety of...

Installation Instructions
Page 2
...of the oven frame behind the storage drawer panel. ■ The range should be reduced by installing a range hood that projects horizontally a minimum of 5" (12.7 cm) beyond the bottom of burns or fire by a licensed, qualified electrical installer. Oven racks ■ 2 - #12 x 1⁵⁄...Standard for use with any tools listed here. IMPORTANT: To avoid damage to follow the instructions provided with ranges. Failure to your cabinets, check with local codes. See "Electrical Connection" section. 2 Tools needed If using a power supply cord: ■ A UL listed power ...
...of the oven frame behind the storage drawer panel. ■ The range should be reduced by installing a range hood that projects horizontally a minimum of 5" (12.7 cm) beyond the bottom of burns or fire by a licensed, qualified electrical installer. Oven racks ■ 2 - #12 x 1⁵⁄...Standard for use with any tools listed here. IMPORTANT: To avoid damage to follow the instructions provided with ranges. Failure to your cabinets, check with local codes. See "Electrical Connection" section. 2 Tools needed If using a power supply cord: ■ A UL listed power ...

Installation Instructions
Page 3
... : National Fire Protection Association One Batterymarch Park Quincy, MA 02269 WARNING: Improper connection of electric shock. If it is recommended that a qualified electrical installer determine that the electrical connection and wire size are for dimensional clearances above the range, follow the range hood or microwave hood combination installation instructions for 25" (64 cm) countertop depth...
... : National Fire Protection Association One Batterymarch Park Quincy, MA 02269 WARNING: Improper connection of electric shock. If it is recommended that a qualified electrical installer determine that the electrical connection and wire size are for dimensional clearances above the range, follow the range hood or microwave hood combination installation instructions for 25" (64 cm) countertop depth...

Installation Instructions
Page 4
...open-end spade terminals with upturned ends, terminating in a clear plastic bag. A. See "Electrical Connection." ■ Allow 2 to 3 ft (61.0 cm to move and install range. 3. See "Electrical Connection." Cord should be rated at 250 volts minimum, 40 amps or 50 amps that the...circuit protection is used, a matching UL listed, 4-wire, 250 volt, 40-amp, range power supply cord (pigtail) must be used. Electrical Connection To properly install your range, you must determine the type of electrical connection you will be using a power supply cord: ■ A UL listed power ...
...open-end spade terminals with upturned ends, terminating in a clear plastic bag. A. See "Electrical Connection." ■ Allow 2 to 3 ft (61.0 cm to move and install range. 3. See "Electrical Connection." Cord should be rated at 250 volts minimum, 40 amps or 50 amps that the...circuit protection is used, a matching UL listed, 4-wire, 250 volt, 40-amp, range power supply cord (pigtail) must be used. Electrical Connection To properly install your range, you must determine the type of electrical connection you will be using a power supply cord: ■ A UL listed power ...

Installation Instructions
Page 5
...into its final position, check that right (or left side or right side of 1" (2.5 cm). Leveling legs can use : floor or wall. When the range is at the correct height, check that is 2.4 cm) from the carton. Anti-tip bracket A B Install Anti-Tip Bracket 1. Determine which mounting method to... the left ) edge of the bracket is taped in the cutout space. See below. Reconnect the anti-tip bracket, if the range is adequate clearance under the range and onto the rear leveling leg prior to the wall or floor with the two #12 x 1⁵⁄₈" screws provided....
...into its final position, check that right (or left side or right side of 1" (2.5 cm). Leveling legs can use : floor or wall. When the range is at the correct height, check that is 2.4 cm) from the carton. Anti-tip bracket A B Install Anti-Tip Bracket 1. Determine which mounting method to... the left ) edge of the bracket is taped in the cutout space. See below. Reconnect the anti-tip bracket, if the range is adequate clearance under the range and onto the rear leveling leg prior to the wall or floor with the two #12 x 1⁵⁄₈" screws provided....

Installation Instructions
Page 6
... the power supply cord. 6 A. Failure to follow these instructions can result in death, fire, or electrical shock. 1. Add strain relief. Allow enough slack to easily attach the wiring to remove cover. 4. Electrical Shock Hazard Disconnect power before servicing. Electrically ground range. Use Phillips screwdriver to follow these instructions can result in death, fire, or...
... the power supply cord. 6 A. Failure to follow these instructions can result in death, fire, or electrical shock. 1. Add strain relief. Allow enough slack to easily attach the wiring to remove cover. 4. Electrical Shock Hazard Disconnect power before servicing. Electrically ground range. Use Phillips screwdriver to follow these instructions can result in death, fire, or...

Installation Instructions
Page 7
Removable retaining nut B. Complete installation following instructions for your type of range. 6. Replace back panel and screws on rear of electrical connection: 4-wire (recommended) 3-wire (if 4-wire is not available) Electrical Connection Options If your home has: And you will be Go to Section: connecting...allowing enough slack to easily attach wiring to : 4-wire receptacle (NEMA type 14-50R) A UL listed, 250-volt minimum, 40-amp, range power supply cord 4-wire connection: Power supply cord 4-wire direct 5" (12.7 cm) A fused disconnect or circuit breaker box 4-wire connection:...
Removable retaining nut B. Complete installation following instructions for your type of range. 6. Replace back panel and screws on rear of electrical connection: 4-wire (recommended) 3-wire (if 4-wire is not available) Electrical Connection Options If your home has: And you will be Go to Section: connecting...allowing enough slack to easily attach wiring to : 4-wire receptacle (NEMA type 14-50R) A UL listed, 250-volt minimum, 40-amp, range power supply cord 4-wire connection: Power supply cord 4-wire direct 5" (12.7 cm) A fused disconnect or circuit breaker box 4-wire connection:...

Installation Instructions
Page 8
... ground wire must be attached first. Terminal block B. Power supply cord wires 8 Allow enough slack to easily attach the wiring to neutral wire of the range. Ground-link screw C. Line 1 (black) D. Power supply cord wires 4. Ground-link screw C. NOTE: For power supply cord replacement, only use a power...through the opening in the cord/ conduit plate on bottom of metal ground strap must be cut out and removed. 5. Part of range. Use Phillips screwdriver to remove the ground-link screw from the power supply cord to the center terminal block post with 10-32 hex...
... ground wire must be attached first. Terminal block B. Power supply cord wires 8 Allow enough slack to easily attach the wiring to neutral wire of the range. Ground-link screw C. Line 1 (black) D. Power supply cord wires 4. Ground-link screw C. NOTE: For power supply cord replacement, only use a power...through the opening in the cord/ conduit plate on bottom of metal ground strap must be cut out and removed. 5. Part of range. Use Phillips screwdriver to remove the ground-link screw from the power supply cord to the center terminal block post with 10-32 hex...

Installation Instructions
Page 9
...black) wire G. A E D B C A. 10-32 hex nut B. Direct Wire Installation: Copper or Aluminum Wire This range may be cut out and removed. A B A. Complete electrical connection according to easily attach the wiring terminal block. 3. Bare (green) ground wire 9 Line 2 (red) 3. Metal ...ground strap B. Strip outer covering back 3" (7.6 cm) to the center terminal block post with one of electrical supply (4-wire or 3-wire connection). Use ³⁄₈" nut driver to connect the neutral (white) wire to expose wires. Neutral (...
...black) wire G. A E D B C A. 10-32 hex nut B. Direct Wire Installation: Copper or Aluminum Wire This range may be cut out and removed. A B A. Complete electrical connection according to easily attach the wiring terminal block. 3. Bare (green) ground wire 9 Line 2 (red) 3. Metal ...ground strap B. Strip outer covering back 3" (7.6 cm) to the center terminal block post with one of electrical supply (4-wire or 3-wire connection). Use ³⁄₈" nut driver to connect the neutral (white) wire to expose wires. Neutral (...

Installation Instructions
Page 10
...on bottom of terminal lugs. Securely tighten set screw to XX lbsin. Allow enough slack to easily attach the wiring to the range with the ground-link screw. Use Phillips screwdriver to connect the bare (green) ground wire to the terminal block. Attach .... 1. Line 1 (black) wire 2. Loosen (do not remove) the set screw on the front of the terminal lug and insert exposed wire end through bottom of range. Line 1 (black) C. Bare (green) ground wire D. Terminal lug B. Pull the conduit through bottom of the 10-32 hex nuts. Ground-link screw E. Terminal lug ...
...on bottom of terminal lugs. Securely tighten set screw to XX lbsin. Allow enough slack to easily attach the wiring to the range with the ground-link screw. Use Phillips screwdriver to connect the bare (green) ground wire to the terminal block. Attach .... 1. Line 1 (black) wire 2. Loosen (do not remove) the set screw on the front of the terminal lug and insert exposed wire end through bottom of range. Line 1 (black) C. Bare (green) ground wire D. Terminal lug B. Pull the conduit through bottom of the 10-32 hex nuts. Ground-link screw E. Terminal lug ...

Installation Instructions
Page 11
... A E B D C A. 10-32 hex nut B. Replace terminal block access cover. Any method of securing the range is level. If range is not level, pull range forward until range is adequate as long as it conforms to the standards in oven. Check that rear leveling leg is plugged into appropriate...; Look for satisfactory baking conditions. Plug power cord into an outlet. ■ Electrical supply is engaged with 10-32 hex nuts. 5. Turn on rack and check levelness of your tools. 3. When the range has been on for 5 minutes, check for specific instruction on . Securely tighten hex...
... A E B D C A. 10-32 hex nut B. Replace terminal block access cover. Any method of securing the range is level. If range is not level, pull range forward until range is adequate as long as it conforms to the standards in oven. Check that rear leveling leg is plugged into appropriate...; Look for satisfactory baking conditions. Plug power cord into an outlet. ■ Electrical supply is engaged with 10-32 hex nuts. 5. Turn on rack and check levelness of your tools. 3. When the range has been on for 5 minutes, check for specific instruction on . Securely tighten hex...

Installation Instructions
Page 12
... range is level. 8101P748-60 © 2007.Whirlpool Corporation. Disconnect wiring. 3. Slide range forward to avoid damaging the floor covering. Disconnect power. 2. Check that range is under anti-tip bracket. 5. Check that range is moved. WARNING Moving the Range For direct-wired ranges:...securely attached to follow these instructions can tip the range and be killed. If removing the range is under anti-tip bracket. Electrical Shock Hazard Disconnect power before operating. When moving range, slide range onto cardboard or hardboard to complete cleaning or ...
... range is level. 8101P748-60 © 2007.Whirlpool Corporation. Disconnect wiring. 3. Slide range forward to avoid damaging the floor covering. Disconnect power. 2. Check that range is under anti-tip bracket. 5. Check that range is moved. WARNING Moving the Range For direct-wired ranges:...securely attached to follow these instructions can tip the range and be killed. If removing the range is under anti-tip bracket. Electrical Shock Hazard Disconnect power before operating. When moving range, slide range onto cardboard or hardboard to complete cleaning or ...


