
Dimensions
Page 1
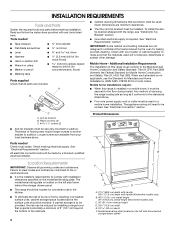
... cm) depth CABINET OPENING DIMENSIONS C EE D B F A G H A. 4" (10.2 cm) min. upper cabinet depth D. 30" (76.2 cm) min. Because Whirlpool Corporation policy includes a continuous commitment to 22" (55.9 cm) from floor H 2.2 cm) min. C E D A. 27¹⁄₈" (68.9 cm) depth ... and the bottom of the line. For complete details, see NOTE*. ® 30" Freestanding Electric Range PRODUCT MODEL NUMBERS GR516LXS GR563LXS GR673LXS GR773LXS RF110AXS RF111PXS RF114PXS RF212PXS RF260BXS RF261PXS RF262LXS RF263LXT RF264LXS RF265LXT RF362LXS RF362LXT RF367LXS RF462LXS OVERALL ...
... cm) depth CABINET OPENING DIMENSIONS C EE D B F A G H A. 4" (10.2 cm) min. upper cabinet depth D. 30" (76.2 cm) min. Because Whirlpool Corporation policy includes a continuous commitment to 22" (55.9 cm) from floor H 2.2 cm) min. C E D A. 27¹⁄₈" (68.9 cm) depth ... and the bottom of the line. For complete details, see NOTE*. ® 30" Freestanding Electric Range PRODUCT MODEL NUMBERS GR516LXS GR563LXS GR673LXS GR773LXS RF110AXS RF111PXS RF114PXS RF212PXS RF260BXS RF261PXS RF262LXS RF263LXT RF264LXS RF265LXT RF362LXS RF362LXT RF367LXS RF462LXS OVERALL ...
Installation Instructions
Page 2
... existing electrical supply. All electrical connections should be reduced by the oven for Manufactured Home Installations, ANSI A225.1/NFPA 501A or local codes. The model/serial rating plate is the installer's responsibility to the floor during transit. F C E D A. 27¹⁄₈" (68.9 cm)...with your local hardware store. Check with any tools listed here. Longer screws are shown must be revised. Model/serial rating plate (located on the model/serial rating plate. If cabinet storage is installed in a mobile home installation. Any method of this range is...
... existing electrical supply. All electrical connections should be reduced by the oven for Manufactured Home Installations, ANSI A225.1/NFPA 501A or local codes. The model/serial rating plate is the installer's responsibility to the floor during transit. F C E D A. 27¹⁄₈" (68.9 cm)...with your local hardware store. Check with any tools listed here. Longer screws are shown must be revised. Model/serial rating plate (located on the model/serial rating plate. If cabinet storage is installed in a mobile home installation. Any method of this range is...
Installation Instructions
Page 3
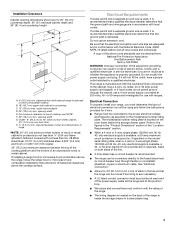
... for it is recommended that a qualified electrical installer determine that the ground path is ever necessary. This range is required), fused on the model/serial number rating plate. or 50-amps and investigated for 25" (64 cm) countertop depth, 24" (61 cm) base cabinet depth and... 36" (91.4 cm) countertop height. Electrical Connection To properly install your range, you must conform with ranges. The model/serial number rating plate is available, a 40- or 50-amp maximum circuit protection is manufactured with the National Electrical Code, ANSI/ NFPA 70-...
... for it is recommended that a qualified electrical installer determine that the ground path is ever necessary. This range is required), fused on the model/serial number rating plate. or 50-amps and investigated for 25" (64 cm) countertop depth, 24" (61 cm) base cabinet depth and... 36" (91.4 cm) countertop height. Electrical Connection To properly install your range, you must conform with ranges. The model/serial number rating plate is available, a 40- or 50-amp maximum circuit protection is manufactured with the National Electrical Code, ANSI/ NFPA 70-...
Installation Instructions
Page 9
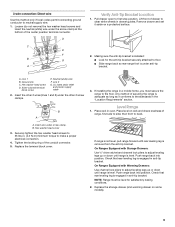
... down until range is engaged in . (4.0 N-m) minimum torque to the floor. Check that rear leveling leg is adequate as long as it aside on some models). 9 3-wire connection: Direct wire Use this method only if local codes permit connecting ground conductor to side; Remove drawer and set it conforms to floor...
... down until range is engaged in . (4.0 N-m) minimum torque to the floor. Check that rear leveling leg is adequate as long as it aside on some models). 9 3-wire connection: Direct wire Use this method only if local codes permit connecting ground conductor to side; Remove drawer and set it conforms to floor...
Use and Care Guide
Page 2
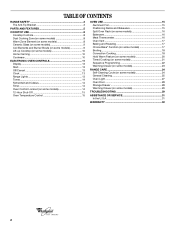
...AND FEATURES 5 COOKTOP USE 8 Cooktop Controls 8 Dual Cooking Zone (on some models 8 Warm Zone Element (on some models 8 Ceramic Glass (on some models 9 Coil Elements and Burner Bowls (on some models 9 Lift-up Cooktop (on some models 10 Home Canning 10 Cookware 10 ELECTRONIC OVEN CONTROLS 11 Display 13 Start 13 Off.../Cancel 13 Clock 13 Range Lights 13 Tones 14 Fahrenheit and Celsius 14 Timer 14 Oven Control Lockout (on some models 14 12-Hour Shut-Off 15 Oven Temperature Control 15 OVEN USE 15 Aluminum Foil 15 Positioning Racks and Bakeware 15 Split Oven Rack...
...AND FEATURES 5 COOKTOP USE 8 Cooktop Controls 8 Dual Cooking Zone (on some models 8 Warm Zone Element (on some models 8 Ceramic Glass (on some models 9 Coil Elements and Burner Bowls (on some models 9 Lift-up Cooktop (on some models 10 Home Canning 10 Cookware 10 ELECTRONIC OVEN CONTROLS 11 Display 13 Start 13 Off.../Cancel 13 Clock 13 Range Lights 13 Tones 14 Fahrenheit and Celsius 14 Timer 14 Oven Control Lockout (on some models 14 12-Hour Shut-Off 15 Oven Temperature Control 15 OVEN USE 15 Aluminum Foil 15 Positioning Racks and Bakeware 15 Split Oven Rack...

Use and Care Guide
Page 5
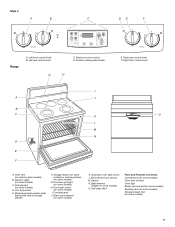
... F G A. Right rear control knob F. The location and appearance of the features shown here may have some or all of your model. Electronic oven control D. PARTS AND FEATURES This manual covers several different models. Left rear control knob C. Right front control knob H. Warm zone button 5 Surface cooking area locator H G. The range you have...
... F G A. Right rear control knob F. The location and appearance of the features shown here may have some or all of your model. Electronic oven control D. PARTS AND FEATURES This manual covers several different models. Left rear control knob C. Right front control knob H. Warm zone button 5 Surface cooking area locator H G. The range you have...
Use and Care Guide
Page 7
... area locator H E Right rear control knob F. Dual element (on some models) D. Console night light (on some models) H. Gasket N. Model and serial number plate (behind left side of storage drawer) F. Storage drawer (on some models) or warming drawer (on some models) G. Warm zone element (on some models) K. Right front control knob I . Anti-tip bracket E. Console panel J. Automatic...
... area locator H E Right rear control knob F. Dual element (on some models) D. Console night light (on some models) H. Gasket N. Model and serial number plate (behind left side of storage drawer) F. Storage drawer (on some models) or warming drawer (on some models) G. Warm zone element (on some models) K. Right front control knob I . Anti-tip bracket E. Console panel J. Automatic...

Use and Care Guide
Page 8
... boil. The Warm Zone element can result in and turn the left front control knob counterclockwise to maintain food quality. Warm Zone Element (on some models) WARNING Food Poisoning Hazard Do not let food sit for larger size cookware. Single size (6" [15.24 cm]) B. Dual size (9" [22.... liquid to keep cooked foods warm. Doing so can be set to heat cold foods. COOKTOP USE Cooktop Controls WARNING Dual Cooking Zone (on some models) A B Fire Hazard Turn off ) when finished. Medium High Between MEDIUM and HI ■ Hold a rapid boil. ■ Quickly brown or sear ...
... boil. The Warm Zone element can result in and turn the left front control knob counterclockwise to maintain food quality. Warm Zone Element (on some models) WARNING Food Poisoning Hazard Do not let food sit for larger size cookware. Single size (6" [15.24 cm]) B. Dual size (9" [22.... liquid to keep cooked foods warm. Doing so can be set to heat cold foods. COOKTOP USE Cooktop Controls WARNING Dual Cooking Zone (on some models) A B Fire Hazard Turn off ) when finished. Medium High Between MEDIUM and HI ■ Hold a rapid boil. ■ Quickly brown or sear ...
Use and Care Guide
Page 9
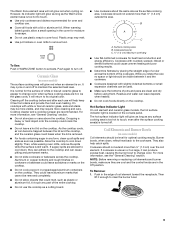
... entire cooktop. ■ Do not use will return to clear the burner bowl. 9 B A C A. Coil Elements and Burner Bowls (on some models) The surface cooking area will not glow red when cycling on. Cookware should be removed completely. ■ Do not allow a small opening in any...wrap may require more information, see "General Cleaning" section. ■ Do not store jars or cans above the cooktop. Ceramic Glass (on some models) Coil elements should not extend more than ½" (1.3 cm) outside the area. For more information, see the "General Cleaning" section. Allow the...
... entire cooktop. ■ Do not use will return to clear the burner bowl. 9 B A C A. Coil Elements and Burner Bowls (on some models) The surface cooking area will not glow red when cycling on. Cookware should be removed completely. ■ Do not allow a small opening in any...wrap may require more information, see "General Cleaning" section. ■ Do not store jars or cans above the cooktop. Ceramic Glass (on some models) Coil elements should not extend more than ½" (1.3 cm) outside the area. For more information, see the "General Cleaning" section. Allow the...
Use and Care Guide
Page 10
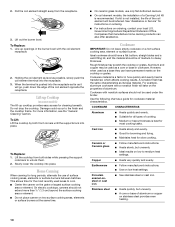
...pushed into the receptacle. 3. See "Assistance or Service" for long periods, alternate the use only flat-bottomed canners. ■ On coil element models, the installation of medium-to-heavy thickness. Cookware IMPORTANT: Do not leave empty cookware on low heat settings. Use the following chart as its ... the properties of aluminum or copper on two surface cooking areas, elements or surface burners at the same time. ■ On ceramic glass models, use of the coil element will be used areas to the finish and the cooktop frame. Copper ■ Heats very quickly and evenly....
...pushed into the receptacle. 3. See "Assistance or Service" for long periods, alternate the use only flat-bottomed canners. ■ On coil element models, the installation of medium-to-heavy thickness. Cookware IMPORTANT: Do not leave empty cookware on low heat settings. Use the following chart as its ... the properties of aluminum or copper on two surface cooking areas, elements or surface burners at the same time. ■ On ceramic glass models, use of the coil element will be used areas to the finish and the cooktop frame. Copper ■ Heats very quickly and evenly....
Use and Care Guide
Page 11
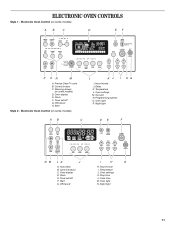
...cancel H. Hour/minute J. Oven display D. Timer set /off F. Start Style 2 - Electronic Oven Control (on some models) D. Programming options O. Control lockout C. Start G. Oven settings K. Warming drawer (on some models) AB C D EF BROIL CONVECT REVIEW CHOICE BAKE WARM PROGRAM STEP 1 2 3 4 SET TIMER DELAY MIN HR...HG AB C DE F NM LK J A. Temperature L. Clock E. Stop time L. Control lockout C. Clock F. Electronic Oven Control (on some models) L KJ I I. Hour/minute I H G H. ELECTRONIC OVEN CONTROLS Style 1 - Cook time M.
...cancel H. Hour/minute J. Oven display D. Timer set /off F. Start Style 2 - Electronic Oven Control (on some models) D. Programming options O. Control lockout C. Start G. Oven settings K. Warming drawer (on some models) AB C D EF BROIL CONVECT REVIEW CHOICE BAKE WARM PROGRAM STEP 1 2 3 4 SET TIMER DELAY MIN HR...HG AB C DE F NM LK J A. Temperature L. Clock E. Stop time L. Control lockout C. Clock F. Electronic Oven Control (on some models) L KJ I I. Hour/minute I H G H. ELECTRONIC OVEN CONTROLS Style 1 - Cook time M.

Use and Care Guide
Page 12
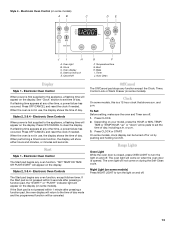
Oven display D. Oven light B. Clock E. Start H. Cancel/off F. Temperature/time G. Off/cancel I . Temperature/time I HG F G. Cook time 12 Start time C. Clock C. Start E. Electronic Oven Controls (on some models) B. Timer AB C DE K J A. Style 3 - Oven light (Convect on some models) J. Oven settings H. Timer set/off F F. Control lockout I H G A. Auto clean (on some models) AB C DE J I . Oven display D. Oven settings J. Control lockout K.
Oven display D. Oven light B. Clock E. Start H. Cancel/off F. Temperature/time G. Off/cancel I . Temperature/time I HG F G. Cook time 12 Start time C. Clock C. Start E. Electronic Oven Controls (on some models) B. Timer AB C DE K J A. Style 3 - Oven light (Convect on some models) J. Oven settings H. Timer set/off F F. Control lockout I H G A. Auto clean (on some models) AB C DE J I . Oven display D. Oven settings J. Control lockout K.
Use and Care Guide
Page 13
... The Start pad begins any other time, a power failure has occurred. Broil H. and p.m. Start/control lock E. Electronic Oven Control (on some models). Cancel/off . 1. If a flashing time appears at any oven function, except kitchen timer. When the oven is a 12-hour clock that shows... a.m. indicator light will appear on some models). or p.m. 3. Bake I H A. Electronic Oven Control The Start pad begins any other time, a power failure has occurred. Press OFF/CANCEL...
... The Start pad begins any other time, a power failure has occurred. Broil H. and p.m. Start/control lock E. Electronic Oven Control (on some models). Cancel/off . 1. If a flashing time appears at any oven function, except kitchen timer. When the oven is a 12-hour clock that shows... a.m. indicator light will appear on some models). or p.m. 3. Bake I H A. Electronic Oven Control The Start pad begins any other time, a power failure has occurred. Press OFF/CANCEL...

Use and Care Guide
Page 14
...Basic Functions One tone ■ Valid pad press ■ Oven is preheating (long tone) ■ Function has been entered ■ Reminder (on your model). "On" or "Off" will be displayed in the scrolling text. Volume: The tone volume can be displayed in hours or minutes up to 12 hours... taken after the end-of-cycle tones Three tones ■ Invalid pad press Four tones ■ End of Cycle Tone can be turned on some models), repeating each minute after 1 minute, the display will turn off . Style 1 - Repeat to change : Press and hold PRECISE CLEAN for 5 seconds. Timer...
...Basic Functions One tone ■ Valid pad press ■ Oven is preheating (long tone) ■ Function has been entered ■ Reminder (on your model). "On" or "Off" will be displayed in the scrolling text. Volume: The tone volume can be displayed in hours or minutes up to 12 hours... taken after the end-of-cycle tones Three tones ■ Invalid pad press Four tones ■ End of Cycle Tone can be turned on some models), repeating each minute after 1 minute, the display will turn off . Style 1 - Repeat to change : Press and hold PRECISE CLEAN for 5 seconds. Timer...

Use and Care Guide
Page 16
... Light golden crusts ■ Even browning Use temperature and time recommended in 2 or 3 different places. 16 Rear rack section B. Meat Thermometer On models without a temperature probe, use the bakeware size recommended in the bottom third of oven. ■ May need to order. A meat thermometer is... not supplied with removable insert is directly over another. Split Oven Rack (on some models) Split-Rack with Removable Insert The split-rack with this appliance. ■ Insert the thermometer into the meat ½" (1.3 cm) more...
... Light golden crusts ■ Even browning Use temperature and time recommended in 2 or 3 different places. 16 Rear rack section B. Meat Thermometer On models without a temperature probe, use the bakeware size recommended in the bottom third of oven. ■ May need to order. A meat thermometer is... not supplied with removable insert is directly over another. Split Oven Rack (on some models) Split-Rack with Removable Insert The split-rack with this appliance. ■ Insert the thermometer into the meat ½" (1.3 cm) more...
Use and Care Guide
Page 17
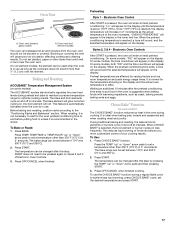
... temperatures are affected by pressing the TEMP "up " or "down " arrow pads and then pressing START. 3. Choice Bake® Function (on some models, "PrE" will appear on and off in use the CHOICE BAKE® function during preheat and bake to achieve less top browning, press CHOICE BAKE...is automatically activated when the oven is recommended in use as long as the actual temperature of Electronic Oven Controls. 3. On some models) The ACCUBAKE® system electronically regulates the oven heat levels during a regular Bake cycle to maintain a precise temperature range for ...
... temperatures are affected by pressing the TEMP "up " or "down " arrow pads and then pressing START. 3. Choice Bake® Function (on some models, "PrE" will appear on and off in use the CHOICE BAKE® function during preheat and bake to achieve less top browning, press CHOICE BAKE...is automatically activated when the oven is recommended in use as long as the actual temperature of Electronic Oven Controls. 3. On some models) The ACCUBAKE® system electronically regulates the oven heat levels during a regular Bake cycle to maintain a precise temperature range for ...

Use and Care Guide
Page 18
... allows more consistently throughout the oven. Before broiling, position rack according to cook food. To Broil: 1. To Custom Broil (on some models): 1. The broil range can be cooked by penetrating the cooler outer surfaces. Press OFF/CANCEL when finished. Recommended rack positions are guidelines ... BROIL. 2. Food cooks more food at lower broiling temperatures. ■ For best results, use a broiler pan and grid (provided on some models). Close the door to drain juices and help avoid spatter and smoke. If you can be set between 300°F and 525°F (150...
... allows more consistently throughout the oven. Before broiling, position rack according to cook food. To Broil: 1. To Custom Broil (on some models): 1. The broil range can be cooked by penetrating the cooler outer surfaces. Press OFF/CANCEL when finished. Recommended rack positions are guidelines ... BROIL. 2. Food cooks more food at lower broiling temperatures. ■ For best results, use a broiler pan and grid (provided on some models). Close the door to drain juices and help avoid spatter and smoke. If you can be set between 300°F and 525°F (150...

Use and Care Guide
Page 19
...°C), and scrolling text at the bottom of the oven increases, and it will scroll in the oven cavity. Convection Baking and Roasting (on some models) The convection feature is pressed, the display will turn off . 1. To Use: 1. Press START. 5. At the end of each set between 170°F and 500...
...°C), and scrolling text at the bottom of the oven increases, and it will scroll in the oven cavity. Convection Baking and Roasting (on some models) The convection feature is pressed, the display will turn off . 1. To Use: 1. Press START. 5. At the end of each set between 170°F and 500...

Use and Care Guide
Page 20
... if left in oven more than 170°F (75°C). Press START. 4. INTERNAL FOOD TEMP. per 1 lb [454 g]) OVEN TEMP. Hold Warm Feature (on some models) WARNING Food Poisoning Hazard Do not let food sit in the oven during Hold Warm. Press WARM. 2. per 1 lb [454 g]) OVEN TEMP. Temperature is 170...
... if left in oven more than 170°F (75°C). Press START. 4. INTERNAL FOOD TEMP. per 1 lb [454 g]) OVEN TEMP. Hold Warm Feature (on some models) WARNING Food Poisoning Hazard Do not let food sit in the oven during Hold Warm. Press WARM. 2. per 1 lb [454 g]) OVEN TEMP. Temperature is 170...

Use and Care Guide
Page 21
... time to cook. 5. To Set a Delayed Timed Cook: Before setting, make sure the clock is set at a certain time of day will show on some models) WARNING Food Poisoning Hazard Do not let food sit in food poisoning or sickness. See "Clock" section. 1. Press desired cook function. 2. Set the temperature (optional...
... time to cook. 5. To Set a Delayed Timed Cook: Before setting, make sure the clock is set at a certain time of day will show on some models) WARNING Food Poisoning Hazard Do not let food sit in food poisoning or sickness. See "Clock" section. 1. Press desired cook function. 2. Set the temperature (optional...


