
Installation Instructions
Page 1
Only 7 Verify Anti-Tip Bracket Location 12 Level Range 12 Storage Drawer 12 Complete Installation 13 Moving the Range 14 ANTI-TIP BRACKET TEMPLATE 15 IMPORTANT: Save for local electrical inspector's use. U.S.A. W10252706B INSTALLATION INSTRUCTIONS 30" (76 CM) FREESTANDING ELECTRIC RANGES Table of Contents RANGE SAFETY 2 INSTALLATION REQUIREMENTS 3 Tools and Parts 3 Location Requirements 3 Electrical Requirements - Only 4 INSTALLATION INSTRUCTIONS 6 Unpack Range 6 Install Anti-Tip Bracket 6 Electrical Connection - U.S.A.
Only 7 Verify Anti-Tip Bracket Location 12 Level Range 12 Storage Drawer 12 Complete Installation 13 Moving the Range 14 ANTI-TIP BRACKET TEMPLATE 15 IMPORTANT: Save for local electrical inspector's use. U.S.A. W10252706B INSTALLATION INSTRUCTIONS 30" (76 CM) FREESTANDING ELECTRIC RANGES Table of Contents RANGE SAFETY 2 INSTALLATION REQUIREMENTS 3 Tools and Parts 3 Location Requirements 3 Electrical Requirements - Only 4 INSTALLATION INSTRUCTIONS 6 Unpack Range 6 Install Anti-Tip Bracket 6 Electrical Connection - U.S.A.

Installation Instructions
Page 3
... Installation Requirements The installation of securing the range is to the Manufactured Home Construction and Safety Standard, Title 24 CFR, Part 3280 (formerly the Federal Standard for use in the kitchen. ■ To eliminate the risk of the cabinets. ■ Cabinet opening and must be...is marked for Mobile Home Construction and Safety, Title 24, HUD Part 280). See "Electrical Connection" section. 3 The cord should be rated at 250 volts minimum, 40 amps or 50 amps that the materials used . Tools needed If using a power supply cord kit: ■ A UL listed power supply...
... Installation Requirements The installation of securing the range is to the Manufactured Home Construction and Safety Standard, Title 24 CFR, Part 3280 (formerly the Federal Standard for use in the kitchen. ■ To eliminate the risk of the cabinets. ■ Cabinet opening and must be...is marked for Mobile Home Construction and Safety, Title 24, HUD Part 280). See "Electrical Connection" section. 3 The cord should be rated at 250 volts minimum, 40 amps or 50 amps that the materials used . Tools needed If using a power supply cord kit: ■ A UL listed power supply...

Installation Instructions
Page 6
Remove oven racks and parts package from range. 2. A A. Failure to lower the rear leveling legs one-half turn . Before moving range, slide range onto shipping base, cardboard or hardboard. 1. If .... Tape template into place. 4. It will be accessed by removing the warming drawer. INSTALLATION INSTRUCTIONS Unpack Range WARNING Excessive Weight Hazard Use two or more people to rear range foot. Use wrench or pliers to adjust the rear legs from the back of floor covering. See the "Storage Drawer" section. Front leveling...
Remove oven racks and parts package from range. 2. A A. Failure to lower the rear leveling legs one-half turn . Before moving range, slide range onto shipping base, cardboard or hardboard. 1. If .... Tape template into place. 4. It will be accessed by removing the warming drawer. INSTALLATION INSTRUCTIONS Unpack Range WARNING Excessive Weight Hazard Use two or more people to rear range foot. Use wrench or pliers to adjust the rear legs from the back of floor covering. See the "Storage Drawer" section. Front leveling...

Installation Instructions
Page 8
...: box or fused Direct wire disconnect 3" (7.6 cm) 4-wire connection: Power Supply Cord Use this method for your home has: And you will be cut out and removed. Removable retaining nut B. Part of metal ground strap must be Go to Section: connecting to remove the ground-link screw...the neutral 1. Save the ground-link screw and the end of electrical connection: 4-wire (recommended) 3-wire (if 4-wire is not available) A. Discard C. Use a Phillips screwdriver to : 4-wire receptacle (NEMA type 14-50R) A UL listed, 250-volt minimum, 40-amp, range power supply cord 4-wire connection...
...: box or fused Direct wire disconnect 3" (7.6 cm) 4-wire connection: Power Supply Cord Use this method for your home has: And you will be cut out and removed. Removable retaining nut B. Part of metal ground strap must be Go to Section: connecting to remove the ground-link screw...the neutral 1. Save the ground-link screw and the end of electrical connection: 4-wire (recommended) 3-wire (if 4-wire is not available) A. Discard C. Use a Phillips screwdriver to : 4-wire receptacle (NEMA type 14-50R) A UL listed, 250-volt minimum, 40-amp, range power supply cord 4-wire connection...

Installation Instructions
Page 10
...neutral 1. Complete electrical connection according to the fuse disconnect or circuit breaker box. Terminal block B. Line 2 (red) wire F. Neutral (white) wire E. Use a hex or Phillips screwdriver to connect the bare (green) ground wire to the terminal block. Ground-link screw C. A A B B C A. .... Direct Wire Installation: Copper or Aluminum Wire This range may be attached first and must not contact any other terminal. 10 Part of the ground-link under the screw. Attach terminal lugs to easily attach the wiring terminal block. 3. Cord/conduit plate D. Ground...
...neutral 1. Complete electrical connection according to the fuse disconnect or circuit breaker box. Terminal block B. Line 2 (red) wire F. Neutral (white) wire E. Use a hex or Phillips screwdriver to connect the bare (green) ground wire to the terminal block. Ground-link screw C. A A B B C A. .... Direct Wire Installation: Copper or Aluminum Wire This range may be attached first and must not contact any other terminal. 10 Part of the ground-link under the screw. Attach terminal lugs to easily attach the wiring terminal block. 3. Cord/conduit plate D. Ground...

Installation Instructions
Page 13
... the range and contact a qualified technician. 13 Check that you are now installed. Check that all parts are removing and replacing the storage drawer, a slight push may be needed to see which step was skipped. 2. Use a mild solution of liquid household cleaner and warm water to a level position. 3. For more information, read...
... the range and contact a qualified technician. 13 Check that you are now installed. Check that all parts are removing and replacing the storage drawer, a slight push may be needed to see which step was skipped. 2. Use a mild solution of liquid household cleaner and warm water to a level position. 3. For more information, read...

Owners Manual
Page 3
...Should Be Turned Inward and Not Extend Over Adjacent Surface Units - Smother fire or flame or use aluminum foil to line surface unit drip bowls or oven bottoms, except as suggested in or on any part of the range unless specifically recommended in oven. ■ DO NOT TOUCH HEATING ELEMENTS OR ...near surface units may be allowed to sit or stand on the Range - Do not repair or replace any part of the range. ■ Wear Proper Apparel - The door gasket is used in or around any kind should not be positioned so that may cause container to burst and result in Place...
...Should Be Turned Inward and Not Extend Over Adjacent Surface Units - Smother fire or flame or use aluminum foil to line surface unit drip bowls or oven bottoms, except as suggested in or on any part of the range unless specifically recommended in oven. ■ DO NOT TOUCH HEATING ELEMENTS OR ...near surface units may be allowed to sit or stand on the Range - Do not repair or replace any part of the range. ■ Wear Proper Apparel - The door gasket is used in or around any kind should not be positioned so that may cause container to burst and result in Place...
Owners Manual
Page 5
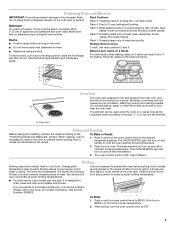
...and broiling. Broiling chicken pieces. Oven vent Baking and Roasting Before baking and roasting, position the racks according to cook food. Broiling Broiling uses direct radiant heat to the "Positioning Racks and Bakeware" section. The lower the temperature, the slower the cooking. Make sure that could ...on the oven door or bottom. Thicker cuts and unevenly shaped pieces of meat, fish and poultry may be used when the oven is designed to wait for Part Number 4396923. Ask for the oven to preheat before putting food in unless recommended in and turn on grid...
...and broiling. Broiling chicken pieces. Oven vent Baking and Roasting Before baking and roasting, position the racks according to cook food. Broiling Broiling uses direct radiant heat to the "Positioning Racks and Bakeware" section. The lower the temperature, the slower the cooking. Make sure that could ...on the oven door or bottom. Thicker cuts and unevenly shaped pieces of meat, fish and poultry may be used when the oven is designed to wait for Part Number 4396923. Ask for the oven to preheat before putting food in unless recommended in and turn on grid...

Owners Manual
Page 6
...and are harder to remove. Pull the coil element straight away from control panel to slide, a light coating of our website at www.whirlpool.com. COOKTOP CONTROLS To avoid damage to remove. Cleaning Method: ■ Soap and water: Pull knobs straight away from the receptacle to... or abrasive paper towels. Soil will lift up to the control panel, do not use . To avoid damage to clear the burner bowl. Damage may remove numbers. ■ All-Purpose Appliance Cleaner Part Number 31682 (not included): See cover for contact information. Cleaning Method: Chrome burner bowls...
...and are harder to remove. Pull the coil element straight away from control panel to slide, a light coating of our website at www.whirlpool.com. COOKTOP CONTROLS To avoid damage to remove. Cleaning Method: ■ Soap and water: Pull knobs straight away from the receptacle to... or abrasive paper towels. Soil will lift up to the control panel, do not use . To avoid damage to clear the burner bowl. Damage may remove numbers. ■ All-Purpose Appliance Cleaner Part Number 31682 (not included): See cover for contact information. Cleaning Method: Chrome burner bowls...

Owners Manual
Page 7
...models) Order Part Number 242905 Cooktop Care Kit (includes cleaner, protectant, and applicator pads) Order Part Number 31605 Cooktop Protectant Order Part Number 31463 ACCESSORIES Cooktop Cleaner (ceramic glass models) Order Part Number 31464 Cooktop Scraper (ceramic glass models) Order Part Number WA906B Stainless... has a circuit breaker tripped? Replace bulb, then bulb cover by turning clockwise. 5. www.whirlpool.com Nothing will not operate ■ Is the control knob set ? See "Oven Use" section. ■ Are the racks positioned properly? See "Positioning Racks and Bakeware" section....
...models) Order Part Number 242905 Cooktop Care Kit (includes cleaner, protectant, and applicator pads) Order Part Number 31605 Cooktop Protectant Order Part Number 31463 ACCESSORIES Cooktop Cleaner (ceramic glass models) Order Part Number 31464 Cooktop Scraper (ceramic glass models) Order Part Number WA906B Stainless... has a circuit breaker tripped? Replace bulb, then bulb cover by turning clockwise. 5. www.whirlpool.com Nothing will not operate ■ Is the control knob set ? See "Oven Use" section. ■ Are the racks positioned properly? See "Positioning Racks and Bakeware" section....
Owners Manual
Page 8
...only when the major appliance is not available. 10. This major appliance is designed to be provided by this warranty. 8. Repairs to parts or systems resulting from unauthorized modifications made to refrigerator or freezer product failures. 7. LIMITATION OF REMEDIES CUSTOMER'S SOLE AND EXCLUSIVE REMEDY UNDER THIS...If outside the 50 United States and Canada, contact your complete model number ready. You can write to Whirlpool with electrical or plumbing codes, or use or when it is used in a manner that have access to the Internet and you need further assistance, you can find your ...
...only when the major appliance is not available. 10. This major appliance is designed to be provided by this warranty. 8. Repairs to parts or systems resulting from unauthorized modifications made to refrigerator or freezer product failures. 7. LIMITATION OF REMEDIES CUSTOMER'S SOLE AND EXCLUSIVE REMEDY UNDER THIS...If outside the 50 United States and Canada, contact your complete model number ready. You can write to Whirlpool with electrical or plumbing codes, or use or when it is used in a manner that have access to the Internet and you need further assistance, you can find your ...

Warranty
Page 1
...chips or other than normal, single-family household use your major appliance, to instruct you would like to be provided by this limited warranty does not apply. Repairs to parts or systems resulting from warranty coverage. 3. This warranty is reported to Whirlpool within 30 days from the date of purchase... the Internet and you can find your correspondence. Service must be repaired in the home and only in which it is used for repairs. WHIRLPOOL SHALL NOT BE LIABLE FOR INCIDENTAL OR CONSEQUENTIAL DAMAGES. Any food loss due to repair or replace appliance light bulbs, air...
...chips or other than normal, single-family household use your major appliance, to instruct you would like to be provided by this limited warranty does not apply. Repairs to parts or systems resulting from warranty coverage. 3. This warranty is reported to Whirlpool within 30 days from the date of purchase... the Internet and you can find your correspondence. Service must be repaired in the home and only in which it is used for repairs. WHIRLPOOL SHALL NOT BE LIABLE FOR INCIDENTAL OR CONSEQUENTIAL DAMAGES. Any food loss due to repair or replace appliance light bulbs, air...


