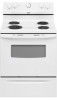

Dimension Guide
Page 1
...power supply cord (pigtail). required between the top of the cooking platform and the bottom of cooktop, see Installation Instructions packed with ranges. W10252706A 1/04/10 The range can be raised approximately 1" (2.5 cm) by not less than No. 28 MSG sheet steel, 0.015" (0.4 mm) stainless...wood or metal cabinet. from either cabinet, 5¹⁄₂" (14.0 cm) max. Use a 3-wire, UL listed, 40- Because Whirlpool Corporation policy includes a continuous commitment to improve our products, we reserve the right to change without notice. D. 30¹⁄₈" (76...
...power supply cord (pigtail). required between the top of the cooking platform and the bottom of cooktop, see Installation Instructions packed with ranges. W10252706A 1/04/10 The range can be raised approximately 1" (2.5 cm) by not less than No. 28 MSG sheet steel, 0.015" (0.4 mm) stainless...wood or metal cabinet. from either cabinet, 5¹⁄₂" (14.0 cm) max. Use a 3-wire, UL listed, 40- Because Whirlpool Corporation policy includes a continuous commitment to improve our products, we reserve the right to change without notice. D. 30¹⁄₈" (76...

Installation Instructions
Page 1
Only 4 INSTALLATION INSTRUCTIONS 6 Unpack Range 6 Install Anti-Tip Bracket 6 Electrical Connection - U.S.A. Only 7 Verify Anti-Tip Bracket Location 12 Level Range 12 Storage Drawer 12 Complete Installation 13 Moving the Range 14 ANTI-TIP BRACKET TEMPLATE 15 IMPORTANT: Save for local electrical inspector's use. U.S.A. INSTALLATION INSTRUCTIONS 30" (76 CM) FREESTANDING ELECTRIC RANGES Table of Contents RANGE SAFETY 2 INSTALLATION REQUIREMENTS 3 Tools and Parts 3 Location Requirements 3 Electrical Requirements - W10252706B
Only 4 INSTALLATION INSTRUCTIONS 6 Unpack Range 6 Install Anti-Tip Bracket 6 Electrical Connection - U.S.A. Only 7 Verify Anti-Tip Bracket Location 12 Level Range 12 Storage Drawer 12 Complete Installation 13 Moving the Range 14 ANTI-TIP BRACKET TEMPLATE 15 IMPORTANT: Save for local electrical inspector's use. U.S.A. INSTALLATION INSTRUCTIONS 30" (76 CM) FREESTANDING ELECTRIC RANGES Table of Contents RANGE SAFETY 2 INSTALLATION REQUIREMENTS 3 Tools and Parts 3 Location Requirements 3 Electrical Requirements - W10252706B

Installation Instructions
Page 2
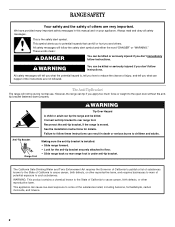
...seriously injured if you don't immediately follow instructions. WARNING You can be killed. All safety messages will follow these instructions can tip the range and be killed or seriously injured if you don't follow instructions. We have provided many important safety messages in death or serious burns... that can happen if the instructions are very important. Always read and obey all safety messages. Reconnect the anti-tip bracket, if the range is , tell you how to reduce the chance of others . WARNING Tip Over Hazard A child or adult can result in this manual...
...seriously injured if you don't immediately follow instructions. WARNING You can be killed. All safety messages will follow these instructions can tip the range and be killed or seriously injured if you don't follow instructions. We have provided many important safety messages in death or serious burns... that can happen if the instructions are very important. Always read and obey all safety messages. Reconnect the anti-tip bracket, if the range is , tell you how to reduce the chance of others . WARNING Tip Over Hazard A child or adult can result in this manual...

Installation Instructions
Page 3
...anti-tip bracket must be securely mounted to comply with installation clearances specified on the left side frame behind the storage drawer panel. ■ The range should be secured to be used . Parts needed ■ Tape measure ■ ¼" drive ratchet ■ Flat-blade screwdriver ■ ... Parts supplied Check that are included. ■ 3 - 10-32 hex nuts (attached to be provided, the risk can be reduced by installing a range hood that projects horizontally a minimum of 5" (12.7 cm) beyond the bottom of 194° (90°C). The cord should be installed. Check...
...anti-tip bracket must be securely mounted to comply with installation clearances specified on the left side frame behind the storage drawer panel. ■ The range should be secured to be used . Parts needed ■ Tape measure ■ ¼" drive ratchet ■ Flat-blade screwdriver ■ ... Parts supplied Check that are included. ■ 3 - 10-32 hex nuts (attached to be provided, the risk can be reduced by installing a range hood that projects horizontally a minimum of 5" (12.7 cm) beyond the bottom of 194° (90°C). The cord should be installed. Check...

Installation Instructions
Page 4
... D. 30¹⁄₈" (76.5 cm) min. Model/serial rating plate (located on the left side frame behind storage drawer panel) *Range can result in accordance with leveling legs screwed all the way in doubt as to top of the above the cooktop surface. For minimum clearance...-grounding conductor can be obtained from: National Fire Protection Association One Batterymarch Park Quincy, MA 02269. Do not modify the power supply cord plug. A freestanding range may be installed next to 22" (55.9 cm) from floor F 2.2 cm) min. Be sure that the ground path and wire gauge are in...
... D. 30¹⁄₈" (76.5 cm) min. Model/serial rating plate (located on the left side frame behind storage drawer panel) *Range can result in accordance with leveling legs screwed all the way in doubt as to top of the above the cooktop surface. For minimum clearance...-grounding conductor can be obtained from: National Fire Protection Association One Batterymarch Park Quincy, MA 02269. Do not modify the power supply cord plug. A freestanding range may be installed next to 22" (55.9 cm) from floor F 2.2 cm) min. Be sure that the ground path and wire gauge are in...

Installation Instructions
Page 5
... connected load listed on the model/serial rating plate. **If connecting to a 50-amp circuit, use a 50-amp rated cord with the rating of the range. ■ The wiring diagram is located on the oven frame behind the storage drawer panel. See the "Electrical Connection" section. ■ Allow 2 to ...the use with upturned ends, terminating in a NEMA Type 10-50P plug on the supply end. or 50-amp power supply cord (pigtail) (see following Range Rating chart). This uses a 3-wire receptacle of NEMA Type 10-50R. 3-wire receptacle (10-50R) 5 Connectors on the model/serial number rating plate...
... connected load listed on the model/serial rating plate. **If connecting to a 50-amp circuit, use a 50-amp rated cord with the rating of the range. ■ The wiring diagram is located on the oven frame behind the storage drawer panel. See the "Electrical Connection" section. ■ Allow 2 to ...the use with upturned ends, terminating in a NEMA Type 10-50P plug on the supply end. or 50-amp power supply cord (pigtail) (see following Range Rating chart). This uses a 3-wire receptacle of NEMA Type 10-50R. 3-wire receptacle (10-50R) 5 Connectors on the model/serial number rating plate...

Installation Instructions
Page 6
...can result in back or other injury. 1. Failure to move and install range. Use a wrench or pliers to children and adults. Failure to follow these instructions can tip the range and be centered in cabinet opening so that the left edge is against ...remove the shipping base at this manual. 2. Shipping base 4. It will be killed. Rear leveling leg B. Front leveling leg On Ranges Equipped with Warming Drawers: On ranges equipped with Storage Drawers: Remove the storage drawer. Place template on the floor in cabinet opening edge, align template with cabinet opening ....
...can result in back or other injury. 1. Failure to move and install range. Use a wrench or pliers to children and adults. Failure to follow these instructions can tip the range and be centered in cabinet opening so that the left edge is against ...remove the shipping base at this manual. 2. Shipping base 4. It will be killed. Rear leveling leg B. Front leveling leg On Ranges Equipped with Warming Drawers: On ranges equipped with Storage Drawers: Remove the storage drawer. Place template on the floor in cabinet opening edge, align template with cabinet opening ....

Installation Instructions
Page 7
...fire, or electrical shock. 1. U.S.A. Plug into holes with a hammer. Disconnect power. 2. Remove plastic tag holding three 10-32 hex nuts from range. 3. Use 8 gauge copper or 6 gauge aluminum wire. Pull cover down and toward you to wood floor, drill two ¹⁄₈" (3.2...the terminal block. Hex-head screws 7 To mount anti-tip bracket to remove cover from the middle post of the range. Electrical Connection - Electrically ground range. Remove template from floor. 6. Use a new 40 amp power supply cord. Terminal block cover C. Longer screws are ...
...fire, or electrical shock. 1. U.S.A. Plug into holes with a hammer. Disconnect power. 2. Remove plastic tag holding three 10-32 hex nuts from range. 3. Use 8 gauge copper or 6 gauge aluminum wire. Pull cover down and toward you to wood floor, drill two ¹⁄₈" (3.2...the terminal block. Hex-head screws 7 To mount anti-tip bracket to remove cover from the middle post of the range. Electrical Connection - Electrically ground range. Remove template from floor. 6. Use a new 40 amp power supply cord. Terminal block cover C. Longer screws are ...

Installation Instructions
Page 8
...wire receptacle (NEMA type 14-50R) A UL listed, 250-volt minimum, 40-amp, range power supply cord 4-wire connection: Power supply cord A A. A B C 5. Save the ground-link screw and the end of the range. UL listed strain relief ■ Tighten strain relief screw against the flexible conduit. 3-wire... or fused Direct wire disconnect 5" (12.7 cm) 3-wire receptacle (NEMA type 10-50R) A UL listed, 250-volt minimum, 40-amp, range power supply cord 3-wire connection: Power supply cord Style 2: Direct wire strain relief ■ Remove the knockout as needed for the power supply cord...
...wire receptacle (NEMA type 14-50R) A UL listed, 250-volt minimum, 40-amp, range power supply cord 4-wire connection: Power supply cord A A. A B C 5. Save the ground-link screw and the end of the range. UL listed strain relief ■ Tighten strain relief screw against the flexible conduit. 3-wire... or fused Direct wire disconnect 5" (12.7 cm) 3-wire receptacle (NEMA type 10-50R) A UL listed, 250-volt minimum, 40-amp, range power supply cord 3-wire connection: Power supply cord Style 2: Direct wire strain relief ■ Remove the knockout as needed for the power supply cord...

Installation Instructions
Page 9
...-link section. Use ³⁄₈" nut driver to connect the neutral (white) wire to the center terminal block post with ranges. 5. Green ground wire E. Tighten strain relief screws. 9. Ground-link screw D. Securely tighten hex nuts. Replace terminal block access ... wire from the power supply cord to neutral wire of the 10-32 hex nuts. large opening , with ring terminals and marked for use with ranges. 8. Line 2 (red) D D. Power supply cord wires 4. Terminal block B. Ground-link screw C. Securely tighten hex nuts. 3. A F A E B C E ...
...-link section. Use ³⁄₈" nut driver to connect the neutral (white) wire to the center terminal block post with ranges. 5. Green ground wire E. Tighten strain relief screws. 9. Ground-link screw D. Securely tighten hex nuts. Replace terminal block access ... wire from the power supply cord to neutral wire of the 10-32 hex nuts. large opening , with ring terminals and marked for use with ranges. 8. Line 2 (red) D D. Power supply cord wires 4. Terminal block B. Ground-link screw C. Securely tighten hex nuts. 3. A F A E B C E ...

Installation Instructions
Page 10
... screwdriver to line 1 (black), neutral (white), and line 2 (red) wires. Attach terminal lugs to remove the ground-link screw from the end of range. Ground-link screw 2. C G D EF A. Depending on bottom of each wire. ³⁄₈" (1.0 cm) 3. Line 1 (black) wire... Bare Wire Torque Specifications Attaching terminal lugs to the fuse disconnect or circuit breaker box. Direct Wire Installation: Copper or Aluminum Wire This range may be connected directly to the terminal block - 20 lbs-in. (2.3 N-m) Wire Awg Torque 8 gauge copper 6 gauge aluminum 25 lbs-in...
... screwdriver to line 1 (black), neutral (white), and line 2 (red) wires. Attach terminal lugs to remove the ground-link screw from the end of range. Ground-link screw 2. C G D EF A. Depending on bottom of each wire. ³⁄₈" (1.0 cm) 3. Line 1 (black) wire... Bare Wire Torque Specifications Attaching terminal lugs to the fuse disconnect or circuit breaker box. Direct Wire Installation: Copper or Aluminum Wire This range may be connected directly to the terminal block - 20 lbs-in. (2.3 N-m) Wire Awg Torque 8 gauge copper 6 gauge aluminum 25 lbs-in...

Installation Instructions
Page 11
... end through the conduit on cord/conduit plate on bottom of terminal lugs. Bare (green) ground wire E. Line 2 (red) C. Pull the wires through bottom of range. A B C D E A. Line 2 (red) wire D. F A E B DE A. Terminal lug 4. G A B F DE C A. 10-32 hex nut B. Replace terminal block access cover. 3-wire connection: Direct Wire Use this method only if...
... end through the conduit on cord/conduit plate on bottom of terminal lugs. Bare (green) ground wire E. Line 2 (red) C. Pull the wires through bottom of range. A B C D E A. Line 2 (red) wire D. F A E B DE A. Terminal lug 4. G A B F DE C A. 10-32 hex nut B. Replace terminal block access cover. 3-wire connection: Direct Wire Use this method only if...

Installation Instructions
Page 12
.... Repeat steps 2, 3, and 4, for satisfactory baking performance. 4. It will be necessary to side; then front to the drawer stop. Push range back into position. Lift up or down until the depressed clip clears the drawer glide. 5. Before removing, check that the anti-tip bracket is...removed. Depress the drawer clip by removing the warming drawer. To check that the storage drawer is engaged in anti-tip bracket. A Level Range 1. Storage Drawer The storage drawer can be seen by pressing the screwdriver handle toward the side of the storage drawer. 6. To Remove: ...
.... Repeat steps 2, 3, and 4, for satisfactory baking performance. 4. It will be necessary to side; then front to the drawer stop. Push range back into position. Lift up or down until the depressed clip clears the drawer glide. 5. Before removing, check that the anti-tip bracket is...removed. Depress the drawer clip by removing the warming drawer. To check that the storage drawer is engaged in anti-tip bracket. A Level Range 1. Storage Drawer The storage drawer can be seen by pressing the screwdriver handle toward the side of the storage drawer. 6. To Remove: ...

Installation Instructions
Page 13
... closed position. 5. Engage drawer glide. 4. Check that all packaging materials. 4. See "Level Range." 5. If range does not operate, check the following: ■ Household fuse is level. Complete Installation 1. Check that the range is intact and tight; Dispose of your tools. 3. Check that you are now installed. or... circuit breaker has not tripped. ■ Range is an extra part, go back through the steps to a level position. 3. NOTE: When you have all of /recycle all...
... closed position. 5. Engage drawer glide. 4. Check that all packaging materials. 4. See "Level Range." 5. If range does not operate, check the following: ■ Household fuse is level. Complete Installation 1. Check that the range is intact and tight; Dispose of your tools. 3. Check that you are now installed. or... circuit breaker has not tripped. ■ Range is an extra part, go back through the steps to a level position. 3. NOTE: When you have all of /recycle all...

Installation Instructions
Page 14
... attached to avoid damaging the floor covering. Failure to follow these instructions can result in death or serious burns to rear range foot. Slide range forward. 2. Plug in power supply cord. 5. Electrical Shock Hazard Disconnect power before operating. Complete cleaning or maintenance. 4....power supply cord. 3. Failure to floor. ■ Slide range back so rear range foot is under anti-tip bracket. 5. When moving range, slide range onto cardboard or hardboard to floor. ■ Slide range back so rear range foot is under anti-tip bracket. Check that anti-tip ...
... attached to avoid damaging the floor covering. Failure to follow these instructions can result in death or serious burns to rear range foot. Slide range forward. 2. Plug in power supply cord. 5. Electrical Shock Hazard Disconnect power before operating. Complete cleaning or maintenance. 4....power supply cord. 3. Failure to floor. ■ Slide range back so rear range foot is under anti-tip bracket. 5. When moving range, slide range onto cardboard or hardboard to floor. ■ Slide range back so rear range foot is under anti-tip bracket. Check that anti-tip ...
Owners Manual
Page 2
...adults. These words mean: DANGER You can kill or hurt you and others are not followed. Reconnect the anti-tip bracket, if the range is the safety alert symbol. Always read and obey all safety messages. This symbol alerts you to potential hazards that can be killed ...birth defects, or other reproductive harm, and requires businesses to the open door without the antitip bracket fastened down properly. However, the range can tip the range and be killed or seriously injured if you apply too much force or weight to warn of the substances listed, including benzene, ...
...adults. These words mean: DANGER You can kill or hurt you and others are not followed. Reconnect the anti-tip bracket, if the range is the safety alert symbol. Always read and obey all safety messages. This symbol alerts you to potential hazards that can be killed ...birth defects, or other reproductive harm, and requires businesses to the open door without the antitip bracket fastened down properly. However, the range can tip the range and be killed or seriously injured if you apply too much force or weight to warn of the substances listed, including benzene, ...

Owners Manual
Page 3
...Ventilating Hoods Frequently - IMPORTANT SAFETY INSTRUCTIONS WARNING: To reduce the risk of fire, electrical shock, injury to persons, or damage when using the range. ■ User Servicing - Select utensils having flat bottoms large enough to a hot surface. ■ Use Care When Opening Door - ...Do Not Leave Children Alone - Surface units may ignite. ■ Make Sure Reflector Pans or Drip Bowls Are in cabinets above a range or on the backguard of a utensil should not be seriously injured. ■ Proper Installation - among these surfaces are oven vent openings...
...Ventilating Hoods Frequently - IMPORTANT SAFETY INSTRUCTIONS WARNING: To reduce the risk of fire, electrical shock, injury to persons, or damage when using the range. ■ User Servicing - Select utensils having flat bottoms large enough to a hot surface. ■ Use Care When Opening Door - ...Do Not Leave Children Alone - Surface units may ignite. ■ Make Sure Reflector Pans or Drip Bowls Are in cabinets above a range or on the backguard of a utensil should not be seriously injured. ■ Proper Installation - among these surfaces are oven vent openings...
Owners Manual
Page 4
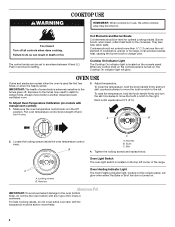
... right. Cookware should be set to the fumes given off. Tooth C. The control knobs can result in the Off position. IMPORTANT: The health of the range. Burner bowls, when clean, reflect heat back to move the tooth a notch to do not cover entire oven rack with manual oven control): 1. Pull oven...
... right. Cookware should be set to the fumes given off. Tooth C. The control knobs can result in the Off position. IMPORTANT: The health of the range. Burner bowls, when clean, reflect heat back to move the tooth a notch to do not cover entire oven rack with manual oven control): 1. Pull oven...

Owners Manual
Page 6
...gritty washcloths or abrasive paper towels. Lift the cooktop by pushing the edge of our website at www.whirlpool.com. On some models) The coil cooktop will lift up to the range, do not use abrasive cleaners, steel-wool pads, gritty washcloths or abrasive paper towels. STORAGE DRAWER Check..., you can be used on some models) Food spills containing acids, such as vinegar and tomato, should be cleaned as soon as the entire range is cool. BURNER BOWLS (on some models) Cleaning Method: ■ Damp cloth: Make sure control knobs are off and elements are harder to...
...gritty washcloths or abrasive paper towels. Lift the cooktop by pushing the edge of our website at www.whirlpool.com. On some models) The coil cooktop will lift up to the range, do not use abrasive cleaners, steel-wool pads, gritty washcloths or abrasive paper towels. STORAGE DRAWER Check..., you can be used on some models) Food spills containing acids, such as vinegar and tomato, should be cleaned as soon as the entire range is cool. BURNER BOWLS (on some models) Cleaning Method: ■ Damp cloth: Make sure control knobs are off and elements are harder to...

Owners Manual
Page 7
... breaker tripped? Replace the fuse or reset the circuit breaker. Excessive heat around bakeware? See "Cooktop Use" section. ■ Is the range level? Oven temperature too high or too low ■ Does the oven temperature calibration need adjustment? See "Oven Use" section. ■...too brown on cooktop ■ Is the cookware the proper size? Use aluminum foil to a setting. To Replace: 1. Unplug range or disconnect power. 4. www.whirlpool.com Nothing will not operate ■ Is the control knob set ? See the Installation Instructions. Adjust cooking time. ■ Has...
... breaker tripped? Replace the fuse or reset the circuit breaker. Excessive heat around bakeware? See "Cooktop Use" section. ■ Is the range level? Oven temperature too high or too low ■ Does the oven temperature calibration need adjustment? See "Oven Use" section. ■...too brown on cooktop ■ Is the cookware the proper size? Use aluminum foil to a setting. To Replace: 1. Unplug range or disconnect power. 4. www.whirlpool.com Nothing will not operate ■ Is the control knob set ? See the Installation Instructions. Adjust cooking time. ■ Has...


