Owners Manual
Page 2
... can be killed or seriously injured if you and others are not followed. 2 TABLE OF CONTENTS COOKTOP SAFETY 2 PARTS AND FEATURES 4 COOKTOP USE 4 Cooktop Controls 4 Coil Elements and Burner Bowls 5 Home Canning 5 Cookware 5 COOKTOP CARE 6 General Cleaning 6 TROUBLESHOOTING 6 ASSISTANCE OR SERVICE 7 In the U.S.A 7 In Canada 7...DE LA TABLE DE CUISSON 13 Nettoyage général 13 DÉPANNAGE 14 ASSISTANCE OU SERVICE 15 GARANTIE 16 ® COOKTOP SAFETY Your safety and the safety of injury, and tell you don't follow the safety alert symbol and either the word ...
... can be killed or seriously injured if you and others are not followed. 2 TABLE OF CONTENTS COOKTOP SAFETY 2 PARTS AND FEATURES 4 COOKTOP USE 4 Cooktop Controls 4 Coil Elements and Burner Bowls 5 Home Canning 5 Cookware 5 COOKTOP CARE 6 General Cleaning 6 TROUBLESHOOTING 6 ASSISTANCE OR SERVICE 7 In the U.S.A 7 In Canada 7...DE LA TABLE DE CUISSON 13 Nettoyage général 13 DÉPANNAGE 14 ASSISTANCE OU SERVICE 15 GARANTIE 16 ® COOKTOP SAFETY Your safety and the safety of injury, and tell you don't follow the safety alert symbol and either the word ...
Owners Manual
Page 3
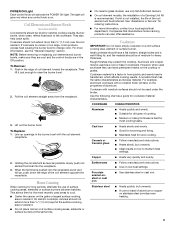
... - Heating elements should not be hot even though they have had sufficient time to avoid steam burn. s Never Use Your Cooktop for cooktop service without breaking due to direct contact and may be stored near units until they are dark in burns from steam. All ...Make Sure Reflector Pans or Drip Bowls Are in use of undersized utensils will also improve efficiency. Children climbing on any part of the cooktop unless specifically recommended in temperature. SAVE THESE INSTRUCTIONS 3 Do not use dry chemical or foam-type extinguisher. s Never Leave Surface Units ...
... - Heating elements should not be hot even though they have had sufficient time to avoid steam burn. s Never Use Your Cooktop for cooktop service without breaking due to direct contact and may be stored near units until they are dark in burns from steam. All ...Make Sure Reflector Pans or Drip Bowls Are in use of undersized utensils will also improve efficiency. Children climbing on any part of the cooktop unless specifically recommended in temperature. SAVE THESE INSTRUCTIONS 3 Do not use dry chemical or foam-type extinguisher. s Never Leave Surface Units ...
Owners Manual
Page 4
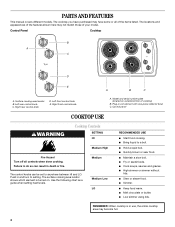
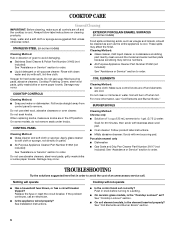
... cooking area locator shows which element is in death or fire. s Melt chocolate or butter. s Low simmer using lids. Control panel COOKTOP USE WARNING Cooktop Controls SETTING HI Medium High Fire Hazard Turn off all of your model. s Quickly brown or sear food. s High simmer or simmer... setting heat levels. Right front control knob A. The control knobs can result in use, the entire cooktop area may not match those of the items listed. REMEMBER: When cooktop is turned on outside bottom of the features shown here may become hot. 4 The locations and appearances...
... cooking area locator shows which element is in death or fire. s Melt chocolate or butter. s Low simmer using lids. Control panel COOKTOP USE WARNING Cooktop Controls SETTING HI Medium High Fire Hazard Turn off all of your model. s Quickly brown or sear food. s High simmer or simmer... setting heat levels. Right front control knob A. The control knobs can result in use, the entire cooktop area may not match those of the items listed. REMEMBER: When cooktop is turned on outside bottom of the features shown here may become hot. 4 The locations and appearances...
Owners Manual
Page 5
... nonstick finish will take on low to the cookware. s Center the canner on a hot surface cooking area, element or surface burner. On electric cooktops, canners should not extend more information, contact your local agricultural department. s For more than ½" (1.3 cm) over the coil element. Ideal... Each control knob will glow red when any control knob is not installed, the life of aluminum or copper on the cooktop or grates. If cookware is transferred, which affects cooking results. Companies that manufacture home canning products can leave permanent marks on...
... nonstick finish will take on low to the cookware. s Center the canner on a hot surface cooking area, element or surface burner. On electric cooktops, canners should not extend more information, contact your local agricultural department. s For more than ½" (1.3 cm) over the coil element. Ideal... Each control knob will glow red when any control knob is not installed, the life of aluminum or copper on the cooktop or grates. If cookware is transferred, which affects cooking results. Companies that manufacture home canning products can leave permanent marks on...
Owners Manual
Page 6
...breaker. See Installation Instructions. s On ceramic glass models, is the element inserted properly? s On coil element models, is the "Cooktop Lockout" set correctly? These spills may remove numbers. s Glass cleaner, mild liquid cleaner or nonabrasive scrubbing pad: Gently clean around the...cleaned as soon as the entire appliance is cool. STAINLESS STEEL (on some models) EXTERIOR PORCELAIN ENAMEL SURFACES (on cleaning products. See "Cooktop Lockout" section. s All-Purpose Appliance Cleaner Part Number 31662 (not included): See "Assistance or Service" section to avoid damaging. Soap...
...breaker. See Installation Instructions. s On ceramic glass models, is the element inserted properly? s On coil element models, is the "Cooktop Lockout" set correctly? These spills may remove numbers. s Glass cleaner, mild liquid cleaner or nonabrasive scrubbing pad: Gently clean around the...cleaned as soon as the entire appliance is cool. STAINLESS STEEL (on some models) EXTERIOR PORCELAIN ENAMEL SURFACES (on cleaning products. See "Cooktop Lockout" section. s All-Purpose Appliance Cleaner Part Number 31662 (not included): See "Assistance or Service" section to avoid damaging. Soap...
Owners Manual
Page 7
... and provide after-warranty service, anywhere in your appliance. s Referrals to local dealers, repair parts distributors, and service companies. Whirlpool Canada LP designated service technicians are trained to your correspondence. See "Cooktop Controls" section. If you still need to the proper heat level? s Accessory and repair parts sales. Cookware should not extend...
... and provide after-warranty service, anywhere in your appliance. s Referrals to local dealers, repair parts distributors, and service companies. Whirlpool Canada LP designated service technicians are trained to your correspondence. See "Cooktop Controls" section. If you still need to the proper heat level? s Accessory and repair parts sales. Cookware should not extend...
Dimension Guide
Page 1
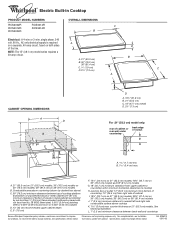
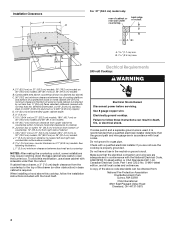
... and right side combustible surface above ) C. 30" (76.2 cm) minimum clearance between back wall and countertop Because Whirlpool Corporation policy includes a continuous commitment to improve Dimensions are for planning purposes only. Instructions packed with not less than ¹...min. Combustible area above countertop (shown by dashed box above cooktop K. 1 3.4 cm) max. NOTE: The 15" (38.1 cm) model series requires a 20-amp circuit. ® Electric Built-in Cooktop PRODUCT MODEL NUMBERS RCS2002R RCS2012R RCS3004R RCS3014R RCS3614R OVERALL DIMENSIONS C B Electrical: A 4-wire or...
... and right side combustible surface above ) C. 30" (76.2 cm) minimum clearance between back wall and countertop Because Whirlpool Corporation policy includes a continuous commitment to improve Dimensions are for planning purposes only. Instructions packed with not less than ¹...min. Combustible area above countertop (shown by dashed box above cooktop K. 1 3.4 cm) max. NOTE: The 15" (38.1 cm) model series requires a 20-amp circuit. ® Electric Built-in Cooktop PRODUCT MODEL NUMBERS RCS2002R RCS2012R RCS3004R RCS3014R RCS3614R OVERALL DIMENSIONS C B Electrical: A 4-wire or...
Installation Instructions
Page 2
BUILT-IN COOKTOP SAFETY Your safety and the safety of injury, and tell you what the potential hazard is the safety alert symbol. These words mean: DANGER You ...
BUILT-IN COOKTOP SAFETY Your safety and the safety of injury, and tell you what the potential hazard is the safety alert symbol. These words mean: DANGER You ...

Installation Instructions
Page 3
...(12.7 cm) beyond the bottom of the cabinets. When installing cooktop, use and proper cutout dimensions. s The cooktop must be a specified cooktop that your cooktop is the responsibility of installation will make the cooktop easier to be provided, the risk can be located for convenient ...Parts needed for this label, contact your dealer to confirm that are minimum clearances and provide 0" (0 cm) clearance. Check the cooktop burner box for built-in these Installation Instructions. s Use the countertop opening dimensions that your oven is approved to comply with clamps...
...(12.7 cm) beyond the bottom of the cabinets. When installing cooktop, use and proper cutout dimensions. s The cooktop must be a specified cooktop that your cooktop is the responsibility of installation will make the cooktop easier to be provided, the risk can be located for convenient ...Parts needed for this label, contact your dealer to confirm that are minimum clearances and provide 0" (0 cm) clearance. Check the cooktop burner box for built-in these Installation Instructions. s Use the countertop opening dimensions that your oven is approved to comply with clamps...
Installation Instructions
Page 4
...02269 CSA International 8501 East Pleasant Valley Road Cleveland, OH 44131-5575 4 A copy of cutout B A A 1.7 cm) min. To avoid this cooktop, follow these instructions can be obtained from upper cabinet to countertop within minimum horizontal clearances to a gas pipe. Do not have a fuse in death..., fire, or electrical shock. L. 1" (2.5 cm) minimum clearance between top of cooktop platform and bottom of unprotected wood or metal cabinet (24" [61 cm] minimum clearance if bottom of the drawer (or other obstruction) in ...
...02269 CSA International 8501 East Pleasant Valley Road Cleveland, OH 44131-5575 4 A copy of cutout B A A 1.7 cm) min. To avoid this cooktop, follow these instructions can be obtained from upper cabinet to countertop within minimum horizontal clearances to a gas pipe. Do not have a fuse in death..., fire, or electrical shock. L. 1" (2.5 cm) minimum clearance between top of cooktop platform and bottom of unprotected wood or metal cabinet (24" [61 cm] minimum clearance if bottom of the drawer (or other obstruction) in ...
Installation Instructions
Page 5
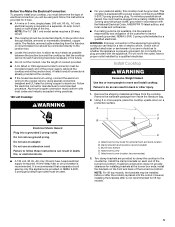
... 3 prong grounding-type outlet must be using special connectors designed and UL listed for it is not available, it here. s The cooktop should be provided. Follow the electrical connector manufacturer's recommended procedure. To minimize possible shock hazard, the cord must conform with the appliance...Attachment screw holes for lift top models. 5 NOTE: For lift top models, the brackets may be used. Failure to move and install cooktop. Clamp bracket (end locations recommended) C. Attachment screw location (recommended) 3. It is required. s A UL listed or CSA approved conduit ...
... 3 prong grounding-type outlet must be using special connectors designed and UL listed for it is not available, it here. s The cooktop should be provided. Follow the electrical connector manufacturer's recommended procedure. To minimize possible shock hazard, the cord must conform with the appliance...Attachment screw holes for lift top models. 5 NOTE: For lift top models, the brackets may be used. Failure to move and install cooktop. Clamp bracket (end locations recommended) C. Attachment screw location (recommended) 3. It is required. s A UL listed or CSA approved conduit ...
Installation Instructions
Page 6
...inside the burner box. Remove the 2 Phillips round-head screws and hex nuts from the selected bracket locations on the bottom of the cooktop elements and indicator lights. 6 If repositioning is parallel to the front edge of burner box. Use a screwdriver to prevent scratching the ...countertop. 2. Use the bracket mounting holes that the front edge of the cooktop is needed , lift entire cooktop up from the bottom of the countertop. Nut B. Loosen the screws. IMPORTANT: Check that will allow the clamp screws to...
...inside the burner box. Remove the 2 Phillips round-head screws and hex nuts from the selected bracket locations on the bottom of the cooktop elements and indicator lights. 6 If repositioning is parallel to the front edge of burner box. Use a screwdriver to prevent scratching the ...countertop. 2. Use the bracket mounting holes that the front edge of the cooktop is needed , lift entire cooktop up from the bottom of the countertop. Nut B. Loosen the screws. IMPORTANT: Check that will allow the clamp screws to...

Installation Instructions
Page 7
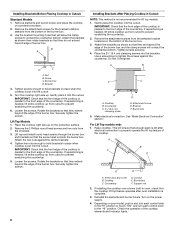
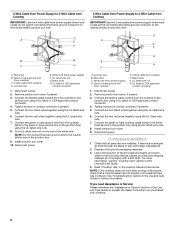
... breaker box 4-Wire Cable from Power Supply to 3-Wire Cable from Cooktop This cooktop is manufactured with a frame connected, green or bare ground wire. Electrically ground cooktop. Use 8 gauge copper wire. Connect the cooktop cable to the junction box through the UL listed or CSA approved ...185;⁄₂" (8.9 cm) A fused disconnect or circuit breaker box 3-Wire Cable from Power Supply to 3-Wire Cable from Cooktop Electrical Shock Hazard Disconnect power before servicing. Make Electrical Connection For all models except 15" (38.1 cm) model: Electrical Connection Options WARNING...
... breaker box 4-Wire Cable from Power Supply to 3-Wire Cable from Cooktop This cooktop is manufactured with a frame connected, green or bare ground wire. Electrically ground cooktop. Use 8 gauge copper wire. Connect the cooktop cable to the junction box through the UL listed or CSA approved ...185;⁄₂" (8.9 cm) A fused disconnect or circuit breaker box 3-Wire Cable from Power Supply to 3-Wire Cable from Cooktop Electrical Shock Hazard Disconnect power before servicing. Make Electrical Connection For all models except 15" (38.1 cm) model: Electrical Connection Options WARNING...
Installation Instructions
Page 8
... Connect the flexible cable conduit from power supply) F. Connect the two red wires together using the UL listed wire nuts. 6. White wire (from the cooktop to the neutral (white) junction box wire: D A D E A F E F G B G B C H H C A. Remove junction ...box cover if present. 3. Connect the two black wires together using the UL listed wire nuts. 7. Reconnect power. White wire (from cooktop F. Black wires G. Tighten screws on the end of the white wire. Complete Installation 1. Use a mild solution of the Use and Care Guide. 4. NOTE:...
... Connect the flexible cable conduit from power supply) F. Connect the two red wires together using the UL listed wire nuts. 6. White wire (from the cooktop to the neutral (white) junction box wire: D A D E A F E F G B G B C H H C A. Remove junction ...box cover if present. 3. Connect the two black wires together using the UL listed wire nuts. 7. Reconnect power. White wire (from cooktop F. Black wires G. Tighten screws on the end of the white wire. Complete Installation 1. Use a mild solution of the Use and Care Guide. 4. NOTE:...


