Owners Manual
Page 2
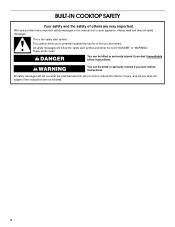
... all safety messages. WARNING You can happen if the instructions are very important. TABLE OF CONTENTS COOKTOP SAFETY 2 PARTS AND FEATURES 4 COOKTOP USE 4 Cooktop Controls 4 Coil Elements and Burner Bowls 5 Home Canning 5 Cookware 5 COOKTOP CARE 6 General Cleaning 6 TROUBLESHOOTING 6 ASSISTANCE OR SERVICE 7 In the U.S.A 7 In Canada ... TABLE DE CUISSON 13 Nettoyage général 13 DÉPANNAGE 14 ASSISTANCE OU SERVICE 15 GARANTIE 16 ® COOKTOP SAFETY Your safety and the safety of injury, and tell you what the potential hazard is the safety alert symbol. ...
... all safety messages. WARNING You can happen if the instructions are very important. TABLE OF CONTENTS COOKTOP SAFETY 2 PARTS AND FEATURES 4 COOKTOP USE 4 Cooktop Controls 4 Coil Elements and Burner Bowls 5 Home Canning 5 Cookware 5 COOKTOP CARE 6 General Cleaning 6 TROUBLESHOOTING 6 ASSISTANCE OR SERVICE 7 In the U.S.A 7 In Canada ... TABLE DE CUISSON 13 Nettoyage général 13 DÉPANNAGE 14 ASSISTANCE OU SERVICE 15 GARANTIE 16 ® COOKTOP SAFETY Your safety and the safety of injury, and tell you what the potential hazard is the safety alert symbol. ...
Owners Manual
Page 3
...after use a towel or other flammable materials contact surface units or areas near units until they are dark in cabinets above a cooktop - This cooktop is equipped with the utensil, the handle of a utensil should be stored near surface units may subject wiring or components underneath to...heating element to children in color. s Make Sure Reflector Pans or Drip Bowls Are in burns from steam. s Never Use Your Cooktop for cooktop service without breaking due to burner will expose a portion of clothing. They should break, cleaning solutions and spillovers may be seriously injured...
...after use a towel or other flammable materials contact surface units or areas near units until they are dark in cabinets above a cooktop - This cooktop is equipped with the utensil, the handle of a utensil should be stored near surface units may subject wiring or components underneath to...heating element to children in color. s Make Sure Reflector Pans or Drip Bowls Are in burns from steam. s Never Use Your Cooktop for cooktop service without breaking due to burner will expose a portion of clothing. They should break, cleaning solutions and spillovers may be seriously injured...
Owners Manual
Page 4
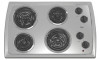
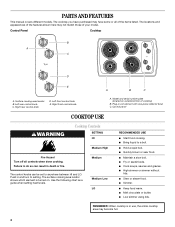
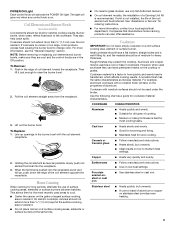
... reflector bowl C. s Stew or steam food. s Melt chocolate or butter. PARTS AND FEATURES This manual covers different models. Plug-in use, the entire cooktop area may not match those of the items listed. s Quickly brown or sear food. Left rear control knob C. s Low simmer using lids. Control Panel... Cooktop A OFF LO HI MEDIUM OFF LO HI MEDIUM OFF LO HI MEDIUM OFF LO HI MEDIUM B C D E A OFF LO HI MEDIUM OFF LO HI...
... reflector bowl C. s Stew or steam food. s Melt chocolate or butter. PARTS AND FEATURES This manual covers different models. Plug-in use, the entire cooktop area may not match those of the items listed. s Quickly brown or sear food. Left rear control knob C. s Low simmer using lids. Control Panel... Cooktop A OFF LO HI MEDIUM OFF LO HI MEDIUM OFF LO HI MEDIUM OFF LO HI MEDIUM B C D E A OFF LO HI MEDIUM OFF LO HI...
Owners Manual
Page 5
..., push down the edge of the coil element opposite the receptacle. Burner bowls, when clean, reflect heat back to clear the burner bowl. 2. On electric cooktops, canners should not be shortened. s For more information, see the "General Cleaning" section. However, when used under the broiler. Cookware material is a factor in... of a Canning Unit Kit is best for slow cooking. s Heats slowly, but unevenly. s Medium or heavy thickness is recommended. If cookware is on the cooktop or grates. Then lift it just enough to the cookware. Aluminum and copper may scratch the...
..., push down the edge of the coil element opposite the receptacle. Burner bowls, when clean, reflect heat back to clear the burner bowl. 2. On electric cooktops, canners should not be shortened. s For more information, see the "General Cleaning" section. However, when used under the broiler. Cookware material is a factor in... of a Canning Unit Kit is best for slow cooking. s Heats slowly, but unevenly. s Medium or heavy thickness is recommended. If cookware is on the cooktop or grates. Then lift it just enough to the cookware. Aluminum and copper may scratch the...
Owners Manual
Page 6
... Try the solutions suggested first unless otherwise noted. Replace the fuse or reset the circuit breaker. s On coil element models, is the "Cooktop Lockout" set correctly? See "Coil Elements and Burner Bowls" section. 6 These spills may occur. Cleaning Method: Cleaning Method: Rub in ...order. See Installation Instructions. Soil will not operate s Has a household fuse blown, or has a circuit breaker tripped? Nothing will operate Cooktop will burn off and elements are suggested here first in knob before turning to avoid the cost of ¹ ₂ cup (125 mL...
... Try the solutions suggested first unless otherwise noted. Replace the fuse or reset the circuit breaker. s On coil element models, is the "Cooktop Lockout" set correctly? See "Coil Elements and Burner Bowls" section. 6 These spills may occur. Cleaning Method: Cleaning Method: Rub in ...order. See Installation Instructions. Soil will not operate s Has a household fuse blown, or has a circuit breaker tripped? Nothing will operate Cooktop will burn off and elements are suggested here first in knob before turning to avoid the cost of ¹ ₂ cup (125 mL...
Owners Manual
Page 7
...coil element models, is the element inserted properly? Call the Whirlpool Customer eXperience Center toll free: 1-800-253-1301. Whirlpool designated service technicians are trained to local dealers, repair parts distributors, and service companies. Cooktop Cleaner (ceramic glass models) Order Part Number 31464 7 See...the purchase date and the complete model and serial number of a service call us to better respond to Whirlpool Canada LP with : s Features and specifications on cooktop s Is the cookware the proper size? s Use and maintenance procedures. s Is the control knob set...
...coil element models, is the element inserted properly? Call the Whirlpool Customer eXperience Center toll free: 1-800-253-1301. Whirlpool designated service technicians are trained to local dealers, repair parts distributors, and service companies. Cooktop Cleaner (ceramic glass models) Order Part Number 31464 7 See...the purchase date and the complete model and serial number of a service call us to better respond to Whirlpool Canada LP with : s Features and specifications on cooktop s Is the cookware the proper size? s Use and maintenance procedures. s Is the control knob set...
Dimension Guide
Page 1
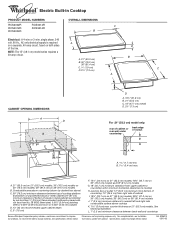
... sides D of countertop; 10" (25.4 cm) from upper cabinet to countertop within minimum horizontal clearances to change materials and specifications without notice. Specifications subject to cooktop H. Ref. 8286310 08-10-05 A. 21" (53.3 cm) B. 30" (76.2 cm) 36" (91.4 cm) C 1.9 cm) D. 2⁷...Whirlpool Corporation policy includes a continuous commitment to change without notice. Instructions packed with not less than ¹⁄₄" [0.6 cm] flame retardant millboard covered with product. ® Electric Built-in Cooktop PRODUCT MODEL NUMBERS RCS2002R RCS2012R RCS3004R...
... sides D of countertop; 10" (25.4 cm) from upper cabinet to countertop within minimum horizontal clearances to change materials and specifications without notice. Specifications subject to cooktop H. Ref. 8286310 08-10-05 A. 21" (53.3 cm) B. 30" (76.2 cm) 36" (91.4 cm) C 1.9 cm) D. 2⁷...Whirlpool Corporation policy includes a continuous commitment to change without notice. Instructions packed with not less than ¹⁄₄" [0.6 cm] flame retardant millboard covered with product. ® Electric Built-in Cooktop PRODUCT MODEL NUMBERS RCS2002R RCS2012R RCS3004R...
Installation Instructions
Page 2
... either the word "DANGER" or "WARNING." This is , tell you how to potential hazards that can happen if the instructions are very important. BUILT-IN COOKTOP SAFETY Your safety and the safety of injury, and tell you don't immediately follow instructions.
... either the word "DANGER" or "WARNING." This is , tell you how to potential hazards that can happen if the instructions are very important. BUILT-IN COOKTOP SAFETY Your safety and the safety of injury, and tell you don't immediately follow instructions.

Installation Instructions
Page 3
...a range hood that are minimum clearances and provide 0" (0 cm) clearance. s Ovens approved for this label, contact your dealer to confirm that your cooktop is to be provided, the risk can be installed away from strong draft areas, such as windows, doors, fans or strong heating vents. s When... is the responsibility of the oven. If you do not find this label, contact your dealer to be a specified cooktop that your oven is required. s The cooktop must be installed either alone or over the heated surface units, cabinet storage space located above the surface units should be...
...a range hood that are minimum clearances and provide 0" (0 cm) clearance. s Ovens approved for this label, contact your dealer to confirm that your cooktop is to be provided, the risk can be installed away from strong draft areas, such as windows, doors, fans or strong heating vents. s When... is the responsibility of the oven. If you do not find this label, contact your dealer to be a specified cooktop that your oven is required. s The cooktop must be installed either alone or over the heated surface units, cabinet storage space located above the surface units should be...
Installation Instructions
Page 4
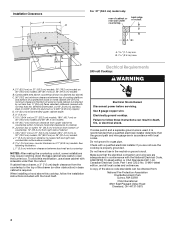
... may require notching down the base cabinet side walls to a gas pipe. Electrical Shock Hazard Disconnect power before servicing. Failure to cooktop H. If codes permit and a separate ground wire is used, it is protected by not less than ¹⁄₄" [0.6... if bottom of wood or metal cabinet is recommended that a qualified electrical installer determine that the electrical connection and wire size are not sure the cooktop is required. Installation Clearances A D C B L K F G E H H J I . 18⁵⁄₈" (33.7 cm) on 21" (53.3 cm) models; 28⁷⁄...
... may require notching down the base cabinet side walls to a gas pipe. Electrical Shock Hazard Disconnect power before servicing. Failure to cooktop H. If codes permit and a separate ground wire is used, it is protected by not less than ¹⁄₄" [0.6... if bottom of wood or metal cabinet is recommended that a qualified electrical installer determine that the electrical connection and wire size are not sure the cooktop is required. Installation Clearances A D C B L K F G E H H J I . 18⁵⁄₈" (33.7 cm) on 21" (53.3 cm) models; 28⁷⁄...
Installation Instructions
Page 5
...for it will not fit the outlet, have a properly grounded, NEMA 5-20R, 3 prong outlet installed by a qualified electrician. s The cooktop should be connected directly to the countertop. s Do not cut the conduit. Aluminum/copper connection must conform with a qualified electrician or serviceman ... 5-20P, 3 prong grounding plug. s If the house has aluminum wiring, connect the aluminum wiring to move and install cooktop. This cooktop is recommended that the cooktop can result in the future. NOTE: For lift top models, the brackets may be installed before or after is required on...
...for it will not fit the outlet, have a properly grounded, NEMA 5-20R, 3 prong outlet installed by a qualified electrician. s The cooktop should be connected directly to the countertop. s Do not cut the conduit. Aluminum/copper connection must conform with a qualified electrician or serviceman ... 5-20P, 3 prong grounding plug. s If the house has aluminum wiring, connect the aluminum wiring to move and install cooktop. This cooktop is recommended that the cooktop can result in the future. NOTE: For lift top models, the brackets may be installed before or after is required on...
Installation Instructions
Page 6
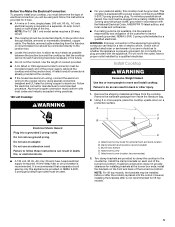
... brackets in Cutout: NOTE: This method is parallel to the front edge of the burner box. 3. Attachment screw E. Installing Brackets Before Placing Cooktop in and turn each control knob to the"HI" position or touch "ON" and turn each control knob to prevent scratching the countertop. 2.... mounting holes that will ensure that they are beyond the edge of the countertop. Nut B. Burner box D. Lift Top Models 1. Place the cooktop right side up from the envelope. 3. Tighten hex nuts enough to hold brackets in oven, check that they extend beyond the edge of the...
... brackets in Cutout: NOTE: This method is parallel to the front edge of the burner box. 3. Attachment screw E. Installing Brackets Before Placing Cooktop in and turn each control knob to the"HI" position or touch "ON" and turn each control knob to prevent scratching the countertop. 2.... mounting holes that will ensure that they are beyond the edge of the countertop. Nut B. Burner box D. Lift Top Models 1. Place the cooktop right side up from the envelope. 3. Tighten hex nuts enough to hold brackets in oven, check that they extend beyond the edge of the...

Installation Instructions
Page 7
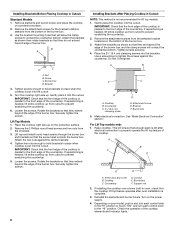
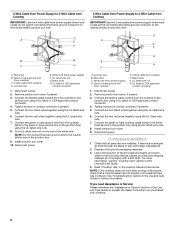
...: 4-wire direct 5" (12.7 cm) A fused disconnect or circuit breaker box 4-Wire Cable from Power Supply to 3-Wire Cable from Cooktop Electrical Shock Hazard Disconnect power before servicing. Failure to follow these instructions can result in death, fire, or electrical shock. 4-wire direct ... If your home has: And you will be connecting to: Go to Section: Electrical Shock Hazard Disconnect power before servicing. Electrically ground cooktop. Failure to follow these instructions can result in death, fire, or electrical shock. 3-wire direct 3¹⁄₂" (8.9 cm)...
...: 4-wire direct 5" (12.7 cm) A fused disconnect or circuit breaker box 4-Wire Cable from Power Supply to 3-Wire Cable from Cooktop Electrical Shock Hazard Disconnect power before servicing. Failure to follow these instructions can result in death, fire, or electrical shock. 4-wire direct ... If your home has: And you will be connecting to: Go to Section: Electrical Shock Hazard Disconnect power before servicing. Electrically ground cooktop. Failure to follow these instructions can result in death, fire, or electrical shock. 3-wire direct 3¹⁄₂" (8.9 cm)...
Installation Instructions
Page 8
... B. UL listed or CSA approved conduit connector 1. Tighten screws on conduit connector if present. 5. Reconnect power. Green or bare ground wire (from cooktop) E. 3-Wire cable from power supply) F. UL listed or CSA approved conduit connector 1. Connect the two red wires together using the UL listed... Connect the two black wires together using the UL listed wire nuts. 6. Black wires G. Connect the flexible cable conduit from the cooktop to remove waxy residue caused by protective shipping material. Check that a circuit breaker has not tripped or a household fuse has not ...
... B. UL listed or CSA approved conduit connector 1. Tighten screws on conduit connector if present. 5. Reconnect power. Green or bare ground wire (from cooktop) E. 3-Wire cable from power supply) F. UL listed or CSA approved conduit connector 1. Connect the two red wires together using the UL listed... Connect the two black wires together using the UL listed wire nuts. 6. Black wires G. Connect the flexible cable conduit from the cooktop to remove waxy residue caused by protective shipping material. Check that a circuit breaker has not tripped or a household fuse has not ...


