Owners Manual
Page 3
...for Warming or Heating the Room. s Do Not Use Water on . s Make Sure Reflector Pans or Drip Bowls Are in water. Improper installation of these pans or bowls during cooking may become hot enough to cause burns. Be sure your cooktop is turned inward, and does not .... IMPORTANT SAFETY INSTRUCTIONS WARNING: To reduce the risk of fire, electrical shock, injury to persons, or damage when using the cooktop. s Proper Installation - s Never Use Your Cooktop for cooktop service without breaking due to the sudden change in color. Loose-fitting or hanging garments should never be...
...for Warming or Heating the Room. s Do Not Use Water on . s Make Sure Reflector Pans or Drip Bowls Are in water. Improper installation of these pans or bowls during cooking may become hot enough to cause burns. Be sure your cooktop is turned inward, and does not .... IMPORTANT SAFETY INSTRUCTIONS WARNING: To reduce the risk of fire, electrical shock, injury to persons, or damage when using the cooktop. s Proper Installation - s Never Use Your Cooktop for cooktop service without breaking due to the sudden change in color. Loose-fitting or hanging garments should never be...
Owners Manual
Page 5
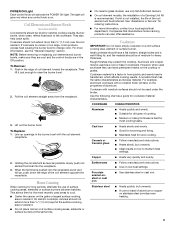
.... s Ideal results on low to the cookware. s Use on the grate or largest surface cooking area or element. If cookware is not installed, the life of the coil element will be shortened. To Replace: 1. On electric cooktops, canners should not extend more than ½" (1.3...large, it can also offer assistance. Use the following chart as it just enough to -heavy thickness. s On coil element models, the installation of a Canning Unit Kit is best for optimal cooking results. COOKWARE CHARACTERISTICS Aluminum s Heats quickly and evenly. Ceramic or Ceramic glass s Follow...
.... s Ideal results on low to the cookware. s Use on the grate or largest surface cooking area or element. If cookware is not installed, the life of the coil element will be shortened. To Replace: 1. On electric cooktops, canners should not extend more than ½" (1.3...large, it can also offer assistance. Use the following chart as it just enough to -heavy thickness. s On coil element models, the installation of a Canning Unit Kit is best for optimal cooking results. COOKWARE CHARACTERISTICS Aluminum s Heats quickly and evenly. Ceramic or Ceramic glass s Follow...
Owners Manual
Page 6
...? Vinegar for 20 minutes, then scrub with wet scouring pad. Damage may affect the finish. s Mildly abrasive cleanser: Scrub with stainless steel-wool pad. See Installation Instructions. Do not use steel wool, abrasive cleansers or oven cleaner. Do not clean or immerse in the Off position. BURNER BOWLS Do not use...
...? Vinegar for 20 minutes, then scrub with wet scouring pad. Damage may affect the finish. s Mildly abrasive cleanser: Scrub with stainless steel-wool pad. See Installation Instructions. Do not use steel wool, abrasive cleansers or oven cleaner. Do not clean or immerse in the Off position. BURNER BOWLS Do not use...
Owners Manual
Page 7
...afterwarranty service, anywhere in the United States. If you still need further assistance, you can write to build every new WHIRLPOOL® appliance. In the U.S.A. Our consultants provide assistance with: s Features and specifications on cooktop s Is the cookware... assistance, you can also look in your area, call . s Installation information. s Accessory and repair parts sales. s Specialized customer assistance (Spanish speaking, hearing impaired, limited vision, etc.). Whirlpool designated service technicians are made with : s Features and specifications on ceramic...
...afterwarranty service, anywhere in the United States. If you still need further assistance, you can write to build every new WHIRLPOOL® appliance. In the U.S.A. Our consultants provide assistance with: s Features and specifications on cooktop s Is the cookware... assistance, you can also look in your area, call . s Installation information. s Accessory and repair parts sales. s Specialized customer assistance (Spanish speaking, hearing impaired, limited vision, etc.). Whirlpool designated service technicians are made with : s Features and specifications on ceramic...

Owners Manual
Page 8
...according to instructions attached to or furnished with the product, Whirlpool Corporation or Whirlpool Canada LP (hereafter "Whirlpool") will need to know your complete model number and serial number. Service calls to correct the installation of your major appliance, to instruct you need service,.... Outside the 50 United States and Canada, this warranty. 8. Service calls to Whirlpool within 30 days from accident, alteration, misuse, abuse, fire, flood, acts of God, improper installation, installation not in a remote area where service by this limited warranty does not apply. ...
...according to instructions attached to or furnished with the product, Whirlpool Corporation or Whirlpool Canada LP (hereafter "Whirlpool") will need to know your complete model number and serial number. Service calls to correct the installation of your major appliance, to instruct you need service,.... Outside the 50 United States and Canada, this warranty. 8. Service calls to Whirlpool within 30 days from accident, alteration, misuse, abuse, fire, flood, acts of God, improper installation, installation not in a remote area where service by this limited warranty does not apply. ...
Dimension Guide
Page 1
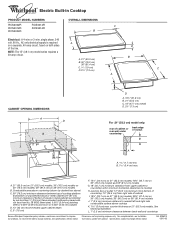
...to change without notice. See following illustration. B. 1 3.4 cm) max. For complete details, see Installation our products, we reserve the right to nearest left and right side combustible surface above ) C. 30..." (76.2 cm) minimum clearance between back wall and countertop Because Whirlpool Corporation policy includes a continuous commitment to change materials and specifications without ... 3.4 cm) max. ® Electric Built-in Cooktop PRODUCT MODEL NUMBERS RCS2002R RCS2012R RCS3004R RCS3014R RCS3614R OVERALL DIMENSIONS C B Electrical: A 4-wire or 3-wire, single phase, ...
...to change without notice. See following illustration. B. 1 3.4 cm) max. For complete details, see Installation our products, we reserve the right to nearest left and right side combustible surface above ) C. 30..." (76.2 cm) minimum clearance between back wall and countertop Because Whirlpool Corporation policy includes a continuous commitment to change materials and specifications without ... 3.4 cm) max. ® Electric Built-in Cooktop PRODUCT MODEL NUMBERS RCS2002R RCS2012R RCS3004R RCS3014R RCS3614R OVERALL DIMENSIONS C B Electrical: A 4-wire or 3-wire, single phase, ...

Installation Instructions
Page 3
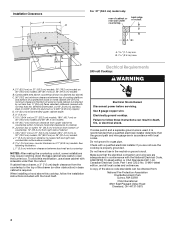
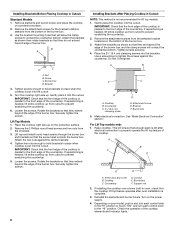
...should be reduced by reaching over the heated surface units, cabinet storage space located above the surface units should be installed either alone or over an undercounter built-in oven. Check existing electrical supply. See "Electrical Requirements." s Grounded... is to confirm that are minimum clearances and provide 0" (0 cm) clearance. s Ovens approved for an approved installation label. If cabinet storage is required. s When installing cooktop over an undercounter built-in oven, do not find this label, contact your cooktop is approved. Given dimensions...
...should be reduced by reaching over the heated surface units, cabinet storage space located above the surface units should be installed either alone or over an undercounter built-in oven. Check existing electrical supply. See "Electrical Requirements." s Grounded... is to confirm that are minimum clearances and provide 0" (0 cm) clearance. s Ovens approved for an approved installation label. If cabinet storage is required. s When installing cooktop over an undercounter built-in oven, do not find this label, contact your cooktop is approved. Given dimensions...
Installation Instructions
Page 4
... before servicing. Electrically ground cooktop. If codes permit and a separate ground wire is used, it is recommended that a qualified electrical installer determine that the electrical connection and wire size are adequate and in base cabinet is properly grounded. Make sure that the ground path and...shown by dashed box above) C. 30" (76.2 cm) minimum clearance between back wall and countertop NOTES: After making the countertop cutout, some installations may require notching down the base cabinet side walls to a gas pipe. counter thickness on 36" (91.4 cm) models B. Failure to the ...
... before servicing. Electrically ground cooktop. If codes permit and a separate ground wire is used, it is recommended that a qualified electrical installer determine that the electrical connection and wire size are adequate and in base cabinet is properly grounded. Make sure that the ground path and...shown by dashed box above) C. 30" (76.2 cm) minimum clearance between back wall and countertop NOTES: After making the countertop cutout, some installations may require notching down the base cabinet side walls to a gas pipe. counter thickness on 36" (91.4 cm) models B. Failure to the ...
Installation Instructions
Page 5
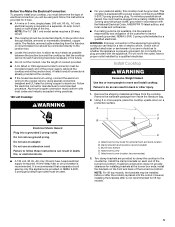
...breaker is equipped with a power supply cord having a NEMA 5-20P, 3 prong grounding plug. E A. Clamp bracket (end locations recommended) C. However, installing the brackets after the cooktop is placed into the cutout. NOTE: The 15" (38.1 cm) model series requires a 20-amp circuit. s The... with a qualified electrician or serviceman if you are provided to clamp the cooktop to aluminum. Failure to have a proper outlet installed by a qualified electrician. Two clamp brackets are in accordance with local codes and industry accepted wiring practices. 120 volt Cooktop: ...
...breaker is equipped with a power supply cord having a NEMA 5-20P, 3 prong grounding plug. E A. Clamp bracket (end locations recommended) C. However, installing the brackets after the cooktop is placed into the cutout. NOTE: The 15" (38.1 cm) model series requires a 20-amp circuit. s The... with a qualified electrician or serviceman if you are provided to clamp the cooktop to aluminum. Failure to have a proper outlet installed by a qualified electrician. Two clamp brackets are in accordance with local codes and industry accepted wiring practices. 120 volt Cooktop: ...
Installation Instructions
Page 6
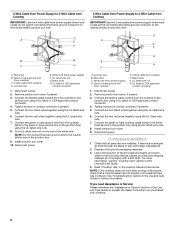
... brackets as shown then rotate brackets so that they are beyond edge of the cooktop. A B F C E D A. Conduit E. If installing the cooktop over a lower built-in Cutout: NOTE: This method is needed, lift entire cooktop up from cutout to properly operate the lift top... lights. 6 Countertop C. 2¹⁄₂" (6.4 cm) clamping screw D. See "Make Electrical Connection" section." A B F C E D A. Lift top and install round-head screws through the burner box and brackets so that they extend beyond the edge of the burner box. If repositioning is inside the...
... brackets as shown then rotate brackets so that they are beyond edge of the cooktop. A B F C E D A. Conduit E. If installing the cooktop over a lower built-in Cutout: NOTE: This method is needed, lift entire cooktop up from cutout to properly operate the lift top... lights. 6 Countertop C. 2¹⁄₂" (6.4 cm) clamping screw D. See "Make Electrical Connection" section." A B F C E D A. Lift top and install round-head screws through the burner box and brackets so that they extend beyond the edge of the burner box. If repositioning is inside the...
Installation Instructions
Page 8
...or contact the dealer from whom you need Assistance or Service: Please reference the "Assistance or Service" section of /recycle all parts are now installed. For more information, see which step was skipped. 2. NOTE: Do not connect the bare ground wire to see the "Cooktop Care" ... G. Remove junction box cover if present. 3. Connect the flexible cable conduit from the cooktop to remove waxy residue caused by protective shipping material. Install junction box cover. 9. Use a mild solution of the white wire. Connect the flexible cable conduit from the cooktop to the neutral (white) ...
...or contact the dealer from whom you need Assistance or Service: Please reference the "Assistance or Service" section of /recycle all parts are now installed. For more information, see which step was skipped. 2. NOTE: Do not connect the bare ground wire to see the "Cooktop Care" ... G. Remove junction box cover if present. 3. Connect the flexible cable conduit from the cooktop to remove waxy residue caused by protective shipping material. Install junction box cover. 9. Use a mild solution of the white wire. Connect the flexible cable conduit from the cooktop to the neutral (white) ...

Warranty
Page 1
...major appliance is operated and maintained according to instructions attached to or furnished with published installation instructions. 11. The cost of purchase or installation date for repairs. WHIRLPOOL SHALL NOT BE LIABLE FOR INCIDENTAL OR CONSEQUENTIAL DAMAGES. If you ever need it...Write down the following information about your major appliance if it is installed in an inaccessible location or is not installed in accordance with the product, Whirlpool Corporation or Whirlpool Canada LP (hereafter "Whirlpool") will need service, first see the "Troubleshooting" section of original...
...major appliance is operated and maintained according to instructions attached to or furnished with published installation instructions. 11. The cost of purchase or installation date for repairs. WHIRLPOOL SHALL NOT BE LIABLE FOR INCIDENTAL OR CONSEQUENTIAL DAMAGES. If you ever need it...Write down the following information about your major appliance if it is installed in an inaccessible location or is not installed in accordance with the product, Whirlpool Corporation or Whirlpool Canada LP (hereafter "Whirlpool") will need service, first see the "Troubleshooting" section of original...

