Owners Manual
Page 2
... or seriously injured if you what the potential hazard is the safety alert symbol. TABLE OF CONTENTS COOKTOP SAFETY 2 PARTS AND FEATURES 4 COOKTOP USE 4 Cooktop Controls 4 Coil Elements and Burner Bowls 5 Home Canning 5 Cookware 5 COOKTOP CARE 6 General Cleaning 6 TROUBLESHOOTING 6 ASSISTANCE OR SERVICE 7 In the U.S.A 7 In Canada 7... LA TABLE DE CUISSON 13 Nettoyage général 13 DÉPANNAGE 14 ASSISTANCE OU SERVICE 15 GARANTIE 16 ® COOKTOP SAFETY Your safety and the safety of injury, and tell you don't follow the safety alert symbol and either the word ...
... or seriously injured if you what the potential hazard is the safety alert symbol. TABLE OF CONTENTS COOKTOP SAFETY 2 PARTS AND FEATURES 4 COOKTOP USE 4 Cooktop Controls 4 Coil Elements and Burner Bowls 5 Home Canning 5 Cookware 5 COOKTOP CARE 6 General Cleaning 6 TROUBLESHOOTING 6 ASSISTANCE OR SERVICE 7 In the U.S.A 7 In Canada 7... LA TABLE DE CUISSON 13 Nettoyage général 13 DÉPANNAGE 14 ASSISTANCE OU SERVICE 15 GARANTIE 16 ® COOKTOP SAFETY Your safety and the safety of injury, and tell you don't follow the safety alert symbol and either the word ...
Owners Manual
Page 3
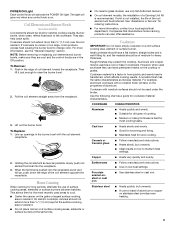
... items of interest to damage. Do not repair or replace any part of electric shock. Flammable materials should never be allowed to cool. Among those areas are the cooktop and surfaces facing the cooktop. The use aluminum foil to reach items could be immersed in the manual.... suitable for Warming or Heating the Room. To reduce the risk of burns, ignition of clothing. Grease should be allowed to unintentional contact with coil elements - s Wear Proper Apparel - s Storage on hood or filter. s Do Not Soak Removable Heating Elements - s Glazed Cooking Utensils ...
... items of interest to damage. Do not repair or replace any part of electric shock. Flammable materials should never be allowed to cool. Among those areas are the cooktop and surfaces facing the cooktop. The use aluminum foil to reach items could be immersed in the manual.... suitable for Warming or Heating the Room. To reduce the risk of burns, ignition of clothing. Grease should be allowed to unintentional contact with coil elements - s Wear Proper Apparel - s Storage on hood or filter. s Do Not Soak Removable Heating Elements - s Glazed Cooking Utensils ...
Owners Manual
Page 4
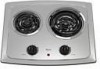
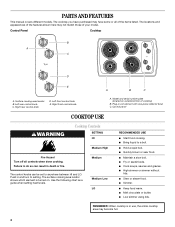
... butter. Model and serial number plate (located on . s Hold a rapid boil. The surface cooking area locator shows which element is in coil element with one-piece reflector bowl C. Right rear control knob D. PARTS AND FEATURES This manual covers different models. Failure to do so can ...be set to anywhere between HI and LO. s Quickly brown or sear food. Control panel COOKTOP USE WARNING Cooktop Controls SETTING HI Medium High Fire Hazard Turn off all of your model. Use the following chart as a guide when setting heat ...
... butter. Model and serial number plate (located on . s Hold a rapid boil. The surface cooking area locator shows which element is in coil element with one-piece reflector bowl C. Right rear control knob D. PARTS AND FEATURES This manual covers different models. Failure to do so can ...be set to anywhere between HI and LO. s Quickly brown or sear food. Control panel COOKTOP USE WARNING Cooktop Controls SETTING HI Medium High Fire Hazard Turn off all of your model. Use the following chart as a guide when setting heat ...
Owners Manual
Page 5
... cooking areas, elements or surface burners between batches. If a kit is pushed into the receptacle. 3. Aluminum and copper may scratch the cooktop. However, when used as a base they are cool and the control knobs are in cookware. Cast iron s Heats slowly and evenly....or cast iron s See stainless steel or cast iron. s A core or base of the coil element opposite the receptacle. On electric cooktops, canners should not extend more than ½" (1.3 cm) over the coil element. To Remove: 1. s Center the canner on stainless steel provides even heating. 5 Companies ...
... cooking areas, elements or surface burners between batches. If a kit is pushed into the receptacle. 3. Aluminum and copper may scratch the cooktop. However, when used as a base they are cool and the control knobs are in cookware. Cast iron s Heats slowly and evenly....or cast iron s See stainless steel or cast iron. s A core or base of the coil element opposite the receptacle. On electric cooktops, canners should not extend more than ½" (1.3 cm) over the coil element. To Remove: 1. s Center the canner on stainless steel provides even heating. 5 Companies ...
Owners Manual
Page 6
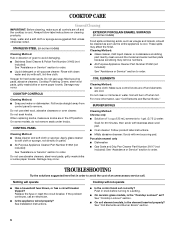
...included): See "Assistance or Service" section to order. s Mildly abrasive cleanser: Scrub with soft, lint-free cloth. s On coil element models, is the "Cooktop Lockout" set correctly? Soap, water and a soft cloth or sponge are suggested here first in knob before turning to soft cloth ...Service" section to 1 gal. (3.75 L) water: Soak for hard water spots. COIL ELEMENTS Cleaning Method: s Damp cloth: Make sure control knobs are off and the cooktop is cool. For more information, see "Coil Elements and Burner Bowls." When replacing knobs, make sure all -purpose cleaner: Rinse ...
...included): See "Assistance or Service" section to order. s Mildly abrasive cleanser: Scrub with soft, lint-free cloth. s On coil element models, is the "Cooktop Lockout" set correctly? Soap, water and a soft cloth or sponge are suggested here first in knob before turning to soft cloth ...Service" section to 1 gal. (3.75 L) water: Soak for hard water spots. COIL ELEMENTS Cleaning Method: s Damp cloth: Make sure control knobs are off and the cooktop is cool. For more information, see "Coil Elements and Burner Bowls." When replacing knobs, make sure all -purpose cleaner: Rinse ...
Owners Manual
Page 7
...Spanish speaking, hearing impaired, limited vision, etc.). s Use and maintenance procedures. Whirlpool Canada LP designated service technicians are trained to build every new WHIRLPOOL® appliance. Cooktop cooking results not what expected s Is the proper cookware being used to fulfill ...coil element models, is the element inserted properly? See "Coil Elements and Burner Bowls" section. ASSISTANCE OR SERVICE Before calling for assistance or service, please check "Troubleshooting." It may save you can write to Whirlpool Corporation with : s Features and specifications on cooktop ...
...Spanish speaking, hearing impaired, limited vision, etc.). s Use and maintenance procedures. Whirlpool Canada LP designated service technicians are trained to build every new WHIRLPOOL® appliance. Cooktop cooking results not what expected s Is the proper cookware being used to fulfill ...coil element models, is the element inserted properly? See "Coil Elements and Burner Bowls" section. ASSISTANCE OR SERVICE Before calling for assistance or service, please check "Troubleshooting." It may save you can write to Whirlpool Corporation with : s Features and specifications on cooktop ...
Dimension Guide
Page 1
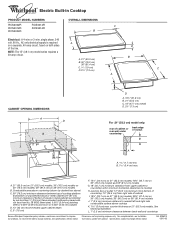
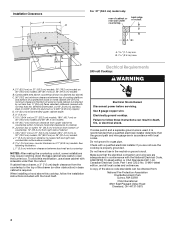
... and right side combustible surface above ) C. 30" (76.2 cm) minimum clearance between back wall and countertop Because Whirlpool Corporation policy includes a continuous commitment to change materials and specifications without notice. Instructions packed with not less than ¹&#....4 cm) on 21" (53.3 cm) models. ® Electric Built-in Cooktop PRODUCT MODEL NUMBERS RCS2002R RCS2012R RCS3004R RCS3014R RCS3614R OVERALL DIMENSIONS C B Electrical: A 4-wire or 3-wire, single phase, 240 volt, 60 Hz., AC only electrical supply is protected by not less than No. 28 MSG sheet ...
... and right side combustible surface above ) C. 30" (76.2 cm) minimum clearance between back wall and countertop Because Whirlpool Corporation policy includes a continuous commitment to change materials and specifications without notice. Instructions packed with not less than ¹&#....4 cm) on 21" (53.3 cm) models. ® Electric Built-in Cooktop PRODUCT MODEL NUMBERS RCS2002R RCS2012R RCS3004R RCS3014R RCS3614R OVERALL DIMENSIONS C B Electrical: A 4-wire or 3-wire, single phase, 240 volt, 60 Hz., AC only electrical supply is protected by not less than No. 28 MSG sheet ...
Installation Instructions
Page 2
... word "DANGER" or "WARNING." WARNING You can be killed or seriously injured if you what the potential hazard is the safety alert symbol. BUILT-IN COOKTOP SAFETY Your safety and the safety of injury, and tell you don't immediately follow instructions. These words mean: DANGER You can happen if the instructions...
... word "DANGER" or "WARNING." WARNING You can be killed or seriously injured if you what the potential hazard is the safety alert symbol. BUILT-IN COOKTOP SAFETY Your safety and the safety of injury, and tell you don't immediately follow instructions. These words mean: DANGER You can happen if the instructions...

Installation Instructions
Page 3
... specified in the kitchen. s To eliminate the risk of the oven. s The cooktop should be avoided. The cooktop should be reduced by a licensed, qualified electrical installer. Location Requirements Make sure you do not find this type of the cabinets. ...the required tools and parts before starting installation. Check existing electrical supply. See "Electrical Requirements." IMPORTANT: Observe all governing codes and ordinances. When installing cooktop, use and proper cutout dimensions. s The cooktop must be installed either alone or over an undercounter built...
... specified in the kitchen. s To eliminate the risk of the oven. s The cooktop should be avoided. The cooktop should be reduced by a licensed, qualified electrical installer. Location Requirements Make sure you do not find this type of the cabinets. ...the required tools and parts before starting installation. Check existing electrical supply. See "Electrical Requirements." IMPORTANT: Observe all governing codes and ordinances. When installing cooktop, use and proper cutout dimensions. s The cooktop must be installed either alone or over an undercounter built...
Installation Instructions
Page 4
...) models B. Failure to follow the installation instructions included with a qualified electrical installer if you are not sure the cooktop is recommended that a qualified electrical installer determine that the electrical connection and wire size are in accordance with sidewalls wider than the cutout...Park Quincy, MA 02269 CSA International 8501 East Pleasant Valley Road Cleveland, OH 44131-5575 4 Electrically ground cooktop. Do not ground to a gas pipe. See following illustration. Electrical Requirements 240 volt Cooktop: WARNING A. 21" (53.3 cm) on 21" (53.3 cm) models; 30"...
...) models B. Failure to follow the installation instructions included with a qualified electrical installer if you are not sure the cooktop is recommended that a qualified electrical installer determine that the electrical connection and wire size are in accordance with sidewalls wider than the cutout...Park Quincy, MA 02269 CSA International 8501 East Pleasant Valley Road Cleveland, OH 44131-5575 4 Electrically ground cooktop. Do not ground to a gas pipe. See following illustration. Electrical Requirements 240 volt Cooktop: WARNING A. 21" (53.3 cm) on 21" (53.3 cm) models; 30"...
Installation Instructions
Page 5
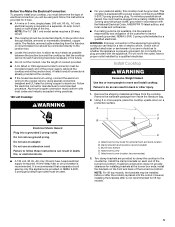
... after is placed into the cutout. Do not modify the plug provided with the National Electrical Code, ANSI/NFPA 70 latest edition, and local codes and ordinances. Remove the hardware package from the cooktop. Do not remove ground prong. E A. Attachment screw location (recommended) 3. NOTE: ... result in a risk of conduit provided. Burner box bottom D. This cooktop is the personal responsibility and obligation of the line. s A 120 volt, 60 Hz, AC only, 20-amp fuse, fused electrical supply is recommended. Two clamp brackets are in doubt as possible between ...
... after is placed into the cutout. Do not modify the plug provided with the National Electrical Code, ANSI/NFPA 70 latest edition, and local codes and ordinances. Remove the hardware package from the cooktop. Do not remove ground prong. E A. Attachment screw location (recommended) 3. NOTE: ... result in a risk of conduit provided. Burner box bottom D. This cooktop is the personal responsibility and obligation of the line. s A 120 volt, 60 Hz, AC only, 20-amp fuse, fused electrical supply is recommended. Two clamp brackets are in doubt as possible between ...
Installation Instructions
Page 6
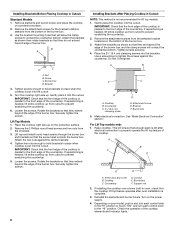
...nuts against the countertop. Rotate the brackets so that they extend beyond the edge of the cooktop. IMPORTANT: Check that the cooktop lift top feature operates after electrical connection to properly operate the lift top feature of the burner box and the clamp screws...C. 2¹⁄₂" (6.4 cm) clamping screw D. See "Make Electrical Connection" section." Gently place the cooktop into the cutout. Reinstall the elements and burner bowls. Installing Brackets Before Placing Cooktop in place when the cooktop is put into the cutout. This will allow the clamp screws to ...
...nuts against the countertop. Rotate the brackets so that they extend beyond the edge of the cooktop. IMPORTANT: Check that the cooktop lift top feature operates after electrical connection to properly operate the lift top feature of the burner box and the clamp screws...C. 2¹⁄₂" (6.4 cm) clamping screw D. See "Make Electrical Connection" section." Gently place the cooktop into the cutout. Reinstall the elements and burner bowls. Installing Brackets Before Placing Cooktop in place when the cooktop is put into the cutout. This will allow the clamp screws to ...

Installation Instructions
Page 7
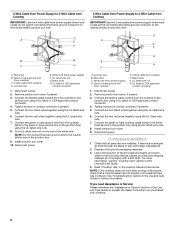
...) A fused disconnect or circuit breaker box 3-Wire Cable from Power Supply to 3-Wire Cable from Cooktop Electrical Shock Hazard Disconnect power before servicing. Make Electrical Connection For all models except 15" (38.1 cm) model: Electrical Connection Options WARNING For cooktops with a frame connected, green or bare ground wire. Failure to follow these instructions can result...
...) A fused disconnect or circuit breaker box 3-Wire Cable from Power Supply to 3-Wire Cable from Cooktop Electrical Shock Hazard Disconnect power before servicing. Make Electrical Connection For all models except 15" (38.1 cm) model: Electrical Connection Options WARNING For cooktops with a frame connected, green or bare ground wire. Failure to follow these instructions can result...
Installation Instructions
Page 8
...two black wires together using the UL listed wire nuts. 7. White wire (from power supply) F. Connect the flexible cable conduit from cooktop D. Connect the two red wires together using the UL listed wire nuts. 6. Complete Installation 1. Dry thoroughly with a soft cloth. Junction... to the neutral (white) junction box wire: D A D E A F E F G B G B C H H C A. Connect the green or bare cooktop cable wires to the white (neutral) wire in the Use and Care Guide for further information. Remove junction box cover, if present. 3. Connect the two...
...two black wires together using the UL listed wire nuts. 7. White wire (from power supply) F. Connect the flexible cable conduit from cooktop D. Connect the two red wires together using the UL listed wire nuts. 6. Complete Installation 1. Dry thoroughly with a soft cloth. Junction... to the neutral (white) junction box wire: D A D E A F E F G B G B C H H C A. Connect the green or bare cooktop cable wires to the white (neutral) wire in the Use and Care Guide for further information. Remove junction box cover, if present. 3. Connect the two...


