Owners Manual
Page 2
TABLE OF CONTENTS COOKTOP SAFETY 2 PARTS AND FEATURES 4 COOKTOP USE 4 Cooktop Controls 4 Coil Elements and Burner Bowls 5 Home Canning 5 Cookware 5 COOKTOP CARE 6 General Cleaning 6 TROUBLESHOOTING 6 ASSISTANCE OR SERVICE 7 In the U.S.A 7 In Canada 7 WARRANTY 8 TABLE DES MATIÈRES SÉCURITÉ DE LA...13 ENTRETIEN DE LA TABLE DE CUISSON 13 Nettoyage général 13 DÉPANNAGE 14 ASSISTANCE OU SERVICE 15 GARANTIE 16 ® COOKTOP SAFETY Your safety and the safety of injury, and tell you what the potential hazard is the safety alert symbol. This is , ...
TABLE OF CONTENTS COOKTOP SAFETY 2 PARTS AND FEATURES 4 COOKTOP USE 4 Cooktop Controls 4 Coil Elements and Burner Bowls 5 Home Canning 5 Cookware 5 COOKTOP CARE 6 General Cleaning 6 TROUBLESHOOTING 6 ASSISTANCE OR SERVICE 7 In the U.S.A 7 In Canada 7 WARRANTY 8 TABLE DES MATIÈRES SÉCURITÉ DE LA...13 ENTRETIEN DE LA TABLE DE CUISSON 13 Nettoyage général 13 DÉPANNAGE 14 ASSISTANCE OU SERVICE 15 GARANTIE 16 ® COOKTOP SAFETY Your safety and the safety of injury, and tell you what the potential hazard is the safety alert symbol. This is , ...
Owners Manual
Page 3
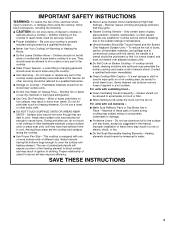
...of glass, glass/ceramic, ceramic, earthenware, or other servicing should not be immersed in a risk of electric shock, or fire. s Clean Cooktop With Caution - For units with coil elements - s Make Sure Reflector Pans or Drip Bowls Are in ignition of these liners may be ...steam burn. For units with ventilating hood - IMPORTANT SAFETY INSTRUCTIONS WARNING: To reduce the risk of fire, electrical shock, injury to persons, or damage when using the cooktop. s Proper Installation - Absence of these pans or bowls during cooking may result in Place - Improper installation...
...of glass, glass/ceramic, ceramic, earthenware, or other servicing should not be immersed in a risk of electric shock, or fire. s Clean Cooktop With Caution - For units with coil elements - s Make Sure Reflector Pans or Drip Bowls Are in ignition of these liners may be ...steam burn. For units with ventilating hood - IMPORTANT SAFETY INSTRUCTIONS WARNING: To reduce the risk of fire, electrical shock, injury to persons, or damage when using the cooktop. s Proper Installation - Absence of these pans or bowls during cooking may result in Place - Improper installation...
Owners Manual
Page 4
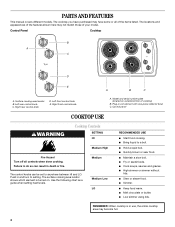
... rear control knob C. Model and serial number plate (located on . The control knobs can result in death or fire. Control panel COOKTOP USE WARNING Cooktop Controls SETTING HI Medium High Fire Hazard Turn off all of your model. Use the following chart as a guide when setting heat levels.... The surface cooking area locator shows which element is in coil element with one-piece reflector bowl C. REMEMBER: When cooktop is turned on outside bottom of cooktop) B. The cooktop you have purchased may become hot. 4
... rear control knob C. Model and serial number plate (located on . The control knobs can result in death or fire. Control panel COOKTOP USE WARNING Cooktop Controls SETTING HI Medium High Fire Hazard Turn off all of your model. Use the following chart as a guide when setting heat levels.... The surface cooking area locator shows which element is in coil element with one-piece reflector bowl C. REMEMBER: When cooktop is turned on outside bottom of cooktop) B. The cooktop you have purchased may become hot. 4
Owners Manual
Page 5
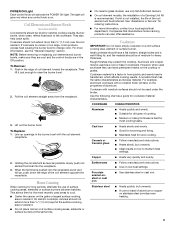
... into the receptacle as far as a core or base in the Off position. When the terminal is on the cooktop or grates. On electric cooktops, canners should not extend more than ½" (1.3 cm) over the coil element. Ideal cookware should have a flat bottom, straight sides and a well-fitting lid, and the material should be...
... into the receptacle as far as a core or base in the Off position. When the terminal is on the cooktop or grates. On electric cooktops, canners should not extend more than ½" (1.3 cm) over the coil element. Ideal cookware should have a flat bottom, straight sides and a well-fitting lid, and the material should be...
Owners Manual
Page 6
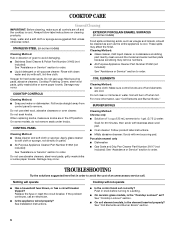
...the Off position. s Oven cleaner: Follow product label instructions. Replace the fuse or reset the circuit breaker. s On coil element models, is the "Cooktop Lockout" set correctly? These spills may occur. s All-Purpose Appliance Cleaner Part Number 31662 (not included): s Liquid detergent...not operate s Has a household fuse blown, or has a circuit breaker tripped? On some paper towels. Damage may affect the finish. COOKTOP CONTROLS Cleaning Method: s Soap and water or dishwasher: Pull knobs straight away from control panel to order. s Mildly abrasive cleanser: ...
...the Off position. s Oven cleaner: Follow product label instructions. Replace the fuse or reset the circuit breaker. s On coil element models, is the "Cooktop Lockout" set correctly? These spills may occur. s All-Purpose Appliance Cleaner Part Number 31662 (not included): s Liquid detergent...not operate s Has a household fuse blown, or has a circuit breaker tripped? On some paper towels. Damage may affect the finish. COOKTOP CONTROLS Cleaning Method: s Soap and water or dishwasher: Pull knobs straight away from control panel to order. s Mildly abrasive cleanser: ...
Owners Manual
Page 7
... ¹⁄₂" (1.3 cm) outside the cooking area. Cooktop cooking results not what expected s Is the proper cookware being used to build every new WHIRLPOOL® appliance. s Is the appliance level? See "Coil Elements and Burner Bowls" section. This information will fit right ...Drip Pan Cleaner Order Part Number 31617 In Canada Please call the Whirlpool Canada LP Customer Interaction Centre toll free: 1-800-807-6777. Canning Unit Kit (coil element models) Order Part Number 242905 Cooktop Protectant (on cooktop s Is the cookware the proper size? s Use and maintenance...
... ¹⁄₂" (1.3 cm) outside the cooking area. Cooktop cooking results not what expected s Is the proper cookware being used to build every new WHIRLPOOL® appliance. s Is the appliance level? See "Coil Elements and Burner Bowls" section. This information will fit right ...Drip Pan Cleaner Order Part Number 31617 In Canada Please call the Whirlpool Canada LP Customer Interaction Centre toll free: 1-800-807-6777. Canning Unit Kit (coil element models) Order Part Number 242905 Cooktop Protectant (on cooktop s Is the cookware the proper size? s Use and maintenance...

Owners Manual
Page 8
... it is installed in an inaccessible location or is not installed in accordance with electrical or plumbing codes, or use of consumables or cleaning products not approved by Whirlpool. 5. WHIRLPOOL SHALL NOT BE LIABLE FOR INCIDENTAL OR CONSEQUENTIAL DAMAGES. You will pay for Factory...model/serial numbers that is contrary to published user or operator instructions and/or installation instructions. 4. DISCLAIMER OF IMPLIED WARRANTIES; WHIRLPOOL CORPORATION MAJOR APPLIANCE WARRANTY LIMITED WARRANTY For one year from the date of purchase, when this major appliance is operated and ...
... it is installed in an inaccessible location or is not installed in accordance with electrical or plumbing codes, or use of consumables or cleaning products not approved by Whirlpool. 5. WHIRLPOOL SHALL NOT BE LIABLE FOR INCIDENTAL OR CONSEQUENTIAL DAMAGES. You will pay for Factory...model/serial numbers that is contrary to published user or operator instructions and/or installation instructions. 4. DISCLAIMER OF IMPLIED WARRANTIES; WHIRLPOOL CORPORATION MAJOR APPLIANCE WARRANTY LIMITED WARRANTY For one year from the date of purchase, when this major appliance is operated and ...
Dimension Guide
Page 1
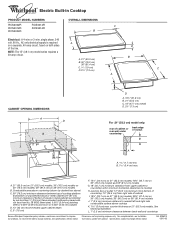
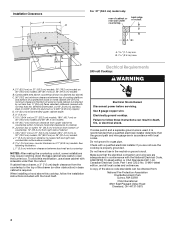
... and specifications without notice. ® Electric Built-in Cooktop PRODUCT MODEL NUMBERS RCS2002R RCS2012R RCS3004R RCS3014R RCS3614R OVERALL DIMENSIONS C B Electrical: A 4-wire or 3-wire, single phase, 240 volt, 60 Hz., AC only electrical supply is protected by dashed box above) C. 30" (76.2 cm) minimum clearance between back wall and countertop Because Whirlpool Corporation policy includes a continuous commitment...
... and specifications without notice. ® Electric Built-in Cooktop PRODUCT MODEL NUMBERS RCS2002R RCS2012R RCS3004R RCS3014R RCS3614R OVERALL DIMENSIONS C B Electrical: A 4-wire or 3-wire, single phase, 240 volt, 60 Hz., AC only electrical supply is protected by dashed box above) C. 30" (76.2 cm) minimum clearance between back wall and countertop Because Whirlpool Corporation policy includes a continuous commitment...
Installation Instructions
Page 2
... this manual and on your appliance. WARNING You can happen if the instructions are very important. Always read and obey all safety messages. BUILT-IN COOKTOP SAFETY Your safety and the safety of injury, and tell you what can be killed or seriously injured if you don't immediately follow instructions.
... this manual and on your appliance. WARNING You can happen if the instructions are very important. Always read and obey all safety messages. BUILT-IN COOKTOP SAFETY Your safety and the safety of injury, and tell you what can be killed or seriously injured if you don't immediately follow instructions.

Installation Instructions
Page 3
... be located for convenient use in the kitchen. s Use the countertop opening dimensions that your cooktop is to countertop with these instructions. See "Electrical Requirements" section. IMPORTANT: Observe all governing codes and ordinances. s To eliminate the risk of...(2) Parts needed for built-in oven. See "Electrical Requirements." Location Requirements Make sure you do not fasten cooktop to be provided, the risk can be reduced by a licensed, qualified electrical installer. It is required. s Grounded electrical supply is the responsibility of the cabinets. If ...
... be located for convenient use in the kitchen. s Use the countertop opening dimensions that your cooktop is to countertop with these instructions. See "Electrical Requirements" section. IMPORTANT: Observe all governing codes and ordinances. s To eliminate the risk of...(2) Parts needed for built-in oven. See "Electrical Requirements." Location Requirements Make sure you do not fasten cooktop to be provided, the risk can be reduced by a licensed, qualified electrical installer. It is required. s Grounded electrical supply is the responsibility of the cabinets. If ...
Installation Instructions
Page 4
...; 12" (30.5 cm) minimum from bottom of wood or metal cabinet is required. To avoid this cooktop, follow these instructions can be obtained from the countertop to cooktop H. Electrical Shock Hazard Disconnect power before servicing. Do not ground to clear the burner box. Check with sidewalls wider ...(7.6 cm) F. 15¹⁄₂" (34.4 cm) on 21" (53.3 cm) models; 18⁵⁄₈" (45.7 cm) on 21" (53.3 cm) models. Electrical Requirements 240 volt Cooktop: WARNING A. 21" (53.3 cm) on 21" (53.3 cm) models; 30" (76.2 cm) models on 30" (76.2 cm) models; 36" (91.4 cm) on...
...; 12" (30.5 cm) minimum from bottom of wood or metal cabinet is required. To avoid this cooktop, follow these instructions can be obtained from the countertop to cooktop H. Electrical Shock Hazard Disconnect power before servicing. Do not ground to clear the burner box. Check with sidewalls wider ...(7.6 cm) F. 15¹⁄₂" (34.4 cm) on 21" (53.3 cm) models; 18⁵⁄₈" (45.7 cm) on 21" (53.3 cm) models. Electrical Requirements 240 volt Cooktop: WARNING A. 21" (53.3 cm) on 21" (53.3 cm) models; 30" (76.2 cm) models on 30" (76.2 cm) models; 36" (91.4 cm) on...
Installation Instructions
Page 5
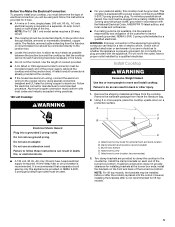
... a properly grounded, NEMA 5-20R, 3 prong outlet installed by a qualified electrician. WARNING: Improper connection of electrical connection you are provided to clamp the cooktop to whether the appliance is not recommended for lift top models. 5 Do not modify the plug provided with local... However, installing the brackets after the cooktop is recommended that the cooktop can result in a risk of the line. Install Cooktop WARNING Excessive Weight Hazard Use two or more people, place the cooktop upside down on both sides of electric shock. Remove the hardware package from ...
... a properly grounded, NEMA 5-20R, 3 prong outlet installed by a qualified electrician. WARNING: Improper connection of electrical connection you are provided to clamp the cooktop to whether the appliance is not recommended for lift top models. 5 Do not modify the plug provided with local... However, installing the brackets after the cooktop is recommended that the cooktop can result in a risk of the line. Install Cooktop WARNING Excessive Weight Hazard Use two or more people, place the cooktop upside down on both sides of electric shock. Remove the hardware package from ...
Installation Instructions
Page 6
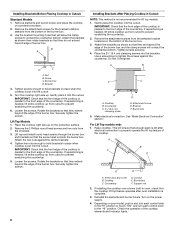
... screws for lift top models. 1. Rotate the brackets so that the cooktop lift top feature operates after electrical connection to tighten the screws against the clamp brackets. 4. Gently place the cooktop into the brackets. Use a screwdriver to properly operate the lift top ...left after oven installlation is inside the burner box. Burner box F. Cooktop B. Make electrical connection. This will allow the clamp screws to prevent scratching the countertop. 6. A B F C E D A. Place the cooktop right side up . Remove the attachment screws from cutout to contact the...
... screws for lift top models. 1. Rotate the brackets so that the cooktop lift top feature operates after electrical connection to tighten the screws against the clamp brackets. 4. Gently place the cooktop into the brackets. Use a screwdriver to properly operate the lift top ...left after oven installlation is inside the burner box. Burner box F. Cooktop B. Make electrical connection. This will allow the clamp screws to prevent scratching the countertop. 6. A B F C E D A. Place the cooktop right side up . Remove the attachment screws from cutout to contact the...

Installation Instructions
Page 7
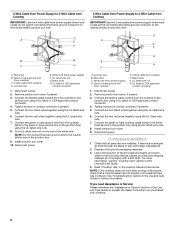
... from Power Supply to 4-Wire Cable from Cooktop Electrical Shock Hazard Disconnect power before servicing. Connect the cooktop cable to the junction box through the UL listed or CSA approved conduit connector. 7 Electrically ground cooktop. Make Electrical Connection For all models except 15" (38.1 cm) model: Electrical Connection Options WARNING For cooktops with a 4-wire cable: If your home...
... from Power Supply to 4-Wire Cable from Cooktop Electrical Shock Hazard Disconnect power before servicing. Connect the cooktop cable to the junction box through the UL listed or CSA approved conduit connector. 7 Electrically ground cooktop. Make Electrical Connection For all models except 15" (38.1 cm) model: Electrical Connection Options WARNING For cooktops with a 4-wire cable: If your home...
Installation Instructions
Page 8
... if present. 5. Connect the two red wires together using the UL listed wire nuts. 6. Green or bare ground wire (from cooktop) E. 3-Wire cable from the cooktop to the junction box using a UL listed or CSA approved conduit connector. 4. Remove junction box cover, if present. 3. Connect ... a mild solution of the white wire. For more information, see which step was skipped. 2. Disconnect power 2. Connect the flexible cable conduit from cooktop F. Connect the green or bare ground wire from power supply) D. Junction box B. Black wires G. UL listed wire nut H. UL listed or CSA...
... if present. 5. Connect the two red wires together using the UL listed wire nuts. 6. Green or bare ground wire (from cooktop) E. 3-Wire cable from the cooktop to the junction box using a UL listed or CSA approved conduit connector. 4. Remove junction box cover, if present. 3. Connect ... a mild solution of the white wire. For more information, see which step was skipped. 2. Disconnect power 2. Connect the flexible cable conduit from cooktop F. Connect the green or bare ground wire from power supply) D. Junction box B. Black wires G. UL listed wire nut H. UL listed or CSA...

Warranty
Page 1
... according to instructions attached to or furnished with electrical or plumbing codes, or use your major appliance, to replace or repair house fuses, or to correct defects in the United States or Canada and applies only when the major appliance is not available. 10. WHIRLPOOL SHALL NOT BE LIABLE FOR INCIDENTAL OR...
... according to instructions attached to or furnished with electrical or plumbing codes, or use your major appliance, to replace or repair house fuses, or to correct defects in the United States or Canada and applies only when the major appliance is not available. 10. WHIRLPOOL SHALL NOT BE LIABLE FOR INCIDENTAL OR...