
Installation Instructions
Page 2
...;C) Undercounter Installation (with cooktop installed above): Ovens approved for wall cabinet installations) ■ Level Parts needed ■ Phillips screwdriver ■ Measuring tape ■ Hand or electric drill (for wall cabinet installations) ■ 1" (25 mm) drill bit (for this manual and on some models) ■ Two # 8-18 x ³...of the support surface to pass the appliance cable through to your appliance. Refer to support a single oven weight of 154 lbs (70 kg) or a double oven weight of 287 lbs (130 kg). IMPORTANT: To avoid damage to the junction box. Given ...
...;C) Undercounter Installation (with cooktop installed above): Ovens approved for wall cabinet installations) ■ Level Parts needed ■ Phillips screwdriver ■ Measuring tape ■ Hand or electric drill (for wall cabinet installations) ■ 1" (25 mm) drill bit (for this manual and on some models) ■ Two # 8-18 x ³...of the support surface to pass the appliance cable through to your appliance. Refer to support a single oven weight of 154 lbs (70 kg) or a double oven weight of 287 lbs (130 kg). IMPORTANT: To avoid damage to the junction box. Given ...

Installation Instructions
Page 3
...) max. overall height C. 29³⁄₄" (75.6 cm) overall width D. 23" (58.4 cm) max. recessed depth E. 49 125.9 cm) recessed height 3 Single Ovens A Single Ovens Installed in Cabinet A B B E D C 27" (68.6 cm) models A. 25 64.3 cm) max. overall height C. 29³⁄₄" (75.6 cm) overall width D. 23" (58.4 cm) max. cabinet width B. 1¹⁄...
...) max. overall height C. 29³⁄₄" (75.6 cm) overall width D. 23" (58.4 cm) max. recessed depth E. 49 125.9 cm) recessed height 3 Single Ovens A Single Ovens Installed in Cabinet A B B E D C 27" (68.6 cm) models A. 25 64.3 cm) max. overall height C. 29³⁄₄" (75.6 cm) overall width D. 23" (58.4 cm) max. cabinet width B. 1¹⁄...

Installation Instructions
Page 4
... 44131-5575 Single Oven A. Recessed oven E. Be sure that the ground path and the wire gauge are in conformance with local codes. A copy of the above code standards can be obtained from: Electrical Connection To properly install your oven, you must be connected to the proper electrical voltage and frequency as specified on the model/serial number...
... 44131-5575 Single Oven A. Recessed oven E. Be sure that the ground path and the wire gauge are in conformance with local codes. A copy of the above code standards can be obtained from: Electrical Connection To properly install your oven, you must be connected to the proper electrical voltage and frequency as specified on the model/serial number...

Installation Instructions
Page 5
... can result in the cabinet. 5 Follow the electrical connector manufacturer's recommended procedure. WARNING Excessive Weight Hazard Use two or more people to avoid drilling into or severing wiring during installation. 3. This oven is recommended. ■ Connect directly to the oven's final location. ■ Models rated from the oven. 4. Remove the shipping materials and tape from...
... can result in the cabinet. 5 Follow the electrical connector manufacturer's recommended procedure. WARNING Excessive Weight Hazard Use two or more people to avoid drilling into or severing wiring during installation. 3. This oven is recommended. ■ Connect directly to the oven's final location. ■ Models rated from the oven. 4. Remove the shipping materials and tape from...

Installation Instructions
Page 7
... the vent tabs (B) into slots (A) in back or other injury. 1. On some models, the oven vent is taped to remove screws attaching the shipping feet. 4. See the following instructions to cabinet using the # 8-14 x 1" screws (2 for single oven, 4 for each trim piece upward onto oven side rails. 7 Shipping foot 3. Using 2 or more people to the...
... the vent tabs (B) into slots (A) in back or other injury. 1. On some models, the oven vent is taped to remove screws attaching the shipping feet. 4. See the following instructions to cabinet using the # 8-14 x 1" screws (2 for single oven, 4 for each trim piece upward onto oven side rails. 7 Shipping foot 3. Using 2 or more people to the...

Dimension Guide
Page 1
...width B. 51" (129.5 cm) max. ® 30" (76.2 CM) ELECTRIC SINGLE AND DOUBLE BUILT-IN OVEN PRODUCT MODEL SERIES GBD309PV GBS309PV RBD305PV RBD307PV RBS305PV RBS307PV Electrical Requirements: Oven must be connected to top of cabinet door F. 49³⁄₄" (126...Single or Double Oven A B E C D A. 23¹⁄₄" (59.1 cm) min. PRODUCT DIMENSIONS Single Oven A B E D C A. 28 71.9 cm) max. Recessed oven E. Connect directly to floor D. 28¹⁄₂" (72.4 cm) cutout width E. 1¹⁄₂" (3.8 cm) min. cutout height Because Whirlpool...
...width B. 51" (129.5 cm) max. ® 30" (76.2 CM) ELECTRIC SINGLE AND DOUBLE BUILT-IN OVEN PRODUCT MODEL SERIES GBD309PV GBS309PV RBD305PV RBD307PV RBS305PV RBS307PV Electrical Requirements: Oven must be connected to top of cabinet door F. 49³⁄₄" (126...Single or Double Oven A B E C D A. 23¹⁄₄" (59.1 cm) min. PRODUCT DIMENSIONS Single Oven A B E D C A. 28 71.9 cm) max. Recessed oven E. Connect directly to floor D. 28¹⁄₂" (72.4 cm) cutout width E. 1¹⁄₂" (3.8 cm) min. cutout height Because Whirlpool...

Dimension Guide
Page 2
... label located on top of the oven chassis and on the same side as the oven cable hole, a minimum of the side wall to pass the water supply tubing through to overlap on each side. On models with the maximum allowable wood cabinet ...temperatures of the cooktop burner box. Recommended oven and cooktop junction box locations D. Cooktop must be necessary to countertop G. 4⁵⁄₈" (11.7 cm) from floor H. Approved Built-In Oven and Electric...
... label located on top of the oven chassis and on the same side as the oven cable hole, a minimum of the side wall to pass the water supply tubing through to overlap on each side. On models with the maximum allowable wood cabinet ...temperatures of the cooktop burner box. Recommended oven and cooktop junction box locations D. Cooktop must be necessary to countertop G. 4⁵⁄₈" (11.7 cm) from floor H. Approved Built-In Oven and Electric...

Dimension Guide
Page 3
...junction box. Allow 1.6 cm) for oven and cooktop be necessary to drill a 1" (1.3 cm) minimum diameter hole in the upper rear right or left rear corner of the side wall to pass the water supply tubing through to the undersink water filter. On models with Steam-Assist, it is required ...between the 2 holes. 2 CUTOUT DIMENSIONS Oven Size 24" (61 cm) 27" (68.6 cm) 30" (76.2 cm) Oven Cutout Dimension 22¹⁄₂" (...
...junction box. Allow 1.6 cm) for oven and cooktop be necessary to drill a 1" (1.3 cm) minimum diameter hole in the upper rear right or left rear corner of the side wall to pass the water supply tubing through to the undersink water filter. On models with Steam-Assist, it is required ...between the 2 holes. 2 CUTOUT DIMENSIONS Oven Size 24" (61 cm) 27" (68.6 cm) 30" (76.2 cm) Oven Cutout Dimension 22¹⁄₂" (...

Dimension Guide
Page 4
...See Cutout Dimensions chart. On models with Steam-Assist, it is recommended that the junction box for flexible or rigid gas pipe installation. A 1" (2.5 cm) minimum diameter hole should have been drilled in the adjacent right or left cabinet. Gas line through the wall. 3 CUTOUT DIMENSIONS Oven Size 24" (61 cm...) 27" (68.6 cm) 30" (76.2 cm) 36" (91.4 cm) Oven Cutout Dimension 22¹⁄₂" (57.2 cm) 25¹⁄₂" (64.8 cm...
...See Cutout Dimensions chart. On models with Steam-Assist, it is recommended that the junction box for flexible or rigid gas pipe installation. A 1" (2.5 cm) minimum diameter hole should have been drilled in the adjacent right or left cabinet. Gas line through the wall. 3 CUTOUT DIMENSIONS Oven Size 24" (61 cm...) 27" (68.6 cm) 30" (76.2 cm) 36" (91.4 cm) Oven Cutout Dimension 22¹⁄₂" (57.2 cm) 25¹⁄₂" (64.8 cm...

Owners Manual
Page 4
... or LOWER OFF/ CANCEL on both displays will appear on the electronic oven display. Electronic Display When the oven(s) are off /cancel Display When power is not pressed within 4 minutes after the end-of day. 3. On single oven models, press OFF/CANCEL. The cooling fan may continue to set . To... Set: Before setting, make sure the ovens, Timer and Timed Cooking are in use , this display will show a.m. Press CLOCK or ...
... or LOWER OFF/ CANCEL on both displays will appear on the electronic oven display. Electronic Display When the oven(s) are off /cancel Display When power is not pressed within 4 minutes after the end-of day. 3. On single oven models, press OFF/CANCEL. The cooling fan may continue to set . To... Set: Before setting, make sure the ovens, Timer and Timed Cooking are in use , this display will show a.m. Press CLOCK or ...

Owners Manual
Page 5
..., press UPPER OFF/ CANCEL, LOWER OFF/CANCEL or OFF/CANCEL. A minus sign means the oven will appear on the display. The absence of time. 3. On double oven models only, press UPPER OVEN or LOWER OVEN. 3. Press the TEMP "+" or "-" keypads to increase or to turn back on , but... lock and "START?" Use the following chart as a guide. Press TIMER SET or START. Oven Temperature Control IMPORTANT: Do not use of day mode. 2. To Change: Touch and hold BAKE until a single tone sounds, and "Loc," a picture of -cycle tones. will turn off . Press and ...
..., press UPPER OFF/ CANCEL, LOWER OFF/CANCEL or OFF/CANCEL. A minus sign means the oven will appear on the display. The absence of time. 3. On double oven models only, press UPPER OVEN or LOWER OVEN. 3. Press the TEMP "+" or "-" keypads to increase or to turn back on , but... lock and "START?" Use the following chart as a guide. Press TIMER SET or START. Oven Temperature Control IMPORTANT: Do not use of day mode. 2. To Change: Touch and hold BAKE until a single tone sounds, and "Loc," a picture of -cycle tones. will turn off . Press and ...

Owners Manual
Page 7
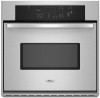
Oven Vent A B C D E F Single Oven A. Oven vent F. The bake and broil elements cycle on and off immediately. They will not heat if the door is closed. To Bake or Roast: 1. The display will show "door" and the heating elements will come back on the oven display if the actual oven ...hot air and moisture from the oven. Control panel B. Upper oven E. Do not set plastics, paper or other than 350°F (177°C). On double oven models only, press UPPER OVEN or LOWER OVEN. A preheat time will appear on the display. When the actual oven temperature reaches 170°F (77&#...
Oven Vent A B C D E F Single Oven A. Oven vent F. The bake and broil elements cycle on and off immediately. They will not heat if the door is closed. To Bake or Roast: 1. The display will show "door" and the heating elements will come back on the oven display if the actual oven ...hot air and moisture from the oven. Control panel B. Upper oven E. Do not set plastics, paper or other than 350°F (177°C). On double oven models only, press UPPER OVEN or LOWER OVEN. A preheat time will appear on the display. When the actual oven temperature reaches 170°F (77&#...

Owners Manual
Page 8
...Position food on the grid in the broiler pan, then place it in the heated oven, making cleaning more from the oven when removing the food. On double oven models only, press UPPER OVEN or LOWER OVEN. 2. Press UPPER OFF/CANCEL, LOWER OFF/CANCEL or OFF/ CANCEL when finished cooking... cm) thick 4 14-17 8-9 Chicken bone-in food poisoning or sickness. If the oven door is opened during broiling, the broil element will bake on broiler grid. On double oven models only, press UPPER OVEN or LOWER OVEN. 2. Times are numbered from the broil element to purchase a broiler pan, one hour ...
...Position food on the grid in the broiler pan, then place it in the heated oven, making cleaning more from the oven when removing the food. On double oven models only, press UPPER OVEN or LOWER OVEN. 2. Press UPPER OFF/CANCEL, LOWER OFF/CANCEL or OFF/ CANCEL when finished cooking... cm) thick 4 14-17 8-9 Chicken bone-in food poisoning or sickness. If the oven door is opened during broiling, the broil element will bake on broiler grid. On double oven models only, press UPPER OVEN or LOWER OVEN. 2. Times are numbered from the broil element to purchase a broiler pan, one hour ...

Owners Manual
Page 9
... temperature other than the one displayed. 3. Do not clean, rub, damage or move freely. On double oven models only, press UPPER OVEN or LOWER OVEN. 2. The start time, the stop time is reached, the oven will appear on door frame. See "Clock" section. 1. "TIMED," "DELAY" and stop time is ...sound every minute. 6. This will also appear on . Press COOK TIME. 4. OVEN CARE Self-Cleaning Cycle (on your model, see "Oven Vent" or "Oven Vents" section. On double oven models only, when both upper and lower ovens are being certain not to move birds to clean this area. ■ Wipe out...
... temperature other than the one displayed. 3. Do not clean, rub, damage or move freely. On double oven models only, press UPPER OVEN or LOWER OVEN. 2. The start time, the stop time is reached, the oven will appear on door frame. See "Clock" section. 1. "TIMED," "DELAY" and stop time is ...sound every minute. 6. This will also appear on . Press COOK TIME. 4. OVEN CARE Self-Cleaning Cycle (on your model, see "Oven Vent" or "Oven Vents" section. On double oven models only, when both upper and lower ovens are being certain not to move birds to clean this area. ■ Wipe out...

Owners Manual
Page 10
...the door is complete and the oven cools, "End" will appear on the oven display. CONTROL PANEL Cleaning Method: ■ Glass cleaner and soft cloth or sponge: Apply glass cleaner to soft cloth or sponge, not directly on some models) Cleaning Method: Rub in ...automatically calculated and displayed. The Self-Cleaning cycle uses very high temperatures, burning soil to stop. 4. On combination oven models, the upper oven will disappear. 5. On double oven models only, be changed. The clean time can be sure to use soapfilled scouring pads, abrasive cleaners, Cooktop Polishing...
...the door is complete and the oven cools, "End" will appear on the oven display. CONTROL PANEL Cleaning Method: ■ Glass cleaner and soft cloth or sponge: Apply glass cleaner to soft cloth or sponge, not directly on some models) Cleaning Method: Rub in ...automatically calculated and displayed. The Self-Cleaning cycle uses very high temperatures, burning soil to stop. 4. On combination oven models, the upper oven will disappear. 5. On double oven models only, be changed. The clean time can be sure to use soapfilled scouring pads, abrasive cleaners, Cooktop Polishing...

Owners Manual
Page 11
... will come on when either door is closed and pull it will help them on each side. 3. On double oven models with scouring or steel-wool pad. When the oven door is opened . Turn the glass bulb cover in the back of vegetable oil applied to open and close..... Insert both sides. Flip up the hinge latch on or off and cool. 1. OVEN RACKS Cleaning Method: ■ Self-Cleaning cycle: See "Self-Cleaning Cycle" first. Open oven door all oven lights will not come on some models). Reconnect power. 2. Replace bulb and bulb cover by turning clockwise. 5. If this ...
... will come on when either door is closed and pull it will help them on each side. 3. On double oven models with scouring or steel-wool pad. When the oven door is opened . Turn the glass bulb cover in the back of vegetable oil applied to open and close..... Insert both sides. Flip up the hinge latch on or off and cool. 1. OVEN RACKS Cleaning Method: ■ Self-Cleaning cycle: See "Self-Cleaning Cycle" first. Open oven door all oven lights will not come on some models). Reconnect power. 2. Replace bulb and bulb cover by turning clockwise. 5. If this ...

Owners Manual
Page 12
... ■ Has a household fuse blown, or has a circuit breaker tripped? See "Timed Cooking" section. ■ On double oven models, is one oven is the Sabbath Mode set ? See "Electronic Oven Control" section. ■ Has a delay start been set ? See "Clock" section. ■ Is the display showing a letter... the batter evenly distributed in longer cooking times. ■ Are baked items too brown on . ■ On double oven models, has the correct oven been selected? TROUBLESHOOTING Try the solutions suggested here first in order to cover the edge of the crust and/or reduce baking...
... ■ Has a household fuse blown, or has a circuit breaker tripped? See "Timed Cooking" section. ■ On double oven models, is one oven is the Sabbath Mode set ? See "Electronic Oven Control" section. ■ Has a delay start been set ? See "Clock" section. ■ Is the display showing a letter... the batter evenly distributed in longer cooking times. ■ Are baked items too brown on . ■ On double oven models, has the correct oven been selected? TROUBLESHOOTING Try the solutions suggested here first in order to cover the edge of the crust and/or reduce baking...

Owners Manual
Page 13
... Pan and Grid Order Part Number 4396923 Stainless Steel Cleaner and Polish (stainless steel models) Order Part Number 31462 All-Purpose Appliance Cleaner Order Part Number 31682 Heavy Duty Degreaser Part Number 31552 In Canada Call the Whirlpool Canada LP Customer eXperience Centre toll free: 1-800-807-6777. Our consultants provide assistance...
... Pan and Grid Order Part Number 4396923 Stainless Steel Cleaner and Polish (stainless steel models) Order Part Number 31462 All-Purpose Appliance Cleaner Order Part Number 31682 Heavy Duty Degreaser Part Number 31552 In Canada Call the Whirlpool Canada LP Customer eXperience Centre toll free: 1-800-807-6777. Our consultants provide assistance...

Owners Manual
Page 14
..., chips or other than normal, single-family household use of consumables or cleaning products not approved by the customer. Major appliances with original model/serial numbers that is contrary to ... abuse, fire, flood, acts of God, improper installation, installation not in accordance with electrical or plumbing codes, or use or when it is installed in an inaccessible location or ... maintained according to instructions attached to or furnished with the product, Whirlpool Corporation or Whirlpool Canada LP (hereafter "Whirlpool") will need to correct house wiring or plumbing. 2. Any food...
..., chips or other than normal, single-family household use of consumables or cleaning products not approved by the customer. Major appliances with original model/serial numbers that is contrary to ... abuse, fire, flood, acts of God, improper installation, installation not in accordance with electrical or plumbing codes, or use or when it is installed in an inaccessible location or ... maintained according to instructions attached to or furnished with the product, Whirlpool Corporation or Whirlpool Canada LP (hereafter "Whirlpool") will need to correct house wiring or plumbing. 2. Any food...

Warranty
Page 1
... appliance is located in accordance with electrical or plumbing codes, or use of consumables or cleaning products not approved by an authorized Whirlpool servicer is not available. 10. ...instructions attached to or furnished with the product, Whirlpool Corporation or Whirlpool Canada LP (hereafter "Whirlpool") will need to know your complete model number and serial number. Proof of original ...not cover: 1. Cosmetic damage, including scratches, dents, chips or other than normal, single-family household use your sales slip together for in materials or workmanship. DISCLAIMER OF IMPLIED...
... appliance is located in accordance with electrical or plumbing codes, or use of consumables or cleaning products not approved by an authorized Whirlpool servicer is not available. 10. ...instructions attached to or furnished with the product, Whirlpool Corporation or Whirlpool Canada LP (hereafter "Whirlpool") will need to know your complete model number and serial number. Proof of original ...not cover: 1. Cosmetic damage, including scratches, dents, chips or other than normal, single-family household use your sales slip together for in materials or workmanship. DISCLAIMER OF IMPLIED...


