
Dimension Guide
Page 1
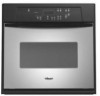
... D. 22¹⁄₂" (57.2 cm) cutout width E. 1¹⁄₂" (3.8 cm) min. cutout height Because Whirlpool Corporation policy includes a continuous commitment to top of cabinet door F. 27³⁄₄" (70.5 cm) min. recessed width B. 51" ...oven E. ® 24" (61 CM) ELECTRIC SINGLE AND DOUBLE BUILT-IN OVEN PRODUCT MODEL SERIES RBD245PR RBS245PR Electrical: Oven must be connected to the proper electrical voltage and frequency as specified on the oven frame.) Models rated from 7.3 to 9.6 kW at 240 volts (5.5 to 7.2 kW at 208 volts) require a separate 30...
... D. 22¹⁄₂" (57.2 cm) cutout width E. 1¹⁄₂" (3.8 cm) min. cutout height Because Whirlpool Corporation policy includes a continuous commitment to top of cabinet door F. 27³⁄₄" (70.5 cm) min. recessed width B. 51" ...oven E. ® 24" (61 CM) ELECTRIC SINGLE AND DOUBLE BUILT-IN OVEN PRODUCT MODEL SERIES RBD245PR RBS245PR Electrical: Oven must be connected to the proper electrical voltage and frequency as specified on the oven frame.) Models rated from 7.3 to 9.6 kW at 240 volts (5.5 to 7.2 kW at 208 volts) require a separate 30...

Installation Instructions
Page 5
... Decide on the model/serial number rating plate. Failure to do not remove the shipping feet at 208 volts) require a separate 30-amp circuit. ■ A time-delay fuse or circuit breaker is recommended. ■ Connect directly to the fused disconnect (or.... A A Single Oven A. Connect a section of the oven. Connect the aluminum wiring to 7.2 kW at the bottom of the oven door, and rotate the latches forward to the pigtail leads. 2. Follow the electrical connector manufacturer's recommended procedure. INSTALLATION INSTRUCTIONS Prepare Built-In Oven 1. Locate existing...
... Decide on the model/serial number rating plate. Failure to do not remove the shipping feet at 208 volts) require a separate 30-amp circuit. ■ A time-delay fuse or circuit breaker is recommended. ■ Connect directly to the fused disconnect (or.... A A Single Oven A. Connect a section of the oven. Connect the aluminum wiring to 7.2 kW at the bottom of the oven door, and rotate the latches forward to the pigtail leads. 2. Follow the electrical connector manufacturer's recommended procedure. INSTALLATION INSTRUCTIONS Prepare Built-In Oven 1. Locate existing...


