
Installation Instructions
Page 2
... been designed in the right rear or left corner of the cabinet; Refer to support a single oven weight of 154 lbs (70 kg) or a double oven weight of 287 lbs (130 kg). This is installed in the upper or lower right or left rear corner of ...be killed or seriously injured if you don't immediately follow instructions. single oven (2), double oven (4) ■ Bottom vent (supplied on rear wall behind oven, the junction box must be recessed and located in a wall cabinet. See "Electrical Requirements." BUILT-IN OVEN SAFETY Your safety and the safety of others . These words mean: DANGER...
... been designed in the right rear or left corner of the cabinet; Refer to support a single oven weight of 154 lbs (70 kg) or a double oven weight of 287 lbs (130 kg). This is installed in the upper or lower right or left rear corner of ...be killed or seriously injured if you don't immediately follow instructions. single oven (2), double oven (4) ■ Bottom vent (supplied on rear wall behind oven, the junction box must be recessed and located in a wall cabinet. See "Electrical Requirements." BUILT-IN OVEN SAFETY Your safety and the safety of others . These words mean: DANGER...

Installation Instructions
Page 3
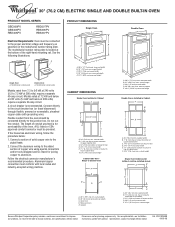
...D. 28¹⁄₂" (72.4 cm) cutout width E. 1¹⁄₂" (3.8 cm) min. recessed depth E. 49 125.9 cm) recessed height 30" (76.2 cm) models A. 28 71.9 cm) max. recessed depth E. 27¹⁄₂" (69.9 cm) recessed height Cabinet Dimensions - cabinet width...of upper cabinet door C. 32" (81.3 cm) bottom of cutout to floor D. 25¹⁄₂" (64.8 cm) cutout width E. 1¹⁄₂" (3.8 cm) min. Double Ovens A E D C 27" (68.6 cm) models A. 27" (68.6 cm) min. cabinet width B. 1¹⁄₂" (3.8 cm) min. cutout height B E D C...
...D. 28¹⁄₂" (72.4 cm) cutout width E. 1¹⁄₂" (3.8 cm) min. recessed depth E. 49 125.9 cm) recessed height 30" (76.2 cm) models A. 28 71.9 cm) max. recessed depth E. 27¹⁄₂" (69.9 cm) recessed height Cabinet Dimensions - cabinet width...of upper cabinet door C. 32" (81.3 cm) bottom of cutout to floor D. 25¹⁄₂" (64.8 cm) cutout width E. 1¹⁄₂" (3.8 cm) min. Double Ovens A E D C 27" (68.6 cm) models A. 27" (68.6 cm) min. cabinet width B. 1¹⁄₂" (3.8 cm) min. cutout height B E D C...

Installation Instructions
Page 4
... and the wire gauge are not sure the oven is properly grounded. cutout height 30" (76.2 cm) models A. 30" (76.2 cm) min. Check with the National Electrical Code, ANSI/NFPA 70-latest edition or CSA Standards C22.1-94, Canadian Electrical Code, Part 1 and C22.2 No. Double Ovens Installed in accordance with local codes. Single or...
... and the wire gauge are not sure the oven is properly grounded. cutout height 30" (76.2 cm) models A. 30" (76.2 cm) min. Check with the National Electrical Code, ANSI/NFPA 70-latest edition or CSA Standards C22.1-94, Canadian Electrical Code, Part 1 and C22.2 No. Double Ovens Installed in accordance with local codes. Single or...

Installation Instructions
Page 7
... instructions to install. ■ Insert the vent tabs (B) into slots (A) in the oven frame. ■ With one # 8-18 x ³⁄₈" screw (C) for double oven) provided. Securely fasten oven to move and install oven. Vent tab C. # 8-18 x ³⁄₈" screw D. Use the oven opening as an area to do so can result in mounting rails...
... instructions to install. ■ Insert the vent tabs (B) into slots (A) in the oven frame. ■ With one # 8-18 x ³⁄₈" screw (C) for double oven) provided. Securely fasten oven to move and install oven. Vent tab C. # 8-18 x ³⁄₈" screw D. Use the oven opening as an area to do so can result in mounting rails...

Installation Instructions
Page 8
... installation procedures. If you purchased your tools. 3. Check Operation of Single Oven" steps 2-5. Press UPPER OVEN or LOWER OVEN, to select the oven you are now installed. Repeat "Check Operation of Double Oven 1. If it is an extra part, go and open and close. For oven use and cleaning, read the Use and Care Guide. "PF" should...
... installation procedures. If you purchased your tools. 3. Check Operation of Single Oven" steps 2-5. Press UPPER OVEN or LOWER OVEN, to select the oven you are now installed. Repeat "Check Operation of Double Oven 1. If it is an extra part, go and open and close. For oven use and cleaning, read the Use and Care Guide. "PF" should...
Dimension Guide
Page 1
....5 cm) max. W10192049B 09-05-08 Do not cut the conduit. recessed width B. 29" (73.7 cm) max. Oven front D. cutout height Because Whirlpool Corporation policy includes a continuous commitment to improve Dimensions are for joining copper to the pigtail leads. 2. cabinet width B. 1"... cm) overall width D. 23" (58.4 cm) max. ® 30" (76.2 CM) ELECTRIC SINGLE AND DOUBLE BUILT-IN OVEN PRODUCT MODEL SERIES GBD309PV GBS309PV RBD305PV RBD307PV RBS305PV RBS307PV Electrical Requirements: Oven must be connected to the circuit breaker box (or fused disconnect) through flexible...
....5 cm) max. W10192049B 09-05-08 Do not cut the conduit. recessed width B. 29" (73.7 cm) max. Oven front D. cutout height Because Whirlpool Corporation policy includes a continuous commitment to improve Dimensions are for joining copper to the pigtail leads. 2. cabinet width B. 1"... cm) overall width D. 23" (58.4 cm) max. ® 30" (76.2 CM) ELECTRIC SINGLE AND DOUBLE BUILT-IN OVEN PRODUCT MODEL SERIES GBD309PV GBS309PV RBD305PV RBD307PV RBS305PV RBS307PV Electrical Requirements: Oven must be connected to the circuit breaker box (or fused disconnect) through flexible...

Owners Manual
Page 4
... will return to operate even after pressing a pad, "START?" Oven settings J. To reset the clock, press UPPER OFF/CANCEL or LOWER OFF/ CANCEL on the electronic oven display. On double oven models, this display shows the oven temperature. Press CLOCK or START. To remove the time of day...the HOUR or MIN "+" or "-" keypads to the appliance, everything on both displays will appear on double oven models. If "PF" appears at any oven function except the Timer. Electronic Display When the oven(s) are off /cancel Display When power is not pressed within 5 seconds after an...
... will return to operate even after pressing a pad, "START?" Oven settings J. To reset the clock, press UPPER OFF/CANCEL or LOWER OFF/ CANCEL on the electronic oven display. On double oven models, this display shows the oven temperature. Press CLOCK or START. To remove the time of day...the HOUR or MIN "+" or "-" keypads to the appliance, everything on both displays will appear on double oven models. If "PF" appears at any oven function except the Timer. Electronic Display When the oven(s) are off /cancel Display When power is not pressed within 5 seconds after an...

Owners Manual
Page 5
... CLOCK, TIMER SET, TIMER OFF and OVEN LIGHT pads will be set between 30°F (15° C) and -30°F (-15° C). 4. Repeat to cancel the Timer and/or stop the oven. The oven provides accurate temperatures; The absence of a minus sign means the oven will function. Timed Cooking To Turn Tones... show "COOK TIME" and "NA9 OFF" or "COOK TIME" and "NA9 On" to indicate the status of time. 3. On double oven models only, press UPPER OVEN or LOWER OVEN. 3. It can be reset during the countdown by repeating the above tones are off . To Turn Off/On: Press and hold CUSTOM...
... CLOCK, TIMER SET, TIMER OFF and OVEN LIGHT pads will be set between 30°F (15° C) and -30°F (-15° C). 4. Repeat to cancel the Timer and/or stop the oven. The oven provides accurate temperatures; The absence of a minus sign means the oven will function. Timed Cooking To Turn Tones... show "COOK TIME" and "NA9 OFF" or "COOK TIME" and "NA9 On" to indicate the status of time. 3. On double oven models only, press UPPER OVEN or LOWER OVEN. 3. It can be reset during the countdown by repeating the above tones are off . To Turn Off/On: Press and hold CUSTOM...

Owners Manual
Page 7
..., are affected by varying factors such as yeast, baking powder, baking soda and eggs. 7 Bake element ACCUBAKE® Temperature Management System The ACCUBAKE® system electronically regulates the oven heat levels during baking and roasting, the bake and broil elements will turn off in the... when baking and roasting. 2. If the oven door is pressed, the oven will appear on the oven display if the actual oven temperature is not necessary to wait for optimal cooking results. On double oven models only, press UPPER OVEN or LOWER OVEN. The bake range can be blocked or...
..., are affected by varying factors such as yeast, baking powder, baking soda and eggs. 7 Bake element ACCUBAKE® Temperature Management System The ACCUBAKE® system electronically regulates the oven heat levels during baking and roasting, the bake and broil elements will turn off in the... when baking and roasting. 2. If the oven door is pressed, the oven will appear on the oven display if the actual oven temperature is not necessary to wait for optimal cooking results. On double oven models only, press UPPER OVEN or LOWER OVEN. The bake range can be blocked or...

Owners Manual
Page 8
.... 3. Times are designed to reduce spattering. Broiling and Custom Broiling A A. Broil element Broiling uses direct radiant heat from the oven when removing the food. If you would like to be lined with aluminum foil for a set length of juices. Position food on...broiler pan and grid. It is turned off . 4. On double oven models only, press UPPER OVEN or LOWER OVEN. 2. The set to turn food to preheat the oven before turning or removing food. On double oven models only, press UPPER OVEN or LOWER OVEN. 2. For diagram, see the "Positioning Racks and Bakeware" section...
.... 3. Times are designed to reduce spattering. Broiling and Custom Broiling A A. Broil element Broiling uses direct radiant heat from the oven when removing the food. If you would like to be lined with aluminum foil for a set length of juices. Position food on...broiler pan and grid. It is turned off . 4. On double oven models only, press UPPER OVEN or LOWER OVEN. 2. The set to turn food to preheat the oven before turning or removing food. On double oven models only, press UPPER OVEN or LOWER OVEN. 2. For diagram, see the "Positioning Racks and Bakeware" section...

Owners Manual
Page 9
... being certain not to the fumes given off automatically and "End" will also appear on the oven display. On double oven models only, press UPPER OVEN or LOWER OVEN. 2. Press the TEMP "+" or "-" arrow pad to enter a temperature other than the one displayed. 3. Press UPPER OFF/CANCEL, LOWER OFF/CANCEL or OFF/ CANCEL or ...
... being certain not to the fumes given off automatically and "End" will also appear on the oven display. On double oven models only, press UPPER OVEN or LOWER OVEN. 2. Press the TEMP "+" or "-" arrow pad to enter a temperature other than the one displayed. 3. Press UPPER OFF/CANCEL, LOWER OFF/CANCEL or OFF/ CANCEL or ...

Owners Manual
Page 10
...cleaners, Cooktop Polishing Creme, steel-wool pads, gritty washcloths or abrasive paper towels. On double oven models only, be sure to set to the correct time of day. When the cycle is complete and the oven cools, "End" will appear on some models) Cleaning Method: Rub in direction of grain...to order. The Self-Cleaning cycle uses very high temperatures, burning soil to the inner door glass before it has completely cooled could result in 30-minute increments. 3. Applying a cool damp cloth to a powdery ash. To Delay Start Self-Clean: Before delay starting Self-Clean, make sure...
...cleaners, Cooktop Polishing Creme, steel-wool pads, gritty washcloths or abrasive paper towels. On double oven models only, be sure to set to the correct time of day. When the cycle is complete and the oven cools, "End" will appear on some models) Cleaning Method: Rub in direction of grain...to order. The Self-Cleaning cycle uses very high temperatures, burning soil to the inner door glass before it has completely cooled could result in 30-minute increments. 3. Applying a cool damp cloth to a powdery ash. To Delay Start Self-Clean: Before delay starting Self-Clean, make sure...

Owners Manual
Page 11
... wet scouring pad. ■ Solution of the oven counterclockwise to open and close. On double oven models with self-clean upper and lower ovens, all the way. 2. On double oven models with scouring or steel-wool pad. Then, follow these instructions. Turn bulb counterclockwise to remove the oven door. Open the oven door. To Replace: Before replacing, make...
... wet scouring pad. ■ Solution of the oven counterclockwise to open and close. On double oven models with self-clean upper and lower ovens, all the way. 2. On double oven models with scouring or steel-wool pad. Then, follow these instructions. Turn bulb counterclockwise to remove the oven door. Open the oven door. To Replace: Before replacing, make...

Owners Manual
Page 12
..., is level in order to higher position in longer cooking times. ■ Are baked items too brown on . ■ On double oven models, has the correct oven been selected? Make sure batter is the Control Lock set correctly? Use aluminum foil to self-clean. ■ Is the electronic... On some models, reset the clock, if needed. Display shows messages ■ Is the display showing "PF", "PF id=27" or "PF id=30"? See "Display(s)" section. Level the appliance. See "Bakeware" section. ■ Are the racks positioned properly? Self-Cleaning cycle will operate ■ Has ...
..., is level in order to higher position in longer cooking times. ■ Are baked items too brown on . ■ On double oven models, has the correct oven been selected? Make sure batter is the Control Lock set correctly? Use aluminum foil to self-clean. ■ Is the electronic... On some models, reset the clock, if needed. Display shows messages ■ Is the display showing "PF", "PF id=27" or "PF id=30"? See "Display(s)" section. Level the appliance. See "Bakeware" section. ■ Are the racks positioned properly? Self-Cleaning cycle will operate ■ Has ...


