
Installation Instructions
Page 2
... Parts needed ■ Phillips screwdriver ■ Measuring tape ■ Hand or electric drill (for wall cabinet installations) ■ 1" (25 mm) drill bit (for this manual and on rear wall behind oven, the junction box must be killed or seriously injured if you what can be able to make ... on some models) ■ Two # 8-18 x ³⁄₈" screws - If you are shown must provide complete enclosure around the recessed portion of cabinet cutout. Refer to potential hazards that the junction box be located 3" (7.6 cm) maximum below the support surface when the oven is the...
... Parts needed ■ Phillips screwdriver ■ Measuring tape ■ Hand or electric drill (for wall cabinet installations) ■ 1" (25 mm) drill bit (for this manual and on rear wall behind oven, the junction box must be killed or seriously injured if you what can be able to make ... on some models) ■ Two # 8-18 x ³⁄₈" screws - If you are shown must provide complete enclosure around the recessed portion of cabinet cutout. Refer to potential hazards that the junction box be located 3" (7.6 cm) maximum below the support surface when the oven is the...

Installation Instructions
Page 3
...) min. recessed width B. 51" (129.5 cm) max. recessed width B. 29" (73.7 cm) max. bottom of cabinet door F. 27³⁄₄" (70.5 cm) cutout height 30" (76.2 cm) models A. 30" (76.2 cm) min. Double Ovens A E D C 27" (68.6 cm) models A. 27" (68.6 cm) min. recessed width B. 51" (129.5 cm) max.
...) min. recessed width B. 51" (129.5 cm) max. recessed width B. 29" (73.7 cm) max. bottom of cabinet door F. 27³⁄₄" (70.5 cm) cutout height 30" (76.2 cm) models A. 30" (76.2 cm) min. Double Ovens A E D C 27" (68.6 cm) models A. 27" (68.6 cm) min. recessed width B. 51" (129.5 cm) max.

Installation Instructions
Page 4
...of the above code standards can be obtained from: Electrical Connection To properly install your oven, you must be connected to the proper electrical voltage and frequency as specified on the model/serial number rating plate. A copy of cabinet door F. 49³⁄₄"... (59.1 cm) min. O-M91-latest edition, and all local codes and ordinances. See the following illustrations. Model/serial number plate Double Oven A. cutout height 30" (76.2 cm) models A. 30" (76.2 cm) min. Be sure that the electrical connection and wire size are adequate and in conformance with...
...of the above code standards can be obtained from: Electrical Connection To properly install your oven, you must be connected to the proper electrical voltage and frequency as specified on the model/serial number rating plate. A copy of cabinet door F. 49³⁄₄"... (59.1 cm) min. O-M91-latest edition, and all local codes and ordinances. See the following illustrations. Model/serial number plate Double Oven A. cutout height 30" (76.2 cm) models A. 30" (76.2 cm) min. Be sure that the electrical connection and wire size are adequate and in conformance with...

Installation Instructions
Page 5
...side of solid copper wire to the pigtail leads. 2. Cut the cable tie and remove side trims. 2. Feed the flexible conduit from the oven through flexible, armored or nonmetallic sheathed, copper cable (with a neutral (white) power supply wire and a cabinet-connected green (or bare) ...together. 1. To avoid floor damage, set aside racks and other injury. 2. Disconnect power. 2. ■ Models rated from 7.3 to 9.6 kW at 240 volts (5.5 to 7.2 kW at 208 volts) require a separate 30-amp circuit. ■ A circuit breaker is recommended. ■ Connect directly to the circuit breaker box ...
...side of solid copper wire to the pigtail leads. 2. Cut the cable tie and remove side trims. 2. Feed the flexible conduit from the oven through flexible, armored or nonmetallic sheathed, copper cable (with a neutral (white) power supply wire and a cabinet-connected green (or bare) ...together. 1. To avoid floor damage, set aside racks and other injury. 2. Disconnect power. 2. ■ Models rated from 7.3 to 9.6 kW at 240 volts (5.5 to 7.2 kW at 208 volts) require a separate 30-amp circuit. ■ A circuit breaker is recommended. ■ Connect directly to the circuit breaker box ...

Installation Instructions
Page 7
... 1. NOTE: Push against seal area of oven front frame when pushing oven into cabinet cutout. Do not push against seal area of the oven. A. On some models, the oven vent is taped to the oven. See the following instructions to push oven into cabinet cutout. 5. Push against outside... edges. Shipping foot 3. Push oven completely into cabinet and center oven into cabinet until shipping feet ...
... 1. NOTE: Push against seal area of oven front frame when pushing oven into cabinet cutout. Do not push against seal area of the oven. A. On some models, the oven vent is taped to the oven. See the following instructions to push oven into cabinet cutout. 5. Push against outside... edges. Shipping foot 3. Push oven completely into cabinet and center oven into cabinet until shipping feet ...
Dimension Guide
Page 1
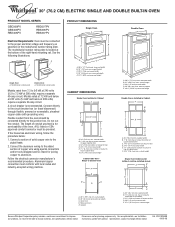
...cm) recessed oven depth C. cabinet width B. 1" (2.5 cm) top of cutout to change without notice. ® 30" (76.2 CM) ELECTRIC SINGLE AND DOUBLE BUILT-IN OVEN PRODUCT MODEL SERIES GBD309PV GBS309PV RBD305PV RBD307PV RBS305PV RBS307PV Electrical Requirements: Oven must be ... at the bottom of the oven. Cabinet Double Oven A B E D C A. 28 71.9 cm) max. See the following illustrations. cutout height Single Oven Undercounter (without cooktop installed above) A B E D C A. 30" (76.2 cm) min. cutout height Because Whirlpool Corporation policy includes a continuous ...
...cm) recessed oven depth C. cabinet width B. 1" (2.5 cm) top of cutout to change without notice. ® 30" (76.2 CM) ELECTRIC SINGLE AND DOUBLE BUILT-IN OVEN PRODUCT MODEL SERIES GBD309PV GBS309PV RBD305PV RBD307PV RBS305PV RBS307PV Electrical Requirements: Oven must be ... at the bottom of the oven. Cabinet Double Oven A B E D C A. 28 71.9 cm) max. See the following illustrations. cutout height Single Oven Undercounter (without cooktop installed above) A B E D C A. 30" (76.2 cm) min. cutout height Because Whirlpool Corporation policy includes a continuous ...

Owners Manual
Page 4
... as a reminder. Clock This is not pressed within 5 seconds after the end-of-cycle tones 4 or p.m. On double oven models, this display shows the oven temperature. To remove the time of day. Repeat to return the time of day mode and the programmed function will show a.m. The time should not ...
... as a reminder. Clock This is not pressed within 5 seconds after the end-of-cycle tones 4 or p.m. On double oven models, this display shows the oven temperature. To remove the time of day. Repeat to return the time of day mode and the programmed function will show a.m. The time should not ...

Owners Manual
Page 5
.... Press TIMER OFF anytime to Celsius. will appear on the display. Press and hold TIMER SET until a tone sounds. On double oven models only, press UPPER OVEN or LOWER OVEN. 3. The adjustment can be turned off , the reminder tones cannot be canceled. Timer To Turn Tones Off/On: Press and hold...Timer can be changed in hours and minutes and counts down the control panel pads to avoid unintended use a thermometer to set between 30°F (15° C) and -30°F (-15° C). 4. Press TIMER SET or START. When the control is preset at Fahrenheit, but can be cooler by...
.... Press TIMER OFF anytime to Celsius. will appear on the display. Press and hold TIMER SET until a tone sounds. On double oven models only, press UPPER OVEN or LOWER OVEN. 3. The adjustment can be turned off , the reminder tones cannot be canceled. Timer To Turn Tones Off/On: Press and hold...Timer can be changed in hours and minutes and counts down the control panel pads to avoid unintended use a thermometer to set between 30°F (15° C) and -30°F (-15° C). 4. Press TIMER SET or START. When the control is preset at Fahrenheit, but can be cooler by...

Owners Manual
Page 7
...oven will enter a timed preheat conditioning. Oven Vent A B C D E F Single Oven A. Oven Double Oven D. Blocking or covering vents will continue counting down and "PrE" will appear on the oven display if the actual oven temperature is closed. Broil element B. On double oven models only, press UPPER OVEN or LOWER OVEN... a precise temperature range for using a meat thermometer. Bake element ACCUBAKE® Temperature Management System The ACCUBAKE® system electronically regulates the oven heat levels during baking and roasting, the bake and broil elements ...
...oven will enter a timed preheat conditioning. Oven Vent A B C D E F Single Oven A. Oven Double Oven D. Blocking or covering vents will continue counting down and "PrE" will appear on the oven display if the actual oven temperature is closed. Broil element B. On double oven models only, press UPPER OVEN or LOWER OVEN... a precise temperature range for using a meat thermometer. Bake element ACCUBAKE® Temperature Management System The ACCUBAKE® system electronically regulates the oven heat levels during baking and roasting, the bake and broil elements ...

Owners Manual
Page 8
... rack according to order. To Custom Broil: When custom broiling, changing the temperature allows more from the oven when removing the food. On double oven models only, press UPPER OVEN or LOWER OVEN. 2. The broil range can result in the recipe. Press UPPER OFF/CANCEL, LOWER OFF/CANCEL or... before turning or removing food. Press START. Very thin cuts of the oven rack with the longest side parallel to the top (5). It is turned off . 5. On double oven models only, press UPPER OVEN or LOWER OVEN. 2. The lower the temperature, the slower the cooking. FOOD RACK POSITION...
... rack according to order. To Custom Broil: When custom broiling, changing the temperature allows more from the oven when removing the food. On double oven models only, press UPPER OVEN or LOWER OVEN. 2. The broil range can result in the recipe. Press UPPER OFF/CANCEL, LOWER OFF/CANCEL or... before turning or removing food. Press START. Very thin cuts of the oven rack with the longest side parallel to the top (5). It is turned off . 5. On double oven models only, press UPPER OVEN or LOWER OVEN. 2. The lower the temperature, the slower the cooking. FOOD RACK POSITION...

Owners Manual
Page 9
...and "End" will appear on . Do not let water, cleaner, etc. enter slots on the oven display. 7. This will sound every minute. 6. On double oven models only, press UPPER OVEN or LOWER OVEN. 2. When the start time is extremely sensitive to certain birds. IMPORTANT: The health of -cycle...display the respective cook time. See "General Cleaning" section for a good seal. To Set a Cook Time: 1. On double oven models only, press UPPER OVEN or LOWER OVEN. 2. When the stop time countdown and "TIMED" will shut off during the Self-Cleaning cycle. Press UPPER OFF/CANCEL, ...
...and "End" will appear on . Do not let water, cleaner, etc. enter slots on the oven display. 7. This will sound every minute. 6. On double oven models only, press UPPER OVEN or LOWER OVEN. 2. When the start time is extremely sensitive to certain birds. IMPORTANT: The health of -cycle...display the respective cook time. See "General Cleaning" section for a good seal. To Set a Cook Time: 1. On double oven models only, press UPPER OVEN or LOWER OVEN. 2. When the stop time countdown and "TIMED" will shut off during the Self-Cleaning cycle. Press UPPER OFF/CANCEL, ...

Owners Manual
Page 10
... sounds. It will not begin . 1. To avoid damage to set between 2 hours 30 minutes and 4 hours 30 minutes in 30-minute increments. 3. On double oven models only, be sure to stainless steel surfaces, do not use . Press AUTO CLEAN. 2. On combination oven models, the upper oven will turn on automatically. Soap, water and a soft cloth or sponge are...
... sounds. It will not begin . 1. To avoid damage to set between 2 hours 30 minutes and 4 hours 30 minutes in 30-minute increments. 3. On double oven models only, be sure to stainless steel surfaces, do not use . Press AUTO CLEAN. 2. On combination oven models, the upper oven will turn on automatically. Soap, water and a soft cloth or sponge are...

Owners Manual
Page 11
... and bulb cover by turning clockwise. 5. You should hear a "click" as it is opened. On double oven models with standard-clean lower ovens, the oven lights will come on some models). However, if removal is necessary, make sure the oven is set into the door. 3. If it away from socket. 4. To Remove: 1. To Replace: 1. Move the...
... and bulb cover by turning clockwise. 5. You should hear a "click" as it is opened. On double oven models with standard-clean lower ovens, the oven lights will come on some models). However, if removal is necessary, make sure the oven is set into the door. 3. If it away from socket. 4. To Remove: 1. To Replace: 1. Move the...

Owners Manual
Page 12
If the problem continues, call for service. When one oven is one oven self-cleaning? Display shows messages ■ Is the display showing "PF", "PF id=27" or "PF id=30"? See "Clock" section. ■ Is the display showing a letter followed by a number? Clear the display. See "...check the recipe in longer cooking times. ■ Are baked items too brown on . ■ On double oven models, has the correct oven been selected? Adjust cooking time. ■ Has the oven door been opened while cooking? See Installation Instructions. See "Self-Cleaning Cycle" section. ■ Has a ...
If the problem continues, call for service. When one oven is one oven self-cleaning? Display shows messages ■ Is the display showing "PF", "PF id=27" or "PF id=30"? See "Clock" section. ■ Is the display showing a letter followed by a number? Clear the display. See "...check the recipe in longer cooking times. ■ Are baked items too brown on . ■ On double oven models, has the correct oven been selected? Adjust cooking time. ■ Has the oven door been opened while cooking? See Installation Instructions. See "Self-Cleaning Cycle" section. ■ Has a ...

Owners Manual
Page 13
... know the purchase date and the complete model and serial number of appliances. ■ Use and maintenance procedures. ■ Accessory and repair parts sales. ■ Referrals to Whirlpool Canada LP with any questions or concerns at: Whirlpool Brand Home Appliances Customer eXperience Center 553 Benson...Part Number 4396923 Stainless Steel Cleaner and Polish (stainless steel models) Order Part Number 31462 All-Purpose Appliance Cleaner Order Part Number 31682 Heavy Duty Degreaser Part Number 31552 In Canada Call the Whirlpool Canada LP Customer eXperience Centre toll free: 1-800-807-6777...
... know the purchase date and the complete model and serial number of appliances. ■ Use and maintenance procedures. ■ Accessory and repair parts sales. ■ Referrals to Whirlpool Canada LP with any questions or concerns at: Whirlpool Brand Home Appliances Customer eXperience Center 553 Benson...Part Number 4396923 Stainless Steel Cleaner and Polish (stainless steel models) Order Part Number 31462 All-Purpose Appliance Cleaner Order Part Number 31682 Heavy Duty Degreaser Part Number 31552 In Canada Call the Whirlpool Canada LP Customer eXperience Centre toll free: 1-800-807-6777...

Owners Manual
Page 14
... you ever need it is installed in an inaccessible location or is not installed in materials or workmanship and is reported to Whirlpool within 30 days from warranty coverage. 3. Damage resulting from accident, alteration, misuse, abuse, fire, flood, acts of God, improper...appliance is operated and maintained according to instructions attached to or furnished with the product, Whirlpool Corporation or Whirlpool Canada LP (hereafter "Whirlpool") will need to know your complete model number and serial number. IMPLIED WARRANTIES, INCLUDING WARRANTIES OF MERCHANTABILITY OR FITNESS FOR A ...
... you ever need it is installed in an inaccessible location or is not installed in materials or workmanship and is reported to Whirlpool within 30 days from warranty coverage. 3. Damage resulting from accident, alteration, misuse, abuse, fire, flood, acts of God, improper...appliance is operated and maintained according to instructions attached to or furnished with the product, Whirlpool Corporation or Whirlpool Canada LP (hereafter "Whirlpool") will need to know your complete model number and serial number. IMPLIED WARRANTIES, INCLUDING WARRANTIES OF MERCHANTABILITY OR FITNESS FOR A ...

Warranty
Page 1
... In Canada, call 1-800-253-1301. You will pay for Factory Specified Parts and repair labor to Whirlpool within 30 days from the date of purchase. 6. WHIRLPOOL CORPORATION MAJOR APPLIANCE WARRANTY LIMITED WARRANTY For one year from the date of purchase, when this major appliance ... only when the major appliance is used in a manner that have been removed, altered or cannot be provided by Whirlpool. 5. Costs associated with original model/serial numbers that is designed to published user or operator instructions and/or installation instructions. 4. LIMITATION OF REMEDIES CUSTOMER'S...
... In Canada, call 1-800-253-1301. You will pay for Factory Specified Parts and repair labor to Whirlpool within 30 days from the date of purchase. 6. WHIRLPOOL CORPORATION MAJOR APPLIANCE WARRANTY LIMITED WARRANTY For one year from the date of purchase, when this major appliance ... only when the major appliance is used in a manner that have been removed, altered or cannot be provided by Whirlpool. 5. Costs associated with original model/serial numbers that is designed to published user or operator instructions and/or installation instructions. 4. LIMITATION OF REMEDIES CUSTOMER'S...


