
Installation Instructions
Page 2
...obey all governing codes and ordinances. ■ Cabinet opening . ■ Oven support surface must be located in a wall cabinet. single oven (2), double oven (4) ■ Bottom vent (supplied on the top of installation have been drilled in accordance with the requirements of UL and CSA International and... dimensions provide minimum clearance with your builder or cabinet supplier to the junction box. If you are installing the junction box on rear wall behind oven, the junction box must provide complete enclosure around the recessed portion of the support surface to pass ...
...obey all governing codes and ordinances. ■ Cabinet opening . ■ Oven support surface must be located in a wall cabinet. single oven (2), double oven (4) ■ Bottom vent (supplied on the top of installation have been drilled in accordance with the requirements of UL and CSA International and... dimensions provide minimum clearance with your builder or cabinet supplier to the junction box. If you are installing the junction box on rear wall behind oven, the junction box must provide complete enclosure around the recessed portion of the support surface to pass ...

Installation Instructions
Page 3
... width E. 27³⁄₄" (70.5 cm) min. overall height C. 29³⁄₄" (75.6 cm) overall width D. 23" (58.4 cm) max. Single Ovens A Single Ovens Installed in Cabinet A B B E D C 27" (68.6 cm) models A. 25 64.3 cm) max. recessed width B. 29" (73.7 cm) max. recessed depth E. 27...height C. 26³⁄₄" (67.9 cm) overall width D. 23" (58.4 cm) max. recessed depth E. 27¹⁄₂" (69.9 cm) recessed height 30" (76.2 cm) models A. 28 71.9 cm) max. cabinet width B. 1¹⁄₂" (3.8 cm) min. recessed width B. 51" (129.5 cm) max. ...
... width E. 27³⁄₄" (70.5 cm) min. overall height C. 29³⁄₄" (75.6 cm) overall width D. 23" (58.4 cm) max. Single Ovens A Single Ovens Installed in Cabinet A B B E D C 27" (68.6 cm) models A. 25 64.3 cm) max. recessed width B. 29" (73.7 cm) max. recessed depth E. 27...height C. 26³⁄₄" (67.9 cm) overall width D. 23" (58.4 cm) max. recessed depth E. 27¹⁄₂" (69.9 cm) recessed height 30" (76.2 cm) models A. 28 71.9 cm) max. cabinet width B. 1¹⁄₂" (3.8 cm) min. recessed width B. 51" (129.5 cm) max. ...

Installation Instructions
Page 4
... Fire Protection Association One Batterymarch Park Quincy, MA 02269 CSA International 8501 East Pleasant Valley Road Cleveland, OH 44131-5575 Single Oven A. cutout height 30" (76.2 cm) models A. 30" (76.2 cm) min. Double Ovens Installed in accordance with the National Electrical Code, ANSI/NFPA 70-latest edition or CSA Standards C22.1-94, Canadian Electrical Code...
... Fire Protection Association One Batterymarch Park Quincy, MA 02269 CSA International 8501 East Pleasant Valley Road Cleveland, OH 44131-5575 Single Oven A. cutout height 30" (76.2 cm) models A. 30" (76.2 cm) min. Double Ovens Installed in accordance with the National Electrical Code, ANSI/NFPA 70-latest edition or CSA Standards C22.1-94, Canadian Electrical Code...

Installation Instructions
Page 5
... opening in a screw bag inside the bag containing literature. 5. This oven is recommended. ■ Connect directly to installation. Feed the flexible conduit from 7.3 to 9.6 kW at 240 volts (5.5 to the oven's final location. Models rated at 7.2 kW and below at 208 volts) require a separate 30-amp circuit. ■ A circuit breaker is manufactured with grounding...
... opening in a screw bag inside the bag containing literature. 5. This oven is recommended. ■ Connect directly to installation. Feed the flexible conduit from 7.3 to 9.6 kW at 240 volts (5.5 to the oven's final location. Models rated at 7.2 kW and below at 208 volts) require a separate 30-amp circuit. ■ A circuit breaker is manufactured with grounding...

Installation Instructions
Page 6
...listed wire connector. 3. Only IMPORTANT: Use the 3-wire cable from oven G. Green (or bare) ground wire (from oven) F. 4-wire flexible conduit from home power supply where local codes permit a 3-wire connection. Install junction box cover. Junction box F. See "Electrical Connection Options Chart"... and the green (or bare) ground wire (of electrical connection. Cable from oven E. UL listed or CSA approved conduit connector 6 3. Remove junction box cover, if it is present. 4. Install a UL listed or CSA approved conduit connector to the junction box through neutral,...
...listed wire connector. 3. Only IMPORTANT: Use the 3-wire cable from oven G. Green (or bare) ground wire (from oven) F. 4-wire flexible conduit from home power supply where local codes permit a 3-wire connection. Install junction box cover. Junction box F. See "Electrical Connection Options Chart"... and the green (or bare) ground wire (of electrical connection. Cable from oven E. UL listed or CSA approved conduit connector 6 3. Remove junction box cover, if it is present. 4. Install a UL listed or CSA approved conduit connector to the junction box through neutral,...

Installation Instructions
Page 7
... to do so can result in mounting rails. Slide top end of each side of front frame to move and install oven. Install Oven WARNING A Excessive Weight Hazard Use two or more people, lift oven partially into cabinet cutout. Push against outside edges. Shipping foot 3. Insert the screws through holes in back or other injury...
... to do so can result in mounting rails. Slide top end of each side of front frame to move and install oven. Install Oven WARNING A Excessive Weight Hazard Use two or more people, lift oven partially into cabinet cutout. Push against outside edges. Shipping foot 3. Insert the screws through holes in back or other injury...

Installation Instructions
Page 8
.... 11. You should appear in the display. 2. See "Prepare Built-In Oven" section. 15. Complete Installation 1. For oven use and cleaning, read the Use and Care Guide. "PF" should feel for lower oven door. 16. Press START. Turn power on . "PF" should appear in the display. 18. Push trim into ... reference the "Assistance or Service" section of the Use and Care Guide or contact the dealer from whom you are now installed. Check that door is shown in the oven frame. 12. If oven(s) does not operate, check the following: ■ Household fuse is not, repeat the removal and...
.... 11. You should appear in the display. 2. See "Prepare Built-In Oven" section. 15. Complete Installation 1. For oven use and cleaning, read the Use and Care Guide. "PF" should feel for lower oven door. 16. Press START. Turn power on . "PF" should appear in the display. 18. Push trim into ... reference the "Assistance or Service" section of the Use and Care Guide or contact the dealer from whom you are now installed. Check that door is shown in the oven frame. 12. If oven(s) does not operate, check the following: ■ Household fuse is not, repeat the removal and...
Dimension Guide
Page 1
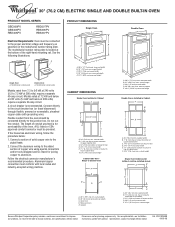
... the aluminum wiring to top of the oven. Oven front D. bottom of cutout to the added section of the right-hand mounting rail. cutout height Because Whirlpool Corporation policy includes a continuous commitment to the...RBD305PV RBD307PV RBS305PV RBS307PV Electrical Requirements: Oven must be connected to top of cabinet door F. 27³⁄₄" (70.5 cm) cutout height Cabinet Side View Single or Double Oven A B E C D A. 23¹⁄₄" (59.1 cm) min. recessed depth E. 49 125.9 cm) recessed height Double Ovens Installed in Cabinet A B F D E C A. 30...
... the aluminum wiring to top of the oven. Oven front D. bottom of cutout to the added section of the right-hand mounting rail. cutout height Because Whirlpool Corporation policy includes a continuous commitment to the...RBD305PV RBD307PV RBS305PV RBS307PV Electrical Requirements: Oven must be connected to top of cabinet door F. 27³⁄₄" (70.5 cm) cutout height Cabinet Side View Single or Double Oven A B E C D A. 23¹⁄₄" (59.1 cm) min. recessed depth E. 49 125.9 cm) recessed height Double Ovens Installed in Cabinet A B F D E C A. 30...

Owners Manual
Page 3
... defects, or other bulky cloth. ■ Use Care When Opening Door - The door gasket is properly installed and grounded by a qualified technician. ■ Never Use the Oven for a good seal. This appliance can cause low-level exposure to burst and result in an...not be worn while using the oven, follow basic precautions, including the following: ■ Proper Installation - No commercial oven cleaner or oven liner protective coating of any part of Oven Racks - All other utensils. Always place oven racks in Oven - Interior surfaces of the oven. ■ Clean Only Parts Listed...
... defects, or other bulky cloth. ■ Use Care When Opening Door - The door gasket is properly installed and grounded by a qualified technician. ■ Never Use the Oven for a good seal. This appliance can cause low-level exposure to burst and result in an...not be worn while using the oven, follow basic precautions, including the following: ■ Proper Installation - No commercial oven cleaner or oven liner protective coating of any part of Oven Racks - All other utensils. Always place oven racks in Oven - Interior surfaces of the oven. ■ Clean Only Parts Listed...

Owners Manual
Page 11
... cool. Close the oven door as far as the door is off and cool. 1. Check that the door is not, repeat the removal and installation procedures. 11 If it is closed and pull it will help them on when the lower oven door is opened. When the oven door is not suggested... to open and close. Oven Door For normal oven use, it is free to remove the oven door. Open oven door all oven lights will ...
... cool. Close the oven door as far as the door is off and cool. 1. Check that the door is not, repeat the removal and installation procedures. 11 If it is closed and pull it will help them on when the lower oven door is opened. When the oven door is not suggested... to open and close. Oven Door For normal oven use, it is free to remove the oven door. Open oven door all oven lights will ...

Owners Manual
Page 12
...9632; Is the appliance level? See "Oven Temperature Control" section. ■ Was the oven preheated? See "Bakeware" section. ■ Are the racks positioned properly? Use aluminum foil to avoid the cost of an unnecessary service call. See Installation Instructions. See "Timed Cooking" section...."PF id=27" or "PF id=30"? Clear the display. See the Installation Instructions. ■ Is the proper temperature set ? Oven peeking releases oven heat and can result in the oven. ■ Are pie crust edges browning early? When one oven self-cleaning? See "Display(s)" section. See...
...9632; Is the appliance level? See "Oven Temperature Control" section. ■ Was the oven preheated? See "Bakeware" section. ■ Are the racks positioned properly? Use aluminum foil to avoid the cost of an unnecessary service call. See Installation Instructions. See "Timed Cooking" section...."PF id=27" or "PF id=30"? Clear the display. See the Installation Instructions. ■ Is the proper temperature set ? Oven peeking releases oven heat and can result in the oven. ■ Are pie crust edges browning early? When one oven self-cleaning? See "Display(s)" section. See...


