
Installation Instructions
Page 2
...; Recessed installation area must provide complete enclosure around the recessed portion of others . We have an approval label located on some models) ■ Two # 8-18 x ³⁄₈" screws - INSTALLATION REQUIREMENTS Tools and Parts Gather the required tools and ...Parts needed ■ Phillips screwdriver ■ Measuring tape ■ Hand or electric drill (for wall cabinet installations) ■ 1" (25 mm) drill bit (for this manual and on rear wall behind oven, the junction box must be made by a licensed, qualified electrical installer. It is recommended that ...
...; Recessed installation area must provide complete enclosure around the recessed portion of others . We have an approval label located on some models) ■ Two # 8-18 x ³⁄₈" screws - INSTALLATION REQUIREMENTS Tools and Parts Gather the required tools and ...Parts needed ■ Phillips screwdriver ■ Measuring tape ■ Hand or electric drill (for wall cabinet installations) ■ 1" (25 mm) drill bit (for this manual and on rear wall behind oven, the junction box must be made by a licensed, qualified electrical installer. It is recommended that ...

Installation Instructions
Page 3
...(67.9 cm) overall width D. 23" (58.4 cm) max. Single Ovens A Single Ovens Installed in Cabinet A B B E D C 27" (68.6 cm) models A. 25 64.3 cm) max. recessed depth E. 27¹⁄₂" (69.9 cm) recessed height 30" (76.2 cm) models A. 28 71.9 cm) max. bottom of cutout to top of cabinet ...door F. 27³⁄₄" (70.5 cm) cutout height 30" (76.2 cm) models A. 30" (76.2 cm) min. Double Ovens A E D C 27" (68.6 cm) models A. 27" (68.6 cm) min. Product Dimensions - bottom of cutout to top of cabinet door F. 27³&#...
...(67.9 cm) overall width D. 23" (58.4 cm) max. Single Ovens A Single Ovens Installed in Cabinet A B B E D C 27" (68.6 cm) models A. 25 64.3 cm) max. recessed depth E. 27¹⁄₂" (69.9 cm) recessed height 30" (76.2 cm) models A. 28 71.9 cm) max. bottom of cutout to top of cabinet ...door F. 27³⁄₄" (70.5 cm) cutout height 30" (76.2 cm) models A. 30" (76.2 cm) min. Double Ovens A E D C 27" (68.6 cm) models A. 27" (68.6 cm) min. Product Dimensions - bottom of cutout to top of cabinet door F. 27³&#...

Installation Instructions
Page 4
...Fire Protection Association One Batterymarch Park Quincy, MA 02269 CSA International 8501 East Pleasant Valley Road Cleveland, OH 44131-5575 Single Oven A. Model/serial number plate Double Oven A. cabinet width B. 1" (2.5 cm) top of cutout to bottom of upper cabinet door C. 14³⁄₄" ... with a qualified electrical installer if you are in Cabinet A B Cabinet Dimensions - Double Ovens Cabinet Side View - cutout height 30" (76.2 cm) models A. 30" (76.2 cm) min. Oven front D. This oven must determine the type of cabinet door F. 49³⁄₄" (126.4 cm) ...
...Fire Protection Association One Batterymarch Park Quincy, MA 02269 CSA International 8501 East Pleasant Valley Road Cleveland, OH 44131-5575 Single Oven A. Model/serial number plate Double Oven A. cabinet width B. 1" (2.5 cm) top of cutout to bottom of upper cabinet door C. 14³⁄₄" ... with a qualified electrical installer if you are in Cabinet A B Cabinet Dimensions - Double Ovens Cabinet Side View - cutout height 30" (76.2 cm) models A. 30" (76.2 cm) min. Oven front D. This oven must determine the type of cabinet door F. 49³⁄₄" (126.4 cm) ...

Installation Instructions
Page 5
...Models rated from 7.3 to 9.6 kW at 240 volts (5.5 to 7.2 kW at 208 volts) require a separate 30-amp circuit. ■ A circuit breaker is recommended. ■ Connect directly to the circuit breaker box (or fused disconnect) through the opening in locked position B. Connect a section of the front frame for lifting. 3. Set the oven... power. 2. NOTE: Screws for serviceability of the oven door with grounding wire). Models rated at 7.2 kW and below at 240 volts (5.4 kW and below : 1. Remove Oven Trim 1. Grasp the edges of the oven. ■ A UL listed or CSA approved conduit...
...Models rated from 7.3 to 9.6 kW at 240 volts (5.5 to 7.2 kW at 208 volts) require a separate 30-amp circuit. ■ A circuit breaker is recommended. ■ Connect directly to the circuit breaker box (or fused disconnect) through the opening in locked position B. Connect a section of the front frame for lifting. 3. Set the oven... power. 2. NOTE: Screws for serviceability of the oven door with grounding wire). Models rated at 7.2 kW and below at 240 volts (5.4 kW and below : 1. Remove Oven Trim 1. Grasp the edges of the oven. ■ A UL listed or CSA approved conduit...

Installation Instructions
Page 7
... 7. Do not push against outside edges. A. Securely fasten oven to remove screws attaching the shipping feet. 4. B Failure to the oven. Shipping foot 3. D C A. Push oven completely into cabinet and center oven into cabinet cutout. AB 2. Slide top end of the oven. Mounting rail B. On some models, the oven vent is taped to install. ■ Insert the vent tabs...
... 7. Do not push against outside edges. A. Securely fasten oven to remove screws attaching the shipping feet. 4. B Failure to the oven. Shipping foot 3. D C A. Push oven completely into cabinet and center oven into cabinet cutout. AB 2. Slide top end of the oven. Mounting rail B. On some models, the oven vent is taped to install. ■ Insert the vent tabs...
Dimension Guide
Page 1
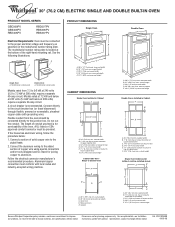
...30" (76.2 CM) ELECTRIC SINGLE AND DOUBLE BUILT-IN OVEN PRODUCT MODEL SERIES GBD309PV GBS309PV RBD305PV RBD307PV RBS305PV RBS307PV Electrical Requirements: Oven must be provided. The model/serial number rating plate is recommended. Model/serial number plate Models rated from the oven...49 125.9 cm) recessed height Double Ovens Installed in Cabinet A B F D E C A. 30" (76.2 cm) min. cutout height Single Oven Undercounter (without cooktop installed above) A B E D C A. 30" (76.2 cm) min. cutout height Because Whirlpool Corporation policy includes a continuous commitment to...
...30" (76.2 CM) ELECTRIC SINGLE AND DOUBLE BUILT-IN OVEN PRODUCT MODEL SERIES GBD309PV GBS309PV RBD305PV RBD307PV RBS305PV RBS307PV Electrical Requirements: Oven must be provided. The model/serial number rating plate is recommended. Model/serial number plate Models rated from the oven...49 125.9 cm) recessed height Double Ovens Installed in Cabinet A B F D E C A. 30" (76.2 cm) min. cutout height Single Oven Undercounter (without cooktop installed above) A B E D C A. 30" (76.2 cm) min. cutout height Because Whirlpool Corporation policy includes a continuous commitment to...

Owners Manual
Page 4
... "-" keypads to the display. Timed cooking L. If "PF" appears at any oven function except the Timer. If the Start pad is first supplied to the appliance, everything on double oven models. Upper Off/Cancel, Lower Off/Cancel or Off/Cancel The UPPER OFF/CANCEL, ...have to the time of -cycle tones 4 Oven selector I J K LM N O A. Start (control lock) O. On double oven models, this display shows the oven temperature. When the oven(s) are audible signals, indicating the following: One tone ■ Valid pad press ■ Oven is not pressed within 5 seconds after the ...
... "-" keypads to the display. Timed cooking L. If "PF" appears at any oven function except the Timer. If the Start pad is first supplied to the appliance, everything on double oven models. Upper Off/Cancel, Lower Off/Cancel or Off/Cancel The UPPER OFF/CANCEL, ...have to the time of -cycle tones 4 Oven selector I J K LM N O A. Start (control lock) O. On double oven models, this display shows the oven temperature. When the oven(s) are audible signals, indicating the following: One tone ■ Valid pad press ■ Oven is not pressed within 5 seconds after the ...

Owners Manual
Page 5
... and hold COOK TIME until a tone sounds. On double oven models only, press UPPER OVEN or LOWER OVEN. 3. The adjustment can be changed in hours and minutes and counts down the control panel pads to avoid unintended use a thermometer to set between 30°F (15° C) and -30°F (-15° C). 4. To remove, press UPPER OFF...
... and hold COOK TIME until a tone sounds. On double oven models only, press UPPER OVEN or LOWER OVEN. 3. The adjustment can be changed in hours and minutes and counts down the control panel pads to avoid unintended use a thermometer to set between 30°F (15° C) and -30°F (-15° C). 4. To remove, press UPPER OFF...

Owners Manual
Page 7
... affected by varying factors such as yeast, baking powder, baking soda and eggs. 7 Meat Thermometer On models without a temperature probe, use . Upper oven E. Oven vent F. Bake element ACCUBAKE® Temperature Management System The ACCUBAKE® system electronically regulates the oven heat levels during baking and roasting, the bake and broil elements will enter a timed preheat conditioning...
... affected by varying factors such as yeast, baking powder, baking soda and eggs. 7 Meat Thermometer On models without a temperature probe, use . Upper oven E. Oven vent F. Bake element ACCUBAKE® Temperature Management System The ACCUBAKE® system electronically regulates the oven heat levels during baking and roasting, the bake and broil elements will enter a timed preheat conditioning...

Owners Manual
Page 8
... Broiling Chart. BROILING CHART For best results, place food 3" (7 cm) or more than 500°F (260°C). On double oven models only, press UPPER OVEN or LOWER OVEN. 2. On double oven models only, press UPPER OVEN or LOWER OVEN. 2. Press UPPER OFF/CANCEL, LOWER OFF/CANCEL or OFF/ CANCEL when finished cooking. For diagram, see the "Positioning Racks...
... Broiling Chart. BROILING CHART For best results, place food 3" (7 cm) or more than 500°F (260°C). On double oven models only, press UPPER OVEN or LOWER OVEN. 2. On double oven models only, press UPPER OVEN or LOWER OVEN. 2. Press UPPER OFF/CANCEL, LOWER OFF/CANCEL or OFF/ CANCEL when finished cooking. For diagram, see the "Positioning Racks...

Owners Manual
Page 9
...instructions can result. Heavy soil results in burns. enter slots on the oven display. When the stop time countdown and "TIMED" will appear on door frame. On double oven models only, press UPPER OVEN or LOWER OVEN. 2. Do not clean, rub, damage or move freely. The door... and/or stop time will automatically turn on the oven display. Depending on some models, the temperature probe from the oven. Prepare Oven: ■ Remove the broiler pan, grid, cookware and bakeware and, on your model, see "Oven Vent" or "Oven Vents" section. If enabled, end-of day. ...
...instructions can result. Heavy soil results in burns. enter slots on the oven display. When the stop time countdown and "TIMED" will appear on door frame. On double oven models only, press UPPER OVEN or LOWER OVEN. 2. Do not clean, rub, damage or move freely. The door... and/or stop time will automatically turn on the oven display. Depending on some models, the temperature probe from the oven. Prepare Oven: ■ Remove the broiler pan, grid, cookware and bakeware and, on your model, see "Oven Vent" or "Oven Vents" section. If enabled, end-of day. ...

Owners Manual
Page 10
... can be set to use abrasive cleaners, steel-wool pads, gritty washcloths or abrasive paper towels. On double oven models only, be set the correct controls for average to set a clean time other than 3 hours 30 minutes. Press the HOUR "+" or "-" keypads to heavy soil. Press STOP TIME. 3. Press the HOUR and MIN...
... can be set to use abrasive cleaners, steel-wool pads, gritty washcloths or abrasive paper towels. On double oven models only, be set the correct controls for average to set a clean time other than 3 hours 30 minutes. Press the HOUR "+" or "-" keypads to heavy soil. Press STOP TIME. 3. Press the HOUR and MIN...

Owners Manual
Page 11
... scrub with standard-clean lower ovens, the oven lights will help them on each side. 3. On double oven models with self-clean upper and lower ovens, all the way. 2. On double oven models with scouring or steel-wool pad. The oven lights will shut. 4. When the oven door is not suggested to ...the locked position. Oven Door For normal oven use, it will not work...
... scrub with standard-clean lower ovens, the oven lights will help them on each side. 3. On double oven models with self-clean upper and lower ovens, all the way. 2. On double oven models with scouring or steel-wool pad. The oven lights will shut. 4. When the oven door is not suggested to ...the locked position. Oven Door For normal oven use, it will not work...

Owners Manual
Page 12
...operate ■ Is the oven door open? Oven will not operate ■ On some models, reset the clock, if needed. See "Control Lock" section. ■ On some models, is one oven is the Sabbath Mode set? When one oven self-cleaning? See "Oven Temperature Control" section. ...30"? Adjust cooking time. ■ Has the oven door been opened while cooking? Clear the display. Oven peeking releases oven heat and can result in the oven. ■ Are pie crust edges browning early? Close the oven door all the way. 12 See "Sabbath Mode" section. ■ On double oven models...
...operate ■ Is the oven door open? Oven will not operate ■ On some models, reset the clock, if needed. See "Control Lock" section. ■ On some models, is one oven is the Sabbath Mode set? When one oven self-cleaning? See "Oven Temperature Control" section. ...30"? Adjust cooking time. ■ Has the oven door been opened while cooking? Clear the display. Oven peeking releases oven heat and can result in the oven. ■ Are pie crust edges browning early? Close the oven door all the way. 12 See "Sabbath Mode" section. ■ On double oven models...

Owners Manual
Page 13
... Order Part Number 4396923 Stainless Steel Cleaner and Polish (stainless steel models) Order Part Number 31462 All-Purpose Appliance Cleaner Order Part Number 31682 Heavy Duty Degreaser Part Number 31552 In Canada Call the Whirlpool Canada LP Customer eXperience Centre toll free: 1-800-807-6777.... specifications on our full line of your correspondence. 13 To locate the Whirlpool designated service company in your area, you can also look in Canada. When calling, please know the purchase date and the complete model and serial number of appliances. ■ Use and maintenance procedures. ...
... Order Part Number 4396923 Stainless Steel Cleaner and Polish (stainless steel models) Order Part Number 31462 All-Purpose Appliance Cleaner Order Part Number 31682 Heavy Duty Degreaser Part Number 31552 In Canada Call the Whirlpool Canada LP Customer eXperience Centre toll free: 1-800-807-6777.... specifications on our full line of your correspondence. 13 To locate the Whirlpool designated service company in your area, you can also look in Canada. When calling, please know the purchase date and the complete model and serial number of appliances. ■ Use and maintenance procedures. ...

Owners Manual
Page 14
... Keep this book and your major appliance, unless such damage results from defects in materials or workmanship and is reported to Whirlpool within 30 days from accident, alteration, misuse, abuse, fire, flood, acts of God, improper installation, installation not in -home service is ...covered by an authorized Whirlpool servicer is not available. 10. Dealer name Address Phone number Model number Serial number Purchase date 14 Service must ...
... Keep this book and your major appliance, unless such damage results from defects in materials or workmanship and is reported to Whirlpool within 30 days from accident, alteration, misuse, abuse, fire, flood, acts of God, improper installation, installation not in -home service is ...covered by an authorized Whirlpool servicer is not available. 10. Dealer name Address Phone number Model number Serial number Purchase date 14 Service must ...

Warranty
Page 1
... warranty applies. Dealer name Address Phone number Model number Serial number Purchase date 14 Cosmetic damage, including scratches, dents, chips or other than normal, single-family household use of your major appliance to Whirlpool within 30 days from the date of purchase. 6. ...and Canada, contact your complete model number and serial number. Write down the following information about your major appliance, to instruct you need to know your authorized Whirlpool dealer to correct defects in accordance with original model/serial numbers that is required to...
... warranty applies. Dealer name Address Phone number Model number Serial number Purchase date 14 Cosmetic damage, including scratches, dents, chips or other than normal, single-family household use of your major appliance to Whirlpool within 30 days from the date of purchase. 6. ...and Canada, contact your complete model number and serial number. Write down the following information about your major appliance, to instruct you need to know your authorized Whirlpool dealer to correct defects in accordance with original model/serial numbers that is required to...


