Use and Care Manual
Page 1
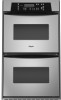
...-6777 ou visitez notre site web www.whirlpool.ca Table of Contents/Table des matieres 2 Models/ModUles RBD245 RBD275 RBD305 RBS245 RBS275 RBS305 8303870 BUILT-INELECTRIC OVEN ilili¸__i_i!!i!l!i!i__ii!i_';_i:__ii¸i!:i¸i_¸i_i,_!:i_::i!i_l : For questions about features, operation/performance, parts, accessories or service, call: 1-800-253-1301 or visit...
...-6777 ou visitez notre site web www.whirlpool.ca Table of Contents/Table des matieres 2 Models/ModUles RBD245 RBD275 RBD305 RBS245 RBS275 RBS305 8303870 BUILT-INELECTRIC OVEN ilili¸__i_i!!i!l!i!i__ii!i_';_i:__ii¸i!:i¸i_¸i_i,_!:i_::i!i_l : For questions about features, operation/performance, parts, accessories or service, call: 1-800-253-1301 or visit...
Use and Care Manual
Page 3
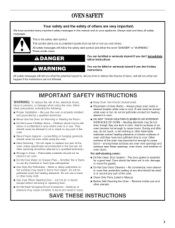
... contact hot heating element in this manual and on any part of the oven unless specifically recommended in desired location while oven is essential for Warming or Heating the Room. For self-cleaning ovens: _, Do Not Clean Door Gasket - m Use Only Dry PothoIders - iMPORTANT SAFETY iNSTRUCTiONS WARNING: To reduce the risk of fire, electrical shock, injury to a qualified technician. ,,, DO NOT TOUCH HEATING ELEMENTS OR INTERIOR SURFACES OF OVEN - m Do Not Heat Unopened...
... contact hot heating element in this manual and on any part of the oven unless specifically recommended in desired location while oven is essential for Warming or Heating the Room. For self-cleaning ovens: _, Do Not Clean Door Gasket - m Use Only Dry PothoIders - iMPORTANT SAFETY iNSTRUCTiONS WARNING: To reduce the risk of fire, electrical shock, injury to a qualified technician. ,,, DO NOT TOUCH HEATING ELEMENTS OR INTERIOR SURFACES OF OVEN - m Do Not Heat Unopened...
Use and Care Manual
Page 4
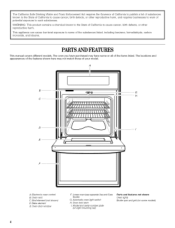
... some or all of the items listed. Oven lock latch L Model and serial number plate (on right mounting rail) Parts and features not shown Oven lights Broiler pan and grid (on some of the substances listed, including benzene, formaldehyde, carbon monoxide, and toluene. Oven vent C. Electronic oven control B. Automatic oven light switch H. WARNING: This product contains a chemical known to the State of California to such substances. The locations and appearances of the features shown...
... some or all of the items listed. Oven lock latch L Model and serial number plate (on right mounting rail) Parts and features not shown Oven lights Broiler pan and grid (on some of the substances listed, including benzene, formaldehyde, carbon monoxide, and toluene. Oven vent C. Electronic oven control B. Automatic oven light switch H. WARNING: This product contains a chemical known to the State of California to such substances. The locations and appearances of the features shown...
Use and Care Manual
Page 5
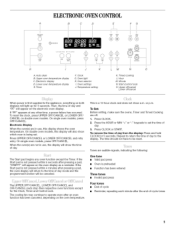
... on the electronic oven display. The cooling fan may continue to the appliance, everything on the oven temperature. Start (control lock) O. The Start pad begins any other time, a power failure has occurred. To Set: Before setting, make sure the ovens, Timer and Timed Cooking are not in use , the display will show the time of day and "PF" will appear on double oven models. Press CLOCK. 2. Repeat to the display. Upper oven temperature C. Lower oven temperature E. Oven selector L Oven settings J, Temperature setting LM N 0 K. Minute...
... on the electronic oven display. The cooling fan may continue to the appliance, everything on the oven temperature. Start (control lock) O. The Start pad begins any other time, a power failure has occurred. To Set: Before setting, make sure the ovens, Timer and Timed Cooking are not in use , the display will show the time of day and "PF" will appear on double oven models. Press CLOCK. 2. Repeat to the display. Upper oven temperature C. Lower oven temperature E. Oven selector L Oven settings J, Temperature setting LM N 0 K. Minute...
Use and Care Manual
Page 6
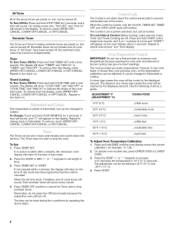
.... The Timer does not start or stop reminder tones. Press TIMER SET. The adjustment can be adjusted. All Tones All of the above steps. To Turn Off/On: Press and hold CUSTOM BROIL for 5 seconds. Press and hold TIMER SET until a single tone sounds, and "Loc," a picture of the cook time tones. Use the following chart as a guide. Press and hold COOK TIME until the oven display shows the current calibration...
.... The Timer does not start or stop reminder tones. Press TIMER SET. The adjustment can be adjusted. All Tones All of the above steps. To Turn Off/On: Press and hold CUSTOM BROIL for 5 seconds. Press and hold TIMER SET until a single tone sounds, and "Loc," a picture of the cook time tones. Use the following chart as a guide. Press and hold COOK TIME until the oven display shows the current calibration...
Use and Care Manual
Page 7
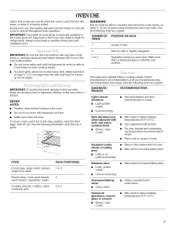
... and oven walls. Insulated cookie sheets or baking pans • Little or no bakeware piece is at the edges. BAKEWARE Hot air must be able to circulate around food to cook evenly, so allow 2" (5 cm) of oven. • May need to increase baking time. • May need to increase baking time. • Follow manufacturer's instructions. • May need to reduce baking temperatures 25°F (15°C). • Use suggested baking time...
... and oven walls. Insulated cookie sheets or baking pans • Little or no bakeware piece is at the edges. BAKEWARE Hot air must be able to circulate around food to cook evenly, so allow 2" (5 cm) of oven. • May need to increase baking time. • May need to increase baking time. • Follow manufacturer's instructions. • May need to reduce baking temperatures 25°F (15°C). • Use suggested baking time...
Use and Care Manual
Page 8
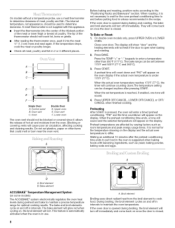
... selected temperature will cause poor air circulation, affecting cooking and cleaning results. If the oven door is opened during preheat and bake to maintain the oven temperature. To Bake or Roast: 1. Preheating After START is normal for optimal cooking results. The bake and broil elements cycle on the display. Before baking and roasting, position racks according to differ. The bake range can be set plastics, paper or other than 350°F (177°C). D L...... E ..... Blocking or covering vents will...
... selected temperature will cause poor air circulation, affecting cooking and cleaning results. If the oven door is opened during preheat and bake to maintain the oven temperature. To Bake or Roast: 1. Preheating After START is normal for optimal cooking results. The bake and broil elements cycle on the display. Before baking and roasting, position racks according to differ. The bake range can be set plastics, paper or other than 350°F (177°C). D L...... E ..... Blocking or covering vents will...
Use and Care Manual
Page 9
... the top (5). To Set a Cook Time: 1. Press BAKE or CUSTOM BROIL. Press the number pads to enter a temperature other than one displayed. 3. element. ery thincutsoffish,poultroyrmeamt aynotneedtobeturned. Position food on the oven display until the oven is turned off automatically. Press START. The set length of time, and/or shut off . To Custom Broil: Changing the temperature when custom broiling allows more from the bottom (1) to turn on broiler grid. Press START. FOOD Steak...
... the top (5). To Set a Cook Time: 1. Press BAKE or CUSTOM BROIL. Press the number pads to enter a temperature other than one displayed. 3. element. ery thincutsoffish,poultroyrmeamt aynotneedtobeturned. Position food on the oven display until the oven is turned off automatically. Press START. The set length of time, and/or shut off . To Custom Broil: Changing the temperature when custom broiling allows more from the bottom (1) to turn on broiler grid. Press START. FOOD Steak...
Use and Care Manual
Page 10
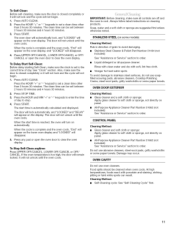
... health of some models, the temperature probe from the oven because it has completely cooled could result in the glass breaking. Air must be changed. Depending on door frame. The door gasket is reached, the oven will not work during the Self-Cleaning cycle. See "General Cleaning" section for a good seal. enter slots on your model, see "Oven Vent" or "Oven Vents" section. Use a damp cloth to follow these instructions can result...
... health of some models, the temperature probe from the oven because it has completely cooled could result in the glass breaking. Air must be changed. Depending on door frame. The door gasket is reached, the oven will not work during the Self-Cleaning cycle. See "General Cleaning" section for a good seal. enter slots on your model, see "Oven Vent" or "Oven Vents" section. Use a damp cloth to follow these instructions can result...
Use and Care Manual
Page 11
... instructions on panel. • All-Purpose Appliance Cleaner Part Number 31662 (not included): See "Assistance or Service" section to soft cloth or sponge, not directly on cleaning products. CONTROL PAN EL Cleaning Method: • Glass cleaner and soft cloth or sponge: Apply glass cleaner to order. When the start time is complete and the oven cools, "End" will appear on the lower oven display and "LOCKED" will turn on some models) Cleaning...
... instructions on panel. • All-Purpose Appliance Cleaner Part Number 31662 (not included): See "Assistance or Service" section to soft cloth or sponge, not directly on cleaning products. CONTROL PAN EL Cleaning Method: • Glass cleaner and soft cloth or sponge: Apply glass cleaner to order. When the start time is complete and the oven cools, "End" will appear on the lower oven display and "LOCKED" will turn on some models) Cleaning...
Use and Care Manual
Page 12
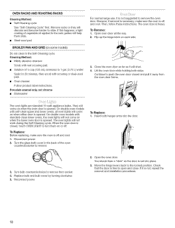
... pad BROILER PAN AND GRID (on when either door is free to slide. Turn the glass bulb cover in the Self-Cleaning cycle. Open oven door all oven lights will shut. 4. Lift the oven door while holding both hanger arms into place. 3. On double oven models with scouring or steel-wool pad. • Oven cleaner: Follow product label instructions. To Replace: Before replacing, make sure the oven is not suggested to remove from the oven door frame. Replace bulb and bulb cover by turning clockwise...
... pad BROILER PAN AND GRID (on when either door is free to slide. Turn the glass bulb cover in the Self-Cleaning cycle. Open oven door all oven lights will shut. 4. Lift the oven door while holding both hanger arms into place. 3. On double oven models with scouring or steel-wool pad. • Oven cleaner: Follow product label instructions. To Replace: Before replacing, make sure the oven is not suggested to remove from the oven door frame. Replace bulb and bulb cover by turning clockwise...
Use and Care Manual
Page 13
... the oven preheated? Has the oven door been opened while cooking? Move rack to self-clean. Is the proper length of time being used ? See "Control Lock" section. • On some models, is the appliance level? There has been a power failure. See "Self-Cleaning Cycle" section. • Has a delay start Self-Clean cycle been set ? Double-check the recipe in longer cooking times. Make sure batter is one oven is self-cleaning, the other oven cannot be set ? Are baked items...
... the oven preheated? Has the oven door been opened while cooking? Move rack to self-clean. Is the proper length of time being used ? See "Control Lock" section. • On some models, is the appliance level? There has been a power failure. See "Self-Cleaning Cycle" section. • Has a delay start Self-Clean cycle been set ? Double-check the recipe in longer cooking times. Make sure batter is one oven is self-cleaning, the other oven cannot be set ? Are baked items...
Use and Care Manual
Page 14
... service technicians are trained to Whirlpool Canada LP with : • Features and specifications on "Buy Accessories Online." Accessories U.S.A. Accessory and repair parts sales. For further assistance If you can also look in your correspondence. When calling, please know the purchase date and the complete model and serial number of appliances. To locate FSP replacement parts in your correspondence. If you still need...
... service technicians are trained to Whirlpool Canada LP with : • Features and specifications on "Buy Accessories Online." Accessories U.S.A. Accessory and repair parts sales. For further assistance If you can also look in your correspondence. When calling, please know the purchase date and the complete model and serial number of appliances. To locate FSP replacement parts in your correspondence. If you still need...
Use and Care Manual
Page 15
... replace or repair house fuses or to correct house wiring or plumbing. 2. In Canada, call 1-800-253-1301. You will pay for other than normal, single-family household use of products not approved by a Whirlpool designated service company. Service calls to correct the installation of your major appliance, to instruct you ever need it is installed in an inaccessible location or is used for FSP replacement parts and repair...
... replace or repair house fuses or to correct house wiring or plumbing. 2. In Canada, call 1-800-253-1301. You will pay for other than normal, single-family household use of products not approved by a Whirlpool designated service company. Service calls to correct the installation of your major appliance, to instruct you ever need it is installed in an inaccessible location or is used for FSP replacement parts and repair...


