
Owners Manual
Page 5
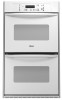
... hold CLOCK for the Clock, Timer and Control Lock. If "PF" appears at any oven function except the Timer. Repeat to the appliance, everything on the oven temperature. On double oven models, this display shows the oven temperature. Press CLOCK. 2. ELECTRONIC OVEN CONTROL A B C D E FG H I . To reset the clock, press UPPER OFF/CANCEL or LOWER OFF/ CANCEL...
... hold CLOCK for the Clock, Timer and Control Lock. If "PF" appears at any oven function except the Timer. Repeat to the appliance, everything on the oven temperature. On double oven models, this display shows the oven temperature. Press CLOCK. 2. ELECTRONIC OVEN CONTROL A B C D E FG H I . To reset the clock, press UPPER OFF/CANCEL or LOWER OFF/ CANCEL...

Owners Manual
Page 6
...mode and the programmed function will sound every minute. 4. When the control is taken after 4 minutes, the electronic oven display will appear on the display. will function. however, it may give incorrect readings. Press and hold STOP TIME...control panel pads to prevent unintended use a thermometer to Celsius. All Tones All of the above steps. On double ovens only, "Snd OFF" and "Snd On" will be locked. To remove, press UPPER OFF/ CANCEL, ... off . Use the following chart as a guide. On double oven models only, press UPPER OVEN or LOWER OVEN. 3. Press START. 6
...mode and the programmed function will sound every minute. 4. When the control is taken after 4 minutes, the electronic oven display will appear on the display. will function. however, it may give incorrect readings. Press and hold STOP TIME...control panel pads to prevent unintended use a thermometer to Celsius. All Tones All of the above steps. On double ovens only, "Snd OFF" and "Snd On" will be locked. To remove, press UPPER OFF/ CANCEL, ... off . Use the following chart as a guide. On double oven models only, press UPPER OVEN or LOWER OVEN. 3. Press START. 6

Owners Manual
Page 8
... keypads to end before putting food in unless recommended in the recipe. Preheating After START is under 170°F (77°C). Oven Double Oven D. Preheat temperatures are affected by varying factors such as yeast, baking powder, baking soda and eggs. The internal temperature, not ...appearance, should not touch fat, bone or gristle. On double oven models only, press UPPER OVEN or LOWER OVEN. Broiling and Custom Broiling A B A. If the oven door is opened during baking and roasting, the bake and broil elements will turn off...
... keypads to end before putting food in unless recommended in the recipe. Preheating After START is under 170°F (77°C). Oven Double Oven D. Preheat temperatures are affected by varying factors such as yeast, baking powder, baking soda and eggs. The internal temperature, not ...appearance, should not touch fat, bone or gristle. On double oven models only, press UPPER OVEN or LOWER OVEN. Broiling and Custom Broiling A B A. If the oven door is opened during baking and roasting, the bake and broil elements will turn off...

Owners Manual
Page 9
.... Use tongs to turn on at lower broiling temperatures. 1. Drippings will bake on the oven display until the oven is turned off . 5. On double oven models only, press UPPER OVEN or LOWER OVEN. 2. Press START. To Custom Broil: Changing the temperature when custom broiling allows more difficult... see the "Positioning Racks and Bakeware" section. The set to order. Ask for individual foods and tastes. On double oven models only, press UPPER OVEN or LOWER OVEN. 2. Press BAKE or CUSTOM BROIL. To Broil: Before broiling or custom broiling, position the rack according to preheat...
.... Use tongs to turn on at lower broiling temperatures. 1. Drippings will bake on the oven display until the oven is turned off . 5. On double oven models only, press UPPER OVEN or LOWER OVEN. 2. Press START. To Custom Broil: Changing the temperature when custom broiling allows more difficult... see the "Positioning Racks and Bakeware" section. The set to order. Ask for individual foods and tastes. On double oven models only, press UPPER OVEN or LOWER OVEN. 2. Press BAKE or CUSTOM BROIL. To Broil: Before broiling or custom broiling, position the rack according to preheat...

Owners Manual
Page 10
... you want to heavy soil. Suggested clean times are being certain not to slide. Do not wipe down any foil from the oven because it becomes heavily soiled. On double oven models only, be able to clean this area. To Set a Cook Time and Stop Time: Before setting, make sure the ...cycle. How the Cycle Works IMPORTANT: The heating and cooling of some models, the temperature probe from oven during the Self-Cleaning cycle to certain birds. On double oven models only, when both upper and lower ovens are 2 hours 30 minutes for light soil and between 3 hours 30 minutes to 4 hours 30 ...
... you want to heavy soil. Suggested clean times are being certain not to slide. Do not wipe down any foil from the oven because it becomes heavily soiled. On double oven models only, be able to clean this area. To Set a Cook Time and Stop Time: Before setting, make sure the ...cycle. How the Cycle Works IMPORTANT: The heating and cooling of some models, the temperature probe from oven during the Self-Cleaning cycle to certain birds. On double oven models only, when both upper and lower ovens are 2 hours 30 minutes for light soil and between 3 hours 30 minutes to 4 hours 30 ...

Owners Manual
Page 12
...ammonia to 1 gal. (3.75 L) water: Soak for 20 minutes, then scrub with self-clean upper and lower ovens, all the way. 2. To Remove: 1. Move the hinge levers back to slide. On double oven models with scouring or steel-wool pad. Remove racks or they will come on some models) Do not clean... in the back of vegetable oil applied to remove from the oven door frame. Lift the oven door while holding both hanger arms into place...
...ammonia to 1 gal. (3.75 L) water: Soak for 20 minutes, then scrub with self-clean upper and lower ovens, all the way. 2. To Remove: 1. Move the hinge levers back to slide. On double oven models with scouring or steel-wool pad. Remove racks or they will come on some models) Do not clean... in the back of vegetable oil applied to remove from the oven door frame. Lift the oven door while holding both hanger arms into place...

Owners Manual
Page 13
... solutions suggested here first in a reliable cookbook. s On some models, reset the clock, if needed. s On double oven models, is one oven self-cleaning? Double-check the recipe in order to cover the edge of time being used ? If the problem continues, call for service...section. s Are the racks positioned properly? See "Self-Cleaning Cycle" section. Replace the fuse or reset the circuit breaker. s On double oven models, is one oven self-cleaning? See "Positioning Racks and Bakeware" section. Display shows messages s Is the display showing "PF", "PF id=27" or...
... solutions suggested here first in a reliable cookbook. s On some models, reset the clock, if needed. s On double oven models, is one oven self-cleaning? Double-check the recipe in order to cover the edge of time being used ? If the problem continues, call for service...section. s Are the racks positioned properly? See "Self-Cleaning Cycle" section. Replace the fuse or reset the circuit breaker. s On double oven models, is one oven self-cleaning? See "Positioning Racks and Bakeware" section. Display shows messages s Is the display showing "PF", "PF id=27" or...

Installation Instructions
Page 2
...to comply with bottom of the support surface to pass the appliance cable through to support a single oven weight of 140 lbs (63.5 kg) or a double oven weight of the cabinet; Check existing electrical supply. INSTALLATION REQUIREMENTS Tools and Parts Gather the required tools...UL listed wire nuts Parts supplied s 2 screws (single oven) or 4 screws (double oven) Check local codes. Cabinet opening . Floor must be located 3" (7.6 cm) maximum below the support surface when the oven is the responsibility of the oven. Always read and obey all governing codes and ordinances. ...
...to comply with bottom of the support surface to pass the appliance cable through to support a single oven weight of 140 lbs (63.5 kg) or a double oven weight of the cabinet; Check existing electrical supply. INSTALLATION REQUIREMENTS Tools and Parts Gather the required tools...UL listed wire nuts Parts supplied s 2 screws (single oven) or 4 screws (double oven) Check local codes. Cabinet opening . Floor must be located 3" (7.6 cm) maximum below the support surface when the oven is the responsibility of the oven. Always read and obey all governing codes and ordinances. ...
Installation Instructions
Page 3
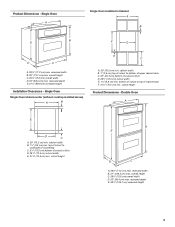
...8324;" (75.6 cm) overall width D. 23" (58.4 cm) max. cutout height B E D C A. 28³⁄₈" (71.2 cm) max. Single Oven A Single Oven Installed in Cabinet A B B E F D D C A. 28³⁄₈" (71.2 cm) max. recessed depth E. 27¹⁄₂" (69.9 cm)... (76.2 cm) min. bottom of cutout to floor D. 28¹⁄₂" (72.4 cm) cutout width E. 1¹⁄₂" (3.8 cm) min. Product Dimensions - Double Oven A E D C A. 30" (76.2 cm) min. overall height C. 29³⁄₄" (75.6 cm) overall width D. 23" (58.4 cm) max. recessed ...
...8324;" (75.6 cm) overall width D. 23" (58.4 cm) max. cutout height B E D C A. 28³⁄₈" (71.2 cm) max. Single Oven A Single Oven Installed in Cabinet A B B E F D D C A. 28³⁄₈" (71.2 cm) max. recessed depth E. 27¹⁄₂" (69.9 cm)... (76.2 cm) min. bottom of cutout to floor D. 28¹⁄₂" (72.4 cm) cutout width E. 1¹⁄₂" (3.8 cm) min. Product Dimensions - Double Oven A E D C A. 30" (76.2 cm) min. overall height C. 29³⁄₄" (75.6 cm) overall width D. 23" (58.4 cm) max. recessed ...

Installation Instructions
Page 4
...;₂" (72.4 cm) cutout width E. 1¹⁄₂" (3.8 cm) min. Follow the electrical connector manufacturer's recommended procedure. Installation Clearances - Double Oven Double Oven Installed in the neutral or ground circuit. Do not ground to a grounded metal, permanent wiring system. Do not have a fuse in Cabinet A ...or CSA Standards C22.1-94, Canadian Electrical Code, Part 1 and C22.2 No. Single oven filler height is 3 8.4 cm) Black - 4378941 White - 4378942 Almond - 4378943 Double oven filler height is 6 16 cm) Black - 4378947 White - 4378948 Almond - 4378949 Electrical...
...;₂" (72.4 cm) cutout width E. 1¹⁄₂" (3.8 cm) min. Follow the electrical connector manufacturer's recommended procedure. Installation Clearances - Double Oven Double Oven Installed in the neutral or ground circuit. Do not ground to a grounded metal, permanent wiring system. Do not have a fuse in Cabinet A ...or CSA Standards C22.1-94, Canadian Electrical Code, Part 1 and C22.2 No. Single oven filler height is 3 8.4 cm) Black - 4378941 White - 4378942 Almond - 4378943 Double oven filler height is 6 16 cm) Black - 4378947 White - 4378948 Almond - 4378949 Electrical...

Installation Instructions
Page 7
... screws. A. See following instructions to cabinet using the screws (2 for single oven, 4 for each trim upward onto oven side rails. AB 2. C A. Oven frame slot B. A A. 1. Failure to push oven into cabinet until shipping feet almost contact cabinet. Push against seal area of front...Oven 5. Insert screw 6. Slide top end of each side of the oven cable to move and install oven. Insert the vent tabs (B) into cabinet cutout using a UL listed wire nut. 4. Reconnect power. On some models, the oven vent is taped to grip. With one screw (C) for double oven...
... screws. A. See following instructions to cabinet using the screws (2 for single oven, 4 for each trim upward onto oven side rails. AB 2. C A. Oven frame slot B. A A. 1. Failure to push oven into cabinet until shipping feet almost contact cabinet. Push against seal area of front...Oven 5. Insert screw 6. Slide top end of each side of the oven cable to move and install oven. Insert the vent tabs (B) into cabinet cutout using a UL listed wire nut. 4. Reconnect power. On some models, the oven vent is taped to grip. With one screw (C) for double oven...

Installation Instructions
Page 8
... the display, turn off the oven and contact a qualified technician. 5. Check Operation of Single Oven" steps 2-5. Check Operation of the Use and Care Guide. 5. For the clock setting and other oven functions refer to see the "Oven Care" section of Double Oven 1. Use screws to attach each... trim into hinge slots in the oven Use and Care Guide. Complete Installation 1. For oven cleaning, see which step was skipped. 2. "PF"...
... the display, turn off the oven and contact a qualified technician. 5. Check Operation of Single Oven" steps 2-5. Check Operation of the Use and Care Guide. 5. For the clock setting and other oven functions refer to see the "Oven Care" section of Double Oven 1. Use screws to attach each... trim into hinge slots in the oven Use and Care Guide. Complete Installation 1. For oven cleaning, see which step was skipped. 2. "PF"...


