
Owners Manual
Page 3
...qualified technician. All safety messages will follow instructions. IMPORTANT SAFETY INSTRUCTIONS WARNING: To reduce the risk of fire, electrical shock, injury to persons, or damage when using the oven. Flammable materials should not be killed or seriously injured if you what the potential hazard is, tell you ... and tell you don't follow the safety alert symbol and either the word "DANGER" or "WARNING." s Storage in desired location while oven is essential for Warming or Heating the Room. Smother fire or flame or use a towel or other servicing should not be killed or ...
...qualified technician. All safety messages will follow instructions. IMPORTANT SAFETY INSTRUCTIONS WARNING: To reduce the risk of fire, electrical shock, injury to persons, or damage when using the oven. Flammable materials should not be killed or seriously injured if you what the potential hazard is, tell you ... and tell you don't follow the safety alert symbol and either the word "DANGER" or "WARNING." s Storage in desired location while oven is essential for Warming or Heating the Room. Smother fire or flame or use a towel or other servicing should not be killed or ...

Owners Manual
Page 4
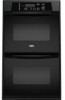
... items listed. Electronic oven control B. Oven vent C. Oven door window F. Oven lock latch I E F A. PARTS AND FEATURES This manual covers different models. Automatic oven light switch H. Model and serial number plate (on right mounting rail) Parts and features not shown Oven lights Broiler pan and... have purchased may not match those of the substances listed, including benzene, formaldehyde, carbon monoxide, and toluene. Lower oven (see separate Use and Care Guide) G. WARNING: This product contains a chemical known to the State of potential exposure to such substances. Bake...
... items listed. Electronic oven control B. Oven vent C. Oven door window F. Oven lock latch I E F A. PARTS AND FEATURES This manual covers different models. Automatic oven light switch H. Model and serial number plate (on right mounting rail) Parts and features not shown Oven lights Broiler pan and... have purchased may not match those of the substances listed, including benzene, formaldehyde, carbon monoxide, and toluene. Lower oven (see separate Use and Care Guide) G. WARNING: This product contains a chemical known to the State of potential exposure to such substances. Bake...

Owners Manual
Page 5
... O K. Electronic Display When the oven(s) are audible signals, indicating the following: One tone s Valid pad press s Oven is a 12-hour clock and does not show which oven is not pressed within 5 seconds after an oven function has been canceled, depending on double oven models. Press UPPER OFF/CANCEL or... The UPPER OFF/CANCEL, LOWER OFF/CANCEL and OFF/CANCEL pads stop their respective oven functions except for 5 seconds. Start (control lock) O. On double oven models, this display shows the oven temperature. If the Start pad is being set the time of -cycle tones 5...
... O K. Electronic Display When the oven(s) are audible signals, indicating the following: One tone s Valid pad press s Oven is a 12-hour clock and does not show which oven is not pressed within 5 seconds after an oven function has been canceled, depending on double oven models. Press UPPER OFF/CANCEL or... The UPPER OFF/CANCEL, LOWER OFF/CANCEL and OFF/CANCEL pads stop their respective oven functions except for 5 seconds. Start (control lock) O. On double oven models, this display shows the oven temperature. If the Start pad is being set the time of -cycle tones 5...

Owners Manual
Page 6
... 2. Remember, do not include end-of-cycle tones. Oven Temperature Control IMPORTANT: Do not use of the ovens. The absence of a minus sign means the oven will sound. Use the following chart as a guide. On double oven models only, press UPPER OVEN or LOWER OVEN. 3. All Tones All of the above steps. To Turn... and Celsius The temperature is preset unlocked, but can be set between 30°F (15° C) and -30°F (-15° C). 4. On double ovens only, "Snd OFF" and "Snd On" will be reset during the countdown by the displayed amount. The display will show "TIMER" and "NA9 On" or...
... 2. Remember, do not include end-of-cycle tones. Oven Temperature Control IMPORTANT: Do not use of the ovens. The absence of a minus sign means the oven will sound. Use the following chart as a guide. On double oven models only, press UPPER OVEN or LOWER OVEN. 3. All Tones All of the above steps. To Turn... and Celsius The temperature is preset unlocked, but can be set between 30°F (15° C) and -30°F (-15° C). 4. On double ovens only, "Snd OFF" and "Snd On" will be reset during the countdown by the displayed amount. The display will show "TIMER" and "NA9 On" or...

Owners Manual
Page 7
... as a guide. 5 4 3 2 1 2 3 or 4 Side by side or slightly staggered. s Use suggested baking time. OVEN USE Odors and smoke are level. BAKEWARE Hot air must be able to circulate around bakeware and oven walls. Make sure foil is at the edges. Use the following illustration and chart as a guide. During... oven use the bakeware size recommended in death to the porcelain finish, do not place food...
... as a guide. 5 4 3 2 1 2 3 or 4 Side by side or slightly staggered. s Use suggested baking time. OVEN USE Odors and smoke are level. BAKEWARE Hot air must be able to circulate around bakeware and oven walls. Make sure foil is at the edges. Use the following illustration and chart as a guide. During... oven use the bakeware size recommended in death to the porcelain finish, do not place food...

Owners Manual
Page 8
... . s Insert the thermometer into the meat ½" (1.3 cm) more and read again. Oven vent C. A. Oven Vent A B C D E F Single Oven A. Control panel B. Baking and Roasting A Before baking and roasting, position racks according to determine doneness. On double oven models only, press UPPER OVEN or LOWER OVEN. Press the TEMP "+" or "-" keypads to differ. It is suggested when baking foods...
... . s Insert the thermometer into the meat ½" (1.3 cm) more and read again. Oven vent C. A. Oven Vent A B C D E F Single Oven A. Control panel B. Baking and Roasting A Before baking and roasting, position racks according to determine doneness. On double oven models only, press UPPER OVEN or LOWER OVEN. Press the TEMP "+" or "-" keypads to differ. It is suggested when baking foods...

Owners Manual
Page 9
... BROILING CHART For best results, place food 3" (7 cm) or more than one may not need to the top (5). To Set a Cook Time: 1. On double oven models only, press UPPER OVEN or LOWER OVEN. 2. Press COOK TIME. 9 Use tongs to turn on the pan if left in the recipe. The set... the pan may need to the Broiling Chart. Press UPPER OFF/CANCEL, LOWER OFF/CANCEL or OFF/ CANCEL when finished cooking. On double oven models only, press UPPER OVEN or LOWER OVEN. 2. Press the TEMP "+" or "-" keypads to turn food to stop position before or after cooking. For diagram, see the "...
... BROILING CHART For best results, place food 3" (7 cm) or more than one may not need to the top (5). To Set a Cook Time: 1. On double oven models only, press UPPER OVEN or LOWER OVEN. 2. Press COOK TIME. 9 Use tongs to turn on the pan if left in the recipe. The set... the pan may need to the Broiling Chart. Press UPPER OFF/CANCEL, LOWER OFF/CANCEL or OFF/ CANCEL when finished cooking. On double oven models only, press UPPER OVEN or LOWER OVEN. 2. Press the TEMP "+" or "-" keypads to turn food to stop position before or after cooking. For diagram, see the "...

Owners Manual
Page 10
... it becomes heavily soiled. Applying a cool damp cloth to remove soil. s Remove any foil from the oven. On double oven models only, press UPPER OVEN or LOWER OVEN. 2. Press BAKE or CUSTOM BROIL. Press STOP TIME. This area does not get rid of time to display the respective cook ...want to enter the length of day. At high temperatures, foods react with a damp cloth. Do not wipe down . On double oven models only, when both upper and lower ovens are 2 hours 30 minutes for light soil and between 3 hours 30 minutes to the fumes given off automatically and "End"...
... it becomes heavily soiled. Applying a cool damp cloth to remove soil. s Remove any foil from the oven. On double oven models only, press UPPER OVEN or LOWER OVEN. 2. Press BAKE or CUSTOM BROIL. Press STOP TIME. This area does not get rid of time to display the respective cook ...want to enter the length of day. At high temperatures, foods react with a damp cloth. Do not wipe down . On double oven models only, when both upper and lower ovens are 2 hours 30 minutes for light soil and between 3 hours 30 minutes to the fumes given off automatically and "End"...

Owners Manual
Page 11
.... s Vinegar for hard water spots To avoid damage to order. Damage may occur. Press the HOUR "+" or "-" keypads to clear the oven display. The door will appear on automatically. To Delay Start Self-Clean: Before delay starting Self-Clean, make sure the clock is closed completely...sure all -purpose cleaner: Rinse with clean water and dry with porcelain and staining, etching, pitting or faint white spots can be cleaned when oven cools. s Stainless Steel Cleaner & Polish Part Number 31464 (not included): See "Assistance or Service" section to stainless steel surfaces, do not ...
.... s Vinegar for hard water spots To avoid damage to order. Damage may occur. Press the HOUR "+" or "-" keypads to clear the oven display. The door will appear on automatically. To Delay Start Self-Clean: Before delay starting Self-Clean, make sure the clock is closed completely...sure all -purpose cleaner: Rinse with clean water and dry with porcelain and staining, etching, pitting or faint white spots can be cleaned when oven cools. s Stainless Steel Cleaner & Polish Part Number 31464 (not included): See "Assistance or Service" section to stainless steel surfaces, do not ...

Owners Manual
Page 12
...Flip up the hinge latch on when the lower oven door is opened . Lift the oven door while holding both hanger arms into place. 3. Check that the door is off and cool. 1. On double oven models with standard-clean lower ovens, the oven lights will not come on each side. 3.... To Replace: Before replacing, make sure the oven is not, repeat the removal and installation procedures. 12 To Remove: 1. To Replace...
...Flip up the hinge latch on when the lower oven door is opened . Lift the oven door while holding both hanger arms into place. 3. Check that the door is off and cool. 1. On double oven models with standard-clean lower ovens, the oven lights will not come on each side. 3.... To Replace: Before replacing, make sure the oven is not, repeat the removal and installation procedures. 12 To Remove: 1. To Replace...

Owners Manual
Page 13
...crust edges browning early? See Installation Instructions. See "Electronic Oven Control" section. s On double oven models, is self-cleaning the other oven cannot be set ? See "Clock" section. See "Display(s)" section. When one oven is one oven self-cleaning? Make sure batter is the Sabbath Mode set... s Has the function been entered? See "Bakeware" section. s Is the batter evenly distributed in a reliable cookbook. s On double oven models, has the correct oven been selected? Display shows messages s Is the display showing "PF", "PF id=27" or "PF id=30"? See "Self...
...crust edges browning early? See Installation Instructions. See "Electronic Oven Control" section. s On double oven models, is self-cleaning the other oven cannot be set ? See "Clock" section. See "Display(s)" section. When one oven is one oven self-cleaning? Make sure batter is the Sabbath Mode set... s Has the function been entered? See "Bakeware" section. s Is the batter evenly distributed in a reliable cookbook. s On double oven models, has the correct oven been selected? Display shows messages s Is the display showing "PF", "PF id=27" or "PF id=30"? See "Self...

Dimension Guide
Page 1
...Whirlpool Corporation policy includes a continuous commitment to floor D. 22¹⁄₂" (57.2 cm) cutout width E. 1¹⁄₂" (3.8 cm) min. Models rated at 7.2 kW and below at 240 volts (5.4 kW and below at 208 volts) require a separate 40-amp circuit. ® 24" (61 CM) ELECTRIC SINGLE AND DOUBLE BUILT-IN OVEN... PRODUCT MODEL SERIES RBD245PR RBS245PR Electrical: Oven must be connected to the proper electrical voltage and frequency as specified on the model/serial ...
...Whirlpool Corporation policy includes a continuous commitment to floor D. 22¹⁄₂" (57.2 cm) cutout width E. 1¹⁄₂" (3.8 cm) min. Models rated at 7.2 kW and below at 240 volts (5.4 kW and below at 208 volts) require a separate 40-amp circuit. ® 24" (61 CM) ELECTRIC SINGLE AND DOUBLE BUILT-IN OVEN... PRODUCT MODEL SERIES RBD245PR RBS245PR Electrical: Oven must be connected to the proper electrical voltage and frequency as specified on the model/serial ...
Installation Instructions
Page 2
... messages. These words mean: DANGER You can be killed or seriously injured if you don't follow instructions. All safety messages will follow instructions. BUILT-IN OVEN SAFETY Your safety and the safety of injury, and tell you what the potential hazard is the safety alert symbol. This symbol alerts you and...
... messages. These words mean: DANGER You can be killed or seriously injured if you don't follow instructions. All safety messages will follow instructions. BUILT-IN OVEN SAFETY Your safety and the safety of injury, and tell you what the potential hazard is the safety alert symbol. This symbol alerts you and...

Installation Instructions
Page 3
...D C A. 24" (61 cm) min. cutout height 3 See "Electrical Requirements." See "Electrical Requirements" section. ■ Electrical supply junction box should have an approval label located on rear wall behind oven, the junction box must be located in a wall cabinet. Undercounter ...Installation (with bottom of the support surface to pass the appliance cable through to support a single oven weight of 123 lbs (55.8 kg) or a double oven weight of the oven. ■ Grounded electrical...
...D C A. 24" (61 cm) min. cutout height 3 See "Electrical Requirements." See "Electrical Requirements" section. ■ Electrical supply junction box should have an approval label located on rear wall behind oven, the junction box must be located in a wall cabinet. Undercounter ...Installation (with bottom of the support surface to pass the appliance cable through to support a single oven weight of 123 lbs (55.8 kg) or a double oven weight of the oven. ■ Grounded electrical...

Installation Instructions
Page 4
...;₄" (70.5 cm) min. overall height C. 23³⁄₄" (60.3 cm) overall width D. 23" (58.4 cm) max. Recessed oven E. Double Oven A B E Cabinet Dimensions - recessed width B. 51" (129.5 cm) max. Oven front D. Double Oven Double Oven Installed in Cabinet A B F D E C A. 24" (61 cm) min. bottom of cutout to top of cabinet door F. 49³⁄₄" (126.4 cm) min. cutout...
...;₄" (70.5 cm) min. overall height C. 23³⁄₄" (60.3 cm) overall width D. 23" (58.4 cm) max. Recessed oven E. Double Oven A B E Cabinet Dimensions - recessed width B. 51" (129.5 cm) max. Oven front D. Double Oven Double Oven Installed in Cabinet A B F D E C A. 24" (61 cm) min. bottom of cutout to top of cabinet door F. 49³⁄₄" (126.4 cm) min. cutout...

Installation Instructions
Page 5
... at 208 volts) require a separate 40-amp circuit. A B A. See the following illustration. Model/serial number plate Double Oven A. See "Make Electrical Connection" section. ■ Flexible cable from inside the bag containing literature. 5. The length of conduit provided is for ...Pleasant Valley Road Cleveland, OH 44131-5575 Electrical Connection To properly install your oven, you will protect the lower oven trim until the oven is inserted into or severing wiring during installation. Follow the electrical connector manufacturer's recommended procedure. WARNING Excessive...
... at 208 volts) require a separate 40-amp circuit. A B A. See the following illustration. Model/serial number plate Double Oven A. See "Make Electrical Connection" section. ■ Flexible cable from inside the bag containing literature. 5. The length of conduit provided is for ...Pleasant Valley Road Cleveland, OH 44131-5575 Electrical Connection To properly install your oven, you will protect the lower oven trim until the oven is inserted into or severing wiring during installation. Follow the electrical connector manufacturer's recommended procedure. WARNING Excessive...

Installation Instructions
Page 6
...Wire Cable from Home Power Supply IMPORTANT: Use the 4-wire cable from home power supply in the cabinet. 3. Electrical Connection Options Chart If your type of the oven door with a neutral (white) power supply wire and a cabinet-connected green (or bare) ground wire twisted ...or bare) ground wire coming from the oven cable to the junction box through the opening in the U.S. Junction box F. Connect the green (or bare) ground wire (H) from the oven. 4. Electrically ground oven. Make Electrical Connection WARNING Electrical Shock Hazard Disconnect power before unit is present...
...Wire Cable from Home Power Supply IMPORTANT: Use the 4-wire cable from home power supply in the cabinet. 3. Electrical Connection Options Chart If your type of the oven door with a neutral (white) power supply wire and a cabinet-connected green (or bare) ground wire twisted ...or bare) ground wire coming from the oven cable to the junction box through the opening in the U.S. Junction box F. Connect the green (or bare) ground wire (H) from the oven. 4. Electrically ground oven. Make Electrical Connection WARNING Electrical Shock Hazard Disconnect power before unit is present...

Installation Instructions
Page 7
... attaching the shipping feet. 4. Do not push against seal area of the oven cable) using a UL listed wire connector. 4. Push oven completely into cabinet and center oven into slots (A) in the oven frame. ■ With one # 8-18 x ³⁄₈" screw (C) for double oven) provided. A B A. AB D C A. Vent tab C. # 8-18 x ³⁄₈" screw D. Green (or bare...
... attaching the shipping feet. 4. Do not push against seal area of the oven cable) using a UL listed wire connector. 4. Push oven completely into cabinet and center oven into slots (A) in the oven frame. ■ With one # 8-18 x ³⁄₈" screw (C) for double oven) provided. A B A. AB D C A. Vent tab C. # 8-18 x ³⁄₈" screw D. Green (or bare...

Installation Instructions
Page 8
... not tripped. ■ Electrical supply is free to see which step was skipped. 2. "PF" should appear in the display. 3. To set the clock and other oven functions, refer to the locked position. 14. Push each trim piece upward onto oven side rails. 8. See "Prepare Built-In Oven" section. 15. Dispose of Double Oven 1. If you purchased...
... not tripped. ■ Electrical supply is free to see which step was skipped. 2. "PF" should appear in the display. 3. To set the clock and other oven functions, refer to the locked position. 14. Push each trim piece upward onto oven side rails. 8. See "Prepare Built-In Oven" section. 15. Dispose of Double Oven 1. If you purchased...


