

Installation Instructions
Page 1
...Install Damper Assembly 9 Install the Microwave Oven 9 Complete Installation 10 VENTING DESIGN SPECIFICATIONS 11 ASSISTANCE 12 Replacement Parts 12 Accessories 12 MICROWAVE HOOD COMBINATION SAFETY Your safety and the safety of injury, and tell you what... the potential hazard is the safety alert symbol. The appearance of Contents MICROWAVE HOOD COMBINATION SAFETY 1 INSTALLATION REQUIREMENTS 2 Tools and Parts 2 Remove Cardboard Template 2 Location Requirements 2 Product Dimensions 3 Electrical Requirements 3 INSTALLATION INSTRUCTIONS 4 Remove Mounting Plate 4 Rotate Blower...
...Install Damper Assembly 9 Install the Microwave Oven 9 Complete Installation 10 VENTING DESIGN SPECIFICATIONS 11 ASSISTANCE 12 Replacement Parts 12 Accessories 12 MICROWAVE HOOD COMBINATION SAFETY Your safety and the safety of injury, and tell you what... the potential hazard is the safety alert symbol. The appearance of Contents MICROWAVE HOOD COMBINATION SAFETY 1 INSTALLATION REQUIREMENTS 2 Tools and Parts 2 Remove Cardboard Template 2 Location Requirements 2 Product Dimensions 3 Electrical Requirements 3 INSTALLATION INSTRUCTIONS 4 Remove Mounting Plate 4 Rotate Blower...

Installation Instructions
Page 2
... mm) drill bits ■ 3/4" (19 mm) hole saw ■ Caulking gun and weatherproof caulking compound ■ Duct tape Parts Supplied For reorder information, see "Replacement Parts" section. See "Electrical Requirements" section. Check with any obstructions so that the door can open fully. ■ Some cabinet and...installation. Read and follow the instructions provided with your builder or cabinet supplier to it during the "Mark Rear Wall" part of microwave oven) Aluminum grease filters Charcoal filters (Depending on model, aluminum grease filter and charcoal filter may not ...
... mm) drill bits ■ 3/4" (19 mm) hole saw ■ Caulking gun and weatherproof caulking compound ■ Duct tape Parts Supplied For reorder information, see "Replacement Parts" section. See "Electrical Requirements" section. Check with any obstructions so that the door can open fully. ■ Some cabinet and...installation. Read and follow the instructions provided with your builder or cabinet supplier to it during the "Mark Rear Wall" part of microwave oven) Aluminum grease filters Charcoal filters (Depending on model, aluminum grease filter and charcoal filter may not ...
Installation Instructions
Page 12
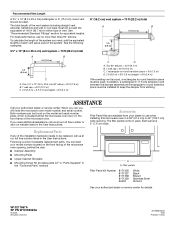
... 9/08 Printed in pairs. You will need your dealer to keep the damper from your model number located on the front frame of available replacement parts. See the following examples: 3¹⁄₄" x 10" (8.3 x 25.4 cm) vent system = 73 ft (22.2 m) total A B 6 ft (1.8 m) 2 ft (0.6 m) C A. ...located behind the door. ■ Damper Assembly ■ Mounting Plate ■ Upper Cabinet Template ■ Mounting Screw Kit (includes parts A-F in "Parts Supplied" in the User Instructions. The filler panels come in China The total length of vent. If you need , add the...
... 9/08 Printed in pairs. You will need your dealer to keep the damper from your model number located on the front frame of available replacement parts. See the following examples: 3¹⁄₄" x 10" (8.3 x 25.4 cm) vent system = 73 ft (22.2 m) total A B 6 ft (1.8 m) 2 ft (0.6 m) C A. ...located behind the door. ■ Damper Assembly ■ Mounting Plate ■ Upper Cabinet Template ■ Mounting Screw Kit (includes parts A-F in "Parts Supplied" in the User Instructions. The filler panels come in China The total length of vent. If you need , add the...

Use and Care Manual
Page 1
or visit our website at... MICROWAVEHOOD COMBINATION For questions about features, operation/performance parts, accessories or service, call: 1-800-253-1301. www.whirlpool.com Table of Contents 2 8205959/4619-652-64152 Model MH3184XP
or visit our website at... MICROWAVEHOOD COMBINATION For questions about features, operation/performance parts, accessories or service, call: 1-800-253-1301. www.whirlpool.com Table of Contents 2 8205959/4619-652-64152 Model MH3184XP
Use and Care Manual
Page 2
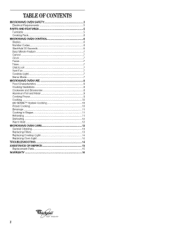
TABLEOF CONTENTS MICROWAVE OVEN SAFETY 3 Electrical Requirements 5 PARTS AND FEATURES 5 Turntable 5 Cooking Rack 6 MICROWAVE OVEN CONTROL 6 Display 6 Number Codes 6 Start/Add 30 Seconds 6 Easy Minute Feature 7 Cancel 7 Clock 7 Tones 7 Timer 7 Child Lock 7 Vent ... MICROWAVE OVEN CARE 13 General Cleaning 13 Replacing Filters 13 Replacing Cooktop Light 14 Replacing Oven Light 14 TROUBLESHOOTING 14 ASSISTANCE OR SERVICE 15 Replacement Parts 15 WAR RAN TY 16 Wh 1°
TABLEOF CONTENTS MICROWAVE OVEN SAFETY 3 Electrical Requirements 5 PARTS AND FEATURES 5 Turntable 5 Cooking Rack 6 MICROWAVE OVEN CONTROL 6 Display 6 Number Codes 6 Start/Add 30 Seconds 6 Easy Minute Feature 7 Cancel 7 Clock 7 Tones 7 Timer 7 Child Lock 7 Vent ... MICROWAVE OVEN CARE 13 General Cleaning 13 Replacing Filters 13 Replacing Cooktop Light 14 Replacing Oven Light 14 TROUBLESHOOTING 14 ASSISTANCE OR SERVICE 15 Replacement Parts 15 WAR RAN TY 16 Wh 1°
Use and Care Manual
Page 4
... when not in the "PAN BROWN" mode (on models with the door open since open-door operation can burn off the pad and touch electrical parts involving a risk of the microwave oven when the microwave oven is not always present. It is damaged. After heating, allow soil or cleaner residue ... racks or any openings on top of electric shock. [] Do not use straight-sided containers with the safety interlocks. (b) Do not place any materials, other part of 36 inches. [] Do not immerse cord or plug in operation. [] When flaming foods under the hood, turn the fan on hood or filter. [] ...
... when not in the "PAN BROWN" mode (on models with the door open since open-door operation can burn off the pad and touch electrical parts involving a risk of the microwave oven when the microwave oven is not always present. It is damaged. After heating, allow soil or cleaner residue ... racks or any openings on top of electric shock. [] Do not use straight-sided containers with the safety interlocks. (b) Do not place any materials, other part of 36 inches. [] Do not immerse cord or plug in operation. [] When flaming foods under the hood, turn the fan on hood or filter. [] ...
Use and Care Manual
Page 5
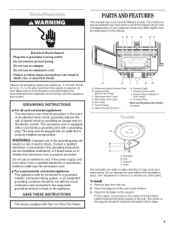
...food more evenly. Microwave Inlet Cover D. Turntable B. In the event of an electrical short circuit, grounding reduces the risk of the parts. If the power supply cord is too short, have some or all of electric shock. Metal Shielded Window I i ! To ...equipment grounding terminal or lead on the support. Remove tape from the illustrations in death, fire, or electrical shock. Support D. Cooking Rack Parts and Features not shown: Turntable B C i D A. GROUNDING iNSTRUCTiONS [] For all governing codes and ordinances. PARTSANDFEATURES This manual may ...
...food more evenly. Microwave Inlet Cover D. Turntable B. In the event of an electrical short circuit, grounding reduces the risk of the parts. If the power supply cord is too short, have some or all of electric shock. Metal Shielded Window I i ! To ...equipment grounding terminal or lead on the support. Remove tape from the illustrations in death, fire, or electrical shock. Support D. Cooking Rack Parts and Features not shown: Turntable B C i D A. GROUNDING iNSTRUCTiONS [] For all governing codes and ordinances. PARTSANDFEATURES This manual may ...

Use and Care Manual
Page 8
... uniformly shaped foods cook more food heated at once, the longer the cook time. Arranging If heating irregularly shaped or different sized foods, the thinner parts and smaller sizes should be dried in the oven. • Do not use cookware and dinnerware with cookware. Use the lid supplied with gold or...
... uniformly shaped foods cook more food heated at once, the longer the cook time. Arranging If heating irregularly shaped or different sized foods, the thinner parts and smaller sizes should be dried in the oven. • Do not use cookware and dinnerware with cookware. Use the lid supplied with gold or...

Use and Care Manual
Page 12
... minute for Fish or Touch DEFROST repeatedly to 2 kg). To Defrost manually:. 1. Touch COOK POWER. 4. Touch START. Touch CANCEL or open the door to shield parts of cycle: Touch WARM HOLD while setting a cooking cycle before defrosting. Cover plates of cycle for 15 minutes. 5. When the cycle ends, "END" will appear...
... minute for Fish or Touch DEFROST repeatedly to 2 kg). To Defrost manually:. 1. Touch COOK POWER. 4. Touch START. Touch CANCEL or open the door to shield parts of cycle: Touch WARM HOLD while setting a cooking cycle before defrosting. Cover plates of cycle for 15 minutes. 5. When the cycle ends, "END" will appear...

Use and Care Manual
Page 13
... • Dishwasher COOKING RACK Do not use ammonia or oven cleaner. • Do not place in place. Microwave Inlet Cover The microwave inlet cover (see "Parts and Features") should be kept clean to 5 minutes in oven. Soil buildup may occur. With the tab side of the filter up and slide the...
... • Dishwasher COOKING RACK Do not use ammonia or oven cleaner. • Do not place in place. Microwave Inlet Cover The microwave inlet cover (see "Parts and Features") should be kept clean to 5 minutes in oven. Soil buildup may occur. With the tab side of the filter up and slide the...
Use and Care Manual
Page 15
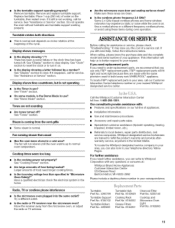
...your area, call for service. This information will help , follow the instructions below. FSP replacement parts will run slower until the oven warms up to your appliance. Call the Whirlpool Customer Interaction Center toll free: 1-800-253-1301. See "Assistance or Service" section. There ...Some steam is not working properly. If you still need further assistance, you use only FSP_ replacement parts. If you need replacement parts If you can write to Whirlpool Corporation with the same precision used to fulfill the product warranty and provide afterwarranty service, anywhere in...
...your area, call for service. This information will help , follow the instructions below. FSP replacement parts will run slower until the oven warms up to your appliance. Call the Whirlpool Customer Interaction Center toll free: 1-800-253-1301. See "Assistance or Service" section. There ...Some steam is not working properly. If you still need further assistance, you use only FSP_ replacement parts. If you need replacement parts If you can write to Whirlpool Corporation with the same precision used to fulfill the product warranty and provide afterwarranty service, anywhere in...

Use and Care Manual
Page 16
... need service, first see the "Troubleshooting" section of the Use & Care Guide. Repairs to parts or systems resulting from warranty coverage. 3. You will pay for in accordance with electrical or plumbing codes, or use your authorized Whirlpool dealer to correct house wiring or plumbing. 2. Outside the 50 United States and Canada, this...
... need service, first see the "Troubleshooting" section of the Use & Care Guide. Repairs to parts or systems resulting from warranty coverage. 3. You will pay for in accordance with electrical or plumbing codes, or use your authorized Whirlpool dealer to correct house wiring or plumbing. 2. Outside the 50 United States and Canada, this...


