

Installation Instructions
Page 1
... word "DANGER" or "WARNING." This symbol alerts you to reduce the chance of Contents MICROWAVE HOOD COMBINATION SAFETY 1 INSTALLATION REQUIREMENTS 2 Tools and Parts 2 Remove Cardboard Template 2 Location Requirements 2 Product Dimensions 3 Electrical Requirements 3 INSTALLATION INSTRUCTIONS 4 Remove Mounting Plate 4 Rotate Blower Motor 4 Locate ... Assembly 9 Install the Microwave Oven 9 Complete Installation 10 VENTING DESIGN SPECIFICATIONS 11 ASSISTANCE 12 Replacement Parts 12 Accessories 12 MICROWAVE HOOD COMBINATION SAFETY Your safety and the safety of your appliance.
... word "DANGER" or "WARNING." This symbol alerts you to reduce the chance of Contents MICROWAVE HOOD COMBINATION SAFETY 1 INSTALLATION REQUIREMENTS 2 Tools and Parts 2 Remove Cardboard Template 2 Location Requirements 2 Product Dimensions 3 Electrical Requirements 3 INSTALLATION INSTRUCTIONS 4 Remove Mounting Plate 4 Rotate Blower Motor 4 Locate ... Assembly 9 Install the Microwave Oven 9 Complete Installation 10 VENTING DESIGN SPECIFICATIONS 11 ASSISTANCE 12 Replacement Parts 12 Accessories 12 MICROWAVE HOOD COMBINATION SAFETY Your safety and the safety of your appliance.

Installation Instructions
Page 2
... 3/8" (10 mm) drill bits ■ 3/4" (19 mm) hole saw ■ Caulking gun and weatherproof caulking compound ■ Duct tape Parts Supplied For reorder information, see "Replacement Parts" section. The piece inside upper cabinet. Set the cardboard template to the side and refer to separate the template from the top..., make sure that the damper blade can open freely and fully. Cut along the perforation to it during the "Mark Rear Wall" part of clearance between the wall and the microwave oven, so that the vent fits properly, and the damper blade opens freely and fully....
... 3/8" (10 mm) drill bits ■ 3/4" (19 mm) hole saw ■ Caulking gun and weatherproof caulking compound ■ Duct tape Parts Supplied For reorder information, see "Replacement Parts" section. The piece inside upper cabinet. Set the cardboard template to the side and refer to separate the template from the top..., make sure that the damper blade can open freely and fully. Cut along the perforation to it during the "Mark Rear Wall" part of clearance between the wall and the microwave oven, so that the vent fits properly, and the damper blade opens freely and fully....
Installation Instructions
Page 12
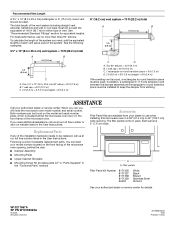
... the damper assembly and rectangular to round transition piece must be used. If you will need the microwave oven model number and serial number. Replacement Parts If any of the installation hardware needs to round transition piece = 5 ft (1.5 m) D. 2 ft (0.6 m) + 6 ft (1.8 m) straight =... cm) wide opening , behind the door. ■ Damper Assembly ■ Mounting Plate ■ Upper Cabinet Template ■ Mounting Screw Kit (includes parts A-F in "Parts Supplied" in the "Tools and Parts" section) A A. Two 90° elbows = 20 ft (6.1 m) B. 1 wall cap = 40 ft (12.2 m) C. 1 rectangular to...
... the damper assembly and rectangular to round transition piece must be used. If you will need the microwave oven model number and serial number. Replacement Parts If any of the installation hardware needs to round transition piece = 5 ft (1.5 m) D. 2 ft (0.6 m) + 6 ft (1.8 m) straight =... cm) wide opening , behind the door. ■ Damper Assembly ■ Mounting Plate ■ Upper Cabinet Template ■ Mounting Screw Kit (includes parts A-F in "Parts Supplied" in the "Tools and Parts" section) A A. Two 90° elbows = 20 ft (6.1 m) B. 1 wall cap = 40 ft (12.2 m) C. 1 rectangular to...

Use and Care Manual
Page 1
or visit our website at... www.whirlpool.com Table of Contents 2 8205959/4619-652-64152 Model MH3184XP MICROWAVEHOOD COMBINATION For questions about features, operation/performance parts, accessories or service, call: 1-800-253-1301.
or visit our website at... www.whirlpool.com Table of Contents 2 8205959/4619-652-64152 Model MH3184XP MICROWAVEHOOD COMBINATION For questions about features, operation/performance parts, accessories or service, call: 1-800-253-1301.
Use and Care Manual
Page 2
TABLEOF CONTENTS MICROWAVE OVEN SAFETY 3 Electrical Requirements 5 PARTS AND FEATURES 5 Turntable 5 Cooking Rack 6 MICROWAVE OVEN CONTROL 6 Display 6 Number Codes 6 Start/Add 30 Seconds 6 Easy Minute Feature 7 Cancel 7 Clock 7 Tones 7 Timer 7 Child Lock 7 Vent ... MICROWAVE OVEN CARE 13 General Cleaning 13 Replacing Filters 13 Replacing Cooktop Light 14 Replacing Oven Light 14 TROUBLESHOOTING 14 ASSISTANCE OR SERVICE 15 Replacement Parts 15 WAR RAN TY 16 Wh 1°
TABLEOF CONTENTS MICROWAVE OVEN SAFETY 3 Electrical Requirements 5 PARTS AND FEATURES 5 Turntable 5 Cooking Rack 6 MICROWAVE OVEN CONTROL 6 Display 6 Number Codes 6 Start/Add 30 Seconds 6 Easy Minute Feature 7 Cancel 7 Clock 7 Tones 7 Timer 7 Child Lock 7 Vent ... MICROWAVE OVEN CARE 13 General Cleaning 13 Replacing Filters 13 Replacing Cooktop Light 14 Replacing Oven Light 14 TROUBLESHOOTING 14 ASSISTANCE OR SERVICE 15 Replacement Parts 15 WAR RAN TY 16 Wh 1°
Use and Care Manual
Page 4
.... (b) Do not place any openings on top of injury to persons: [] Do not clean with narrow necks. - Use extreme care when inserting a spoon or other part of the oven with the door open since open-door operation can burn off the pad and touch electrical... parts involving a risk of electric shock. [] Do not cover racks or any other utensil into the container. [] Suitable for example, near a kitchen sink, in a wet basement, ...
.... (b) Do not place any openings on top of injury to persons: [] Do not clean with narrow necks. - Use extreme care when inserting a spoon or other part of the oven with the door open since open-door operation can burn off the pad and touch electrical... parts involving a risk of electric shock. [] Do not cover racks or any other utensil into the container. [] Suitable for example, near a kitchen sink, in a wet basement, ...
Use and Care Manual
Page 5
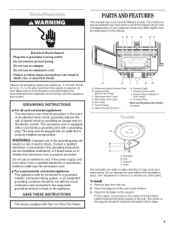
...or if doubt exists as to follow these instructions can rotate in death, fire, or electrical shock. Vent Grille F Control Panel G. Cooking Rack Parts and Features not shown: Turntable B C i D A. Support D. To Install: 1. The model you have purchased may have a qualified electrician or... KH H. Charcoal Filter (behind Vent Grille) C. Failure to whether the microwave oven is equipped with a cord having a grounding wire with Part 18 of the FCC Rules. If the power supply cord is properly installed and grounded. Turntable B. Shaft The turntable can result in either...
...or if doubt exists as to follow these instructions can rotate in death, fire, or electrical shock. Vent Grille F Control Panel G. Cooking Rack Parts and Features not shown: Turntable B C i D A. Support D. To Install: 1. The model you have purchased may have a qualified electrician or... KH H. Charcoal Filter (behind Vent Grille) C. Failure to whether the microwave oven is equipped with a cord having a grounding wire with Part 18 of the FCC Rules. If the power supply cord is properly installed and grounded. Turntable B. Shaft The turntable can result in either...

Use and Care Manual
Page 8
... Stirring and turning redistributes heat evenly to shield the thin pieces of the food. Arranging If heating irregularly shaped or different sized foods, the thinner parts and smaller sizes should be in place and correct side up when oven is not available, wax paper, paper towels or plastic wrap approved for...
... Stirring and turning redistributes heat evenly to shield the thin pieces of the food. Arranging If heating irregularly shaped or different sized foods, the thinner parts and smaller sizes should be in place and correct side up when oven is not available, wax paper, paper towels or plastic wrap approved for...

Use and Care Manual
Page 12
... count down the defrost time. To Use: Put hot cooked food in microwavable baking dish. Touch START. Touch CANCEL or open the door to shield parts of food such as chicken wings, leg tips and fish tails. Use the following chart as possible during or at this time by itself or...
... count down the defrost time. To Use: Put hot cooked food in microwavable baking dish. Touch START. Touch CANCEL or open the door to shield parts of food such as chicken wings, leg tips and fish tails. Use the following chart as possible during or at this time by itself or...

Use and Care Manual
Page 13
... paper towels or nonabrasive plastic scrubbing pad: Apply glass cleaner to towel, not directly to the oven. Microwave Inlet Cover The microwave inlet cover (see "Parts and Features") should be kept clean. Always follow label instructions on cleaning products. OVEN CAVITY Do not use ammonia or oven cleaner. • Do not...
... paper towels or nonabrasive plastic scrubbing pad: Apply glass cleaner to towel, not directly to the oven. Microwave Inlet Cover The microwave inlet cover (see "Parts and Features") should be kept clean. Always follow label instructions on cleaning products. OVEN CAVITY Do not use ammonia or oven cleaner. • Do not...
Use and Care Manual
Page 15
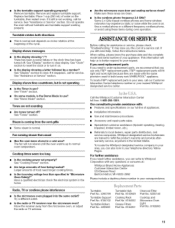
... GHz? This information will help , follow the instructions below. If you need replacement parts If you need further assistance, you can write to your telephone directory Yellow Pages. Call the Whirlpool Customer Interaction Center toll free: 1-800-253-1301. For further assistance If you need ...? Move the receiver away from the vent grille • Some steam is not working properly. FSP replacement parts will run slower until the oven warms up to build every new WHIRLPOOL ® appliance. See "Demo Mode" section. Have a qualified electrician check the electrical system in the ...
... GHz? This information will help , follow the instructions below. If you need replacement parts If you need further assistance, you can write to your telephone directory Yellow Pages. Call the Whirlpool Customer Interaction Center toll free: 1-800-253-1301. For further assistance If you need ...? Move the receiver away from the vent grille • Some steam is not working properly. FSP replacement parts will run slower until the oven warms up to build every new WHIRLPOOL ® appliance. See "Demo Mode" section. Have a qualified electrician check the electrical system in the ...

Use and Care Manual
Page 16
... Dealer name Address Phone number Model number Serial number Purchase date 8205959/4619-652-64152 © 2005 Whirlpool Corporation. Repairs when your major appliance is designed to parts or systems resulting from warranty coverage. 3. Damage resulting from accident, alteration, misuse, abuse, fire, ...outside the United States or Canada. 7. In Canada, call f-800-253-1301. Replacement parts or repair labor costs for future reference. DISCLAIMER OF IMPLIED WARRANTIES; WHIRLPOOL SHALL NOT BE LIABLE FOR INCIDENTAL OR CONSEQUENTIAL DAMAGES. If you need to determine if ...
... Dealer name Address Phone number Model number Serial number Purchase date 8205959/4619-652-64152 © 2005 Whirlpool Corporation. Repairs when your major appliance is designed to parts or systems resulting from warranty coverage. 3. Damage resulting from accident, alteration, misuse, abuse, fire, ...outside the United States or Canada. 7. In Canada, call f-800-253-1301. Replacement parts or repair labor costs for future reference. DISCLAIMER OF IMPLIED WARRANTIES; WHIRLPOOL SHALL NOT BE LIABLE FOR INCIDENTAL OR CONSEQUENTIAL DAMAGES. If you need to determine if ...


