

Installation Instructions
Page 1
... INSTRUCTIONS This product is the safety alert symbol. Table of Contents MICROWAVE HOOD COMBINATION SAFETY 1 INSTALLATION REQUIREMENTS 2 Tools and Parts 2 Remove Cardboard Template 2 Location Requirements 2 Product Dimensions 3 Electrical Requirements 3 INSTALLATION INSTRUCTIONS 4 Remove Mounting Plate 4 Rotate...8 Install Damper Assembly 9 Install the Microwave Oven 9 Complete Installation 10 VENTING DESIGN SPECIFICATIONS 11 ASSISTANCE 12 Replacement Parts 12 Accessories 12 MICROWAVE HOOD COMBINATION SAFETY Your safety and the safety of injury, and tell you what the...
... INSTRUCTIONS This product is the safety alert symbol. Table of Contents MICROWAVE HOOD COMBINATION SAFETY 1 INSTALLATION REQUIREMENTS 2 Tools and Parts 2 Remove Cardboard Template 2 Location Requirements 2 Product Dimensions 3 Electrical Requirements 3 INSTALLATION INSTRUCTIONS 4 Remove Mounting Plate 4 Rotate...8 Install Damper Assembly 9 Install the Microwave Oven 9 Complete Installation 10 VENTING DESIGN SPECIFICATIONS 11 ASSISTANCE 12 Replacement Parts 12 Accessories 12 MICROWAVE HOOD COMBINATION SAFETY Your safety and the safety of injury, and tell you what the...

Installation Instructions
Page 2
...here are not designed to use as a rear wall template. 1. Cut along the perforation to it during the "Mark Rear Wall" part of 150 lbs (68 kg), which includes microwave oven and items placed inside the microwave oven and upper cabinet. ■ Grounded electrical...10 mm) drill bits ■ 3/4" (19 mm) hole saw ■ Caulking gun and weatherproof caulking compound ■ Duct tape Parts Supplied For reorder information, see "Replacement Parts" section. Read and follow the instructions provided with your builder or cabinet supplier to exist above the microwave oven so that the...
...here are not designed to use as a rear wall template. 1. Cut along the perforation to it during the "Mark Rear Wall" part of 150 lbs (68 kg), which includes microwave oven and items placed inside the microwave oven and upper cabinet. ■ Grounded electrical...10 mm) drill bits ■ 3/4" (19 mm) hole saw ■ Caulking gun and weatherproof caulking compound ■ Duct tape Parts Supplied For reorder information, see "Replacement Parts" section. Read and follow the instructions provided with your builder or cabinet supplier to exist above the microwave oven so that the...
Installation Instructions
Page 12
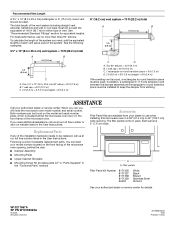
...Following is located behind the door. ■ Damper Assembly ■ Mounting Plate ■ Upper Cabinet Template ■ Mounting Screw Kit (includes parts A-F in "Parts Supplied" in the User Instructions. To calculate the length of the system you will need , add the equivalent lengths of each vent piece used ... any of the installation hardware needs to be found on the model and serial number plate, which is a list of available replacement parts. Recommended Vent Length A 3¹⁄₄" x 10" (8.3 x 25.4 cm) rectangular or 6" (15.2 cm) round vent should be installed to ...
...Following is located behind the door. ■ Damper Assembly ■ Mounting Plate ■ Upper Cabinet Template ■ Mounting Screw Kit (includes parts A-F in "Parts Supplied" in the User Instructions. To calculate the length of the system you will need , add the equivalent lengths of each vent piece used ... any of the installation hardware needs to be found on the model and serial number plate, which is a list of available replacement parts. Recommended Vent Length A 3¹⁄₄" x 10" (8.3 x 25.4 cm) rectangular or 6" (15.2 cm) round vent should be installed to ...

Use and Care Manual
Page 1
or visit our website at... MICROWAVEHOOD COMBINATION For questions about features, operation/performance parts, accessories or service, call: 1-800-253-1301. www.whirlpool.com Table of Contents 2 8205959/4619-652-64152 Model MH3184XP
or visit our website at... MICROWAVEHOOD COMBINATION For questions about features, operation/performance parts, accessories or service, call: 1-800-253-1301. www.whirlpool.com Table of Contents 2 8205959/4619-652-64152 Model MH3184XP
Use and Care Manual
Page 2
TABLEOF CONTENTS MICROWAVE OVEN SAFETY 3 Electrical Requirements 5 PARTS AND FEATURES 5 Turntable 5 Cooking Rack 6 MICROWAVE OVEN CONTROL 6 Display 6 Number Codes 6 Start/Add 30 Seconds 6 Easy Minute Feature 7 Cancel 7 Clock 7 Tones 7 Timer 7 Child Lock 7 Vent ... MICROWAVE OVEN CARE 13 General Cleaning 13 Replacing Filters 13 Replacing Cooktop Light 14 Replacing Oven Light 14 TROUBLESHOOTING 14 ASSISTANCE OR SERVICE 15 Replacement Parts 15 WAR RAN TY 16 Wh 1°
TABLEOF CONTENTS MICROWAVE OVEN SAFETY 3 Electrical Requirements 5 PARTS AND FEATURES 5 Turntable 5 Cooking Rack 6 MICROWAVE OVEN CONTROL 6 Display 6 Number Codes 6 Start/Add 30 Seconds 6 Easy Minute Feature 7 Cancel 7 Clock 7 Tones 7 Timer 7 Child Lock 7 Vent ... MICROWAVE OVEN CARE 13 General Cleaning 13 Replacing Filters 13 Replacing Cooktop Light 14 Replacing Oven Light 14 TROUBLESHOOTING 14 ASSISTANCE OR SERVICE 15 Replacement Parts 15 WAR RAN TY 16 Wh 1°
Use and Care Manual
Page 4
... in the microwave oven as lye-based oven cleaners, may create a fire or risk of electric shock. [] Do not cover racks or any materials, other part of 36 inches. [] Do not immerse cord or plug in this oven with maximum width of the oven with metal scouring pads. Pieces can result... overheating of electric shock. [] Do not use above ranges with the door open since open-door operation can burn off the pad and touch electrical parts involving a risk of the oven.
... in the microwave oven as lye-based oven cleaners, may create a fire or risk of electric shock. [] Do not cover racks or any materials, other part of 36 inches. [] Do not immerse cord or plug in this oven with maximum width of the oven with metal scouring pads. Pieces can result... overheating of electric shock. [] Do not use above ranges with the door open since open-door operation can burn off the pad and touch electrical parts involving a risk of the oven.
Use and Care Manual
Page 5
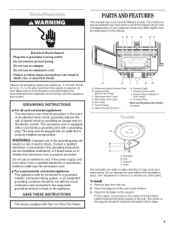
...is recommended that is properly installed and grounded. Charcoal Filter (behind Vent Grille) C. Grease Filters (shipped in death, fire, or electrical shock. Cooking Rack Parts and Features not shown: Turntable B C i D A. The rollers on the oven cavity bottom. 3. Observe all of the features shown here. or 20...fit inside the turntable bottom ridge. In the event of an electrical short circuit, grounding reduces the risk of the parts. The plug must be run with Part 18 of the hub. WARNING: Improper use an extension cord. Do not use of the grounding plug can rotate ...
...is recommended that is properly installed and grounded. Charcoal Filter (behind Vent Grille) C. Grease Filters (shipped in death, fire, or electrical shock. Cooking Rack Parts and Features not shown: Turntable B C i D A. The rollers on the oven cavity bottom. 3. Observe all of the features shown here. or 20...fit inside the turntable bottom ridge. In the event of an electrical short circuit, grounding reduces the risk of the parts. The plug must be run with Part 18 of the hub. WARNING: Improper use an extension cord. Do not use of the grounding plug can rotate ...

Use and Care Manual
Page 8
... evenly to shield the thin pieces of Food The more evenly than other foods. Arranging If heating irregularly shaped or different sized foods, the thinner parts and smaller sizes should be at once, the longer the cook time. Prick in fat and sugar will cook more quickly than larger pieces, and...
... evenly to shield the thin pieces of Food The more evenly than other foods. Arranging If heating irregularly shaped or different sized foods, the thinner parts and smaller sizes should be at once, the longer the cook time. Prick in fat and sugar will cook more quickly than larger pieces, and...

Use and Care Manual
Page 12
...: Meat, Poultry and Fish. When the cycle ends, "END" will appear in microwavable baking dish, chicken breast side up. Touch the number pads to shield parts of food and foods that were cooked covered. Meats and Poultry can be set a length of aluminum foil to enter the weight. The display will...
...: Meat, Poultry and Fish. When the cycle ends, "END" will appear in microwavable baking dish, chicken breast side up. Touch the number pads to shield parts of food and foods that were cooked covered. Meats and Poultry can be set a length of aluminum foil to enter the weight. The display will...

Use and Care Manual
Page 13
... not use soap-filled scouring pads, abrasive cleaners, steelwool pads, gritty washcloths or some recycled paper towels. Microwave Inlet Cover The microwave inlet cover (see "Parts and Features") should be kept clean to surface, TURNTABLE Replace turntable immediately after cleaning. See "Assistance or Service" to remove supports from cavity walls. With...
... not use soap-filled scouring pads, abrasive cleaners, steelwool pads, gritty washcloths or some recycled paper towels. Microwave Inlet Cover The microwave inlet cover (see "Parts and Features") should be kept clean to surface, TURNTABLE Replace turntable immediately after cleaning. See "Assistance or Service" to remove supports from cavity walls. With...
Use and Care Manual
Page 15
...Whirlpool Customer Interaction Center toll free: 1-800-253-1301. Turntable Part No. 4393799 Turntable Support Part No. 8184102 Turntable Rollers Part No. 4393861 Turntable Hub Part No. 8183949 Cooking Rack Part No. 8184052 Grease Filters Part No. 8184001 Charcoal Filter Part No. 8205146 Cooktop and Microwave Oven Light Part...using these areas are trained to Whirlpool Corporation with : • Features and specifications on the turntable, then restart oven. Remove and replace turntable support. See "Display" section to local dealers, repair parts distributors, and service companies. ...
...Whirlpool Customer Interaction Center toll free: 1-800-253-1301. Turntable Part No. 4393799 Turntable Support Part No. 8184102 Turntable Rollers Part No. 4393861 Turntable Hub Part No. 8183949 Cooking Rack Part No. 8184052 Grease Filters Part No. 8184001 Charcoal Filter Part No. 8205146 Cooktop and Microwave Oven Light Part...using these areas are trained to Whirlpool Corporation with : • Features and specifications on the turntable, then restart oven. Remove and replace turntable support. See "Display" section to local dealers, repair parts distributors, and service companies. ...

Use and Care Manual
Page 16
... number Serial number Purchase date 8205959/4619-652-64152 © 2005 Whirlpool Corporation. Replacement parts or repair labor costs for other than normal, single-family household use of products not approved by Whirlpool. 5. Expenses for travel and transportation for future reference. After checking ... OR FITNESS, SO THESE EXCLUSIONS OR LIMITATIONS MAY NOT APPLY TO YOU. You can be provided by calling Whirlpool. Pickup and delivery. Repairs to parts or systems resulting from warranty coverage. 3. Contact your major appliance is used for units operated outside the United...
... number Serial number Purchase date 8205959/4619-652-64152 © 2005 Whirlpool Corporation. Replacement parts or repair labor costs for other than normal, single-family household use of products not approved by Whirlpool. 5. Expenses for travel and transportation for future reference. After checking ... OR FITNESS, SO THESE EXCLUSIONS OR LIMITATIONS MAY NOT APPLY TO YOU. You can be provided by calling Whirlpool. Pickup and delivery. Repairs to parts or systems resulting from warranty coverage. 3. Contact your major appliance is used for units operated outside the United...


