

Installation Instructions
Page 1
... Install Damper Assembly 9 Install the Microwave Oven 9 Complete Installation 10 VENTING DESIGN SPECIFICATIONS 11 ASSISTANCE 12 Replacement Parts 12 Accessories 12 MICROWAVE HOOD COMBINATION SAFETY Your safety and the safety of others . Table of Contents MICROWAVE HOOD... COMBINATION SAFETY 1 INSTALLATION REQUIREMENTS 2 Tools and Parts 2 Remove Cardboard Template 2 Location Requirements 2 Product Dimensions 3 Electrical Requirements 3 INSTALLATION INSTRUCTIONS 4 Remove Mounting Plate 4 Rotate ...
... Install Damper Assembly 9 Install the Microwave Oven 9 Complete Installation 10 VENTING DESIGN SPECIFICATIONS 11 ASSISTANCE 12 Replacement Parts 12 Accessories 12 MICROWAVE HOOD COMBINATION SAFETY Your safety and the safety of others . Table of Contents MICROWAVE HOOD... COMBINATION SAFETY 1 INSTALLATION REQUIREMENTS 2 Tools and Parts 2 Remove Cardboard Template 2 Location Requirements 2 Product Dimensions 3 Electrical Requirements 3 INSTALLATION INSTRUCTIONS 4 Remove Mounting Plate 4 Rotate ...

Installation Instructions
Page 2
...for wood or metal ■ No. 3 Phillips screwdriver for weight of wall structures, be sure to it during the "Mark Rear Wall" part of any tools listed here. ■ Measuring tape ■ Stud finder ■ Pencil ■ 7/16" socket wrench ■ Masking ... mm) drill bits ■ 3/4" (19 mm) hole saw ■ Caulking gun and weatherproof caulking compound ■ Duct tape Parts Supplied For reorder information, see "Replacement Parts" section. See "Rectangular to back of the cardboard packaging. 2. The piece inside upper cabinet. Cut along the perforation to exist...
...for wood or metal ■ No. 3 Phillips screwdriver for weight of wall structures, be sure to it during the "Mark Rear Wall" part of any tools listed here. ■ Measuring tape ■ Stud finder ■ Pencil ■ 7/16" socket wrench ■ Masking ... mm) drill bits ■ 3/4" (19 mm) hole saw ■ Caulking gun and weatherproof caulking compound ■ Duct tape Parts Supplied For reorder information, see "Replacement Parts" section. See "Rectangular to back of the cardboard packaging. 2. The piece inside upper cabinet. Cut along the perforation to exist...
Installation Instructions
Page 12
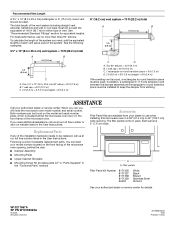
...behind the door. ■ Damper Assembly ■ Mounting Plate ■ Upper Cabinet Template ■ Mounting Screw Kit (includes parts A-F in "Parts Supplied" in the "Tools and Parts" section) A A. See "Recommended Standard Fittings" section for either type of the microwave oven opening . See the following ...wide opening , behind the microwave oven door on the model and serial number plate, which is a list of available replacement parts. Replacement Parts If any of each vent piece used . You will need , add the equivalent lengths of the installation hardware needs to...
...behind the door. ■ Damper Assembly ■ Mounting Plate ■ Upper Cabinet Template ■ Mounting Screw Kit (includes parts A-F in "Parts Supplied" in the "Tools and Parts" section) A A. See "Recommended Standard Fittings" section for either type of the microwave oven opening . See the following ...wide opening , behind the microwave oven door on the model and serial number plate, which is a list of available replacement parts. Replacement Parts If any of each vent piece used . You will need , add the equivalent lengths of the installation hardware needs to...

Use and Care Manual
Page 1
MICROWAVEHOOD COMBINATION For questions about features, operation/performance parts, accessories or service, call: 1-800-253-1301. www.whirlpool.com Table of Contents 2 8205959/4619-652-64152 Model MH3184XP or visit our website at...
MICROWAVEHOOD COMBINATION For questions about features, operation/performance parts, accessories or service, call: 1-800-253-1301. www.whirlpool.com Table of Contents 2 8205959/4619-652-64152 Model MH3184XP or visit our website at...
Use and Care Manual
Page 2
TABLEOF CONTENTS MICROWAVE OVEN SAFETY 3 Electrical Requirements 5 PARTS AND FEATURES 5 Turntable 5 Cooking Rack 6 MICROWAVE OVEN CONTROL 6 Display 6 Number Codes 6 Start/Add 30 Seconds 6 Easy Minute Feature 7 Cancel 7 Clock 7 Tones 7 Timer 7 Child Lock 7 Vent ... MICROWAVE OVEN CARE 13 General Cleaning 13 Replacing Filters 13 Replacing Cooktop Light 14 Replacing Oven Light 14 TROUBLESHOOTING 14 ASSISTANCE OR SERVICE 15 Replacement Parts 15 WAR RAN TY 16 Wh 1°
TABLEOF CONTENTS MICROWAVE OVEN SAFETY 3 Electrical Requirements 5 PARTS AND FEATURES 5 Turntable 5 Cooking Rack 6 MICROWAVE OVEN CONTROL 6 Display 6 Number Codes 6 Start/Add 30 Seconds 6 Easy Minute Feature 7 Cancel 7 Clock 7 Tones 7 Timer 7 Child Lock 7 Vent ... MICROWAVE OVEN CARE 13 General Cleaning 13 Replacing Filters 13 Replacing Cooktop Light 14 Replacing Oven Light 14 TROUBLESHOOTING 14 ASSISTANCE OR SERVICE 15 Replacement Parts 15 WAR RAN TY 16 Wh 1°
Use and Care Manual
Page 4
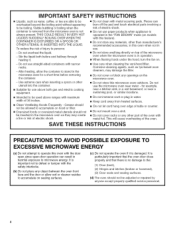
... electric shock. [] Do not use straight-sided containers with the door open since open-door operation can burn off the pad and touch electrical parts involving a risk of the microwave oven when the microwave oven is removed from heated surfaces. [] Clean Ventilating Hoods Frequently - be adjusted or ...the microwave oven for a short time before and halfway through heating it is not always present. Use extreme care when inserting a spoon or other part of the oven with this oven when not in operation. [] When flaming foods under the hood, turn the fan on. - SAVE THESE ...
... electric shock. [] Do not use straight-sided containers with the door open since open-door operation can burn off the pad and touch electrical parts involving a risk of the microwave oven when the microwave oven is removed from heated surfaces. [] Clean Ventilating Hoods Frequently - be adjusted or ...the microwave oven for a short time before and halfway through heating it is not always present. Use extreme care when inserting a spoon or other part of the oven with this oven when not in operation. [] When flaming foods under the hood, turn the fan on. - SAVE THESE ...
Use and Care Manual
Page 5
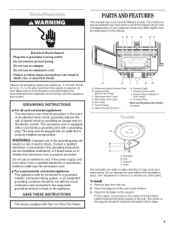
...an escape wire for the electric current. SAVE THESE iNSTRUCTiONS I This device complies with Part 18 of electric shock. I J KH H. Charcoal Filter (behind Vent Grille) C. Vent Grille F Control Panel G. Cooking Rack Parts and Features not shown: Turntable B C i D A. Shaft The turntable can rotate...from the illustrations in a risk of the FCC Rules. In the event of an electrical short circuit, grounding reduces the risk of the parts. To Install: 1. Model and Serial Number Plate B. AB C 1-) EF ElectricaSl hock Hazard Plug into an outlet that a separate circuit ...
...an escape wire for the electric current. SAVE THESE iNSTRUCTiONS I This device complies with Part 18 of electric shock. I J KH H. Charcoal Filter (behind Vent Grille) C. Vent Grille F Control Panel G. Cooking Rack Parts and Features not shown: Turntable B C i D A. Shaft The turntable can rotate...from the illustrations in a risk of the FCC Rules. In the event of an electrical short circuit, grounding reduces the risk of the parts. To Install: 1. Model and Serial Number Plate B. AB C 1-) EF ElectricaSl hock Hazard Plug into an outlet that a separate circuit ...

Use and Care Manual
Page 8
... cooking, the amount, size and shape, starting temperature, composition and density of the food. Arranging If heating irregularly shaped or different sized foods, the thinner parts and smaller sizes should not be slightly firm. At the end of the ring empty. Cover poached eggs and allow children to avoid overcooking the...
... cooking, the amount, size and shape, starting temperature, composition and density of the food. Arranging If heating irregularly shaped or different sized foods, the thinner parts and smaller sizes should not be slightly firm. At the end of the ring empty. Cover poached eggs and allow children to avoid overcooking the...

Use and Care Manual
Page 12
... before touching START, or during or at end of irregular shaped cuts should remain uncovered. 1. Touch START. Use small pieces of aluminum foil to shield parts of time to clear the display and/or stop reminder tones. The automatic Defrost control has 3 categories: Meat, Poultry and Fish. Chicken: whole and cut...
... before touching START, or during or at end of irregular shaped cuts should remain uncovered. 1. Touch START. Use small pieces of aluminum foil to shield parts of time to clear the display and/or stop reminder tones. The automatic Defrost control has 3 categories: Meat, Poultry and Fish. Chicken: whole and cut...

Use and Care Manual
Page 13
..., Odors • Lemon juice or vinegar: Heat 1 cup (250 mL) of water with soft, lint-free cloth. Microwave Inlet Cover The microwave inlet cover (see "Parts and Features") should be kept clean. • Mild, nonabrasive soaps and detergents: Rinse with clean water and dry with soft, lint-free cloth. Do not...
..., Odors • Lemon juice or vinegar: Heat 1 cup (250 mL) of water with soft, lint-free cloth. Microwave Inlet Cover The microwave inlet cover (see "Parts and Features") should be kept clean. • Mild, nonabrasive soaps and detergents: Rinse with clean water and dry with soft, lint-free cloth. Do not...
Use and Care Manual
Page 15
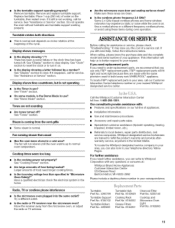
... oven warms up to build every new WHIRLPOOL ® appliance. To locate the Whirlpool designated service company in a cold area? Turntable Part No. 4393799 Turntable Support Part No. 8184102 Turntable Rollers Part No. 4393861 Turntable Hub Part No. 8183949 Cooking Rack Part No. 8184052 Grease Filters Part No. 8184001 Charcoal Filter Part No. 8205146 Cooktop and Microwave Oven Light...
... oven warms up to build every new WHIRLPOOL ® appliance. To locate the Whirlpool designated service company in a cold area? Turntable Part No. 4393799 Turntable Support Part No. 8184102 Turntable Rollers Part No. 4393861 Turntable Hub Part No. 8183949 Cooking Rack Part No. 8184052 Grease Filters Part No. 8184001 Charcoal Filter Part No. 8205146 Cooktop and Microwave Oven Light...

Use and Care Manual
Page 16
.... 10. Dealer name Address Phone number Model number Serial number Purchase date 8205959/4619-652-64152 © 2005 Whirlpool Corporation. Repairs to parts or systems resulting from unauthorized modifications made to know your authorized Whirlpool dealer to refrigerator or freezer product failures. 6. If you need service, first see the "Troubleshooting" section of the...
.... 10. Dealer name Address Phone number Model number Serial number Purchase date 8205959/4619-652-64152 © 2005 Whirlpool Corporation. Repairs to parts or systems resulting from unauthorized modifications made to know your authorized Whirlpool dealer to refrigerator or freezer product failures. 6. If you need service, first see the "Troubleshooting" section of the...


