
Installation Instructions
Page 1
The appearance of your particular model may differ slightly from the illustration in these installation instructions. NOTES: MICROWAVE HOOD COMBINATION INSTALLATION INSTRUCTIONS This product is suitable for use above electric or gas cooking products up to 36" (91.4 cm) wide. These installation instructions cover different models.
The appearance of your particular model may differ slightly from the illustration in these installation instructions. NOTES: MICROWAVE HOOD COMBINATION INSTALLATION INSTRUCTIONS This product is suitable for use above electric or gas cooking products up to 36" (91.4 cm) wide. These installation instructions cover different models.
Installation Instructions
Page 2
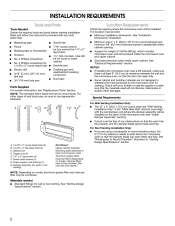
INSTALLATION REQUIREMENTS Tools and Parts Tools Needed Gather the required tools and parts before starting installation. Read and follow the instructions provided with any tools listed here. Location Requirements Check the opening where the microwave oven will be installed. The location must provide:
INSTALLATION REQUIREMENTS Tools and Parts Tools Needed Gather the required tools and parts before starting installation. Read and follow the instructions provided with any tools listed here. Location Requirements Check the opening where the microwave oven will be installed. The location must provide:

Installation Instructions
Page 4
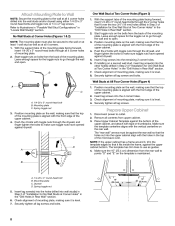
... together and set for ventless (recirculating) installation. Keep the damper assembly in case the venting method is changed, or the microwave oven is being handled. Mounting plate B. NOTE: Do not grip or use the door or door handle while the... a protective cover on the work surface. 1. Remove 2 screws attaching blower motor to top of microwave oven C. A A. Blower motor 4 For wall or roof venting, changes must be used. A A. Back of microwave oven exterior. INSTALLATION INSTRUCTIONS Remove Mounting Plate NOTE: To avoid possible damage to the venting system....
... together and set for ventless (recirculating) installation. Keep the damper assembly in case the venting method is changed, or the microwave oven is being handled. Mounting plate B. NOTE: Do not grip or use the door or door handle while the... a protective cover on the work surface. 1. Remove 2 screws attaching blower motor to top of microwave oven C. A A. Blower motor 4 For wall or roof venting, changes must be used. A A. Back of microwave oven exterior. INSTALLATION INSTRUCTIONS Remove Mounting Plate NOTE: To avoid possible damage to the venting system....
Installation Instructions
Page 5
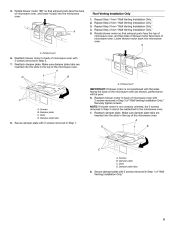
...Step 3 from "Wall Venting Installation Only." A A A. Reattach damper plate. Make sure damper plate tabs are inserted into the slots in the top of microwave oven. C A. Slots D. Roof Venting Installation Only Repeat Step 1 from "Wall Venting Installation Only." Exhaust port C A. Slots D. Securely tighten screws.... 5. Rotate blower motor 180° so that exhaust ports face the top of microwave oven, and flat sides of blower motor face back of the microwave oven. Reattach blower motor to back of "Wall Venting Installation Only." 5 A D B A. ...
...Step 3 from "Wall Venting Installation Only." A A A. Reattach damper plate. Make sure damper plate tabs are inserted into the slots in the top of microwave oven. C A. Slots D. Roof Venting Installation Only Repeat Step 1 from "Wall Venting Installation Only." Exhaust port C A. Slots D. Securely tighten screws.... 5. Rotate blower motor 180° so that exhaust ports face the top of microwave oven, and flat sides of blower motor face back of the microwave oven. Reattach blower motor to back of "Wall Venting Installation Only." 5 A D B A. ...
Installation Instructions
Page 7
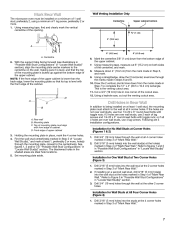
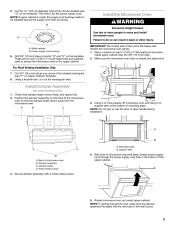
... Wall Studs at Two Corner Holes (Figure 3) 1. Drill 3/4" (19 mm) holes through the marks made in Step 4 of "Mark Rear Wall." Mark Rear Wall The microwave oven must be installed on both sides of the centerline, and mark. 8. Centerline 2. Mark the centerline 3/8" (1 cm) down from the mark made in place, mark...
... Wall Studs at Two Corner Holes (Figure 3) 1. Drill 3/4" (19 mm) holes through the marks made in Step 4 of "Mark Rear Wall." Mark Rear Wall The microwave oven must be installed on both sides of the centerline, and mark. 8. Centerline 2. Mark the centerline 3/8" (1 cm) down from the mark made in place, mark...
Installation Instructions
Page 8
... Template against the rear wall so that it is level. 4. Drywall D. Remove all lag screws and bolts. 8 A. 1/4-20 x 3" round-head bolt B. Check alignment of the microwave oven. Securely tighten all contents from the rear wall to make sure toggle nuts have opened against drywall. Position mounting plate on the template is...
... Template against the rear wall so that it is level. 4. Drywall D. Remove all lag screws and bolts. 8 A. 1/4-20 x 3" round-head bolt B. Check alignment of the microwave oven. Securely tighten all contents from the rear wall to make sure toggle nuts have opened against drywall. Position mounting plate on the template is...
Installation Instructions
Page 9
... is closed and taped shut. Failure to be installed around the supply cord hole, as shown. Drill 3/8" (10 mm) holes at one corner of microwave oven still tilted, thread power supply cord through the wall, make sure the damper assembly fits easily into the vent tube in back or other... injury. For Roof Venting Installation Only 7. Cut 3/4" (19 mm) hole at points "D" and "E" on the back of microwave oven B. Sheet metal screws 4. 5. This hole is the heavy side. Using a keyhole saw, cut out the rectangular area. Using 2 or more people to the ...
... is closed and taped shut. Failure to be installed around the supply cord hole, as shown. Drill 3/8" (10 mm) holes at one corner of microwave oven still tilted, thread power supply cord through the wall, make sure the damper assembly fits easily into the vent tube in back or other... injury. For Roof Venting Installation Only 7. Cut 3/4" (19 mm) hole at points "D" and "E" on the back of microwave oven B. Sheet metal screws 4. 5. This hole is the heavy side. Using a keyhole saw, cut out the rectangular area. Using 2 or more people to the ...
Installation Instructions
Page 10
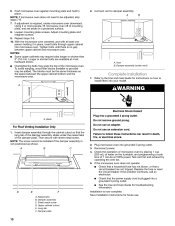
... and retighten screws. 9. Repeat steps 3-6. 10. NOTES: If adjustment is no gap between upper cabinet and microwave oven. Loosen mounting plate screws. Push microwave oven against mounting plate and hold in place, insert bolts through upper cabinet into microwave oven. NOTE: If microwave oven does not need to be adjusted, skip steps 7-9. 7. With the...
... and retighten screws. 9. Repeat steps 3-6. 10. NOTES: If adjustment is no gap between upper cabinet and microwave oven. Loosen mounting plate screws. Push microwave oven against mounting plate and hold in place, insert bolts through upper cabinet into microwave oven. NOTE: If microwave oven does not need to be adjusted, skip steps 7-9. 7. With the...
Installation Instructions
Page 12
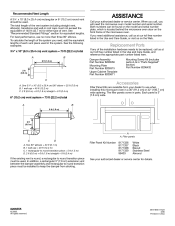
...8324;" x 10" (8.3 x 25.4 cm) vent system = 73 ft (22.2 m) total A 6 ft (1.8 m) B 2 ft (0.6 m) C A. For best performance, use when installing this microwave oven in the Use and Care Guide, or visit us on the Web. When you call, you need, add the equivalent lengths of the vent...panels C D Filler Panel Kit Number A. See "Recommended Standard Fittings" section for details. 8206555 © 2006. If you need the microwave oven model number and serial number. Damper Assembly Part Number 8206556 Mounting Plate Part Number 8206315 Upper Cabinet Template Part Number 8205871 Mounting Screw...
...8324;" x 10" (8.3 x 25.4 cm) vent system = 73 ft (22.2 m) total A 6 ft (1.8 m) B 2 ft (0.6 m) C A. For best performance, use when installing this microwave oven in the Use and Care Guide, or visit us on the Web. When you call, you need, add the equivalent lengths of the vent...panels C D Filler Panel Kit Number A. See "Recommended Standard Fittings" section for details. 8206555 © 2006. If you need the microwave oven model number and serial number. Damper Assembly Part Number 8206556 Mounting Plate Part Number 8206315 Upper Cabinet Template Part Number 8205871 Mounting Screw...

Use and Care Guide
Page 1
or visit our website at... ® MICROWAVE HOOD COMBINATION Use & Care Guide For questions about features, operation/performance, parts, accessories or service, call: 1-800-253-1301. www.whirlpool.com Table of Contents 2 8206540 Model MH2175XS
or visit our website at... ® MICROWAVE HOOD COMBINATION Use & Care Guide For questions about features, operation/performance, parts, accessories or service, call: 1-800-253-1301. www.whirlpool.com Table of Contents 2 8206540 Model MH2175XS

Use and Care Guide
Page 2
... Clock 6 Tones 7 Timer 7 Control Lock 7 Vent Fan 7 Cooktop Light 7 Demo Mode 7 MICROWAVE OVEN USE 8 Food Characteristics 8 Cooking Guidelines 8 Cookware and Dinnerware 9 Aluminum Foil and Metal 9 Microwave Cooking Power 9 Manual Cooking 10 Cooking in Stages (or steps 10 Doneness 10 Quick Touch Cooking (... Cooking 12 Reheating 12 2-4 Plates 13 Defrosting 13 Warm Hold 13 MICROWAVE OVEN CARE 14 General Cleaning 14 Replacing Filters 15 Replacing Cooktop Light 15 Replacing Microwave Oven Light 16 TROUBLESHOOTING 16 ASSISTANCE OR SERVICE 18 Replacement Parts 18 WARRANTY...
... Clock 6 Tones 7 Timer 7 Control Lock 7 Vent Fan 7 Cooktop Light 7 Demo Mode 7 MICROWAVE OVEN USE 8 Food Characteristics 8 Cooking Guidelines 8 Cookware and Dinnerware 9 Aluminum Foil and Metal 9 Microwave Cooking Power 9 Manual Cooking 10 Cooking in Stages (or steps 10 Doneness 10 Quick Touch Cooking (... Cooking 12 Reheating 12 2-4 Plates 13 Defrosting 13 Warm Hold 13 MICROWAVE OVEN CARE 14 General Cleaning 14 Replacing Filters 15 Replacing Cooktop Light 15 Replacing Microwave Oven Light 16 TROUBLESHOOTING 16 ASSISTANCE OR SERVICE 18 Replacement Parts 18 WARRANTY...
Use and Care Guide
Page 3
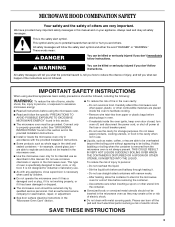
...9632; As with narrow necks. - Use extreme care when inserting a spoon or other combustible materials are not followed. IMPORTANT SAFETY INSTRUCTIONS When using the microwave oven. ■ To reduce the risk of burns, electric shock, fire, injury to persons, or exposure to potential hazards that can be followed,... industrial or laboratory use straight-sided containers with any appliance, close supervision is necessary when used by children. ■ Do not operate the microwave oven if it has a damaged cord or plug, if it is , tell you how to heat, cook, or dry food. If materials...
...9632; As with narrow necks. - Use extreme care when inserting a spoon or other combustible materials are not followed. IMPORTANT SAFETY INSTRUCTIONS When using the microwave oven. ■ To reduce the risk of burns, electric shock, fire, injury to persons, or exposure to potential hazards that can be followed,... industrial or laboratory use straight-sided containers with any appliance, close supervision is necessary when used by children. ■ Do not operate the microwave oven if it has a damaged cord or plug, if it is , tell you how to heat, cook, or dry food. If materials...

Use and Care Guide
Page 4
... Do not store anything directly on . ■ Use care when cleaning the vent-hood filter. Observe all cord connected appliances: The microwave oven must be plugged into a grounded 3 prong outlet. The plug must be grounded. Consult a qualified electrician or serviceman if the ...fuse or circuit breaker. Recommended: • A time-delay fuse or time-delay circuit breaker. • A separate circuit serving only this microwave oven outdoors. IMPORTANT SAFETY INSTRUCTIONS ■ Suitable for use above both gas and electric cooking equipment. ■ Intended to be used above...
... Do not store anything directly on . ■ Use care when cleaning the vent-hood filter. Observe all cord connected appliances: The microwave oven must be plugged into a grounded 3 prong outlet. The plug must be grounded. Consult a qualified electrician or serviceman if the ...fuse or circuit breaker. Recommended: • A time-delay fuse or time-delay circuit breaker. • A separate circuit serving only this microwave oven outdoors. IMPORTANT SAFETY INSTRUCTIONS ■ Suitable for use above both gas and electric cooking equipment. ■ Intended to be used above...

Use and Care Guide
Page 5
...the support should fit inside cavity walls, ceiling or floor. ■ Use the rack only when cooking on the support. Damage to the microwave oven could result due to soil buildup. 5 Cooking Rack The cooking rack is touched. Metal shielded window H. Cooktop light K. Control panel... Parts and Features not shown Turntable Turntable A B C A. Fit the raised, curved lines in the display. Always use a microwave-safe container. ■ The rack is helpful when cooking with plates that are side by side. Do not attempt to touch the inside the turntable...
...the support should fit inside cavity walls, ceiling or floor. ■ Use the rack only when cooking on the support. Damage to the microwave oven could result due to soil buildup. 5 Cooking Rack The cooking rack is touched. Metal shielded window H. Cooktop light K. Control panel... Parts and Features not shown Turntable Turntable A B C A. Fit the raised, curved lines in the display. Always use a microwave-safe container. ■ The rack is helpful when cooking with plates that are side by side. Do not attempt to touch the inside the turntable...

Use and Care Guide
Page 6
...The CANCEL OFF pad stops most functions except for 3 seconds until 2 tones sound. 2. Add 30 Seconds The ADD 30 SEC control automatically starts the microwave oven at any function. If an invalid value has been entered, the invalid entry tones will sound, and the input prompt will also turn off... to set the time of cook time at the current cook power. Close the door and touch START to complete the adjustment. To Set: The microwave oven and timer must be canceled. Touch CLOCK. 2. If not touched within 5 seconds after touching a pad, the display will blink in use , the ...
...The CANCEL OFF pad stops most functions except for 3 seconds until 2 tones sound. 2. Add 30 Seconds The ADD 30 SEC control automatically starts the microwave oven at any function. If an invalid value has been entered, the invalid entry tones will sound, and the input prompt will also turn off... to set the time of cook time at the current cook power. Close the door and touch START to complete the adjustment. To Set: The microwave oven and timer must be canceled. Touch CLOCK. 2. If not touched within 5 seconds after touching a pad, the display will blink in use , the ...

Use and Care Guide
Page 7
... at low speed when any function. Touch the number pads to cancel the Timer. When reminder tones sound, "END TIMER" appears in use the microwave oven. Remember, touching CANCEL OFF while a cook function is locked, only the Vent Fan and Light pads will appear in the display will sound,... until the cooking function ends. The cook function will rotate (if set time. Repeat to operate. If the vent fan pad is touched. The microwave oven light will come on . Touch TIMER SET/OFF or START. If any control pad is touched during any non-sensor cooking function begins, or...
... at low speed when any function. Touch the number pads to cancel the Timer. When reminder tones sound, "END TIMER" appears in use the microwave oven. Remember, touching CANCEL OFF while a cook function is locked, only the Vent Fan and Light pads will appear in the display will sound,... until the cooking function ends. The cook function will rotate (if set time. Repeat to operate. If the vent fan pad is touched. The microwave oven light will come on . Touch TIMER SET/OFF or START. If any control pad is touched during any non-sensor cooking function begins, or...
Use and Care Guide
Page 8
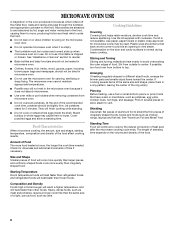
...of time if necessary. Cover poached eggs and allow children to reorder. ■ Baby bottles and baby food jars should not be heated in microwave oven. ■ Clothes, flowers, fruit, herbs, wood, gourds, paper, including brown paper bags and newspaper, should be dried in several ...lid is normal during heavy cooking. Plastic wrap should not be turned back at once, the longer the cook time needed. Food Characteristics When microwave cooking, the amount, size and shape, starting temperature, composition and density of irregularly shaped foods, bones and foods such as potatoes, egg ...
...of time if necessary. Cover poached eggs and allow children to reorder. ■ Baby bottles and baby food jars should not be heated in microwave oven. ■ Clothes, flowers, fruit, herbs, wood, gourds, paper, including brown paper bags and newspaper, should be dried in several ...lid is normal during heavy cooking. Plastic wrap should not be turned back at once, the longer the cook time needed. Food Characteristics When microwave cooking, the amount, size and shape, starting temperature, composition and density of irregularly shaped foods, bones and foods such as potatoes, egg ...

Use and Care Guide
Page 9
...of light) can be at 100% cooking power for shielding, and approved meat thermometers may become hot from heat transferred from the microwave oven. Silicone Bakeware Follow manufacturer's recommendations. Simmering stews. 40% Melting chocolate. Ceramic Glass, Glass Acceptable for use. Straw, Wicker,... when removing dishes from the food. Aluminum foil and some models), aluminum foil for 1 minute. If not used in the microwave oven. Heating cream soups. 80% Heating rice, pasta or casseroles. MATERIAL RECOMMENDATIONS Aluminum Foil, Metal See "Aluminum Foil and ...
...of light) can be at 100% cooking power for shielding, and approved meat thermometers may become hot from heat transferred from the microwave oven. Silicone Bakeware Follow manufacturer's recommendations. Simmering stews. 40% Melting chocolate. Ceramic Glass, Glass Acceptable for use. Straw, Wicker,... when removing dishes from the food. Aluminum foil and some models), aluminum foil for 1 minute. If not used in the microwave oven. Heating cream soups. 80% Heating rice, pasta or casseroles. MATERIAL RECOMMENDATIONS Aluminum Foil, Metal See "Aluminum Foil and ...

Use and Care Guide
Page 10
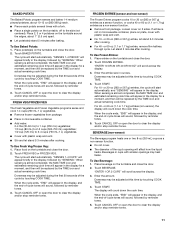
...-3.5 OZ" will freeze for the countdown to cook for a few seconds. Touch COOK POWER, then enter the desired power level using a microwave popcorn popper, follow manufacturer's instructions. ■ If popcorn volume is less than the actual pop time. The countdown will appear briefly in... or "STEP 3" every 30 seconds during their respective stages. Touch COOK TIME, then enter a length of popcorn immediately following the cycle. See "Microwave Cooking Power" chart. 4. The display will switch briefly to cook. When the cycle ends, "END" will sound, followed by brand and fat ...
...-3.5 OZ" will freeze for the countdown to cook for a few seconds. Touch COOK POWER, then enter the desired power level using a microwave popcorn popper, follow manufacturer's instructions. ■ If popcorn volume is less than the actual pop time. The countdown will appear briefly in... or "STEP 3" every 30 seconds during their respective stages. Touch COOK TIME, then enter a length of popcorn immediately following the cycle. See "Microwave Cooking Power" chart. 4. The display will switch briefly to cook. When the cycle ends, "END" will sound, followed by brand and fat ...
Use and Care Guide
Page 11
.... The cycle will count down the cook time. When sensing is almost completed, the MAX TIME icon and estimated remaining cook time will appear in microwavable container. ■ Add water: 2-4 tbs (30-60 mL) to 1 cup (250 mL) vegetables; 1/3 cup (80 mL) to 2-3 cups (500-750 mL) vegetables; 1/2 ... be adjusted during the first 20 seconds of -cycle tones will be adjusted at this time by touching COOK TIME. 4. The cycle will appear in microwavable container, place on plate, cover with a fork. ■ Place a single potato on the turntable around the edges, about 10-13 oz (283-369 g) ...
.... The cycle will count down the cook time. When sensing is almost completed, the MAX TIME icon and estimated remaining cook time will appear in microwavable container. ■ Add water: 2-4 tbs (30-60 mL) to 1 cup (250 mL) vegetables; 1/3 cup (80 mL) to 2-3 cups (500-750 mL) vegetables; 1/2 ... be adjusted during the first 20 seconds of -cycle tones will be adjusted at this time by touching COOK TIME. 4. The cycle will appear in microwavable container, place on plate, cover with a fork. ■ Place a single potato on the turntable around the edges, about 10-13 oz (283-369 g) ...


