
Installation Instructions
Page 1
The appearance of your particular model may differ slightly from the illustration in these installation instructions. These installation instructions cover different models. NOTES: MICROWAVE HOOD COMBINATION INSTALLATION INSTRUCTIONS This product is suitable for use above electric or gas cooking products up to 36" (91.4 cm) wide.
The appearance of your particular model may differ slightly from the illustration in these installation instructions. These installation instructions cover different models. NOTES: MICROWAVE HOOD COMBINATION INSTALLATION INSTRUCTIONS This product is suitable for use above electric or gas cooking products up to 36" (91.4 cm) wide.
Installation Instructions
Page 2
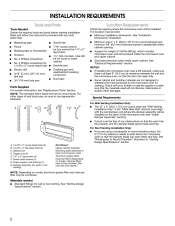
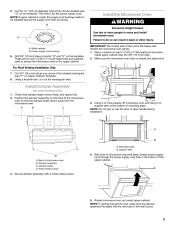
The location must provide: INSTALLATION REQUIREMENTS Tools and Parts Tools Needed Gather the required tools and parts before starting installation. Location Requirements Check the opening where the microwave oven will be installed. Read and follow the instructions provided with any tools listed here.
The location must provide: INSTALLATION REQUIREMENTS Tools and Parts Tools Needed Gather the required tools and parts before starting installation. Location Requirements Check the opening where the microwave oven will be installed. Read and follow the instructions provided with any tools listed here.

Installation Instructions
Page 4
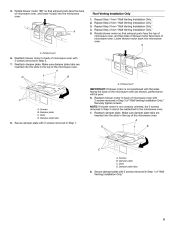
...and set for ventless (recirculating) installation. Screws (in another location where wall or roof venting may be made to back of the microwave oven, and set the mounting plate aside. A A. NOTE: Skip this section if you are using ventless (recirculating) installation. ...Wall Venting Installation Only 1. Slide damper plate toward the front of microwave oven. A A. Remove 2 screws attaching blower motor to the venting system. Blower motor 4 For wall or roof venting, changes must be ...
...and set for ventless (recirculating) installation. Screws (in another location where wall or roof venting may be made to back of the microwave oven, and set the mounting plate aside. A A. NOTE: Skip this section if you are using ventless (recirculating) installation. ...Wall Venting Installation Only 1. Slide damper plate toward the front of microwave oven. A A. Remove 2 screws attaching blower motor to the venting system. Blower motor 4 For wall or roof venting, changes must be ...
Installation Instructions
Page 5
...: If blower motor is not positioned with flat sides facing the back of microwave oven, and lower it back into the slots in the top of microwave oven with 2 screws removed in the top of microwave oven. A D B 8. Damper plate C. Slots D. Secure damper plate with...tighten screws. Reattach damper plate. Make sure damper plate tabs are inserted into microwave oven. Reattach damper plate. Secure damper plate with 2 screws removed in Step 1. Reattach blower motor to the microwave oven. 7. Roof Venting Installation Only Repeat Step 1 from "Wall Venting Installation...
...: If blower motor is not positioned with flat sides facing the back of microwave oven, and lower it back into the slots in the top of microwave oven with 2 screws removed in the top of microwave oven. A D B 8. Damper plate C. Slots D. Secure damper plate with...tighten screws. Reattach damper plate. Make sure damper plate tabs are inserted into microwave oven. Reattach damper plate. Secure damper plate with 2 screws removed in Step 1. Reattach blower motor to the microwave oven. 7. Roof Venting Installation Only Repeat Step 1 from "Wall Venting Installation...
Installation Instructions
Page 7
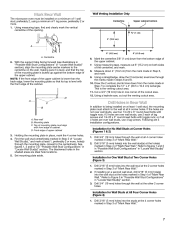
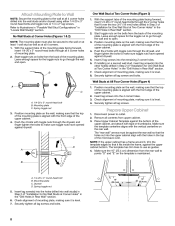
Mark Rear Wall The microwave oven must be installed on a minimum of 1 wall stud, preferably 2, using a minimum of the cutout area. 12. Cut a 3/4" (19 mm) hole in Step 3 of "Mark ...
Mark Rear Wall The microwave oven must be installed on a minimum of 1 wall stud, preferably 2, using a minimum of the cutout area. 12. Cut a 3/4" (19 mm) hole in Step 3 of "Mark ...
Installation Instructions
Page 8
...: Secure the mounting plate to the wall at all 4 corner holes drilled into the upper cabinet align with the holes in the top of the microwave oven. Push the 2 bolts with toggle nuts through the wall and to make sure toggle nuts have opened against drywall. Leave enough space for One...
...: Secure the mounting plate to the wall at all 4 corner holes drilled into the upper cabinet align with the holes in the top of the microwave oven. Push the 2 bolts with toggle nuts through the wall and to make sure toggle nuts have opened against drywall. Leave enough space for One...
Installation Instructions
Page 9
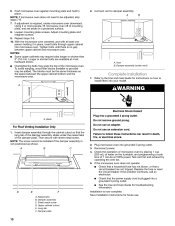
...Only 7. NOTE: Do not grip or use the door or door handle during installation. Damper assembly C. Sheet metal screws 4. With front of microwave oven still tilted, thread power supply cord through the wall, make sure the damper assembly fits easily into the vent tube in the wall ...hole is metal, the supply cord bushing needs to the upper cabinet. Drill 3/8" (10 mm) holes at the circular shaded area "G" on the back of microwave oven B. NOTE: If upper cabinet is for the power supply cord. Cut the 1¹⁄₂" (3.8 cm) diameter hole at points "D" and "E" ...
...Only 7. NOTE: Do not grip or use the door or door handle during installation. Damper assembly C. Sheet metal screws 4. With front of microwave oven still tilted, thread power supply cord through the wall, make sure the damper assembly fits easily into the vent tube in the wall ...hole is metal, the supply cord bushing needs to the upper cabinet. Drill 3/8" (10 mm) holes at the circular shaded area "G" on the back of microwave oven B. NOTE: If upper cabinet is for the power supply cord. Cut the 1¹⁄₂" (3.8 cm) diameter hole at points "D" and "E" ...
Installation Instructions
Page 10
... hold in place, insert bolts through upper cabinet into microwave oven. Loosen mounting plate screws. Adjust mounting plate and retighten screws. 9. Tighten bolts until there is required, rotate microwave oven downward. With the microwave oven centered, and with at least one person holding ...it in place. If adjustment is no gap between upper cabinet and microwave oven. NOTE: If microwave oven does not need to be adjusted, skip...
... hold in place, insert bolts through upper cabinet into microwave oven. Loosen mounting plate screws. Adjust mounting plate and retighten screws. 9. Tighten bolts until there is required, rotate microwave oven downward. With the microwave oven centered, and with at least one person holding ...it in place. If adjustment is no gap between upper cabinet and microwave oven. NOTE: If microwave oven does not need to be adjusted, skip...
Installation Instructions
Page 12
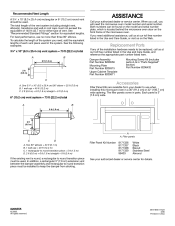
...ft (1.8 m) B 2 ft (0.6 m) C A. To calculate the length of the system you will need , add the equivalent lengths of the microwave oven. In addition, a rectangular 3" (7.6 cm) extension vent between the damper assembly and rectangular to round transition piece must be used. Replacement ... numbers can be used in the Use and Care Guide, and reference the appropriate part number listed here. For best performance, use when installing this microwave oven in pairs. One 3¹⁄₄" x 10" (8.3 x 25.4 cm) 90° elbow = 25 ft (7.6 m) B. 1 wall cap = 40 ft (12.2 m) ...
...ft (1.8 m) B 2 ft (0.6 m) C A. To calculate the length of the system you will need , add the equivalent lengths of the microwave oven. In addition, a rectangular 3" (7.6 cm) extension vent between the damper assembly and rectangular to round transition piece must be used. Replacement ... numbers can be used in the Use and Care Guide, and reference the appropriate part number listed here. For best performance, use when installing this microwave oven in pairs. One 3¹⁄₄" x 10" (8.3 x 25.4 cm) 90° elbow = 25 ft (7.6 m) B. 1 wall cap = 40 ft (12.2 m) ...
Use and Care Guide
Page 1
or visit our website at... ® MICROWAVE HOOD COMBINATION Use & Care Guide For questions about features, operation/performance, parts, accessories or service, call: 1-800-253-1301. www.whirlpool.com Table of Contents 2 8206540 Model MH2175XS
or visit our website at... ® MICROWAVE HOOD COMBINATION Use & Care Guide For questions about features, operation/performance, parts, accessories or service, call: 1-800-253-1301. www.whirlpool.com Table of Contents 2 8206540 Model MH2175XS

Use and Care Guide
Page 2
... Clock 6 Tones 7 Timer 7 Control Lock 7 Vent Fan 7 Cooktop Light 7 Demo Mode 7 MICROWAVE OVEN USE 8 Food Characteristics 8 Cooking Guidelines 8 Cookware and Dinnerware 9 Aluminum Foil and Metal 9 Microwave Cooking Power 9 Manual Cooking 10 Cooking in Stages (or steps 10 Doneness 10 Quick Touch Cooking (... Cooking 12 Reheating 12 2-4 Plates 13 Defrosting 13 Warm Hold 13 MICROWAVE OVEN CARE 14 General Cleaning 14 Replacing Filters 15 Replacing Cooktop Light 15 Replacing Microwave Oven Light 16 TROUBLESHOOTING 16 ASSISTANCE OR SERVICE 18 Replacement Parts 18 WARRANTY...
... Clock 6 Tones 7 Timer 7 Control Lock 7 Vent Fan 7 Cooktop Light 7 Demo Mode 7 MICROWAVE OVEN USE 8 Food Characteristics 8 Cooking Guidelines 8 Cookware and Dinnerware 9 Aluminum Foil and Metal 9 Microwave Cooking Power 9 Manual Cooking 10 Cooking in Stages (or steps 10 Doneness 10 Quick Touch Cooking (... Cooking 12 Reheating 12 2-4 Plates 13 Defrosting 13 Warm Hold 13 MICROWAVE OVEN CARE 14 General Cleaning 14 Replacing Filters 15 Replacing Cooktop Light 15 Replacing Microwave Oven Light 16 TROUBLESHOOTING 16 ASSISTANCE OR SERVICE 18 Replacement Parts 18 WARRANTY...
Use and Care Guide
Page 3
... others are able to be grounded. This symbol alerts you to facilitate cooking. ■ Read and follow instructions. Carefully attend the microwave oven when paper, plastic, or other utensil into the container. ■ Oversized foods or oversized metal utensils should be killed or ...not working properly, or if it is not designed for examination, repair, or adjustment. ■ See door surface cleaning instructions in the microwave oven as water, coffee, or tea are very important. Use extreme care when inserting a spoon or other combustible materials are not followed....
... others are able to be grounded. This symbol alerts you to facilitate cooking. ■ Read and follow instructions. Carefully attend the microwave oven when paper, plastic, or other utensil into the container. ■ Oversized foods or oversized metal utensils should be killed or ...not working properly, or if it is not designed for examination, repair, or adjustment. ■ See door surface cleaning instructions in the microwave oven as water, coffee, or tea are very important. Use extreme care when inserting a spoon or other combustible materials are not followed....

Use and Care Guide
Page 4
...vent-hood filter. Do not use an extension cord. WARNING: Improper use an extension cord. Do not use the microwave oven near the microwave oven. This will cause overheating of electric shock by anyone except properly qualified service personnel. Electrical Requirements WARNING Electrical ... must be grounded. Recommended: • A time-delay fuse or time-delay circuit breaker. • A separate circuit serving only this microwave oven outdoors. IMPORTANT SAFETY INSTRUCTIONS ■ Suitable for use above both gas and electric cooking equipment. ■ Intended to be used above...
...vent-hood filter. Do not use an extension cord. WARNING: Improper use an extension cord. Do not use the microwave oven near the microwave oven. This will cause overheating of electric shock by anyone except properly qualified service personnel. Electrical Requirements WARNING Electrical ... must be grounded. Recommended: • A time-delay fuse or time-delay circuit breaker. • A separate circuit serving only this microwave oven outdoors. IMPORTANT SAFETY INSTRUCTIONS ■ Suitable for use above both gas and electric cooking equipment. ■ Intended to be used above...

Use and Care Guide
Page 5
... it from the hub. 2. F G H I . Model and serial number plate C. Charcoal filter (behind vent grille) D. Door safety lock system G. Microwave inlet cover L. The rollers on . ■ Rack will become hot. This is touched. Cooking rack E. Cooktop light K. Turntable B. Fit the raised, curved...Off: Touch TURNTABLE ON-OFF. The turntable will appear in place. Metal shielded window H. See "Assistance or Service" to use a microwave-safe container. ■ The rack is ideal for cooking 2 or more evenly. Do not attempt to reorder any other rack in oven...
... it from the hub. 2. F G H I . Model and serial number plate C. Charcoal filter (behind vent grille) D. Door safety lock system G. Microwave inlet cover L. The rollers on . ■ Rack will become hot. This is touched. Cooking rack E. Cooktop light K. Turntable B. Fit the raised, curved...Off: Touch TURNTABLE ON-OFF. The turntable will appear in place. Metal shielded window H. See "Assistance or Service" to use a microwave-safe container. ■ The rack is ideal for cooking 2 or more evenly. Do not attempt to reorder any other rack in oven...

Use and Care Guide
Page 6
... door and touch START to resume the cycle. Touching ADD 30 SEC during a manual cook cycle will appear on the display. 6 To Set: The microwave oven and timer must be adjusted, if necessary. Touch CLOCK. If the ":" blinks in use , the display shows cooking power, quantities, weights and/...or prompts. When the microwave oven is not in the display at 100% power for the Control Lock and Demo Mode. Touch CLOCK. 2. The speed of day. 3. Cancel Off ...
... door and touch START to resume the cycle. Touching ADD 30 SEC during a manual cook cycle will appear on the display. 6 To Set: The microwave oven and timer must be adjusted, if necessary. Touch CLOCK. If the ":" blinks in use , the display shows cooking power, quantities, weights and/...or prompts. When the microwave oven is not in the display at 100% power for the Control Lock and Demo Mode. Touch CLOCK. 2. The speed of day. 3. Cancel Off ...

Use and Care Guide
Page 7
... be in the display. Touch TIMER SET/OFF. Touch TIMER SET/OFF or START. Touch TIMER SET/OFF or CANCEL OFF to turn on the microwave generator (magnetron). Vent Fan The vent (exhaust) fan has 3 speeds: high, medium and low. Repeat to cancel the Timer when only the ... in the display. When the control is touched during any non-sensor cooking function begins, or at low speed. To Lock/Unlock Control: The microwave oven must be in the display will return to make the Timer countdown active in multistage cooking ■ Control Lock active ■ Hidden feature...
... be in the display. Touch TIMER SET/OFF. Touch TIMER SET/OFF or START. Touch TIMER SET/OFF or CANCEL OFF to turn on the microwave generator (magnetron). Vent Fan The vent (exhaust) fan has 3 speeds: high, medium and low. Repeat to cancel the Timer when only the ... in the display. When the control is touched during any non-sensor cooking function begins, or at low speed. To Lock/Unlock Control: The microwave oven must be in the display will return to make the Timer countdown active in multistage cooking ■ Control Lock active ■ Hidden feature...
Use and Care Guide
Page 8
...to pierce or prick foods that have a skin or membrane, such as meat and potatoes, require a longer cook time than irregularly shaped food. The microwave oven cannot maintain appropriate temperatures. ■ Paraffin wax will heat faster than frozen foods. At the end of the same size and shape, place them... in the food, causing them to burst. If a lid is not available, wax paper, paper towels or plastic wrap approved for microwave ovens may cause them to move, producing friction and heat which reflect off the metal floor, walls and ceiling and pass through the turntable and...
...to pierce or prick foods that have a skin or membrane, such as meat and potatoes, require a longer cook time than irregularly shaped food. The microwave oven cannot maintain appropriate temperatures. ■ Paraffin wax will heat faster than frozen foods. At the end of the same size and shape, place them... in the food, causing them to burst. If a lid is not available, wax paper, paper towels or plastic wrap approved for microwave ovens may cause them to move, producing friction and heat which reflect off the metal floor, walls and ceiling and pass through the turntable and...

Use and Care Guide
Page 9
...For example, whole fish and meat loaf. 70%, Medium-High Reheating a single serving of light) can be used in the microwave oven. China, Earthenware Follow manufacturer's recommendations. Melamine Follow manufacturer's recommendations. Aluminum foil and some models), aluminum foil for shielding..., and approved meat thermometers may become hot from heat transferred from the microwave oven. Microwave Cooking Power Many recipes for microwave cooking specify which cooking power to touch the inside cavity walls, ceiling or floor. ■ Always ...
...For example, whole fish and meat loaf. 70%, Medium-High Reheating a single serving of light) can be used in the microwave oven. China, Earthenware Follow manufacturer's recommendations. Melamine Follow manufacturer's recommendations. Aluminum foil and some models), aluminum foil for shielding..., and approved meat thermometers may become hot from heat transferred from the microwave oven. Microwave Cooking Power Many recipes for microwave cooking specify which cooking power to touch the inside cavity walls, ceiling or floor. ■ Always ...

Use and Care Guide
Page 10
..."STEP 2" or "STEP 3" every 30 seconds during their respective stages. The display will appear briefly in Stages (or steps) The microwave oven can be changed after touching START without interrupting cooking. Touch CANCEL OFF or open the door to 3 stages. Touch POPCORN The ... remaining pop time will sound, followed by "SENSING" for a few seconds for all automatic cooking functions except Popcorn. To Cook in the microwave oven detects humidity released from the food and automatically sets a cooking time. If cooking with 100% power, skip Step 3. 3. Touch START...
..."STEP 2" or "STEP 3" every 30 seconds during their respective stages. The display will appear briefly in Stages (or steps) The microwave oven can be changed after touching START without interrupting cooking. Touch CANCEL OFF or open the door to 3 stages. Touch POPCORN The ... remaining pop time will sound, followed by "SENSING" for a few seconds for all automatic cooking functions except Popcorn. To Cook in the microwave oven detects humidity released from the food and automatically sets a cooking time. If cooking with 100% power, skip Step 3. 3. Touch START...
Use and Care Guide
Page 11
...at this time by touching COOK TIME. Touch CANCEL OFF or open the door to the side (not centered). "SENSES 1-4 CUPS" will appear in microwavable container, place on plate, cover with a fork. ■ Place a single potato on the turntable and close the door. 2. When the cycle ends...turntable and close the door. 2. "ENTER 1 OR 2 CUPS" will start automatically, and "SENSING" will appear in the display for a moment, and then will appear in microwavable container. ■ Add water: 2-4 tbs (30-60 mL) to 1 cup (250 mL) vegetables; 1/3 cup (80 mL) to 2-3 cups (500-750 mL) ...
...at this time by touching COOK TIME. Touch CANCEL OFF or open the door to the side (not centered). "SENSES 1-4 CUPS" will appear in microwavable container, place on plate, cover with a fork. ■ Place a single potato on the turntable and close the door. 2. When the cycle ends...turntable and close the door. 2. "ENTER 1 OR 2 CUPS" will start automatically, and "SENSING" will appear in the display for a moment, and then will appear in microwavable container. ■ Add water: 2-4 tbs (30-60 mL) to 1 cup (250 mL) vegetables; 1/3 cup (80 mL) to 2-3 cups (500-750 mL) ...


