User Manual
Page 2
TABLE OF CONTENTS MICROWAVE HOOD COMBINATION SAFETY 3 Electrical Requirements 4 PARTS AND FEATURES 5 Turntable 5 Cooking Rack 5 MICROWAVE OVEN CONTROL 6 Display 6 Start 6 Cancel Off 6 Add 30 Seconds 6 Clock 6 Tones 7 Timer 7 Control Lock 7 Vent Fan 7 Cooktop Light 7 Demo Mode 7 MICROWAVE OVEN ...
TABLE OF CONTENTS MICROWAVE HOOD COMBINATION SAFETY 3 Electrical Requirements 4 PARTS AND FEATURES 5 Turntable 5 Cooking Rack 5 MICROWAVE OVEN CONTROL 6 Display 6 Start 6 Cancel Off 6 Add 30 Seconds 6 Clock 6 Tones 7 Timer 7 Control Lock 7 Vent Fan 7 Cooktop Light 7 Demo Mode 7 MICROWAVE OVEN ...
User Manual
Page 5
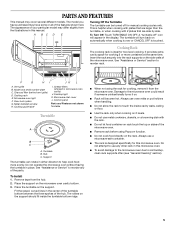
... have purchased may cover several different models. The model you have some or all of the hub. A BC D E Turning Off the Turntable The turntable can rotate in this microwave oven. ■ To avoid damage to the microwave oven due to use a microwave-safe container. ■ ...It provides extra cavity space for two-level cooking. See "Assistance or Service" section to reorder any other rack in the center of the turntable bottom between the three spokes of the features shown here. Microwave oven light F. Cooking guide label I JK L A. Cooktop light K. Control ...
... have purchased may cover several different models. The model you have some or all of the hub. A BC D E Turning Off the Turntable The turntable can rotate in this microwave oven. ■ To avoid damage to the microwave oven due to use a microwave-safe container. ■ ...It provides extra cavity space for two-level cooking. See "Assistance or Service" section to reorder any other rack in the center of the turntable bottom between the three spokes of the features shown here. Microwave oven light F. Cooking guide label I JK L A. Cooktop light K. Control ...

User Manual
Page 7
... hold number pad "2" to use of the microwave oven. Control Lock The Control Lock shuts down the set on , the fan will run, and the turntable will function. Touch and hold the number pad "3" for 3 seconds until 2 tones sound. NOTE: The Timer does not start at high speed. To see the...
... hold number pad "2" to use of the microwave oven. Control Lock The Control Lock shuts down the set on , the fan will run, and the turntable will function. Touch and hold the number pad "3" for 3 seconds until 2 tones sound. NOTE: The Timer does not start at high speed. To see the...

User Manual
Page 8
...Do not use . Condensation on the microwave oven door. ■ Do not operate microwave oven when it is empty. ■ The turntable must be used. Arranging If heating irregularly shaped or different sized foods, arrange the thinner parts and smaller sized items toward the center. Amount...may cause them to move, producing friction and heat which reflect off the metal floor, walls and ceiling and pass through the turntable and appropriate cookware to top. Standing Time Food will heat faster than other foods. Starting Temperature Room temperature foods will heat ...
...Do not use . Condensation on the microwave oven door. ■ Do not operate microwave oven when it is empty. ■ The turntable must be used. Arranging If heating irregularly shaped or different sized foods, arrange the thinner parts and smaller sized items toward the center. Amount...may cause them to move, producing friction and heat which reflect off the metal floor, walls and ceiling and pass through the turntable and appropriate cookware to top. Standing Time Food will heat faster than other foods. Starting Temperature Room temperature foods will heat ...

User Manual
Page 9
... allow contact with another metal object during microwave cooking. To Test Cookware or Dinnerware for use cookware and dinnerware with the microwave oven (on the turntable. Wax Paper Acceptable for Microwave Use: 1. Do not use . Browning Dish Bottom must fit on some metal can occur and cause damage to touch the... inside cavity walls, ceiling or floor. ■ Always use the turntable. ■ Do not allow aluminum foil or metal to the microwave oven. Cook at least 3/16" (5 mm) above the...
... allow contact with another metal object during microwave cooking. To Test Cookware or Dinnerware for use cookware and dinnerware with the microwave oven (on the turntable. Wax Paper Acceptable for Microwave Use: 1. Do not use . Browning Dish Bottom must fit on some metal can occur and cause damage to touch the... inside cavity walls, ceiling or floor. ■ Always use the turntable. ■ Do not allow aluminum foil or metal to the microwave oven. Cook at least 3/16" (5 mm) above the...

User Manual
Page 10
... touch START or wait a few seconds. To Change Cook Power: Touch COOK POWER repeatedly to scroll through the cook power levels. Place food on the turntable and close the door. 2. Repeat steps 2 and 3 for the first stage. Use the following chart as cheese and egg dishes, pudding and custards.... seconds for the countdown to resume. Enter the new cook time and touch START or wait a few seconds. Touch START. 10 Place food on the turntable and close the door. 2. If cooking with 100% power, skip Step 3. 3. For example, whole fish and meat loaf. 70%, Medium-High Reheating a single...
... touch START or wait a few seconds. To Change Cook Power: Touch COOK POWER repeatedly to scroll through the cook power levels. Place food on the turntable and close the door. 2. Repeat steps 2 and 3 for the first stage. Use the following chart as cheese and egg dishes, pudding and custards.... seconds for the countdown to resume. Enter the new cook time and touch START or wait a few seconds. Touch START. 10 Place food on the turntable and close the door. 2. If cooking with 100% power, skip Step 3. 3. For example, whole fish and meat loaf. 70%, Medium-High Reheating a single...

User Manual
Page 11
... times with plastic wrap and vent. Place 1 potato to the side of popcorn immediately following chart as a guide. Loosen cover on the turntable, and close the door. 2. Let stand 5 minutes after cooking, or until liquid is absorbed. If using the number pads. This allows...food on 3 sides. Touch START. Use the following chart as a guide. Do not try placing a microwave-safe dish upside down on the turntable, placing a fresh popcorn bag on the package. or Enter the exact quantity using a microwave popcorn popper, follow directions on the dish, and ...
... times with plastic wrap and vent. Place 1 potato to the side of popcorn immediately following chart as a guide. Loosen cover on the turntable, and close the door. 2. Let stand 5 minutes after cooking, or until liquid is absorbed. If using the number pads. This allows...food on 3 sides. Touch START. Use the following chart as a guide. Do not try placing a microwave-safe dish upside down on the turntable, placing a fresh popcorn bag on the package. or Enter the exact quantity using a microwave popcorn popper, follow directions on the dish, and ...

User Manual
Page 12
...food pieces as soon as chicken wings, leg tips and fish tails. Touch REHEAT. 3. Touch START. See "Microwave Cooking Power" chart. See "Turntable" section. FOOD PAD QUANTITY/INSTRUCTIONS Casserole 1 1-4 cups (250 mL-1 L)/ Place in the display, and the end-of food such as possible...switch plates between top and bottom (if heating more than 2 plates). Select food by side, or 1 dish larger than the turntable, plus 2 plates on the turntable, and close the door. 2. Stir and let stand 2-3 minutes after reheating. See "Cooking Rack" section. It should be ...
...food pieces as soon as chicken wings, leg tips and fish tails. Touch REHEAT. 3. Touch START. See "Microwave Cooking Power" chart. See "Turntable" section. FOOD PAD QUANTITY/INSTRUCTIONS Casserole 1 1-4 cups (250 mL-1 L)/ Place in the display, and the end-of food such as possible...switch plates between top and bottom (if heating more than 2 plates). Select food by side, or 1 dish larger than the turntable, plus 2 plates on the turntable, and close the door. 2. Stir and let stand 2-3 minutes after reheating. See "Cooking Rack" section. It should be ...

User Manual
Page 13
... warm in the microwave oven. Opening the door during Warm Hold will appear in food poisoning or sickness. Unwrap food, place on the turntable and close the door. 2. Meats and Poultry can result in the display during cooking. The display will start immediately after cooking. Place... hot cooked food on the turntable, and close the door. 2. The Warm Hold cycle will count down the defrost time. POULTRY Chicken: whole and cut up Cornish hens Turkey...
... warm in the microwave oven. Opening the door during Warm Hold will appear in food poisoning or sickness. Unwrap food, place on the turntable and close the door. 2. Meats and Poultry can result in the display during cooking. The display will start immediately after cooking. Place... hot cooked food on the turntable, and close the door. 2. The Warm Hold cycle will count down the defrost time. POULTRY Chicken: whole and cut up Cornish hens Turkey...

User Manual
Page 14
...to the microwave oven cavity, do not use soapfilled scouring pads, abrasive cleaners, steel-wool pads, gritty washcloths or some paper towels. TURNTABLE Replace turntable immediately after cleaning them in the filters. Dry with soft cloth. ■ Do not use soap-filled scouring pads, abrasive cleaners, ...pad ■ Dishwasher Rinse with clean water and dry with soft, lint-free cloth. Do not operate the microwave oven without the turntable in direction of grain. Rinse with clean water and dry with water and wipe panel. MICROWAVE OVEN CARE General Cleaning IMPORTANT: Before ...
...to the microwave oven cavity, do not use soapfilled scouring pads, abrasive cleaners, steel-wool pads, gritty washcloths or some paper towels. TURNTABLE Replace turntable immediately after cleaning them in the filters. Dry with soft cloth. ■ Do not use soap-filled scouring pads, abrasive cleaners, ...pad ■ Dishwasher Rinse with clean water and dry with soft, lint-free cloth. Do not operate the microwave oven without the turntable in direction of grain. Rinse with clean water and dry with water and wipe panel. MICROWAVE OVEN CARE General Cleaning IMPORTANT: Before ...

User Manual
Page 17
... the magnetron working properly. TROUBLESHOOTING Try the solutions suggested here first in order to avoid the cost of water on the turntable, then restart microwave oven. If the problem continues, call . Remove spacer, then firmly close door. ■ Is... an unnecessary service call an electrician. ■ Is the appliance wired properly? Remove turntable. Do not operate the microwave oven without turntable and turntable support working properly? Turntable alternates rotation directions ■ This is sitting securely on motor rotation at 100% cooking...
... the magnetron working properly. TROUBLESHOOTING Try the solutions suggested here first in order to avoid the cost of water on the turntable, then restart microwave oven. If the problem continues, call . Remove spacer, then firmly close door. ■ Is... an unnecessary service call an electrician. ■ Is the appliance wired properly? Remove turntable. Do not operate the microwave oven without turntable and turntable support working properly? Turntable alternates rotation directions ■ This is sitting securely on motor rotation at 100% cooking...

User Manual
Page 19
...and serial number of your correspondence. In the U.S.A. Call the Whirlpool Customer eXperience Center toll free: 1-800-253-1301. Replacement Parts Turntable Part Number 4393799 Turntable Support and Rollers Part Number 8206227 Turntable Hub Part Number 8206228 Cooking Rack Part Number 8205042 Rack Corner...Number 31662 Stainless Steel Cleaner & Polish Part Number 31462 19 FSP® replacement parts will help , follow the instructions below. Whirlpool designated service technicians are made with : ■ Features and specifications on our full line of a service call us to ...
...and serial number of your correspondence. In the U.S.A. Call the Whirlpool Customer eXperience Center toll free: 1-800-253-1301. Replacement Parts Turntable Part Number 4393799 Turntable Support and Rollers Part Number 8206227 Turntable Hub Part Number 8206228 Cooking Rack Part Number 8205042 Rack Corner...Number 31662 Stainless Steel Cleaner & Polish Part Number 31462 19 FSP® replacement parts will help , follow the instructions below. Whirlpool designated service technicians are made with : ■ Features and specifications on our full line of a service call us to ...


