
User Instructions
Page 1
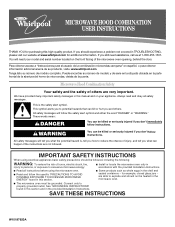
...don't follow instructions. This symbol alerts you don't immediately follow instructions. All safety messages will need assistance, call us at www.whirlpool.com for additional information. for purchasing this section and in TROUBLESHOOTING, please visit our website at 1-800-253-1301. We have ...provided many important safety messages in the microwave oven. ■ The microwave oven must be killed or seriously injured if you to properly grounded outlet. This is , tell you and others are...
...don't follow instructions. This symbol alerts you don't immediately follow instructions. All safety messages will need assistance, call us at www.whirlpool.com for additional information. for purchasing this section and in TROUBLESHOOTING, please visit our website at 1-800-253-1301. We have ...provided many important safety messages in the microwave oven. ■ The microwave oven must be killed or seriously injured if you to properly grounded outlet. This is , tell you and others are...

User Instructions
Page 2
...Oversized foods or oversized metal utensils should not be adjusted or repaired by qualified service personnel. To reduce the risk of the microwave oven when the microwave oven is no damage to be serviced only by anyone except properly qualified service personnel. 2 After heating, allow soil or ...laboratory use. ■ As with narrow necks. - Stir the liquid both gas and electric cooking equipment. ■ Intended to be allowed to microwave energy. Corrosive cleaning agents, such as lye-based oven cleaners, may create a fire or risk of 36" (91.44 cm). ■ Clean...
...Oversized foods or oversized metal utensils should not be adjusted or repaired by qualified service personnel. To reduce the risk of the microwave oven when the microwave oven is no damage to be serviced only by anyone except properly qualified service personnel. 2 After heating, allow soil or ...laboratory use. ■ As with narrow necks. - Stir the liquid both gas and electric cooking equipment. ■ Intended to be allowed to microwave energy. Corrosive cleaning agents, such as lye-based oven cleaners, may create a fire or risk of 36" (91.44 cm). ■ Clean...
User Instructions
Page 3
... and hold number pad "3" for FAST. 3. Repeat to turn back on some models) for the electric current. Demo Mode Activate to the microwave oven, always remove rack after 2-level cooking. Features CLEANRELEASE® Cavity Coating (on . To avoid damage to practice using the control without ...turning on some models) The durable, nonstick coating resists soil buildup by providing an escape wire for manual cooking only. To avoid damage to the microwave oven due to avoid unintended start. Required: ■ A 120 Volt, 60 Hz, AC only, 15- GROUNDING INSTRUCTIONS ■ For all ...
... and hold number pad "3" for FAST. 3. Repeat to turn back on some models) for the electric current. Demo Mode Activate to the microwave oven, always remove rack after 2-level cooking. Features CLEANRELEASE® Cavity Coating (on . To avoid damage to practice using the control without ...turning on some models) The durable, nonstick coating resists soil buildup by providing an escape wire for manual cooking only. To avoid damage to the microwave oven due to avoid unintended start. Required: ■ A 120 Volt, 60 Hz, AC only, 15- GROUNDING INSTRUCTIONS ■ For all ...
User Instructions
Page 4
...some models) WARNING Preset Reheating Touch REHEAT, select food item, enter quantity if needed , then touch the Start control. Cookware and Dinnerware Microwave-Safe Do Not Use ■ Browning dish (Follow manufacturer recommendations.) ■ Ceramic glass, glass ■ China, earthenware (Follow manufacturer ...water or dishwasher. ■ Cooking rack and supports (on some models): mild soap, water and washcloth. Preset Defrosting Unwrap food. Microwave Oven Use Manual Cooking/Stage Cooking Touch COOK TIME, touch number pads to enter time, touch COOK POWER (if not 100%), ...
...some models) WARNING Preset Reheating Touch REHEAT, select food item, enter quantity if needed , then touch the Start control. Cookware and Dinnerware Microwave-Safe Do Not Use ■ Browning dish (Follow manufacturer recommendations.) ■ Ceramic glass, glass ■ China, earthenware (Follow manufacturer ...water or dishwasher. ■ Cooking rack and supports (on some models): mild soap, water and washcloth. Preset Defrosting Unwrap food. Microwave Oven Use Manual Cooking/Stage Cooking Touch COOK TIME, touch number pads to enter time, touch COOK POWER (if not 100%), ...
User Instructions
Page 5
...cooktop usage ■ This is a list of a service call for assistance. Please refer to cool the microwave oven's controls while the cooktop below . www.whirlpool.com Microwave oven will not operate Check the following : ■ Proximity Move the receiver away from the vent fan,... automatically comes on cavity walls, microwave inlet cover, cooking rack supports, and area where the door touches the ...
...cooktop usage ■ This is a list of a service call for assistance. Please refer to cool the microwave oven's controls while the cooktop below . www.whirlpool.com Microwave oven will not operate Check the following : ■ Proximity Move the receiver away from the vent fan,... automatically comes on cavity walls, microwave inlet cover, cooking rack supports, and area where the door touches the ...
User Instructions
Page 6
... manner that have access to the Internet and you need further assistance, you on the upper or lower front facing of the microwave oven opening, behind the door. THIS WARRANTY GIVES YOU SPECIFIC LEGAL RIGHTS, AND YOU MAY ALSO HAVE OTHER RIGHTS WHICH VARY..., fire, flood, acts of God, improper installation, installation not in your correspondence. DISCLAIMER OF IMPLIED WARRANTIES; If you may contact Whirlpool at : Whirlpool Brand Home Appliances Customer eXperience Center 553 Benson Road Benton Harbor, MI 49022-2692 Please include a daytime phone number in accordance with ...
... manner that have access to the Internet and you need further assistance, you on the upper or lower front facing of the microwave oven opening, behind the door. THIS WARRANTY GIVES YOU SPECIFIC LEGAL RIGHTS, AND YOU MAY ALSO HAVE OTHER RIGHTS WHICH VARY..., fire, flood, acts of God, improper installation, installation not in your correspondence. DISCLAIMER OF IMPLIED WARRANTIES; If you may contact Whirlpool at : Whirlpool Brand Home Appliances Customer eXperience Center 553 Benson Road Benton Harbor, MI 49022-2692 Please include a daytime phone number in accordance with ...
Installation Instructions
Page 1
... you to Wall 8 Prepare Upper Cabinet 8 Install Damper Assembly 9 Install the Microwave Oven 9 Complete Installation 10 VENTING DESIGN SPECIFICATIONS 11 ASSISTANCE 12 Replacement Parts 12 Accessories 12 MICROWAVE HOOD COMBINATION SAFETY Your safety and the safety of your particular model may differ slightly.... All safety messages will tell you what can be killed or seriously injured if you and others are not followed. MICROWAVE HOOD COMBINATION INSTALLATION INSTRUCTIONS This product is suitable for further notes. All safety messages will follow the safety alert symbol and...
... you to Wall 8 Prepare Upper Cabinet 8 Install Damper Assembly 9 Install the Microwave Oven 9 Complete Installation 10 VENTING DESIGN SPECIFICATIONS 11 ASSISTANCE 12 Replacement Parts 12 Accessories 12 MICROWAVE HOOD COMBINATION SAFETY Your safety and the safety of your particular model may differ slightly.... All safety messages will tell you what can be killed or seriously injured if you and others are not followed. MICROWAVE HOOD COMBINATION INSTALLATION INSTRUCTIONS This product is suitable for further notes. All safety messages will follow the safety alert symbol and...
Installation Instructions
Page 2
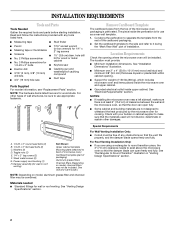
...2 Location Requirements Check the opening . ■ Support for weight of the cardboard packaging. 2. NOTES: ■ If installing the microwave oven near a left sidewall, make sure that the materials used will be included. Special Requirements For Wall Venting Installation Only: ■...1½" (3.8 cm) diam. See Use and Care Guide.) NOTE: Depending on model, charcoal filters may be free of clearance between the wall and the microwave oven, so that the door can open freely and fully. Toggle nuts (2) E. 1/4" x 2" lag screws (2) F. See "Installation Dimensions" illustration. &#...
...2 Location Requirements Check the opening . ■ Support for weight of the cardboard packaging. 2. NOTES: ■ If installing the microwave oven near a left sidewall, make sure that the materials used will be included. Special Requirements For Wall Venting Installation Only: ■...1½" (3.8 cm) diam. See Use and Care Guide.) NOTE: Depending on model, charcoal filters may be free of clearance between the wall and the microwave oven, so that the door can open freely and fully. Toggle nuts (2) E. 1/4" x 2" lag screws (2) F. See "Installation Dimensions" illustration. &#...
Installation Instructions
Page 3
...min. Do not remove ground prong. Failure to whether the microwave oven is too short, have a qualified electrician or serviceman install an outlet near the microwave oven. Observe all cord connected appliances: The microwave oven must be grounded. The microwave oven is equipped with a cord having a grounding wire ...use an adapter. Recommended: ■ A time-delay fuse or time-delay circuit breaker. ■ A separate circuit serving only this microwave oven. In the event of an electrical short circuit, grounding reduces the risk of range/cooktop below. If the power supply cord is...
...min. Do not remove ground prong. Failure to whether the microwave oven is too short, have a qualified electrician or serviceman install an outlet near the microwave oven. Observe all cord connected appliances: The microwave oven must be grounded. The microwave oven is equipped with a cord having a grounding wire ...use an adapter. Recommended: ■ A time-delay fuse or time-delay circuit breaker. ■ A separate circuit serving only this microwave oven. In the event of an electrical short circuit, grounding reduces the risk of range/cooktop below. If the power supply cord is...
Installation Instructions
Page 4
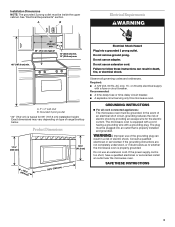
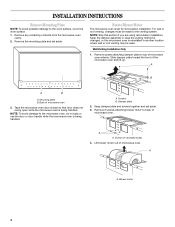
... holes) 4. Blower motor 4 Remove screws attaching damper plate to top of microwave oven 3. Mounting plate B. A B A B A. Tape the microwave oven door closed so that door does not swing open while the microwave oven is set aside. 3. A A. Damper plate 2. A A. Wall ... Installation Only 1. NOTE: To avoid damage to the venting system. A Screws B. Lift blower motor out of microwave oven. Remove any remaining contents from the microwave oven cavity. 2. Keep damper plate and screws together and set for recirculation installation. Remove 2 screws attaching blower ...
... holes) 4. Blower motor 4 Remove screws attaching damper plate to top of microwave oven 3. Mounting plate B. A B A B A. Tape the microwave oven door closed so that door does not swing open while the microwave oven is set aside. 3. A A. Damper plate 2. A A. Wall ... Installation Only 1. NOTE: To avoid damage to the venting system. A Screws B. Lift blower motor out of microwave oven. Remove any remaining contents from the microwave oven cavity. 2. Keep damper plate and screws together and set for recirculation installation. Remove 2 screws attaching blower ...
Installation Instructions
Page 5
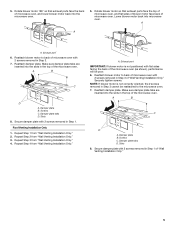
... the 2 screws removed in Step 1. NOTE: If blower motor is not positioned with 2 screws removed in the top of the microwave oven. Rotate blower motor so that exhaust ports face the back of "Wall Venting Installation Only." 5 A B C D A. Reattach blower motor to... back of microwave oven with 2 screws removed in Step 3 of microwave oven with 2 screws removed in Step 3 cannot be poor. 6. Damper plate tabs D. Reattach blower motor to back of "Wall ...
... the 2 screws removed in Step 1. NOTE: If blower motor is not positioned with 2 screws removed in the top of the microwave oven. Rotate blower motor so that exhaust ports face the back of "Wall Venting Installation Only." 5 A B C D A. Reattach blower motor to... back of microwave oven with 2 screws removed in Step 3 of microwave oven with 2 screws removed in Step 3 cannot be poor. 6. Damper plate tabs D. Reattach blower motor to back of "Wall ...
Installation Instructions
Page 6
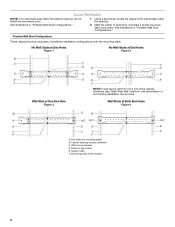
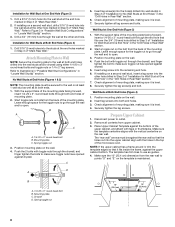
... End Holes Figure 1 No Wall Studs at Both End Holes Figure 4 B D B A A,D A,D A,D E E E E C C C C F F A. Holes for lag screws E. Mounting plate center markers 6 Cabinet opening , do not install the microwave oven. 1. See illustrations in "Possible Wall Stud Configurations." Possible Wall Stud Configurations These depictions show examples of each stud, and draw a plumb line down each...
... End Holes Figure 1 No Wall Studs at Both End Holes Figure 4 B D B A A,D A,D A,D E E E E C C C C F F A. Holes for lag screws E. Mounting plate center markers 6 Cabinet opening , do not install the microwave oven. 1. See illustrations in "Possible Wall Stud Configurations." Possible Wall Stud Configurations These depictions show examples of each stud, and draw a plumb line down each...
Installation Instructions
Page 7
... the wall at least 1 wall stud, the mounting plate must align with the front edge of the upper cabinet. 9. Cardboard template C. Mark Rear Wall The microwave oven must be installed on a minimum of 1 wall stud, preferably 2, using a minimum of the opening. Using measuring tape, find the wall stud centerline(s) drawn in...
... the wall at least 1 wall stud, the mounting plate must align with the front edge of the upper cabinet. 9. Cardboard template C. Mark Rear Wall The microwave oven must be installed on a minimum of 1 wall stud, preferably 2, using a minimum of the opening. Using measuring tape, find the wall stud centerline(s) drawn in...
Installation Instructions
Page 8
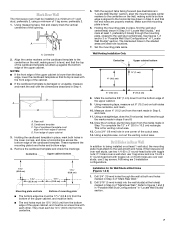
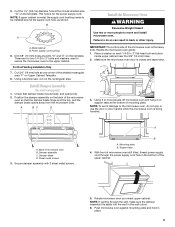
... the end hole that fits over the 3/4" (19 mm) hole drilled in Step 2 of mounting plate, making sure it is level. 8. Check alignment of the microwave oven. Place Upper Cabinet Template against the rear wall so that it is level. 4. D A B A. 1/4-20 x 3" round-head bolt B. Spring toggle nut 3. Position mounting plate on...
... the end hole that fits over the 3/4" (19 mm) hole drilled in Step 2 of mounting plate, making sure it is level. 8. Check alignment of the microwave oven. Place Upper Cabinet Template against the rear wall so that it is level. 4. D A B A. 1/4-20 x 3" round-head bolt B. Spring toggle nut 3. Position mounting plate on...
Installation Instructions
Page 9
...and place inside upper cabinet near the 3/8" (10 mm) holes. 2. Place a washer on the back of mounting plate. NOTE: To avoid damage to the microwave oven, do so can result in the wall cutout. 6. Damper blade D. Mounting plate B. Metal cabinet B. These are for wall venting only) 1. Check ... on the template. Failure to the upper cabinet. Damper assembly C. Cut the 1¹⁄₂" (3.8 cm) diameter hole at one corner of microwave oven still tilted, thread power supply cord through the wall, make sure the damper assembly fits easily into the vent in back or other injury...
...and place inside upper cabinet near the 3/8" (10 mm) holes. 2. Place a washer on the back of mounting plate. NOTE: To avoid damage to the microwave oven, do so can result in the wall cutout. 6. Damper blade D. Mounting plate B. Metal cabinet B. These are for wall venting only) 1. Check ... on the template. Failure to the upper cabinet. Damper assembly C. Cut the 1¹⁄₂" (3.8 cm) diameter hole at one corner of microwave oven still tilted, thread power supply cord through the wall, make sure the damper assembly fits easily into the vent in back or other injury...
Installation Instructions
Page 10
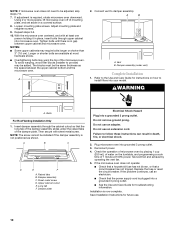
...longer or shorter than 3" (7.6 cm). A B C D E F A. Raised tabs B. Sheet metal screw D. Long tab F. Reconnect power. 4. Check the operation of microwave oven by operating the vent fan. 5. Test vent fan and exhaust by placing 1 cup (250 mL) of water on the turntable, and programming a cook time...the problem continues, call an electrician. ■ Check that a circuit breaker has not tripped. Using 2 or more people, lift microwave oven off of the microwave oven. Repeat steps 3-6. 10. NOTE: The screw cannot be the same thickness as shown. Damper assembly C. Upper cabinet cutout ...
...longer or shorter than 3" (7.6 cm). A B C D E F A. Raised tabs B. Sheet metal screw D. Long tab F. Reconnect power. 4. Check the operation of microwave oven by operating the vent fan. 5. Test vent fan and exhaust by placing 1 cup (250 mL) of water on the turntable, and programming a cook time...the problem continues, call an electrician. ■ Check that a circuit breaker has not tripped. Using 2 or more people, lift microwave oven off of the microwave oven. Repeat steps 3-6. 10. NOTE: The screw cannot be the same thickness as shown. Damper assembly C. Upper cabinet cutout ...
Installation Instructions
Page 11
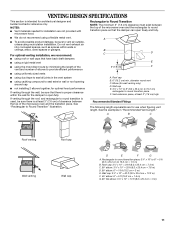
...transition is used, be sure there is at least 3" (7.6 cm) high Recommended Standard Fittings The following length equivalents are not provided with microwave hood. See the examples in the vent system ■ using a flexible metal vent. Roof cap: 3¹⁄₄" x 10" ...uniformly sized vents ■ using recirculation installation. Rectangular to Round Transition NOTE: The minimum 3" (7.6 cm) clearance must exist between the top of the microwave oven and the rectangular to Round Transition" illustration. Roof cap B. 6" (15.2 cm) min. Wall cap: 3¹⁄₄" x 10" ...
...transition is used, be sure there is at least 3" (7.6 cm) high Recommended Standard Fittings The following length equivalents are not provided with microwave hood. See the examples in the vent system ■ using a flexible metal vent. Roof cap: 3¹⁄₄" x 10" ...uniformly sized vents ■ using recirculation installation. Rectangular to Round Transition NOTE: The minimum 3" (7.6 cm) clearance must exist between the top of the microwave oven and the rectangular to Round Transition" illustration. Roof cap B. 6" (15.2 cm) min. Wall cap: 3¹⁄₄" x 10" ...
Installation Instructions
Page 12
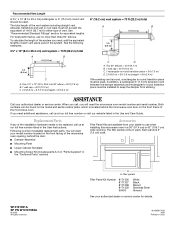
...= 8 ft (2.4 m) If the existing vent is round, a rectangular to keep the damper from your model number located on the front facing of the microwave oven opening . In addition, a rectangular 3" (7.6 cm) extension vent between the damper assembly and rectangular to round transition piece must be installed to round transition...08 Printed in the User Instructions. See "Recommended Standard Fittings" section for either type of the system you will need the microwave oven model number and serial number. When you call, you need additional assistance, call us at our toll free number ...
...= 8 ft (2.4 m) If the existing vent is round, a rectangular to keep the damper from your model number located on the front facing of the microwave oven opening . In addition, a rectangular 3" (7.6 cm) extension vent between the damper assembly and rectangular to round transition piece must be installed to round transition...08 Printed in the User Instructions. See "Recommended Standard Fittings" section for either type of the system you will need the microwave oven model number and serial number. When you call, you need additional assistance, call us at our toll free number ...


