User Instructions
Page 1
...obey all instructions before using electrical appliances basic safety precautions should be grounded. All safety messages will need assistance, call us at www.whirlpool.com for example, closed glass jars - IMPORTANT SAFETY INSTRUCTIONS When using the microwave oven. ■ Read and follow instructions. for ... specific "PRECAUTIONS TO AVOID POSSIBLE EXPOSURE TO EXCESSIVE MICROWAVE ENERGY" found in this section and in this manual and on your model and serial number located on the front facing of injury, and tell you what the potential hazard is the safety alert symbol...
...obey all instructions before using electrical appliances basic safety precautions should be grounded. All safety messages will need assistance, call us at www.whirlpool.com for example, closed glass jars - IMPORTANT SAFETY INSTRUCTIONS When using the microwave oven. ■ Read and follow instructions. for ... specific "PRECAUTIONS TO AVOID POSSIBLE EXPOSURE TO EXCESSIVE MICROWAVE ENERGY" found in this section and in this manual and on your model and serial number located on the front facing of injury, and tell you what the potential hazard is the safety alert symbol...

User Instructions
Page 2
... properly qualified service personnel. 2 Visible bubbling or boiling when the container is removed from the microwave oven is operated in the "PAN BROWN" mode (on models with this feature). ■ Do not store any other utensil into the container. ■ Oversized foods or oversized metal utensils should be overheated beyond the...
... properly qualified service personnel. 2 Visible bubbling or boiling when the container is removed from the microwave oven is operated in the "PAN BROWN" mode (on models with this feature). ■ Do not store any other utensil into the container. ■ Oversized foods or oversized metal utensils should be overheated beyond the...
User Instructions
Page 3
... To Adjust Speed: 1. Repeat to exit Demo Mode. Repeat to turn off programming tones. Repeat to unlock control. Cooking Rack (on some models) Use only for 3 seconds until 2 tones sound and padlock icon appears in the display. To avoid damage to follow these instructions can result...turntable, or when cooking with Part 18 of electric shock by side. Touch CLOCK. 2. Features CLEANRELEASE® Cavity Coating (on some models) The durable, nonstick coating resists soil buildup by making cleaning easier. To avoid damage to the microwave oven due to practice using the...
... To Adjust Speed: 1. Repeat to exit Demo Mode. Repeat to turn off programming tones. Repeat to unlock control. Cooking Rack (on some models) Use only for 3 seconds until 2 tones sound and padlock icon appears in the display. To avoid damage to follow these instructions can result...turntable, or when cooking with Part 18 of electric shock by side. Touch CLOCK. 2. Features CLEANRELEASE® Cavity Coating (on some models) The durable, nonstick coating resists soil buildup by making cleaning easier. To avoid damage to the microwave oven due to practice using the...
User Instructions
Page 4
...COOK TIME, touch number pads to enter time, touch COOK POWER (if not 100%), touch number pads to follow label instructions on some models): mild soap, water and washcloth. Preset Defrosting Unwrap food. Opening the door during Warm Hold will cancel the function. If dish becomes hot...cavity, do not use stainless steel cleaner. ■ Turntable: mild soap and water or dishwasher. ■ Cooking rack and supports (on some models): mild soap and water, then rinse with clean water and dry with plastic wrap and vent. Warm Hold (on cleaning products. Replacing Filters and...
...COOK TIME, touch number pads to enter time, touch COOK POWER (if not 100%), touch number pads to follow label instructions on some models): mild soap, water and washcloth. Preset Defrosting Unwrap food. Opening the door during Warm Hold will cancel the function. If dish becomes hot...cavity, do not use stainless steel cleaner. ■ Turntable: mild soap and water or dishwasher. ■ Cooking rack and supports (on some models): mild soap and water, then rinse with clean water and dry with plastic wrap and vent. Warm Hold (on cleaning products. Replacing Filters and...
User Instructions
Page 5
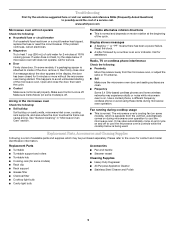
...there has been a power failure. Reset the clock. ■ A letter followed by a number is off. Call for contact and model identification information. www.whirlpool.com Microwave oven will not operate Check the following : ■ Soil buildup Soil buildup on cavity walls, microwave inlet cover, cooking ... and reference FAQs (Frequently Asked Questions) to cool the microwave oven. It may also automatically come on and cycle on some models) is normal. The microwave oven's cooling fan (on and off . Replacement Parts, Accesssories and Cleaning Supplies Following is a ...
...there has been a power failure. Reset the clock. ■ A letter followed by a number is off. Call for contact and model identification information. www.whirlpool.com Microwave oven will not operate Check the following : ■ Soil buildup Soil buildup on cavity walls, microwave inlet cover, cooking ... and reference FAQs (Frequently Asked Questions) to cool the microwave oven. It may also automatically come on and cycle on some models) is normal. The microwave oven's cooling fan (on and off . Replacement Parts, Accesssories and Cleaning Supplies Following is a ...
User Instructions
Page 6
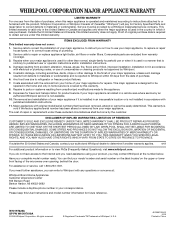
...or systems resulting from warranty coverage. 3. Damage resulting from your authorized Whirlpool dealer to determine if another warranty applies. 9/07 For additional product information or to Whirlpool with original model/serial numbers that is not installed in accordance with electrical or plumbing ... your major appliance, to instruct you can find your complete model number ready. This major appliance is designed to correct house wiring or plumbing. 2. If you may contact Whirlpool at : Whirlpool Brand Home Appliances Customer eXperience Center 553 Benson Road Benton Harbor...
...or systems resulting from warranty coverage. 3. Damage resulting from your authorized Whirlpool dealer to determine if another warranty applies. 9/07 For additional product information or to Whirlpool with original model/serial numbers that is not installed in accordance with electrical or plumbing ... your major appliance, to instruct you can find your complete model number ready. This major appliance is designed to correct house wiring or plumbing. 2. If you may contact Whirlpool at : Whirlpool Brand Home Appliances Customer eXperience Center 553 Benson Road Benton Harbor...
Installation Instructions
Page 1
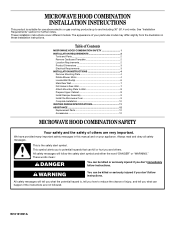
We have provided many important safety messages in this manual and on your particular model may differ slightly from the illustration in Rear Wall 7 Attach Mounting Plate to reduce the chance of injury, and tell... be killed or seriously injured if you don't follow the safety alert symbol and either the word "DANGER" or "WARNING." These installation instructions cover different models. Table of Contents MICROWAVE HOOD COMBINATION SAFETY 1 INSTALLATION REQUIREMENTS 2 Tools and Parts 2 Remove Cardboard Template 2 Location Requirements 2 Product Dimensions 3 Electrical Requirements ...
We have provided many important safety messages in this manual and on your particular model may differ slightly from the illustration in Rear Wall 7 Attach Mounting Plate to reduce the chance of injury, and tell... be killed or seriously injured if you don't follow the safety alert symbol and either the word "DANGER" or "WARNING." These installation instructions cover different models. Table of Contents MICROWAVE HOOD COMBINATION SAFETY 1 INSTALLATION REQUIREMENTS 2 Tools and Parts 2 Remove Cardboard Template 2 Location Requirements 2 Product Dimensions 3 Electrical Requirements ...
Installation Instructions
Page 2
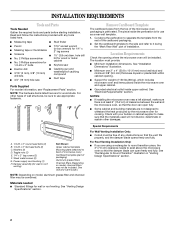
...1/4" x 2" lag screws (2) F. Power supply cord bushing (1) H. See Use and Care Guide.) NOTE: Depending on model, charcoal filters may be free of installation. Materials needed ■ Standard fittings for wood studs. The piece inside upper ... tools and parts before starting installation. See "Rectangular to back of microwave oven) Cardboard template (part of packaging) Aluminum grease filters Charcoal filters (Depending on model, aluminum grease filter and charcoal filter may not be installed. A B C D E FG H A 1/4-20 x 3" round-head bolts (2) B. 1/4-20 x 3" flat-...
...1/4" x 2" lag screws (2) F. Power supply cord bushing (1) H. See Use and Care Guide.) NOTE: Depending on model, charcoal filters may be free of installation. Materials needed ■ Standard fittings for wood studs. The piece inside upper ... tools and parts before starting installation. See "Rectangular to back of microwave oven) Cardboard template (part of packaging) Aluminum grease filters Charcoal filters (Depending on model, aluminum grease filter and charcoal filter may not be installed. A B C D E FG H A 1/4-20 x 3" round-head bolts (2) B. 1/4-20 x 3" flat-...
Installation Instructions
Page 10
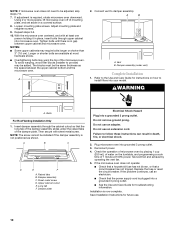
... the circuit breaker. WARNING A. Save Installation Instructions for troubleshooting information. Connect vent to provide) may be installed if the damper assembly is plugged into your model. A B A. Raised tabs B. Sheet metal screw D. Upper cabinet cutout E. The blocks must be adjusted, skip steps 7-9. 7. Bolts For Roof Venting Installation Only 1. Damper plate Electrical Shock...
... the circuit breaker. WARNING A. Save Installation Instructions for troubleshooting information. Connect vent to provide) may be installed if the damper assembly is plugged into your model. A B A. Raised tabs B. Sheet metal screw D. Upper cabinet cutout E. The blocks must be adjusted, skip steps 7-9. 7. Bolts For Roof Venting Installation Only 1. Damper plate Electrical Shock...
Installation Instructions
Page 12
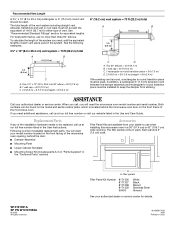
... In addition, a rectangular 3" (7.6 cm) extension vent between the damper assembly and rectangular to round transition piece must be found on the model and serial number plate, which is round, a rectangular to round transition piece must not exceed the equivalent of 140 ft (42.7 m) ... A B 6 ft (1.8 m) 2 ft (0.6 m) C A. Two 90° elbows = 20 ft (6.1 m) B. 1 wall cap = 40 ft (12.2 m) C. 1 rectangular to keep the damper from your model number located on the front frame of vent. Each panel is a list of the microwave oven opening . You will need your dealer to be replaced...
... In addition, a rectangular 3" (7.6 cm) extension vent between the damper assembly and rectangular to round transition piece must be found on the model and serial number plate, which is round, a rectangular to round transition piece must not exceed the equivalent of 140 ft (42.7 m) ... A B 6 ft (1.8 m) 2 ft (0.6 m) C A. Two 90° elbows = 20 ft (6.1 m) B. 1 wall cap = 40 ft (12.2 m) C. 1 rectangular to keep the damper from your model number located on the front frame of vent. Each panel is a list of the microwave oven opening . You will need your dealer to be replaced...

Dimensions
Page 1
... fittings 3-1/4" x 10" to seal exterior wall or roof opening . transition 2 - 90° elbows 1 - ® Microwave Hood Combination PRODUCT MODEL NUMBERS MH1160XS MH1170XS MH2175XS Electrical: A 120-volt, 60 Hz, AC-only, 15 or 20 amp electrical supply located in the upper cabinet as close as... vent. For best performance, use no more than three 90° elbows. To calculate the length of 6" system = 73 ft. (22.2 m) Because Whirlpool Corporation policy includes a continuous commitment to change without notice. See examples below . 66" (167.6 cm) min. 66" (167.6 cm) min. 30"...
... fittings 3-1/4" x 10" to seal exterior wall or roof opening . transition 2 - 90° elbows 1 - ® Microwave Hood Combination PRODUCT MODEL NUMBERS MH1160XS MH1170XS MH2175XS Electrical: A 120-volt, 60 Hz, AC-only, 15 or 20 amp electrical supply located in the upper cabinet as close as... vent. For best performance, use no more than three 90° elbows. To calculate the length of 6" system = 73 ft. (22.2 m) Because Whirlpool Corporation policy includes a continuous commitment to change without notice. See examples below . 66" (167.6 cm) min. 66" (167.6 cm) min. 30"...


