
Use and Care Guide
Page 1
or visit our website at... ® MICROWAVE HOOD COMBINATION Use & Care Guide For questions about features, operation/performance, parts, accessories or service, call: 1-800-253-1301. www.whirlpool.com Table of Contents 2 8206573 Model MH1160XS
or visit our website at... ® MICROWAVE HOOD COMBINATION Use & Care Guide For questions about features, operation/performance, parts, accessories or service, call: 1-800-253-1301. www.whirlpool.com Table of Contents 2 8206573 Model MH1160XS
Use and Care Guide
Page 2
... Clock 6 Tones 6 Timer 6 Control Lock 6 Vent Fan 7 Cooktop Light 7 Demo Mode 7 MICROWAVE OVEN USE 7 Food Characteristics 7 Cooking Guidelines 8 Cookware and Dinnerware 8 Aluminum Foil and Metal 8 Microwave Cooking Power 8 Manual Cooking 9 Cooking in Stages (or steps 9 Popcorn 9 Baked Potato 10 Pizza ...10 Doneness 10 Preset Cooking 10 Reheating 11 Defrosting 11 MICROWAVE OVEN CARE 12 General Cleaning 12 Replacing Filters 12 Replacing Cooktop Light 13 Replacing Microwave Oven Light 13 TROUBLESHOOTING 14 ASSISTANCE OR SERVICE 15 Replacement Parts 15 ...
... Clock 6 Tones 6 Timer 6 Control Lock 6 Vent Fan 7 Cooktop Light 7 Demo Mode 7 MICROWAVE OVEN USE 7 Food Characteristics 7 Cooking Guidelines 8 Cookware and Dinnerware 8 Aluminum Foil and Metal 8 Microwave Cooking Power 8 Manual Cooking 9 Cooking in Stages (or steps 9 Popcorn 9 Baked Potato 10 Pizza ...10 Doneness 10 Preset Cooking 10 Reheating 11 Defrosting 11 MICROWAVE OVEN CARE 12 General Cleaning 12 Replacing Filters 12 Replacing Cooktop Light 13 Replacing Microwave Oven Light 13 TROUBLESHOOTING 14 ASSISTANCE OR SERVICE 15 Replacement Parts 15 ...

Use and Care Guide
Page 3
... instructions. If materials inside the oven to heat, cook, or dry food. Do not use corrosive chemicals or vapors in the microwave oven. ■ Use the microwave oven only for storage purposes. See "GROUNDING INSTRUCTIONS" found in the shell and sealed containers - Do not use . ■... Liquids, such as whole eggs in this section. ■ The microwave oven must be grounded. Visible bubbling or boiling when the container is removed from paper or plastic bags before removing the container. - To reduce ...
... instructions. If materials inside the oven to heat, cook, or dry food. Do not use corrosive chemicals or vapors in the microwave oven. ■ Use the microwave oven only for storage purposes. See "GROUNDING INSTRUCTIONS" found in the shell and sealed containers - Do not use . ■... Liquids, such as whole eggs in this section. ■ The microwave oven must be grounded. Visible bubbling or boiling when the container is removed from paper or plastic bags before removing the container. - To reduce ...

Use and Care Guide
Page 4
...■ A time-delay fuse or time-delay circuit breaker. ■ A separate circuit serving only this oven with metal foil. The microwave oven is properly installed and grounded. Do not use an extension cord. IMPORTANT SAFETY INSTRUCTIONS ■ Suitable for use above ranges with a ...grounding plug. Corrosive cleaning agents, such as to microwave energy. This will cause overheating of electric shock by anyone except properly qualified service personnel. Do not remove ground prong. Do ...
...■ A time-delay fuse or time-delay circuit breaker. ■ A separate circuit serving only this oven with metal foil. The microwave oven is properly installed and grounded. Do not use an extension cord. IMPORTANT SAFETY INSTRUCTIONS ■ Suitable for use above ranges with a ...grounding plug. Corrosive cleaning agents, such as to microwave energy. This will cause overheating of electric shock by anyone except properly qualified service personnel. Do not remove ground prong. Do ...

Use and Care Guide
Page 5
... in place. Turntable B. To Install: 1. Fit the raised, curved lines in the display. Display When power is first supplied to the microwave oven, a ":" will reappear in the center of the turntable bottom between the three spokes of the features shown here. Retry your particular model... J. Touch number pad "1" for SLOW, "2" for NORMAL or "3" for 3 seconds until 2 tones sound. 2. Metal shielded window G. Hub C. When the microwave oven is not in either direction to reorder any other time, a power failure has occurred. See "Assistance or Service" to help cook food more evenly...
... in place. Turntable B. To Install: 1. Fit the raised, curved lines in the display. Display When power is first supplied to the microwave oven, a ":" will reappear in the center of the turntable bottom between the three spokes of the features shown here. Retry your particular model... J. Touch number pad "1" for SLOW, "2" for NORMAL or "3" for 3 seconds until 2 tones sound. 2. Metal shielded window G. Hub C. When the microwave oven is not in either direction to reorder any other time, a power failure has occurred. See "Assistance or Service" to help cook food more evenly...
Use and Care Guide
Page 6
...display as a reminder. The cook function will appear in the display as a reminder. Close the door and touch START to prevent unintended use , the microwave oven can be canceled. To Remove: 1. Touch TIMER SET/OFF. When the set time ends, "END" will continue to set time. Start The... a padlock icon appears in use of day mode. 2. Timer The Timer can also operate. NOTE: The Timer does not start or stop the microwave oven. While the Timer is interrupted by reminder tones. To Set: 1. Touch TIMER SET/OFF or START. If tones are audible signals, indicating ...
...display as a reminder. The cook function will appear in the display as a reminder. Close the door and touch START to prevent unintended use , the microwave oven can be canceled. To Remove: 1. Touch TIMER SET/OFF. When the set time ends, "END" will continue to set time. Start The... a padlock icon appears in use of day mode. 2. Timer The Timer can also operate. NOTE: The Timer does not start or stop the microwave oven. While the Timer is interrupted by reminder tones. To Set: 1. Touch TIMER SET/OFF or START. If tones are audible signals, indicating ...
Use and Care Guide
Page 7
.... To Turn Light On/Off: Touch LIGHT pad once for high, twice for low or 3 times for learning how to cool the microwave oven. The microwave oven light will come on, the fan will run, and the turntable will heat faster than other foods. Touch and hold the number ... than the same size of a light, porous food, such as meat and potatoes, require a longer cook time than frozen foods. Food Characteristics When microwave cooking, the amount, size and shape, starting temperature, composition and density of the recommended cook time, potatoes should not be slightly firm. See "Assistance...
.... To Turn Light On/Off: Touch LIGHT pad once for high, twice for low or 3 times for learning how to cool the microwave oven. The microwave oven light will come on, the fan will run, and the turntable will heat faster than other foods. Touch and hold the number ... than the same size of a light, porous food, such as meat and potatoes, require a longer cook time than frozen foods. Food Characteristics When microwave cooking, the amount, size and shape, starting temperature, composition and density of the recommended cook time, potatoes should not be slightly firm. See "Assistance...

Use and Care Guide
Page 8
...;®STYROFOAM is a Registered Trademark of the food. Plastic: Wraps, Bags, Covers, Dinnerware, Containers Use those approved by the manufacturer for microwave ovens may be used . Do Not Use Metal cookware and bakeware, gold, silver, pewter, nonapproved meat thermometers, skewers, twist ties, foil...Styrofoam®† Wax Paper RECOMMENDATIONS Follow manufacturer's recommendations. If possible, turn food over from the food. Do not use in the microwave oven. Cook at 100% cooking power for the suggested cooking power of light) can be turned back at least 3/16" (5 ...
...;®STYROFOAM is a Registered Trademark of the food. Plastic: Wraps, Bags, Covers, Dinnerware, Containers Use those approved by the manufacturer for microwave ovens may be used . Do Not Use Metal cookware and bakeware, gold, silver, pewter, nonapproved meat thermometers, skewers, twist ties, foil...Styrofoam®† Wax Paper RECOMMENDATIONS Follow manufacturer's recommendations. If possible, turn food over from the food. Do not use in the microwave oven. Cook at 100% cooking power for the suggested cooking power of light) can be turned back at least 3/16" (5 ...
Use and Care Guide
Page 9
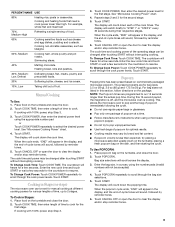
... set for various lengths of time to "STEP 1" or "STEP 2" every 30 seconds during their respective stages. Touch START. This allows the microwave oven to pop another bag of popcorn immediately following the cycle. ■ Do not use regular paper bags or glassware. ■ Pop only ...display. 3. During this section, follow directions on the dish, and then starting the cycle. The display will count down the cook time. See "Microwave Cooking Power" chart. 4. Touch START. To Cook in ounces, using the appropriate number pad or Touch COOK POWER repeatedly to scroll through the ...
... set for various lengths of time to "STEP 1" or "STEP 2" every 30 seconds during their respective stages. Touch START. This allows the microwave oven to pop another bag of popcorn immediately following the cycle. ■ Do not use regular paper bags or glassware. ■ Pop only ...display. 3. During this section, follow directions on the dish, and then starting the cycle. The display will count down the cook time. See "Microwave Cooking Power" chart. 4. Touch START. To Cook in ounces, using the appropriate number pad or Touch COOK POWER repeatedly to scroll through the ...
Use and Care Guide
Page 10
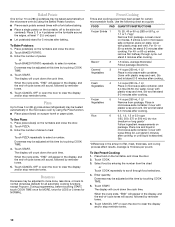
... in microwavesafe container, place on plate, cover with plastic wrap and vent. Canned 3 Vegetables 1-4 cups (250 mL-1 L)/ Place in microwave-safe container. Stir and let stand 2-3 minutes after cooking, or until liquid is 16 slices per pound. Let stand 5 minutes after ... average thickness/ Follow package directions. Pizza Up to three 3 oz (85 g) pizza slices (refrigerated) may be heated automatically in the microwave oven by using the Baked Potato function. ■ Pierce each potato several times with loose-fitting lid. Doneness Doneness may be adjusted to...
... in microwavesafe container, place on plate, cover with plastic wrap and vent. Canned 3 Vegetables 1-4 cups (250 mL-1 L)/ Place in microwave-safe container. Stir and let stand 2-3 minutes after cooking, or until liquid is 16 slices per pound. Let stand 5 minutes after ... average thickness/ Follow package directions. Pizza Up to three 3 oz (85 g) pizza slices (refrigerated) may be heated automatically in the microwave oven by using the Baked Potato function. ■ Pierce each potato several times with loose-fitting lid. Doneness Doneness may be adjusted to...
Use and Care Guide
Page 11
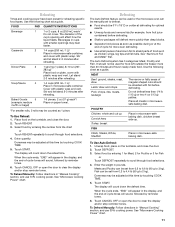
...mL) each */ Place on plate, cover with foil before defrosting. ■ Shallow packages will affect how the liquid heats. Touch REHEAT. 3. See "Microwave Cooking Power" chart. See "Aluminum Foil and Metal" first. The Auto Defrost system has 3 categories: Meat, Poultry and Fish. Do not defrost ...CANCEL OFF or open the door to 2 kg). Stir and let stand 2-3 minutes after reheating. Enter quantity. Doneness may be used or the microwave oven can be set to shield parts of -cycle tones will count down the defrost time. Dinner Plate 3 1 serving (1 plate), 8-10...
...mL) each */ Place on plate, cover with foil before defrosting. ■ Shallow packages will affect how the liquid heats. Touch REHEAT. 3. See "Microwave Cooking Power" chart. See "Aluminum Foil and Metal" first. The Auto Defrost system has 3 categories: Meat, Poultry and Fish. Do not defrost ...CANCEL OFF or open the door to 2 kg). Stir and let stand 2-3 minutes after reheating. Enter quantity. Doneness may be used or the microwave oven can be set to shield parts of -cycle tones will count down the defrost time. Dinner Plate 3 1 serving (1 plate), 8-10...
Use and Care Guide
Page 12
...after cleaning them in the dishwasher. Remove each grease filter by inserting one end of either lemon juice or vinegar for 2 to the microwave oven cavity, do not use soapfilled scouring pads, abrasive cleaners, steel-wool pads, gritty washcloths or some paper towels. Replace grease ... cup (250 mL) of water with soft, lint-free cloth. Always follow label instructions on some models) To avoid damage to reorder filters. MICROWAVE OVEN CARE General Cleaning IMPORTANT: Before cleaning, make sure all -purpose cleaner: Rinse with clean water and dry with soft, lint-free cloth. ...
...after cleaning them in the dishwasher. Remove each grease filter by inserting one end of either lemon juice or vinegar for 2 to the microwave oven cavity, do not use soapfilled scouring pads, abrasive cleaners, steel-wool pads, gritty washcloths or some paper towels. Replace grease ... cup (250 mL) of water with soft, lint-free cloth. Always follow label instructions on some models) To avoid damage to reorder filters. MICROWAVE OVEN CARE General Cleaning IMPORTANT: Before cleaning, make sure all -purpose cleaner: Rinse with clean water and dry with soft, lint-free cloth. ...

Use and Care Guide
Page 13
... down , then lift out to remove. To Replace: 1. Replace vent grille and mounting screws. Unplug microwave oven or disconnect power. 2. A A A. Plug in microwave oven or reconnect power. 13 Mounting screw 3. It will automatically come on when the door is opened ...Close bulb cover. 6. To Remove and Replace Charcoal Filter: 1. A B C A. A B C 3. Replacing Cooktop Light The cooktop light is operating. Unplug microwave oven or disconnect power. 2. Vent grille B. Lift up the bulb cover. 4. Install new charcoal filter. 5. See "Assistance or Service" section to reorder....
... down , then lift out to remove. To Replace: 1. Replace vent grille and mounting screws. Unplug microwave oven or disconnect power. 2. A A A. Plug in microwave oven or reconnect power. 13 Mounting screw 3. It will automatically come on when the door is opened ...Close bulb cover. 6. To Remove and Replace Charcoal Filter: 1. A B C A. A B C 3. Replacing Cooktop Light The cooktop light is operating. Unplug microwave oven or disconnect power. 2. Vent grille B. Lift up the bulb cover. 4. Install new charcoal filter. 5. See "Assistance or Service" section to reorder....

Use and Care Guide
Page 14
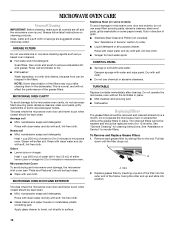
...":"? See "Display" section to turn it still is normal. See "Demo Mode" section. Replace turntable support. Do not operate the microwave oven without turntable and turntable support working properly? See "Assistance or Service" section. Turntable alternates rotation directions ■ This is normal....Some steam is not working, call an electrician. ■ Is the appliance wired properly? See Installation Instructions provided with your microwave oven. Microwave oven makes humming noise ■ This is not operating ■ Is the Timer in place? If the problem continues,...
...":"? See "Display" section to turn it still is normal. See "Demo Mode" section. Replace turntable support. Do not operate the microwave oven without turntable and turntable support working properly? See "Assistance or Service" section. Turntable alternates rotation directions ■ This is normal....Some steam is not working, call an electrician. ■ Is the appliance wired properly? See Installation Instructions provided with your microwave oven. Microwave oven makes humming noise ■ This is not operating ■ Is the Timer in place? If the problem continues,...

Use and Care Guide
Page 15
... (Spanish speaking, hearing impaired, limited vision, etc.). ■ Referrals to your nearest Whirlpool designated service center. See "Vent Fan" section. It may experience static or noise while the microwave oven is normal. If you need replacement parts If you use only FSP® replacement... parts. Whirlpool designated service technicians are made with : ■ Features and specifications on our full...
... (Spanish speaking, hearing impaired, limited vision, etc.). ■ Referrals to your nearest Whirlpool designated service center. See "Vent Fan" section. It may experience static or noise while the microwave oven is normal. If you need replacement parts If you use only FSP® replacement... parts. Whirlpool designated service technicians are made with : ■ Features and specifications on our full...
Installation Instructions
Page 1
...Requirements" section for use above electric or gas cooking products up to and including 36" (91.4 cm) wide. Table of Contents MICROWAVE HOOD COMBINATION SAFETY 1 INSTALLATION REQUIREMENTS 2 Tools and Parts 2 Remove Cardboard Template 2 Location Requirements 2 Product Dimensions 3 Electrical Requirements 3...Wall 8 Prepare Upper Cabinet 8 Install Damper Assembly 9 Install the Microwave Oven 9 Complete Installation 10 VENTING DESIGN SPECIFICATIONS 11 ASSISTANCE 12 Replacement Parts 12 Accessories 12 MICROWAVE HOOD COMBINATION SAFETY Your safety and the safety of injury, and tell...
...Requirements" section for use above electric or gas cooking products up to and including 36" (91.4 cm) wide. Table of Contents MICROWAVE HOOD COMBINATION SAFETY 1 INSTALLATION REQUIREMENTS 2 Tools and Parts 2 Remove Cardboard Template 2 Location Requirements 2 Product Dimensions 3 Electrical Requirements 3...Wall 8 Prepare Upper Cabinet 8 Install Damper Assembly 9 Install the Microwave Oven 9 Complete Installation 10 VENTING DESIGN SPECIFICATIONS 11 ASSISTANCE 12 Replacement Parts 12 Accessories 12 MICROWAVE HOOD COMBINATION SAFETY Your safety and the safety of injury, and tell...

Installation Instructions
Page 2
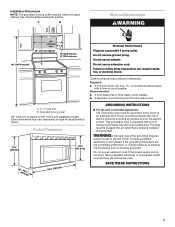
...wood studs. See Use and Care Guide.) NOTE: Depending on model, charcoal filters may be combined. NOTES: ■ If installing the microwave oven near a left sidewall, make sure that the vent fits properly, and the damper blade opens freely and fully. For Roof Venting...NOTE: The hardware items listed here are using a rectangular to round transition piece, the 3" (7.6 cm) clearance needs to withstand the heat produced by the microwave oven for 1/4" x 2" lag screws ■ Scissors ■ 1½" (3.8 cm) diam. Materials needed ■ Standard fittings for weight of wall...
...wood studs. See Use and Care Guide.) NOTE: Depending on model, charcoal filters may be combined. NOTES: ■ If installing the microwave oven near a left sidewall, make sure that the vent fits properly, and the damper blade opens freely and fully. For Roof Venting...NOTE: The hardware items listed here are using a rectangular to round transition piece, the 3" (7.6 cm) clearance needs to withstand the heat produced by the microwave oven for 1/4" x 2" lag screws ■ Scissors ■ 1½" (3.8 cm) diam. Materials needed ■ Standard fittings for weight of wall...
Installation Instructions
Page 3
... fuse or time-delay circuit breaker. ■ A separate circuit serving only this microwave oven. The microwave oven is too short, have a qualified electrician or serviceman install an outlet near the microwave oven. Do not use an adapter. If the power supply cord is equipped with...B. WARNING: Improper use an extension cord. SAVE THESE INSTRUCTIONS 3 See "Electrical Requirements" section. Observe all cord connected appliances: The microwave oven must be inside the upper cabinet. Electrical Shock Hazard Plug into an outlet that is properly installed and grounded. or 20-amp ...
... fuse or time-delay circuit breaker. ■ A separate circuit serving only this microwave oven. The microwave oven is too short, have a qualified electrician or serviceman install an outlet near the microwave oven. Do not use an adapter. If the power supply cord is equipped with...B. WARNING: Improper use an extension cord. SAVE THESE INSTRUCTIONS 3 See "Electrical Requirements" section. Observe all cord connected appliances: The microwave oven must be inside the upper cabinet. Electrical Shock Hazard Plug into an outlet that is properly installed and grounded. or 20-amp ...

Installation Instructions
Page 4
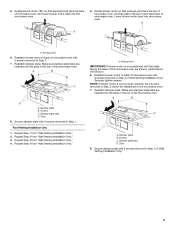
...must be used. Wall Venting Installation Only 1. Slide damper plate toward the front of microwave oven 3. Tape the microwave oven door closed so that door does not swing open while the microwave oven is set for recirculation installation. Remove 2 screws attaching blower motor to the work... Screws (in another location where wall or roof venting may be made to top of microwave oven exterior. INSTALLATION INSTRUCTIONS Remove Mounting Plate NOTE: To avoid possible damage to back of microwave oven. NOTE: Skip this section if you are using recirculation installation. A A. Keep ...
...must be used. Wall Venting Installation Only 1. Slide damper plate toward the front of microwave oven 3. Tape the microwave oven door closed so that door does not swing open while the microwave oven is set for recirculation installation. Remove 2 screws attaching blower motor to the work... Screws (in another location where wall or roof venting may be made to top of microwave oven exterior. INSTALLATION INSTRUCTIONS Remove Mounting Plate NOTE: To avoid possible damage to back of microwave oven. NOTE: Skip this section if you are using recirculation installation. A A. Keep ...
Installation Instructions
Page 5
...tabs D. Reattach damper plate. Roof Venting Installation Only 1. Repeat Step 3 from "Wall Venting Installation Only." 2. Reattach blower motor to the microwave oven. 7. Secure damper plate with 2 screws removed in Step 3. 7. Exhaust port 6. Make sure damper plate tabs are inserted into the...removed in Step 3 of "Wall Venting Installation Only." A A A. A. Damper plate B. Reattach blower motor to back of microwave oven with flat sides facing the back of the microwave oven. Damper plate tabs D. Slots 8. Rotate blower motor so that exhaust ports face the back of...
...tabs D. Reattach damper plate. Roof Venting Installation Only 1. Repeat Step 3 from "Wall Venting Installation Only." 2. Reattach blower motor to the microwave oven. 7. Secure damper plate with 2 screws removed in Step 3. 7. Exhaust port 6. Make sure damper plate tabs are inserted into the...removed in Step 3 of "Wall Venting Installation Only." A A A. A. Damper plate B. Reattach blower motor to back of microwave oven with flat sides facing the back of the microwave oven. Damper plate tabs D. Slots 8. Rotate blower motor so that exhaust ports face the back of...


