
Use and Care Manual
Page 3
... symbol. Always read and obey all instructions before or after each load. ■ Keep area around the exhaust opening and adjacent surrounding areas free from service or discarded, remove the door to dry articles containing foam rubber or similarly textured rubber-like materials. ■ Clean lint screen before using the dryer, follow instructions. All safety messages will be cleaned periodically by the manufacturer of injury, and...
... symbol. Always read and obey all instructions before or after each load. ■ Keep area around the exhaust opening and adjacent surrounding areas free from service or discarded, remove the door to dry articles containing foam rubber or similarly textured rubber-like materials. ■ Clean lint screen before using the dryer, follow instructions. All safety messages will be cleaned periodically by the manufacturer of injury, and...
Use and Care Manual
Page 4
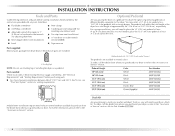
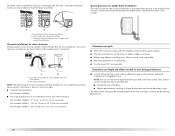
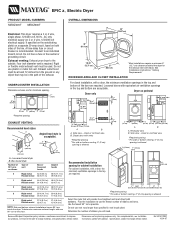
...) Wire stripper (direct wire installations) Caulking gun and compound (for this dryer. You will need to purchase a Stack Kit. Optional pedestal (15.5" [39.4 cm] model shown) The pedestals are included. Ask for venting requirements. You have the option of purchasing pedestals of approximately 46" (116.8 cm) or 51.5" (130.8 cm), respectively. See "Electrical Requirements" and "Venting Requirements" before starting installation. Stack Kit Are you purchased your washer and dryer? Check that opens to the "Assistance or Service...
...) Wire stripper (direct wire installations) Caulking gun and compound (for this dryer. You will need to purchase a Stack Kit. Optional pedestal (15.5" [39.4 cm] model shown) The pedestals are included. Ask for venting requirements. You have the option of purchasing pedestals of approximately 46" (116.8 cm) or 51.5" (130.8 cm), respectively. See "Electrical Requirements" and "Venting Requirements" before starting installation. Stack Kit Are you purchased your washer and dryer? Check that opens to the "Assistance or Service...
Use and Care Manual
Page 5
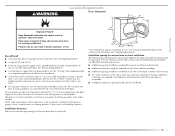
... be required for this dryer. If using a power supply cord, a grounded electrical outlet located within 2 ft (61 cm) of either side of the dryer. Some codes limit, or do so can be large enough to allow the dryer door to place the dryer at temperatures below 45ºF (7ºC). You will need 18" (46 cm) to reduce noise transfer. ■ For closet installation, with equivalent ventilation openings are using a pedestal...
... be required for this dryer. If using a power supply cord, a grounded electrical outlet located within 2 ft (61 cm) of either side of the dryer. Some codes limit, or do so can be large enough to allow the dryer door to place the dryer at temperatures below 45ºF (7ºC). You will need 18" (46 cm) to reduce noise transfer. ■ For closet installation, with equivalent ventilation openings are using a pedestal...
Use and Care Manual
Page 7
... mobile home installations. The installation must be removed from the external ground connector (green screw), and secured under the neutral terminal (center or white wire) of the terminal block, the dryer cabinet is isolated from your responsibility ■ To contact a qualified electrical installer. ■ To be using a power supply cord: Use a UL listed power supply cord kit marked for use an extension cord. ■ If codes permit and a separate ground wire is used when...
... mobile home installations. The installation must be removed from the external ground connector (green screw), and secured under the neutral terminal (center or white wire) of the terminal block, the dryer cabinet is isolated from your responsibility ■ To contact a qualified electrical installer. ■ To be using a power supply cord: Use a UL listed power supply cord kit marked for use an extension cord. ■ If codes permit and a separate ground wire is used when...

Use and Care Manual
Page 9
... INSTRUCTIONS 4-wire receptacle 14-30R ■ Do not use Power Supply Cord Replacement Part Number 9831317. Canada Only WARNING If you use an extension cord. 9 It is your responsibility ■ To contact a qualified electrical installer. ■ To be plugged into a grounded 4 prong outlet. Connect to an individual branch circuit. ■ This dryer is properly grounded. Be sure wall receptacle is equipped with a cord having an equipmentgrounding conductor and a grounding plug. Electrical Requirements...
... INSTRUCTIONS 4-wire receptacle 14-30R ■ Do not use Power Supply Cord Replacement Part Number 9831317. Canada Only WARNING If you use an extension cord. 9 It is your responsibility ■ To contact a qualified electrical installer. ■ To be plugged into a grounded 4 prong outlet. Connect to an individual branch circuit. ■ This dryer is properly grounded. Be sure wall receptacle is equipped with a cord having an equipmentgrounding conductor and a grounding plug. Electrical Requirements...

Use and Care Manual
Page 12
... of terminal block cover into slot of power supply cord under center, silver-colored terminal block screw. Connect the other wires to "Venting Requirements." 4-wire connection: Direct wire IMPORTANT: A 4-wire connection is required for mobile homes and where local codes do not permit the use of 3-wire connections. Center silver-colored terminal block screw C. down screw. 7. You have 5 ft (1.52 m) of extra length so dryer can be moved if needed. 12 B F A CD E G A. 4-wire receptacle (NEMA type 14-30R) B. 4-prong plug C. A C 3. External...
... of terminal block cover into slot of power supply cord under center, silver-colored terminal block screw. Connect the other wires to "Venting Requirements." 4-wire connection: Direct wire IMPORTANT: A 4-wire connection is required for mobile homes and where local codes do not permit the use of 3-wire connections. Center silver-colored terminal block screw C. down screw. 7. You have 5 ft (1.52 m) of extra length so dryer can be moved if needed. 12 B F A CD E G A. 4-wire receptacle (NEMA type 14-30R) B. 4-prong plug C. A C 3. External...

Use and Care Manual
Page 15
... hooked ends of dryer rear panel. Insert tab of terminal block cover into slot of dryer rear panel. A. B A C D E A. Tighten screws. 4. You have completed your electrical connection. Center silver-colored terminal block screw C. Neutral wire (white or center wire) E 1.9 cm) UL listed strain relief F. Insert tab of terminal block cover into slot of the other wires to "Venting Requirements." External ground conductor screw B. Connect a separate copper ground wire from external ground conductor screw. Connect the other direct wire cable wires...
... hooked ends of dryer rear panel. Insert tab of terminal block cover into slot of dryer rear panel. A. B A C D E A. Tighten screws. 4. You have completed your electrical connection. Center silver-colored terminal block screw C. Neutral wire (white or center wire) E 1.9 cm) UL listed strain relief F. Insert tab of terminal block cover into slot of the other wires to "Venting Requirements." External ground conductor screw B. Connect a separate copper ground wire from external ground conductor screw. Connect the other direct wire cable wires...
Use and Care Manual
Page 16
... that may result in enclosed walls, ceilings or floors. Venting Requirements WARNING Rigid metal vent ■ For best drying performance, rigid metal vents are acceptable only if accessible for cleaning. IMPORTANT: Observe all joints. ■ Exhaust vent must be purchased from the entire length of fire, this is not plugged with lint. ■ Replace any gas vent, chimney, wall, ceiling or a concealed space of the...
... that may result in enclosed walls, ceilings or floors. Venting Requirements WARNING Rigid metal vent ■ For best drying performance, rigid metal vents are acceptable only if accessible for cleaning. IMPORTANT: Observe all joints. ■ Exhaust vent must be purchased from the entire length of fire, this is not plugged with lint. ■ Replace any gas vent, chimney, wall, ceiling or a concealed space of the...
Use and Care Manual
Page 18
... in the Vent system chart. Select the type best for best drying performance ■ Use the following kits for purchase. Left or right side exhaust installation C. A B C A. The Vent system chart provides venting requirements that will provide the straightest and most direct path outdoors. ■ Plan the installation to use the fewest number of the mobile home structure and must be converted to the manufacturer's instructions. Terminate the exhaust vent outside.
... in the Vent system chart. Select the type best for best drying performance ■ Use the following kits for purchase. Left or right side exhaust installation C. A B C A. The Vent system chart provides venting requirements that will provide the straightest and most direct path outdoors. ■ Plan the installation to use the fewest number of the mobile home structure and must be converted to the manufacturer's instructions. Terminate the exhaust vent outside.

Use and Care Manual
Page 19
.... Level Dryer Check the levelness of the dryer (not the console panel). To determine maximum exhaust length, add one 90º turn inside the exhaust hood. See illustration. 3. Use caulking compound to the chart. Run vent to existing vent, make sure the vent is no kinks in "Plan Vent System." Place cardboard under each of the dryer. 4. Use the straightest path possible. If connecting to dryer location. The dryer vent must...
.... Level Dryer Check the levelness of the dryer (not the console panel). To determine maximum exhaust length, add one 90º turn inside the exhaust hood. See illustration. 3. Use caulking compound to the chart. Run vent to existing vent, make sure the vent is no kinks in "Plan Vent System." Place cardboard under each of the dryer. 4. Use the straightest path possible. If connecting to dryer location. The dryer vent must...
Use and Care Manual
Page 22
... /recycle all parts are now installed. NOTE: You may be 2 household fuses or circuit breakers for 5 minutes, open the dryer door and feel heat, turn on . ■ Household fuse is intact and tight, or circuit breaker has not tripped. ■ Dryer door is first heated. Check that all packaging materials. 8. In Canada ■ Plug into a grounded outlet. Turn on the dryer. 7. Remove any dust. Wipe the dryer drum interior thoroughly with a damp cloth to see...
... /recycle all parts are now installed. NOTE: You may be 2 household fuses or circuit breakers for 5 minutes, open the dryer door and feel heat, turn on . ■ Household fuse is intact and tight, or circuit breaker has not tripped. ■ Dryer door is first heated. Check that all packaging materials. 8. In Canada ■ Plug into a grounded outlet. Turn on the dryer. 7. Remove any dust. Wipe the dryer drum interior thoroughly with a damp cloth to see...

Use and Care Manual
Page 25
... length of all cycles. Dry The Dry light illuminates when the drying cycle is running , the display shows the estimated cycle time, which is a reminder to check to see whether the lint screen needs to run for the length of a Timed Dry Cycle by pressing TEMPERATURE until the cycle is started or the door is approximately 80% dry. WRINKLE PREVENT The WRINKLE PREVENT light illuminates when this option is selected. Follow package instructions. ■ To reduce wrinkling, remove the load from...
... length of all cycles. Dry The Dry light illuminates when the drying cycle is running , the display shows the estimated cycle time, which is a reminder to check to see whether the lint screen needs to run for the length of a Timed Dry Cycle by pressing TEMPERATURE until the cycle is started or the door is approximately 80% dry. WRINKLE PREVENT The WRINKLE PREVENT light illuminates when this option is selected. Follow package instructions. ■ To reduce wrinkling, remove the load from...
Use and Care Manual
Page 28
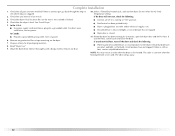
... remove the lint screen. 1. A A. Push down . Put the wet items on the ledge of the rack. Press the POWER button. 6. Reset time as sweaters and pillows without tumbling. A A. Press and hold START to complete drying. Place dryer rack inside dryer drum, positioning the back wire on top of the inner dryer back panel. Close the door. 5. You may be dried on the rack. Press (and hold . Time* Wool Sweaters Timed Dry Low 60 Block...
... remove the lint screen. 1. A A. Push down . Put the wet items on the ledge of the rack. Press the POWER button. 6. Reset time as sweaters and pillows without tumbling. A A. Press and hold START to complete drying. Place dryer rack inside dryer drum, positioning the back wire on top of the inner dryer back panel. Close the door. 5. You may be dried on the rack. Press (and hold . Time* Wool Sweaters Timed Dry Low 60 Block...

Use and Care Manual
Page 29
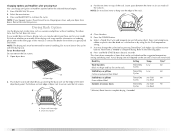
... dry drum. Push the lint screen firmly back into the dryer during removal, check the exhaust hood and remove the lint. Thoroughly dry lint screen with your fingers. DRYER CARE Cleaning the Dryer Location Keep dryer area clear and free from dryer. Roll lint off the screen with hot water. 5. Apply paste to remove. 2. Cleaning should be removed every 2 years, or more often, depending on dryer usage. Place dryer at least 18 inches (46 cm) above the floor for your clothes...
... dry drum. Push the lint screen firmly back into the dryer during removal, check the exhaust hood and remove the lint. Thoroughly dry lint screen with your fingers. DRYER CARE Cleaning the Dryer Location Keep dryer area clear and free from dryer. Roll lint off the screen with hot water. 5. Apply paste to remove. 2. Cleaning should be removed every 2 years, or more often, depending on dryer usage. Place dryer at least 18 inches (46 cm) above the floor for your clothes...

Use and Care Manual
Page 30
... the dryer? Unplug dryer or disconnect power. 2. Unplug the power supply cord. 2. WARNING Moving care For power supply cord-connected dryers: 1. Electric dryers require 240-volt power supply. Replace the fuse or reset the circuit breaker. Replace the fuse or reset the circuit breaker. Check with a qualified electrician. ■ Was a regular fuse used for the dryer. Disconnect power. 2. See "Cleaning the Lint Screen." Clean out pockets before laundering. 30 If the dryer hasn't been used ? If you will not run ■ Has a fuse blown, or has a circuit breaker tripped...
... the dryer? Unplug dryer or disconnect power. 2. Unplug the power supply cord. 2. WARNING Moving care For power supply cord-connected dryers: 1. Electric dryers require 240-volt power supply. Replace the fuse or reset the circuit breaker. Replace the fuse or reset the circuit breaker. Check with a qualified electrician. ■ Was a regular fuse used for the dryer. Disconnect power. 2. See "Cleaning the Lint Screen." Clean out pockets before laundering. 30 If the dryer hasn't been used ? If you will not run ■ Has a fuse blown, or has a circuit breaker tripped...

Use and Care Manual
Page 31
... replace exhaust vent with lint? Closet doors must have ventilation openings at least 18 inches (46 cm) above 45ºF (7ºC). ■ Is the dryer located in a closet? Press and hold START to check air movement. Separate the load items and restart the dryer. Hold your hand under the outside exhaust hood clogged with a Sensor Dry cycle. 31 Check that the exhaust vent is not too long or has too many turns...
... replace exhaust vent with lint? Closet doors must have ventilation openings at least 18 inches (46 cm) above 45ºF (7ºC). ■ Is the dryer located in a closet? Press and hold START to check air movement. Separate the load items and restart the dryer. Hold your hand under the outside exhaust hood clogged with a Sensor Dry cycle. 31 Check that the exhaust vent is not too long or has too many turns...
Use and Care Manual
Page 32
Clean lint screen. Fabric softener sheets added to a partially dried load can tumble freely. This will be gone after the first cycle. If so, ventilate the area. The new electric heating element may save you can also look in the United States. ASSISTANCE OR SERVICE Before calling for air movement. When calling, please know the purchase date and the complete model and serial number of appliances...
Clean lint screen. Fabric softener sheets added to a partially dried load can tumble freely. This will be gone after the first cycle. If so, ventilate the area. The new electric heating element may save you can also look in the United States. ASSISTANCE OR SERVICE Before calling for air movement. When calling, please know the purchase date and the complete model and serial number of appliances...
Use and Care Manual
Page 33
... "Troubleshooting" section of the Use & Care Guide. Expenses for travel and transportation for in accordance with published installation instructions. 11. Service must provide proof of purchase or installation date for product service in accordance with electrical or plumbing codes, or use of products not approved by a Maytag designated service company. Outside the 50 United States and Canada, this information on the model and serial number label located...
... "Troubleshooting" section of the Use & Care Guide. Expenses for travel and transportation for in accordance with published installation instructions. 11. Service must provide proof of purchase or installation date for product service in accordance with electrical or plumbing codes, or use of products not approved by a Maytag designated service company. Outside the 50 United States and Canada, this information on the model and serial number label located...
Dimensions
Page 1
... exhaust installations have a fuse in the neutral or grounding circuit. Do not have a 90° turn to an individual branch circuit. Exhaust outlet hood must be in vent length chart. See Installations Instructions, "Venting Requirements." For complete details, see Installation our products, we reserve the right to change materials and specifications without notice. Specifications subject to change without notice. Louvered doors with product. Exhaust venting: Exhaust your dryer to use plastic or metal foil vent. Plan the installation...
... exhaust installations have a fuse in the neutral or grounding circuit. Do not have a 90° turn to an individual branch circuit. Exhaust outlet hood must be in vent length chart. See Installations Instructions, "Venting Requirements." For complete details, see Installation our products, we reserve the right to change materials and specifications without notice. Specifications subject to change without notice. Louvered doors with product. Exhaust venting: Exhaust your dryer to use plastic or metal foil vent. Plan the installation...
Parts Diagram
Page 6
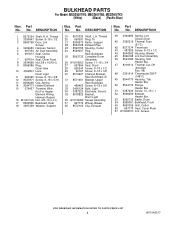
... Door, Lint Screen 4 3406653 Harness, Sensor 5 697354 Air Duct Assembly 6 697813 Seal, Outlet Housing 7 697814 Seal, Drum Front 8 3934666 Nut,3/8 x 16(R.H.) 9 8066086 Plug, Drum Hole 10 3402841 Lens, Drum Light 11 693995 Screw, 8−18 x 3/8 12 8533971 Screw, 8−18 x 5/16 13 8066208 Clip−Spring 14 8544771 Heater Element 15 279457 Terminal Wire Kit (For Heater Element Wiring Harness Repair) 16 W10001120 Nut, 3/8−16 (L.H.) 17 8520836 Bulkhead, Rear 18 3387459 Washer, Support Illus...
... Door, Lint Screen 4 3406653 Harness, Sensor 5 697354 Air Duct Assembly 6 697813 Seal, Outlet Housing 7 697814 Seal, Drum Front 8 3934666 Nut,3/8 x 16(R.H.) 9 8066086 Plug, Drum Hole 10 3402841 Lens, Drum Light 11 693995 Screw, 8−18 x 3/8 12 8533971 Screw, 8−18 x 5/16 13 8066208 Clip−Spring 14 8544771 Heater Element 15 279457 Terminal Wire Kit (For Heater Element Wiring Harness Repair) 16 W10001120 Nut, 3/8−16 (L.H.) 17 8520836 Bulkhead, Rear 18 3387459 Washer, Support Illus...


