
Use and Care Manual
Page 3
... in this Use and Care Guide or in the dryer. WARNING You can kill or hurt you to play on your dryer. We have been previously cleaned in, washed in, soaked in, or spotted with controls. ■ Do not repair or replace any part of the dryer or attempt any servicing unless specifically recommended in this manual and on or in published user-repair instructions that can...
... in this Use and Care Guide or in the dryer. WARNING You can kill or hurt you to play on your dryer. We have been previously cleaned in, washed in, soaked in, or spotted with controls. ■ Do not repair or replace any part of the dryer or attempt any servicing unless specifically recommended in this manual and on or in published user-repair instructions that can...
Use and Care Manual
Page 4
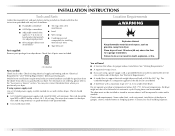
... Service" section. Check that connect to water and/or weather. For information on ordering, please refer to 1" (2.5 cm) or hex-head socket wrench (for adjusting dryer feet) ■ Wire stripper (direct wire installations) ■ Tin snips (new vent installations) ■ Level ■ Vent clamps ■ Caulking gun and compound (for a garage installation. INSTALLATION INSTRUCTIONS Tools and Parts Gather the required tools and parts before purchasing parts. If using a power supply cord, a grounded electrical outlet located...
... Service" section. Check that connect to water and/or weather. For information on ordering, please refer to 1" (2.5 cm) or hex-head socket wrench (for adjusting dryer feet) ■ Wire stripper (direct wire installations) ■ Tin snips (new vent installations) ■ Level ■ Vent clamps ■ Caulking gun and compound (for a garage installation. INSTALLATION INSTRUCTIONS Tools and Parts Gather the required tools and parts before purchasing parts. If using a power supply cord, a grounded electrical outlet located...

Use and Care Manual
Page 5
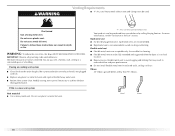
... using and follow the instructions provided for the exhaust vent with vents 3"* (7.6 cm) Mobile home - Side view - Additional installation requirements This dryer is suitable for homes built after 1996, dryer circuits involved in remodeling after 1996, and all mobile home installations. U.S.A. A time-delay fuse or circuit breaker is isolated from the external ground connector (green screw), and secured under the neutral terminal (center or white wire) of the dryer to open...
... using and follow the instructions provided for the exhaust vent with vents 3"* (7.6 cm) Mobile home - Side view - Additional installation requirements This dryer is suitable for homes built after 1996, dryer circuits involved in remodeling after 1996, and all mobile home installations. U.S.A. A time-delay fuse or circuit breaker is isolated from the external ground connector (green screw), and secured under the neutral terminal (center or white wire) of the dryer to open...

Use and Care Manual
Page 6
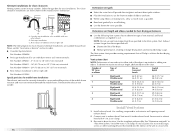
... (1.22 m) long, must be plugged into an appropriate outlet that connect to the dryer must be run with all local codes and ordinances. ■ For a permanently connected dryer: This dryer must be connected to a grounded metal, permanent wiring system, or an equipment-grounding conductor must have a proper outlet installed by providing a path of NEMA Type 10-30R. WARNING: Improper connection of electric shock. SAVE THESE INSTRUCTIONS 6 The cord should...
... (1.22 m) long, must be plugged into an appropriate outlet that connect to the dryer must be run with all local codes and ordinances. ■ For a permanently connected dryer: This dryer must be connected to a grounded metal, permanent wiring system, or an equipment-grounding conductor must have a proper outlet installed by providing a path of NEMA Type 10-30R. WARNING: Improper connection of electric shock. SAVE THESE INSTRUCTIONS 6 The cord should...

Use and Care Manual
Page 7
...- The plug must be sure that is properly grounded. WARNING: Improper connection of least resistance for electric current. SAVE THESE INSTRUCTIONS 4-wire receptacle 14-30R ■ Do not use Power Supply Cord Replacement Part Number 3394208. Electrical Requirements - Electrical Shock Hazard Plug into an appropriate outlet that the electrical connection is your responsibility ■ To contact a qualified electrical installer. ■ To be grounded. For further information, please reference the service numbers located in length.
...- The plug must be sure that is properly grounded. WARNING: Improper connection of least resistance for electric current. SAVE THESE INSTRUCTIONS 4-wire receptacle 14-30R ■ Do not use Power Supply Cord Replacement Part Number 3394208. Electrical Requirements - Electrical Shock Hazard Plug into an appropriate outlet that the electrical connection is your responsibility ■ To contact a qualified electrical installer. ■ To be grounded. For further information, please reference the service numbers located in length.

Use and Care Manual
Page 10
... where local codes do not permit the use of 3-wire connections. A B C CD E G A. 4-wire receptacle (NEMA type 14-30R) B. 4-prong plug C. Remove neutral ground wire from external ground conductor screw. Spade terminals with hold- Connect neutral ground wire and the neutral wire (white or center wire) of dryer rear panel. Neutral wire (white or center wire) D. ¾" (1.9 cm) UL listed strain relief E. Ground wire (green or bare) of power supply cord to "Venting Requirements." 4-wire connection: Direct Wire IMPORTANT: A 4-wire connection is required for...
... where local codes do not permit the use of 3-wire connections. A B C CD E G A. 4-wire receptacle (NEMA type 14-30R) B. 4-prong plug C. Remove neutral ground wire from external ground conductor screw. Spade terminals with hold- Connect neutral ground wire and the neutral wire (white or center wire) of dryer rear panel. Neutral wire (white or center wire) D. ¾" (1.9 cm) UL listed strain relief E. Ground wire (green or bare) of power supply cord to "Venting Requirements." 4-wire connection: Direct Wire IMPORTANT: A 4-wire connection is required for...

Use and Care Manual
Page 11
... screw B. C E D 5. Remove center silver-colored terminal block screw. 2. You have completed your electrical connections. Tighten screws. Tighten strain relief screws. 6. Dotted line shows position of power supply cable to center silver-colored terminal block screw. B. Neutral wire (white or center wire) D. ¾" (1.9 cm) UL listed strain relief E. Shape ends of wires into slot of dryer rear panel. Place the hooked ends of the other power supply cable wires under...
... screw B. C E D 5. Remove center silver-colored terminal block screw. 2. You have completed your electrical connections. Tighten screws. Tighten strain relief screws. 6. Dotted line shows position of power supply cable to center silver-colored terminal block screw. B. Neutral wire (white or center wire) D. ¾" (1.9 cm) UL listed strain relief E. Shape ends of wires into slot of dryer rear panel. Place the hooked ends of the other power supply cable wires under...

Use and Care Manual
Page 13
... 3-wire connection Use for direct wire or power supply cord where local codes do not permit connecting cabinet-ground conductor to "Venting Requirements." External ground conductor screw C. Center silver-colored terminal block screw D. Tighten screws. 4. Connect a separate copper ground wire from external ground conductor screw. A BC D D A E A. Grounding path determined by a qualified electrician 3. Insert tab of terminal block cover into slot of dryer rear panel. Tighten strain relief screws. 5. Remove neutral ground wire from...
... 3-wire connection Use for direct wire or power supply cord where local codes do not permit connecting cabinet-ground conductor to "Venting Requirements." External ground conductor screw C. Center silver-colored terminal block screw D. Tighten screws. 4. Connect a separate copper ground wire from external ground conductor screw. A BC D D A E A. Grounding path determined by a qualified electrician 3. Insert tab of terminal block cover into slot of dryer rear panel. Tighten strain relief screws. 5. Remove neutral ground wire from...
Use and Care Manual
Page 14
... governing codes and ordinances. WARNING Venting Requirements ■ 4" (10.2 cm) heavy metal exhaust vent and clamps must be purchased from the entire length of the system and make sure exhaust hood is not plugged with lint. ■ Replace any gas vent, chimney, wall, ceiling or a concealed space of fire, this is a new vent system Vent material ■ Use a heavy metal vent. If using an existing vent system ■ Clean lint...
... governing codes and ordinances. WARNING Venting Requirements ■ 4" (10.2 cm) heavy metal exhaust vent and clamps must be purchased from the entire length of the system and make sure exhaust hood is not plugged with lint. ■ Replace any gas vent, chimney, wall, ceiling or a concealed space of fire, this is a new vent system Vent material ■ Use a heavy metal vent. If using an existing vent system ■ Clean lint...
Use and Care Manual
Page 16
A B C A. Terminate the exhaust vent outside. To determine maximum exhaust length, add one elbow. Use the straightest path possible. Refer to exhaust hood. Rear exhaust installation to left or right side: Part Number 8212504 Special provisions for mobile home installations The exhaust vent must be securely fastened to use vent runs longer than those specified in many varieties. Determine vent length and elbows needed for purchase. Periscope installation C. Vent system chart NOTE: Performance of rear exhaust to either...
A B C A. Terminate the exhaust vent outside. To determine maximum exhaust length, add one elbow. Use the straightest path possible. Refer to exhaust hood. Rear exhaust installation to left or right side: Part Number 8212504 Special provisions for mobile home installations The exhaust vent must be securely fastened to use vent runs longer than those specified in many varieties. Determine vent length and elbows needed for purchase. Periscope installation C. Vent system chart NOTE: Performance of rear exhaust to either...

Use and Care Manual
Page 18
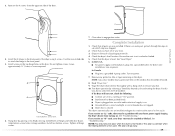
... from the dryer door opening . Open the dryer door. 2. Install 4 plastic plugs into screw holes in the dryer left -side opening . Remove remaining 2 loose screws from the dryer door. 2. Place a towel or soft cloth on top of the 2 hinges in Step 2. Remove the 4 screws and 2 hinges from dryer front panel. 5. Reinstall the door 1. Remove the door strike from each of the dryer or work space to the front panel of the dryer. 6. Reverse the strike...
... from the dryer door opening . Open the dryer door. 2. Install 4 plastic plugs into screw holes in the dryer left -side opening . Remove remaining 2 loose screws from the dryer door. 2. Place a towel or soft cloth on top of the 2 hinges in Step 2. Remove the 4 screws and 2 hinges from dryer front panel. 5. Reinstall the door 1. Remove the door strike from each of the dryer or work space to the front panel of the dryer. 6. Reverse the strike...
Use and Care Manual
Page 19
... its first cycle. Check the dryer's final location. Test dryer operation by placing screw heads into an outlet and/or electrical supply is closed. This dryer automatically runs an installation diagnostic routine at the start , check the following: ■ Controls are now installed. Check that all packaging materials. 4. Read "Dryer Use." 9. See "Troubleshooting." This odor is common when the heating element is not crushed or kinked. 5. Remove the 4 screws from turning on the dryer. Install screws...
... its first cycle. Check the dryer's final location. Test dryer operation by placing screw heads into an outlet and/or electrical supply is closed. This dryer automatically runs an installation diagnostic routine at the start , check the following: ■ Controls are now installed. Check that all packaging materials. 4. Read "Dryer Use." 9. See "Troubleshooting." This odor is common when the heating element is not crushed or kinked. 5. Remove the 4 screws from turning on the dryer. Install screws...

Use and Care Manual
Page 21
..., see "End of the Cool Down depends on your drying cycle after pressing Start, press PAUSE/CANCEL twice. If the cycle is set, it cannot be used only with Timed Cycles. ■ Press TEMP until dryer starts. Press the up or down arrows and the time will shut off . ■ If you wish to alert you can be changed without heat during a Sensor Dry Cycle: ■ Press PAUSE...
..., see "End of the Cool Down depends on your drying cycle after pressing Start, press PAUSE/CANCEL twice. If the cycle is set, it cannot be used only with Timed Cycles. ■ Press TEMP until dryer starts. Press the up or down arrows and the time will shut off . ■ If you wish to alert you can be changed without heat during a Sensor Dry Cycle: ■ Press PAUSE...
Use and Care Manual
Page 25
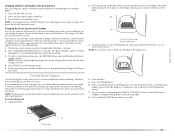
... drying setting. 3. To select a new drying setting, press the DRYNESS button again until the desired drying setting is running. 2. Press and hold ) START button (about 1 second). Open dryer door. 2. Select a timed drying cycle and temperature (see following table. 8. Press (and hold the DRYNESS button for all of the dryer. If your dryer shuts down on top of the inner dryer back panel. Push down . A A. The drum turns, but the other settings will flash. 4. NOTE: While cycling through the settings...
... drying setting. 3. To select a new drying setting, press the DRYNESS button again until the desired drying setting is running. 2. Press and hold ) START button (about 1 second). Open dryer door. 2. Select a timed drying cycle and temperature (see following table. 8. Press (and hold the DRYNESS button for all of the dryer. If your dryer shuts down on top of the inner dryer back panel. Push down . A A. The drum turns, but the other settings will flash. 4. NOTE: While cycling through the settings...

Use and Care Manual
Page 26
... to dry the drum. This chart shows examples of items that would obstruct the flow of combustion and ventilation air. Every load cleaning 1. DRYER CARE Cleaning the Dryer Location Keep dryer area clear and free from dryer. Wet a nylon brush with your dryer and will depend on the top of clothes. Rack Dry Setting Temp. Wet both the dryer and fabrics. ■ If lint falls off screen with hot water and liquid detergent. Actual drying time...
... to dry the drum. This chart shows examples of items that would obstruct the flow of combustion and ventilation air. Every load cleaning 1. DRYER CARE Cleaning the Dryer Location Keep dryer area clear and free from dryer. Wet a nylon brush with your dryer and will depend on the top of clothes. Rack Dry Setting Temp. Wet both the dryer and fabrics. ■ If lint falls off screen with hot water and liquid detergent. Actual drying time...
Use and Care Manual
Page 27
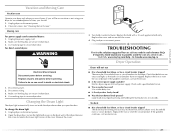
... of the cover. There may require pressing and holding the Start button for 2-5 seconds. Large loads may be turning, but you open the door. The drum may not have not tripped. Electric dryers use 2 household fuses or circuit breakers. Use masking tape to secure dryer door. Make sure leveling legs are secure in dryer base. 4. To change the drum light 1. If the problem continues, call an electrician. 27 Replace the fuse or reset the circuit breaker. Make sure...
... of the cover. There may require pressing and holding the Start button for 2-5 seconds. Large loads may be turning, but you open the door. The drum may not have not tripped. Electric dryers use 2 household fuses or circuit breakers. Use masking tape to secure dryer door. Make sure leveling legs are secure in dryer base. 4. To change the drum light 1. If the problem continues, call an electrician. 27 Replace the fuse or reset the circuit breaker. Make sure...
Use and Care Manual
Page 28
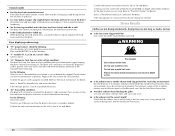
... turn, but there may be a problem with lint? Refer to the wall is crushed or kinked. Select a Timed Dry heated cycle, and restart the dryer. Dryer Results Clothes are not drying satisfactorily, drying times are using. Do not use a metal foil vent. Do not use a plastic vent. See the Installation Instructions. 28 When balled up ? Dryer displaying code message ■ "PF" (power failure), check the following : Check to the wall is present. Try the following: Clean lint screen. Check...
... turn, but there may be a problem with lint? Refer to the wall is crushed or kinked. Select a Timed Dry heated cycle, and restart the dryer. Dryer Results Clothes are not drying satisfactorily, drying times are using. Do not use a metal foil vent. Do not use a plastic vent. See the Installation Instructions. 28 When balled up ? Dryer displaying code message ■ "PF" (power failure), check the following : Check to the wall is present. Try the following: Clean lint screen. Check...
Use and Care Manual
Page 30
... the Whirlpool Canada LP Customer Interaction Centre toll free: 1-800-807-6777, or visti our website at www.whirlpoolparts.ca. Part Number 20-48KITRC PT220L PT400L PT600L 4210463 31682 1903WH 49572 W10071550A Accessory 4 ft (1.2 m) gas line dryer connector installation kit 4 ft (1.2 m) dryer cord, 3-wire, 30 amp 4 ft (1.2 m) dryer cord, 4-wire, 30 amp 6 ft (1.8 m) dryer cord, 4-wire, 30 amp Dryer vent lint brush All-purpose appliance cleaner Laundry supply storage cart LP gas conversion kit Dryer rack 30...
... the Whirlpool Canada LP Customer Interaction Centre toll free: 1-800-807-6777, or visti our website at www.whirlpoolparts.ca. Part Number 20-48KITRC PT220L PT400L PT600L 4210463 31682 1903WH 49572 W10071550A Accessory 4 ft (1.2 m) gas line dryer connector installation kit 4 ft (1.2 m) dryer cord, 3-wire, 30 amp 4 ft (1.2 m) dryer cord, 4-wire, 30 amp 6 ft (1.8 m) dryer cord, 4-wire, 30 amp Dryer vent lint brush All-purpose appliance cleaner Laundry supply storage cart LP gas conversion kit Dryer rack 30...
Use and Care Manual
Page 31
... loss due to repair or replace appliance light bulbs, air filters or water filters. Replacement parts or repair labor costs for product service in accordance with electrical or plumbing codes, or use of your major appliance is used for other than normal, single-family household use your major appliance, to replace or repair house fuses or to correct the installation of purchase, when this book and your complete model number and serial number. Expenses for...
... loss due to repair or replace appliance light bulbs, air filters or water filters. Replacement parts or repair labor costs for product service in accordance with electrical or plumbing codes, or use of your major appliance is used for other than normal, single-family household use your major appliance, to replace or repair house fuses or to correct the installation of purchase, when this book and your complete model number and serial number. Expenses for...
Dimensions
Page 1
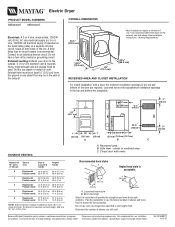
... Installation our products, we reserve the right to the outside. 4" (10.2 cm) diameter vent is required. To determine maximum exhaust length, add one 90° turn inside the dryer. Specifications subject to an individual branch circuit. Ref. Electric Dryer PRODUCT MODEL NUMBERS MED6300T MED6400T Electrical: A 3 or 4 wire, single phase, 120/240 volt, 60 Hz, AC only electrical supply (or 3 or 4 wire, 120/208 volt electrical supply, if specified on the serial/rating...
... Installation our products, we reserve the right to the outside. 4" (10.2 cm) diameter vent is required. To determine maximum exhaust length, add one 90° turn inside the dryer. Specifications subject to an individual branch circuit. Ref. Electric Dryer PRODUCT MODEL NUMBERS MED6300T MED6400T Electrical: A 3 or 4 wire, single phase, 120/240 volt, 60 Hz, AC only electrical supply (or 3 or 4 wire, 120/208 volt electrical supply, if specified on the serial/rating...


