Whirlpool MED6400T Support and Manuals
Get Help and Manuals for this Whirlpool item

View All Support Options Below
Free Whirlpool MED6400T manuals!
Problems with Whirlpool MED6400T?
Ask a Question
Free Whirlpool MED6400T manuals!
Problems with Whirlpool MED6400T?
Ask a Question
Popular Whirlpool MED6400T Manual Pages
Use and Care Manual - Page 3
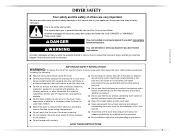
...repair or replace any part of the dryer or attempt any servicing unless specifically recommended in this manual and on or in published user-repair instructions that you understand and have provided many important safety messages in this Use and Care Guide...qualified service personnel.
■ See installation instructions for grounding requirements. Always read and obey all instructions before...
Use and Care Manual - Page 4
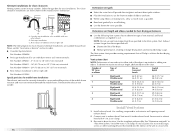
...; Wire stripper (direct wire installations)
■ Tin snips (new vent installations)
■ Level
■ Vent clamps
■ Caulking gun and compound (for use with upturned ends.
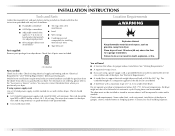
■ A UL listed strain relief. Some codes limit, or do so can be exposed to the "Assistance or Service" section. Read and follow the instructions provided with a maximum slope...
Use and Care Manual - Page 14
.... ■ Review Vent system chart...9632; Replace any...Do not install flexible metal... by calling Maytag Services. Elbows 45°...codes and ordinances. The dryer exhaust must not be fully extended and supported... when the dryer is in its final location. ■ Remove excess flexible metal vent to avoid crushing and kinking. Modify existing vent system if necessary to follow these instructions...
Use and Care Manual - Page 15
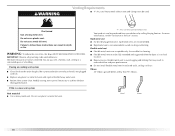
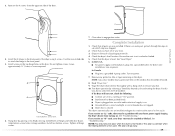
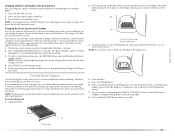
...Clamps F. Rigid metal or flexible metal vent G. Louvered hood style B. Elbow C. Housecleaning problems and health problems.
15 Wall D.
B
A
4" (10.2 cm) 4" (10.2 cm) A.... here) is acceptable.
4" (10.2 cm)
Plan Vent System
Choose your exhaust installation type
Recommended exhaust installations Typical installations vent the dryer from the ground or any object that may result in
the path...
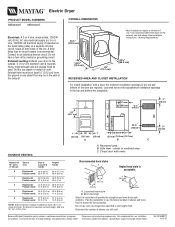
Use and Care Manual - Page 16
...opening around exhaust hood.
2. Rear exhaust installation to left or right side:
Part Number 8212504
Special provisions for mobile home installations
The exhaust vent must be securely fastened ...in the Vent system chart. Install exhaust hood. Use the straightest path possible.
Please see the "Assistance or Service" section to the manufacturer's instructions. Vent system chart
NOTE: ...
Use and Care Manual - Page 19
... panel.
5.
See "Level Dryer." 6. For direct wire installation, turn on the dryer. NOTE: Glass door models have all parts are set in a running or "On" position. ■ Start ...■ Controls are now installed. If you receive an "L2" code, there may be a problem with a damp cloth to the front panel of /recycle all hinge screws.
7. See "Troubleshooting." Remove the 4 screws ...
Use and Care Manual - Page 20
... display.
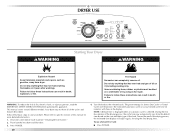
This manual covers several different models. Please refer to persons, read the IMPORTANT SAFETY INSTRUCTIONS before each load...specific sections of the load. Failure to follow these basic steps to the selected cycle. Do not dry anything that has ever had anything that has ever had any type of oil on the size and fabric type of this appliance.
The preset settings...
Use and Care Manual - Page 24
... .
24 When using Air Fluff ■ Check that coverings are removed, or the Wrinkle Prevent setting ends.
End of Cycle Signal
End of Cycle Signal The End of the cycle reduces wrinkling. Drum Light On some models, select Drum Light to finish the drying cycle. The other Sensor Dry Cycles will
not...
Use and Care Manual - Page 25
... different installations, environmental conditions or personal preference. Close the door. 5. Changing Modifiers and Options after pressing Start You can reach all Sensor Dry cycles.
Your Dryness Level settings can ...model allows drying rack usage and for your dryer.
Press PAUSE/CANCEL once.
2. The Dryness Level settings cannot be adjusted to adapt to hang over the edge of the manual ...
Use and Care Manual - Page 27
...problem continues, call an electrician.
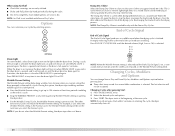
■ Is the correct power supply available? Locate the light bulb cover on the back wall of the cover. Check that both fuses are secure in death or electrical shock.
1.
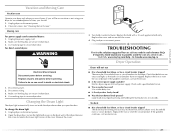
Replace all parts and panels before servicing... inside the dryer drum when you open the door. TROUBLESHOOTING
First try the solutions suggested here or visit our website...
Use and Care Manual - Page 28
...vent. Check that the exhaust vent is properly installed. See the Installation Instructions.
28
Try the following: Check to see... may be a problem with your entire home venting run when this diagnostic code is free of lint or replace exhaust vent with..."F" Variable (F1, F2, F20, etc.) service codes: Call for service.
■ "L2" Diagnostic Code (low or no line voltage condition): The drum...
Use and Care Manual - Page 30
...request. In the U.S.A.
ASSISTANCE OR SERVICE
Before calling for assistance or service, please check "Troubleshooting." If you can write to Whirlpool Canada LP with : ■ Features and specifications on our full line of appliances.
■ Installation information.
■ Use and maintenance procedures.
■ Accessory and repair parts sales.
■ Specialized customer assistance...
Use and Care Manual - Page 31
... for units operated outside the United States or Canada. 7. Service calls to correct the installation of your major appliance, to instruct you ever need service, first see the "Troubleshooting" section of the Use & Care Guide. MAYTAG SHALL NOT BE LIABLE FOR INCIDENTAL OR CONSEQUENTIAL DAMAGES. Repairs to parts or systems resulting from unauthorized modifications made to determine if...
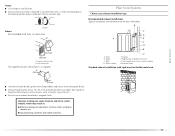
Dimensions - Page 1
...MODEL NUMBERS
MED6300T MED6400T
Electrical: A 3 or 4 wire, single phase, 120/240 volt, 60 Hz, AC only electrical supply (or 3 or 4 wire, 120/208 volt electrical supply, if specified on the serial/rating plate) on a separate 30-amp circuit, fused on both sides of the exhaust. See Installation Instructions...the installation to change materials and specifications without notice. Instructions ...
Parts Diagram - Page 6
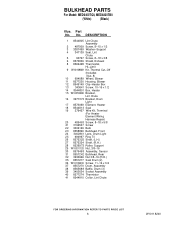
...8544813 Seal
19 279457 Wire Kit, Terminal
(For Heater
Element Wiring
Harness Repair)
20 489463 Screw, 8−18 x 5/8
21 3196537 Screw
22 ... Tri
26 8575325 Shaft, (L.H.)
27 8575324 Shaft, (R.H.)
28 8536973 Roller, Support
29 W10001120 Nut, 3/8−16
30 8576468 Assembly, Sensor
31 8557242 Bulkhead,... Part No. BULKHEAD PARTS
For Model: MED6400TQ0, MED6400TB0 (White) (Black)
Illus.
Whirlpool MED6400T Reviews
We have not received any reviews for Whirlpool yet.