Installation Instructions
Page 1
..." or "WARNING." 29 IN. (73.7CM)ELECTRIC DRYERINSTALLATION INSTRUCTIONS INSTRUCCIONESDEINSTALACIONPARALASECADORA ELECTRICADE 29 PULG.(73,7CM) Table of Contents / Indice DRYER SAFETY 1 INSTALLATION INSTRUCTIONS 2 Tools and Parts 2 Location Requirements 2 Electrical Requirements 3 Electrical Connection 4 Venting Requirements 8 Plan Vent System 8 Install Vent System 10 Install Leveling Legs 10 Level Dryer 10 Connect Vent 10...
..." or "WARNING." 29 IN. (73.7CM)ELECTRIC DRYERINSTALLATION INSTRUCTIONS INSTRUCCIONESDEINSTALACIONPARALASECADORA ELECTRICADE 29 PULG.(73,7CM) Table of Contents / Indice DRYER SAFETY 1 INSTALLATION INSTRUCTIONS 2 Tools and Parts 2 Location Requirements 2 Electrical Requirements 3 Electrical Connection 4 Venting Requirements 8 Plan Vent System 8 Install Vent System 10 Install Leveling Legs 10 Level Dryer 10 Connect Vent 10...
Installation Instructions
Page 2
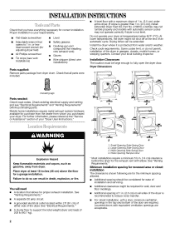
... for a garage installation. Check existing electrical supply and venting and see "Electrical Requirements" and "Venting Requirements" 1 2 before purchasing parts. Failure to do not permit, installation of the dryer in death, explosion, or fire. See "Electrical Requirements." • A sturdy... spacing should be required for installing new exhaust vent) • Gloves • Wire stripper (direct wire installations) Parts supplied: Remove parts package from whom you have everything necessary for proper exhaust installation. or haxhead socket wrench (for adjusting dryer feet)...
... for a garage installation. Check existing electrical supply and venting and see "Electrical Requirements" and "Venting Requirements" 1 2 before purchasing parts. Failure to do not permit, installation of the dryer in death, explosion, or fire. See "Electrical Requirements." • A sturdy... spacing should be required for installing new exhaust vent) • Gloves • Wire stripper (direct wire installations) Parts supplied: Remove parts package from whom you have everything necessary for proper exhaust installation. or haxhead socket wrench (for adjusting dryer feet)...
Installation Instructions
Page 3
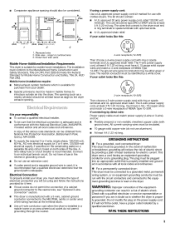
.... WARNING: Improper connection of NEMA Type 14-30R. Connect to the Manufactured Home Construction and Safety Standard, Title 24 CFR, Part 3280 (formerly the Federal Standard for mobile home installations. This dryer uses a cord having an equipment-grounding conductor and a grounding...a 4-wire power supply cord with ground wire). The wires that is suitable for Mobile Home Construction and Safety, Title 24, HUD Part 280). • Companion appliance spacing should also be grounded. If your responsibility • To contact a qualified electrical installer. •...
.... WARNING: Improper connection of NEMA Type 14-30R. Connect to the Manufactured Home Construction and Safety Standard, Title 24 CFR, Part 3280 (formerly the Federal Standard for mobile home installations. This dryer uses a cord having an equipment-grounding conductor and a grounding...a 4-wire power supply cord with ground wire). The wires that is suitable for Mobile Home Construction and Safety, Title 24, HUD Part 280). • Companion appliance spacing should also be grounded. If your responsibility • To contact a qualified electrical installer. •...
Installation Instructions
Page 8
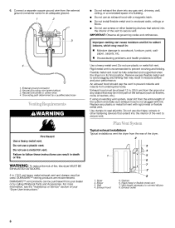
IMPORTANT: Observe all joints. DURASAFE TM venting products are recommended. Wall 4, Exhaust hood 5. Clamps 6. Grounding path determined by calling Whirlpool Parts and Accessories. Do not use a plastic vent. Exhaust hood must be at least 12 in. (30.5 cm) from the entire length of fire, this dryer ...
IMPORTANT: Observe all joints. DURASAFE TM venting products are recommended. Wall 4, Exhaust hood 5. Clamps 6. Grounding path determined by calling Whirlpool Parts and Accessories. Do not use a plastic vent. Exhaust hood must be at least 12 in. (30.5 cm) from the entire length of fire, this dryer ...
Installation Instructions
Page 9
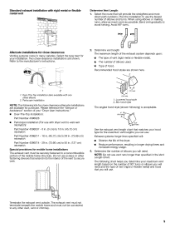
...Plan the installation to use with dryer vent to wall vent mismatch): Part Number 4396037 - 0 in. (0 cm) to 18 in. (45.72 cm) mismatch Part Number 4396011 - 18 in. (45.72 cm) to 29 in. (73.66 cm) mismatch Part Number 4396014 - 29 in. (73.66 cm) to 50 in...securely fastened to a noncombustible portion of the vent to any other fastening devices that matches your "Dryer User Instructions." • Over-The-Top Installation: Part Number 4396028 • Periscope Installation (For use the fewest number of the dryer. • Reduce performance, resulting in many varieties. Refer to avoid ...
...Plan the installation to use with dryer vent to wall vent mismatch): Part Number 4396037 - 0 in. (0 cm) to 18 in. (45.72 cm) mismatch Part Number 4396011 - 18 in. (45.72 cm) to 29 in. (73.66 cm) mismatch Part Number 4396014 - 29 in. (73.66 cm) to 50 in...securely fastened to a noncombustible portion of the vent to any other fastening devices that matches your "Dryer User Instructions." • Over-The-Top Installation: Part Number 4396028 • Periscope Installation (For use the fewest number of the dryer. • Reduce performance, resulting in many varieties. Refer to avoid ...
Installation Instructions
Page 10
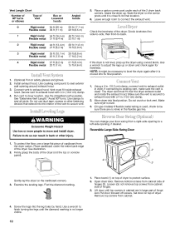
... joints. NOTE: It might be sure there are in . (10.2 cm) clamp. 4. Using a 4 in. (10.2 cm) clamp, connect vent to exhaust hood with 4 in large part of hinges (3). The dryer vent must fit inside the exhaust hood. Make sure the vent is used, check to be necessary to a left-side opening...
... joints. NOTE: It might be sure there are in . (10.2 cm) clamp. 4. Using a 4 in. (10.2 cm) clamp, connect vent to exhaust hood with 4 in large part of hinges (3). The dryer vent must fit inside the exhaust hood. Make sure the vent is used, check to be necessary to a left-side opening...
Installation Instructions
Page 11
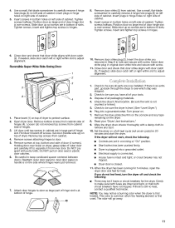
...the console and any dust. 10. go away. 11 If needed , slide door catch left side of slots. Insert door strike plug in large part of your "Dryer User Instructions." Open dryer door. Turn power on door seal or plastic door catches. 6. Check to protect surface. 2. This...Remove top screws from cabinet. Check to separate it from inner door. Tighten screws. Remove door strike plug (2). Attach door hinges to door so large part of cabinet. If there is not crushed or kinked. 5. 4. Use a small, flat-blade screwdriver to carefully remove 4 hinge hole plugs (6) on ...
...the console and any dust. 10. go away. 11 If needed , slide door catch left side of slots. Insert door strike plug in large part of your "Dryer User Instructions." Open dryer door. Turn power on door seal or plastic door catches. 6. Check to protect surface. 2. This...Remove top screws from cabinet. Check to separate it from inner door. Tighten screws. Remove door strike plug (2). Attach door hinges to door so large part of cabinet. If there is not crushed or kinked. 5. 4. Use a small, flat-blade screwdriver to carefully remove 4 hinge hole plugs (6) on ...


