Installation Instructions
Page 1
... this manual and on your appliance. This symbol alerts you to reduce the chance of others . 29 IN. (73.7CM)ELECTRIC DRYERINSTALLATION INSTRUCTIONS INSTRUCCIONESDEINSTALACIONPARALASECADORA ELECTRICADE 29 PULG.(73,7CM) Table of Contents / Indice DRYER SAFETY 1 INSTALLATION INSTRUCTIONS 2 Tools and Parts 2 Location Requirements 2 Electrical Requirements 3 Electrical Connection 4 Venting Requirements 8 Plan Vent System 8 Install Vent System 10 Install Leveling Legs 10 Level Dryer 10 Connect Vent 10 Reverse Door Swing 10 Complete Installation 11 SEGURIDAD DE LA SECADORA...
... this manual and on your appliance. This symbol alerts you to reduce the chance of others . 29 IN. (73.7CM)ELECTRIC DRYERINSTALLATION INSTRUCTIONS INSTRUCCIONESDEINSTALACIONPARALASECADORA ELECTRICADE 29 PULG.(73,7CM) Table of Contents / Indice DRYER SAFETY 1 INSTALLATION INSTRUCTIONS 2 Tools and Parts 2 Location Requirements 2 Electrical Requirements 3 Electrical Connection 4 Venting Requirements 8 Plan Vent System 8 Install Vent System 10 Install Leveling Legs 10 Level Dryer 10 Connect Vent 10 Reverse Door Swing 10 Complete Installation 11 SEGURIDAD DE LA SECADORA...
Installation Instructions
Page 2
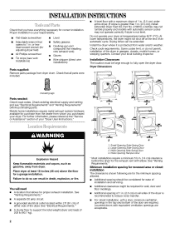
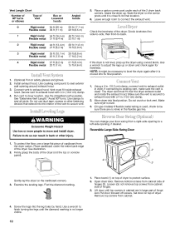
... venting and see "Electrical Requirements" and "Venting Requirements" 1 2 before purchasing parts. You will need • A location that allows for a garage installation. Wide Opening Side-Swing Door 4. At lower temperatures, the dryer might be large enough to support the total weight (dryer and load) of the dryer is protected from water and/or weather. Installation Clearances The location must be required for installing new exhaust vent) • Gloves • Wire stripper (direct wire installations) Parts supplied: Remove parts package from dryer drum. Place dryer...
... venting and see "Electrical Requirements" and "Venting Requirements" 1 2 before purchasing parts. You will need • A location that allows for a garage installation. Wide Opening Side-Swing Door 4. At lower temperatures, the dryer might be large enough to support the total weight (dryer and load) of the dryer is protected from water and/or weather. Installation Clearances The location must be required for installing new exhaust vent) • Gloves • Wire stripper (direct wire installations) Parts supplied: Remove parts package from dryer drum. Place dryer...
Installation Instructions
Page 3
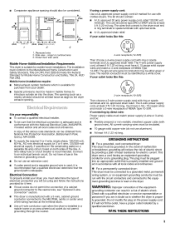
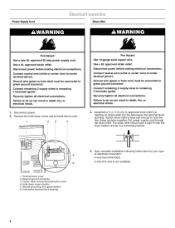
... not use with vents Mobile Home-Additional Installation Requirements This dryer is manufactured with upturned ends. • A ULapproved strain relief. If connecting by direct wire: Power supply cable must be obtained from your outlet looks like this : © 4-wire receptacle (14-30R) Then choose a 4-wire power supply cord with ground wire). Closet door with clothes dryers. A time-delay fuse or circuit breaker is properly installed and grounded in accordance with all local codes and...
... not use with vents Mobile Home-Additional Installation Requirements This dryer is manufactured with upturned ends. • A ULapproved strain relief. If connecting by direct wire: Power supply cable must be obtained from your outlet looks like this : © 4-wire receptacle (14-30R) Then choose a 4-wire power supply cord with ground wire). Closet door with clothes dryers. A time-delay fuse or circuit breaker is properly installed and grounded in accordance with all local codes and...
Installation Instructions
Page 4
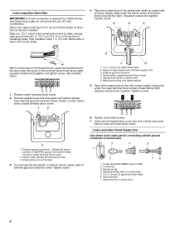
... location 5. Securely tighten all electrical connections. Securely tighten all electrical connections. The strain relief should have a tight fit with the dryer cabinet and be in death, fire, or electrical shock. 3. Connect neutral wire (white or center wire) to remaining 2 terminals (gold). Hold-down screw and terminal block cover. Hole below the terminal block opening 4. Now complete installation following instructions for your type of electrical connection: 4-wire (recommended) 3-wire (if 4-wire is not available) 4 Connect remaining 2 supply wires...
... location 5. Securely tighten all electrical connections. Securely tighten all electrical connections. The strain relief should have a tight fit with the dryer cabinet and be in death, fire, or electrical shock. 3. Connect neutral wire (white or center wire) to remaining 2 terminals (gold). Hold-down screw and terminal block cover. Hole below the terminal block opening 4. Now complete installation following instructions for your type of electrical connection: 4-wire (recommended) 3-wire (if 4-wire is not available) 4 Connect remaining 2 supply wires...

Installation Instructions
Page 5
... type 10-30R) (_ A fused circuit breaker disconnect or box* 4-wire connection: Direct Wire A UL listed, 120/ 240 volt amp., dryer power supply mcoinrdim* um, 30 3-wire connection: Power Supply Cord 3-wire direct A fused disconnect or circuit breaker box* 3-wire connection: Direct Wire *If local codes do not permit the connection of a frame-grounding conductor to the neutral wire, go to "Optional 3-wire connection" section. 4-wire connection: Power Supply Cord IMPORTANT: A 4-wire connection is required for mobile homes and where local codes do not permit the use of dryer rear panel...
... type 10-30R) (_ A fused circuit breaker disconnect or box* 4-wire connection: Direct Wire A UL listed, 120/ 240 volt amp., dryer power supply mcoinrdim* um, 30 3-wire connection: Power Supply Cord 3-wire direct A fused disconnect or circuit breaker box* 3-wire connection: Direct Wire *If local codes do not permit the connection of a frame-grounding conductor to the neutral wire, go to "Optional 3-wire connection" section. 4-wire connection: Power Supply Cord IMPORTANT: A 4-wire connection is required for mobile homes and where local codes do not permit the use of dryer rear panel...
Installation Instructions
Page 6
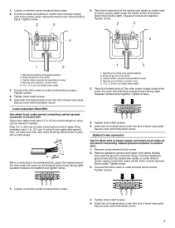
... of dryer rear panel. Neutral prong 4. Bend ends of wires into slot of terminal block (hook facing right). Place the hooked end of the neutral wire (white or center wire) of cable, leaving bare ground wire at 5 in . (3.8 cm) from external ground connector screw. Center silver-colored terminal block screw 3. External ground connector 4. Neutral (white or center wire) 7 6 6 4-wireconnection: Direct Wire IMPORTANT: A 4-wire connection is required for mobile homes and where local codes do...
... of dryer rear panel. Neutral prong 4. Bend ends of wires into slot of terminal block (hook facing right). Place the hooked end of the neutral wire (white or center wire) of cable, leaving bare ground wire at 5 in . (3.8 cm) from external ground connector screw. Center silver-colored terminal block screw 3. External ground connector 4. Neutral (white or center wire) 7 6 6 4-wireconnection: Direct Wire IMPORTANT: A 4-wire connection is required for mobile homes and where local codes do...
Installation Instructions
Page 7
... of terminal block cover into slot of dryer rear panel. Connect neutral wire (white or center wire) of outer covering from external ground connector screw. Neutral wire (white or center wire) 5. _ in . (2.5 cm). Strip 31/2in. (8.9 cm) of power supply cord to neutral wire. 1. External ground connector 3. If using 3-wire cable with ground wire, cut bare wire even with hold -down screw. 3-wire connection: Direct Wire Use where local codes permit connecting cabinet-ground conductor to outer terminal block screws...
... of terminal block cover into slot of dryer rear panel. Connect neutral wire (white or center wire) of outer covering from external ground connector screw. Neutral wire (white or center wire) 5. _ in . (2.5 cm). Strip 31/2in. (8.9 cm) of power supply cord to neutral wire. 1. External ground connector 3. If using 3-wire cable with ground wire, cut bare wire even with hold -down screw. 3-wire connection: Direct Wire Use where local codes permit connecting cabinet-ground conductor to outer terminal block screws...
Installation Instructions
Page 8
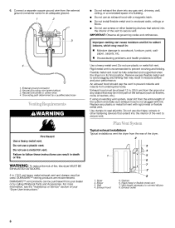
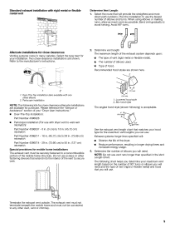
... indoors, which may result in . (30.5 cm) from your "Dryer User instructions." Fire Hazard Use a heavy metal vent. Exhaust outlet 8 Neutral wire (white or center wire) 4. Connect a separate copper ground wire from the entire length of the exhaust (such as flowers, rocks or bushes, etc.). External ground connector 2, Neutral grounding wire (green/yellow) 3. Remove excess flexible metal vent to avoid sagging and kinking that may result in...
... indoors, which may result in . (30.5 cm) from your "Dryer User instructions." Fire Hazard Use a heavy metal vent. Exhaust outlet 8 Neutral wire (white or center wire) 4. Connect a separate copper ground wire from the entire length of the exhaust (such as flowers, rocks or bushes, etc.). External ground connector 2, Neutral grounding wire (green/yellow) 3. Remove excess flexible metal vent to avoid sagging and kinking that may result in...
Installation Instructions
Page 9
... metal vent Determine Vent Length 1. Please reference the "Service or Assistance" section of your maximum vent length based on the number of 90 ° turns or elbows you determine your "Dryer User Instructions." • Over-The-Top Installation: Part Number 4396028 • Periscope Installation (For use the fewest number of the vent to 50 in longer drying times and increased energy usage. 3. qh Terminate the exhaust vent outside. Refer to avoid kinking. r- 2. Standard exhaust installation with...
... metal vent Determine Vent Length 1. Please reference the "Service or Assistance" section of your maximum vent length based on the number of 90 ° turns or elbows you determine your "Dryer User Instructions." • Over-The-Top Installation: Part Number 4396028 • Periscope Installation (For use the fewest number of the vent to 50 in longer drying times and increased energy usage. 3. qh Terminate the exhaust vent outside. Refer to avoid kinking. r- 2. Standard exhaust installation with...
Installation Instructions
Page 10
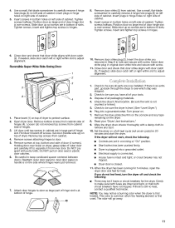
.... 2. If connecting to exhaust hood with 4 in dryer. Use caulking compound to dryer location. Do not crush or kink vent. Use a wrench to finish turning the legs until it is close to secure vent. 5. Run vent to seal exterior wall opening around exhaust hood. 3. Place towel (1) on top of hinges (3). Pull door forward off screws. Install exhaust hood. Vent must fit over the dryer exhaust outlet and inside exhaust hood. Use clamps to...
.... 2. If connecting to exhaust hood with 4 in dryer. Use caulking compound to dryer location. Do not crush or kink vent. Use a wrench to finish turning the legs until it is close to secure vent. 5. Run vent to seal exterior wall opening around exhaust hood. 3. Place towel (1) on top of hinges (3). Pull door forward off screws. Install exhaust hood. Vent must fit over the dryer exhaust outlet and inside exhaust hood. Use clamps to...
Installation Instructions
Page 11
... (do not feel for 5 minutes, open the dryer door and feel heat, turn the dryer off and check the following : • Controls are now installed. Do NOT pull on dryer, grasp sides of cabinet. Check to door so large part of hinge slot is on top of your "Dryer User Instructions." Turn power on left side of outer door and carefully lift to inner door panel so handle is at top, bottom...
... (do not feel for 5 minutes, open the dryer door and feel heat, turn the dryer off and check the following : • Controls are now installed. Do NOT pull on dryer, grasp sides of cabinet. Check to door so large part of hinge slot is on top of your "Dryer User Instructions." Turn power on left side of outer door and carefully lift to inner door panel so handle is at top, bottom...


