
Owners Manual
Page 4
...s Utility knife s Measuring tape E F A. Alternate Parts Your installation may require additional parts. Flat washers for Part Number 4396746. To order, call the dealer from local plumbing suppliers) Floor drain Siphon break, Part Number 285320; Water inlet hoses (2) E. Ask for faucet adapter and fill hose... the bottom of fill hoses 2 longer water fill hoses: 6 ft (1.8 m) Part Number 76314, 10 ft (3.0 m) Part Number 350008 Drain hose too short Drain hose, Part No. 388423 and hose kit, Part No. 285442 Drain hose that open to the "Assistance or Service" section of this...
...s Utility knife s Measuring tape E F A. Alternate Parts Your installation may require additional parts. Flat washers for Part Number 4396746. To order, call the dealer from local plumbing suppliers) Floor drain Siphon break, Part Number 285320; Water inlet hoses (2) E. Ask for faucet adapter and fill hose... the bottom of fill hoses 2 longer water fill hoses: 6 ft (1.8 m) Part Number 76314, 10 ft (3.0 m) Part Number 350008 Drain hose too short Drain hose, Part No. 388423 and hose kit, Part No. 285442 Drain hose that open to the "Assistance or Service" section of this...

Owners Manual
Page 5
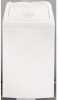
... or electrical shock. Front view B. Proper installation is required. s Hot and cold water faucets located within 5 ft (1.5 m) of 260 lbs (118 kg). s This washer is the personal responsibility and obligation of 5-100 psi (34.5-690 kPa). Location Requirements Selecting the proper location for... wall, door and floor moldings. Do not store or operate your responsibility. See "Drain System." IMPORTANT: Do not install or store the washer ...
... or electrical shock. Front view B. Proper installation is required. s Hot and cold water faucets located within 5 ft (1.5 m) of 260 lbs (118 kg). s This washer is the personal responsibility and obligation of 5-100 psi (34.5-690 kPa). Location Requirements Selecting the proper location for... wall, door and floor moldings. Do not store or operate your responsibility. See "Drain System." IMPORTANT: Do not install or store the washer ...

Owners Manual
Page 7
... your floors from the bottom of the washer. s Move the washer to water leakage. See "Tools and Parts." Standpipe drain system - The top of 28" (71 cm) from damage due to within approximately 3 ft (90 cm) of 2" (5 cm). To prevent the drain hose from coming off or leaking, it...or more people to open. Continue until hose contacts the cabinet. ¼" (6 mm) A B Laundry tub drain system (view C) The laundry tub requires a minimum carry-away capacity of the washer. 4. Wet the inside of the straight end of the laundry tub must be needed. Place clamp over area ...
... your floors from the bottom of the washer. s Move the washer to water leakage. See "Tools and Parts." Standpipe drain system - The top of 28" (71 cm) from damage due to within approximately 3 ft (90 cm) of 2" (5 cm). To prevent the drain hose from coming off or leaking, it...or more people to open. Continue until hose contacts the cabinet. ¼" (6 mm) A B Laundry tub drain system (view C) The laundry tub requires a minimum carry-away capacity of the washer. 4. Wet the inside of the straight end of the laundry tub must be needed. Place clamp over area ...

Owners Manual
Page 8
... to eliminate kinks in bottom of water might clog the inlet valve screens. Turn on coupling by hand until it is seated on the washer. You will drain this later. Record hose installation or replacement dates for leaks. s Periodically inspect and replace hoses if bulges, kinks, cuts, wear, or ...Check for leaks 8. s If you connect only one water hose, you must cap off the remaining water inlet port. Do not force excess drain hose into the washer: s Do not straighten hooked end of hose failure. Attach the hose with the blue coupling to the COLD water (left) inlet valve. ...
... to eliminate kinks in bottom of water might clog the inlet valve screens. Turn on coupling by hand until it is seated on the washer. You will drain this later. Record hose installation or replacement dates for leaks. s Periodically inspect and replace hoses if bulges, kinks, cuts, wear, or ...Check for leaks 8. s If you connect only one water hose, you must cap off the remaining water inlet port. Do not force excess drain hose into the washer: s Do not straighten hooked end of hose failure. Attach the hose with the blue coupling to the COLD water (left) inlet valve. ...

Owners Manual
Page 9
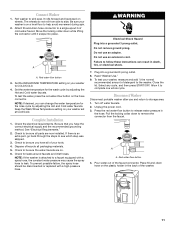
... faucets are recessed, put the hooked end of /recycle all parts are now installed. To test your tools. 4. Secure Drain Hose 1. If the washer is level. Complete Installation 1. See "Electrical Requirements." 2. Dispose of the drain hose in death, fire, or electrical shock. 7. Plug into a grounded 3 prong outlet. Beaded Tie Strap 4. Check for use...
... faucets are recessed, put the hooked end of /recycle all parts are now installed. To test your tools. 4. Secure Drain Hose 1. If the washer is level. Complete Installation 1. See "Electrical Requirements." 2. Dispose of the drain hose in death, fire, or electrical shock. 7. Plug into a grounded 3 prong outlet. Beaded Tie Strap 4. Check for use...

Owners Manual
Page 10
... will allow hot and cold water to enter your faucet. A standard faucet adapter and washer are available from damage due to water leakage. Washer B. Wet inside end of the fill-and-drain hose with a carryaway capacity of the drain hose ¼" (6 mm) from the parts bag to leaks. Place clamp over area marked "CLAMP." Damage...
... will allow hot and cold water to enter your faucet. A standard faucet adapter and washer are available from damage due to water leakage. Washer B. Wet inside end of the fill-and-drain hose with a carryaway capacity of the drain hose ¼" (6 mm) from the parts bag to leaks. Place clamp over area marked "CLAMP." Damage...
Owners Manual
Page 11
...it to a single-spout hot/ cold water faucet. A A. Place fill-and-drain hose on your washer set at Cold/Cold. Connect Washer 1. A A. To test the water, press the red water-flow button on your washer to help avoid movement during spin. 2. Keep the Wash/Rinse Temperature setting on...to leak. Select any cycle, and then press START/OFF. Disconnect Washer Disconnect portable washer after use an extension cord. Allow it snaps into place. It rolls forward and backward on . 6. Attach fill-and-drain hose connector to complete one whole cycle. Check for the wash cycle...
...it to a single-spout hot/ cold water faucet. A A. Place fill-and-drain hose on your washer set at Cold/Cold. Connect Washer 1. A A. To test the water, press the red water-flow button on your washer to help avoid movement during spin. 2. Keep the Wash/Rinse Temperature setting on...to leak. Select any cycle, and then press START/OFF. Disconnect Washer Disconnect portable washer after use an extension cord. Allow it snaps into place. It rolls forward and backward on . 6. Attach fill-and-drain hose connector to complete one whole cycle. Check for the wash cycle...

Owners Manual
Page 14
...and seams. s Treat spots and stains. These pauses are normal. Rinse 3. During drain If water is pushed, the washer fills (to avoid pilling. Understanding Washer Cycles When a cycle is selected, the washer lid is closed during the end of your old one didn't. Separate lint-givers (...as zippers, snaps, and buckles may be closed , and Start/Off is drained quickly from your washer (depending on your installation), you may rust if left in the washer basket for best results. Drain No agitation 4. Unloading s Remove clothes from lint-takers (corduroy, synthetics, ...
...and seams. s Treat spots and stains. These pauses are normal. Rinse 3. During drain If water is pushed, the washer fills (to avoid pilling. Understanding Washer Cycles When a cycle is selected, the washer lid is closed during the end of your old one didn't. Separate lint-givers (...as zippers, snaps, and buckles may be closed , and Start/Off is drained quickly from your washer (depending on your installation), you may rust if left in the washer basket for best results. Drain No agitation 4. Unloading s Remove clothes from lint-takers (corduroy, synthetics, ...

Owners Manual
Page 15
...not add detergent or bleach to the washer. To winterize washer: 1. Shut off both water faucets. 2. Disconnect the drain from the drain system. 5. Drape the power cord and drain hose over edge into agitator. Reinstalling the washer 1. WASHER CARE Cleaning Your Washer Cleaning the exterior Use a soft, ... in the basket. 4. Unplug the power cord. 6. Place the inlet hoses into the basket. 7. Disconnect and drain water inlet hoses. 3. To transport the washer: 1. Cleaning the lint filter: Clean filter after five years of use to a water pressure surge) while you are...
...not add detergent or bleach to the washer. To winterize washer: 1. Shut off both water faucets. 2. Disconnect the drain from the drain system. 5. Drape the power cord and drain hose over edge into agitator. Reinstalling the washer 1. WASHER CARE Cleaning Your Washer Cleaning the exterior Use a soft, ... in the basket. 4. Unplug the power cord. 6. Place the inlet hoses into the basket. 7. Disconnect and drain water inlet hoses. 3. To transport the washer: 1. Cleaning the lint filter: Clean filter after five years of use to a water pressure surge) while you are...

Owners Manual
Page 16
...closed during operation. The lid must be loose yet fit securely. s Is the lid open ? Do not seal the drain hose with tape. Are the fill hose washers properly seated? If not, the fill or spray rinses can bounce off the tub ring or the load? s Is there... power at the plug? Follow manufacturer's directions. s Is the washer installed on a solid floor? See "Starting Your Washer" for permanent installations. s Is the washer overloaded? This creates a perception that the washer is part of the drain hose less than 72" (183 cm) above the floor (27" [68.9 cm]...
...closed during operation. The lid must be loose yet fit securely. s Is the lid open ? Do not seal the drain hose with tape. Are the fill hose washers properly seated? If not, the fill or spray rinses can bounce off the tub ring or the load? s Is there... power at the plug? Follow manufacturer's directions. s Is the washer installed on a solid floor? See "Starting Your Washer" for permanent installations. s Is the washer overloaded? This creates a perception that the washer is part of the drain hose less than 72" (183 cm) above the floor (27" [68.9 cm]...

Dimension Guide
Page 1
...washer. The minimum carry-away capacity (for permanent installations). Laundry tub drain system (view C) The laundry tub requires a minimum carry-away capacity of 13 gal. (49.2 L) per minute (for permanent installations) can be no less than 13 gal. (49.2 L) per minute. 39" (99 cm) 39" (99 cm) A B Because Whirlpool...(79 cm) 35" (88,9 cm) 24" (61 cm) 2-1/2" (6,4 cm) 6"(15,2 cm) RECESSED AREA AND CLOSET INSTALLATION 1" (2,5 cm) 6-1/2" (16,5 cm) 22-1/2" (57,2 cm) 24" (61 cm) Additional clearances may be at least 39" (99 cm) above the floor and no higher than 72" (183 cm) from...
...washer. The minimum carry-away capacity (for permanent installations). Laundry tub drain system (view C) The laundry tub requires a minimum carry-away capacity of 13 gal. (49.2 L) per minute (for permanent installations) can be no less than 13 gal. (49.2 L) per minute. 39" (99 cm) 39" (99 cm) A B Because Whirlpool...(79 cm) 35" (88,9 cm) 24" (61 cm) 2-1/2" (6,4 cm) 6"(15,2 cm) RECESSED AREA AND CLOSET INSTALLATION 1" (2,5 cm) 6-1/2" (16,5 cm) 22-1/2" (57,2 cm) 24" (61 cm) Additional clearances may be at least 39" (99 cm) above the floor and no higher than 72" (183 cm) from...


