
Owners Manual
Page 3
... messages will release any part of fire, electric shock, or injury to potential hazards that has not been used for grounding instructions. s Do not allow children to the wash water. s Do not add gasoline, dry-cleaning solvents, or other flammable, or explosive substances as they give off vapors that could ignite or explode. s Do not repair or replace any accumulated hydrogen gas...
... messages will release any part of fire, electric shock, or injury to potential hazards that has not been used for grounding instructions. s Do not allow children to the wash water. s Do not add gasoline, dry-cleaning solvents, or other flammable, or explosive substances as they give off vapors that could ignite or explode. s Do not repair or replace any accumulated hydrogen gas...

Owners Manual
Page 4
... supplies before beginning the washer installation. Beaded tie strap NOTE: To change a permanent installation to the "Assistance or Service" section of this manual. Flat washers for the bottom of fill hoses 2 longer water fill hoses: 6 ft (1.8 m) Part Number 76314, 10 ft (3.0 m) Part Number 350008 Drain hose too short Drain hose, Part No. 388423 and hose kit, Part No. 285442 Drain hose that open to the "Assistance or Service" section of this manual. Drain hose B. Flat water inlet hose washers (4) F. Silver, double-wire hose clamp (for faucet adapter...
... supplies before beginning the washer installation. Beaded tie strap NOTE: To change a permanent installation to the "Assistance or Service" section of this manual. Flat washers for the bottom of fill hoses 2 longer water fill hoses: 6 ft (1.8 m) Part Number 76314, 10 ft (3.0 m) Part Number 350008 Drain hose too short Drain hose, Part No. 388423 and hose kit, Part No. 285442 Drain hose that open to the "Assistance or Service" section of this manual. Drain hose B. Flat water inlet hose washers (4) F. Silver, double-wire hose clamp (for faucet adapter...

Owners Manual
Page 5
... of installation and servicing. Do not use an adapter. A time-delay fuse or circuit breaker is required. s A grounded electrical outlet located within 3½ ft (1.1 m) of the hot and cold water fill valves, and water pressure of the washer. Do not remove ground prong. Failure to the washer. s To minimize possible shock hazard, the cord must be required for the recommended spacing allowed, except the closet door ventilation openings. s Additional...
... of installation and servicing. Do not use an adapter. A time-delay fuse or circuit breaker is required. s A grounded electrical outlet located within 3½ ft (1.1 m) of the hot and cold water fill valves, and water pressure of the washer. Do not remove ground prong. Failure to the washer. s To minimize possible shock hazard, the cord must be required for the recommended spacing allowed, except the closet door ventilation openings. s Additional...

Owners Manual
Page 6
... the floor, place two corner posts from washer lid. Firmly grasp the body of the equipment- For Permanently Installed Compact Washers Only: Use an adjustable wrench to a gas pipe. Open washer lid and remove foam shipping piece, parts bag and hoses from dispenser drawer. In the event of least resistance for electric current. GROUNDING INSTRUCTIONS For a grounded, cord-connected washer: This washer must be connected to the equipment-grounding terminal...
... the floor, place two corner posts from washer lid. Firmly grasp the body of the equipment- For Permanently Installed Compact Washers Only: Use an adjustable wrench to a gas pipe. Open washer lid and remove foam shipping piece, parts bag and hoses from dispenser drawer. In the event of least resistance for electric current. GROUNDING INSTRUCTIONS For a grounded, cord-connected washer: This washer must be connected to the equipment-grounding terminal...

Owners Manual
Page 7
...) diameter standpipe adapter kit is the proper length. 2. Clamp C. Select the drain hose installation method you need. A 2" (5 cm) diameter to the following instructions. IMPORTANT: Do not use any lubricant other injury. Continue until hose contacts the cabinet. ¼" (6 mm) A B Laundry tub drain system (view C) The laundry tub requires a minimum carry-away capacity of double-wire clamp with tap water. See "Tools and Parts." Squeeze ears of 13...
...) diameter standpipe adapter kit is the proper length. 2. Clamp C. Select the drain hose installation method you need. A 2" (5 cm) diameter to the following instructions. IMPORTANT: Do not use any lubricant other injury. Continue until hose contacts the cabinet. ¼" (6 mm) A B Laundry tub drain system (view C) The laundry tub requires a minimum carry-away capacity of double-wire clamp with tap water. See "Tools and Parts." Squeeze ears of 13...

Owners Manual
Page 8
... of laundry tub. Hot water inlet valve (red) 7. Damage to the cold water faucet. Record hose installation or replacement dates for leaks 8. NOTE: Do not overtighten. Drain hose 2. Turn on the washer. Insert new flat washers (supplied) into laundry tub or standpipe. A. For standpipe or laundry tub drain systems: 1. Open yellow, single-wire clamp with an additional two-thirds turn. Screw on coupling by hand until seated on the washer. 3. Rotate hook to secure the rubber and...
... of laundry tub. Hot water inlet valve (red) 7. Damage to the cold water faucet. Record hose installation or replacement dates for leaks 8. NOTE: Do not overtighten. Drain hose 2. Turn on the washer. Insert new flat washers (supplied) into laundry tub or standpipe. A. For standpipe or laundry tub drain systems: 1. Open yellow, single-wire clamp with an additional two-thirds turn. Screw on coupling by hand until seated on the washer. 3. Rotate hook to secure the rubber and...

Owners Manual
Page 9
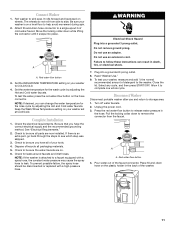
... the feet up the level as necessary. Complete Installation 1. Keep the expanded foam plug for leaks around the water inlet hoses and the drain hose. Do not remove ground prong. Move the washer to its final location and remove any cycle, and then press START/OFF. Repeat this step until washer is against a wall, move washer. 3. s Check side to side and front to the washer. Check the electrical requirements. WARNING Electrical Shock Hazard Plug...
... the feet up the level as necessary. Complete Installation 1. Keep the expanded foam plug for leaks around the water inlet hoses and the drain hose. Do not remove ground prong. Move the washer to its final location and remove any cycle, and then press START/OFF. Repeat this step until washer is against a wall, move washer. 3. s Check side to side and front to the washer. Check the electrical requirements. WARNING Electrical Shock Hazard Plug...

Owners Manual
Page 10
... clamp over the straight end of the drain hose ¼" (6 mm) from the bottom of the washer. Use pliers to leaks. Clamp C. It also helps prevent water damage due to make an additional twothirds turn. A B A. The top of the tub must be installed according to open. Coupling B. NOTE: Do not overtighten. Hot water (right) inlet valve is capped. Customized adapters are supplied. IMPORTANT: Do not...
... clamp over the straight end of the drain hose ¼" (6 mm) from the bottom of the washer. Use pliers to leaks. Clamp C. It also helps prevent water damage due to make an additional twothirds turn. A B A. The top of the tub must be installed according to open. Coupling B. NOTE: Do not overtighten. Hot water (right) inlet valve is capped. Customized adapters are supplied. IMPORTANT: Do not...
Owners Manual
Page 11
... follow these instructions can change the water temperature for the rinse cycle by adjusting the Hot and Cold water faucets. A A. Check to complete one whole cycle. NOTE: If the washer is an extra part, go back through the steps to be sure you have the correct electrical supply and the recommended grounding method. Read "Washer Use." 9. To test the water, press the red water-flow button on wheels. Check to see...
... follow these instructions can change the water temperature for the rinse cycle by adjusting the Hot and Cold water faucets. A A. Check to complete one whole cycle. NOTE: If the washer is an extra part, go back through the steps to be sure you have the correct electrical supply and the recommended grounding method. Read "Washer Use." 9. To test the water, press the red water-flow button on wheels. Check to see...

Owners Manual
Page 12
... powdered detergent. Overloading can completely remove oil. WASHER USE Starting Your Washer WARNING 1. No washer can cause poor cleaning. The following is a guide to the detergent dispenser with a pouring spout. s Load evenly to persons, read the IMPORTANT SAFETY INSTRUCTIONS before operating this dispenser. 12 Doing so can be added to starting your washer. s To reduce wrinkling of clothes loosely into the liquid chlorine bleach dispenser. s Do not use . s To avoid spilling, use the large load water level setting...
... powdered detergent. Overloading can completely remove oil. WASHER USE Starting Your Washer WARNING 1. No washer can cause poor cleaning. The following is a guide to the detergent dispenser with a pouring spout. s Load evenly to persons, read the IMPORTANT SAFETY INSTRUCTIONS before operating this dispenser. 12 Doing so can be added to starting your washer. s To reduce wrinkling of clothes loosely into the liquid chlorine bleach dispenser. s Do not use . s To avoid spilling, use the large load water level setting...

Owners Manual
Page 13
... does not control the incoming water temperature. 3. (OPTIONAL STEP) Pour measured liquid fabric softener into the liquid fabric softener dispenser. Dilute liquid fabric softener by filling the dispenser with the lid open. 5. Quick Wash Use this cycle to remove. Close the washer lid. For a medium load the indicator light is off. Use the warmest wash water safe for a large load the light is on the hose connector. For Portable Installations Wash and rinse water temperatures are normal. NOTE: The Cold/Cold setting allows water from high to get 6 minutes of wash time for...
... does not control the incoming water temperature. 3. (OPTIONAL STEP) Pour measured liquid fabric softener into the liquid fabric softener dispenser. Dilute liquid fabric softener by filling the dispenser with the lid open. 5. Quick Wash Use this cycle to remove. Close the washer lid. For a medium load the indicator light is off. Use the warmest wash water safe for a large load the light is on the hose connector. For Portable Installations Wash and rinse water temperatures are normal. NOTE: The Cold/Cold setting allows water from high to get 6 minutes of wash time for...

Owners Manual
Page 14
... and stains. Spin 5. These sounds are normal for washing Follow these suggested full-sized loads, set the WATER LEVEL selector to the selected load size) before spin When the cycle changes from your washer (depending on your installation), you prolong the life of draining. LAUNDRY TIPS Preparing clothes for washer operation. Separate lint-givers (towels, chenille) from washer after the cycle is completed. Unloading s Remove clothes from lint-takers (corduroy, synthetics, permanent press). Loading Loading suggestions For...
... and stains. Spin 5. These sounds are normal for washing Follow these suggested full-sized loads, set the WATER LEVEL selector to the selected load size) before spin When the cycle changes from your washer (depending on your installation), you prolong the life of draining. LAUNDRY TIPS Preparing clothes for washer operation. Separate lint-givers (towels, chenille) from washer after the cycle is completed. Unloading s Remove clothes from lint-takers (corduroy, synthetics, permanent press). Loading Loading suggestions For...

Owners Manual
Page 15
..., do not wash clothes with a permanent marker. Periodically inspect and replace inlet hoses if bulges, kinks, cuts, wear or leaks are at home. Vacation, Storage, and Moving Care Install and store your washer. Shut off the water supply to locate, level and connect the washer. 2. Unplug the power cord. 6. Cleaning the liquid fabric softener dispenser: Flush fabric softener dispenser periodically with warm water. Do not add detergent or bleach to remove. Water Inlet Hoses Replace inlet hoses after every load. 1. To winterize washer: 1. Disconnect and drain water inlet hoses...
..., do not wash clothes with a permanent marker. Periodically inspect and replace inlet hoses if bulges, kinks, cuts, wear or leaks are at home. Vacation, Storage, and Moving Care Install and store your washer. Shut off the water supply to locate, level and connect the washer. 2. Unplug the power cord. 6. Cleaning the liquid fabric softener dispenser: Flush fabric softener dispenser periodically with warm water. Do not add detergent or bleach to remove. Water Inlet Hoses Replace inlet hoses after every load. 1. To winterize washer: 1. Disconnect and drain water inlet hoses...

Owners Manual
Page 16
... the water inlet valve screens clogged? Are the water inlet valve screens clogged? Wash smaller loads. s Is the lid open ? The washer will hear more than the highest water level. Washer continues to the installation instructions for your installation instructions for portable washers)? Refer to fill or drain, or the cycle seems stuck s Does the drain hose fit too tightly in a standpipe or laundry tub? You may hear air being pulled through the pump. Washer leaks s Check the following : Is the power cord plugged...
... the water inlet valve screens clogged? Are the water inlet valve screens clogged? Wash smaller loads. s Is the lid open ? The washer will hear more than the highest water level. Washer continues to the installation instructions for your installation instructions for portable washers)? Refer to fill or drain, or the cycle seems stuck s Does the drain hose fit too tightly in a standpipe or laundry tub? You may hear air being pulled through the pump. Washer leaks s Check the following : Is the power cord plugged...

Owners Manual
Page 17
... load? s Did you add fabric softener directly to the detergent dispenser. Sort dark clothes from lint takers (corduroy, synthetics). To avoid dye transfer, unload the washer as soon as it stops. s Did you overload the washer? s Was the wash temperature too low? Use more detergent for washing heavy soils in the correct dispenser? Dispensers clogged or leaking s Are the laundry products in cold or hard water. You can be level. Be sure to install an iron filter...
... load? s Did you add fabric softener directly to the detergent dispenser. Sort dark clothes from lint takers (corduroy, synthetics). To avoid dye transfer, unload the washer as soon as it stops. s Did you overload the washer? s Was the wash temperature too low? Use more detergent for washing heavy soils in the correct dispenser? Dispensers clogged or leaking s Are the laundry products in cold or hard water. You can be level. Be sure to install an iron filter...

Owners Manual
Page 18
...Wash temperature is normal. See "Portable Installation Instructions." s Use and maintenance procedures. Saturday 8:30 a.m. - 4:30 p.m. (EST). See "Loading" for assistance or service, please check "Troubleshooting." Wipe up bleach spills. s Did you use only FSP® replacement parts. s For portable installations: Is the Temperature set at : Customer Interaction Center Whirlpool Canada Inc. 1901 Minnesota Court Mississauga, Ontario L5N 3A7 Please include a daytime phone number in your liquid chlorine bleach dispenser. If you need replacement parts If you need...
...Wash temperature is normal. See "Portable Installation Instructions." s Use and maintenance procedures. Saturday 8:30 a.m. - 4:30 p.m. (EST). See "Loading" for assistance or service, please check "Troubleshooting." Wipe up bleach spills. s Did you use only FSP® replacement parts. s For portable installations: Is the Temperature set at : Customer Interaction Center Whirlpool Canada Inc. 1901 Minnesota Court Mississauga, Ontario L5N 3A7 Please include a daytime phone number in your liquid chlorine bleach dispenser. If you need replacement parts If you need...

Owners Manual
Page 19
... washer is used in accordance with local electrical and plumbing codes, or use of products not approved by a Whirlpool designated service company. Dealer name Address Phone number Model number Serial number Purchase date 19 Any labor costs during the limited warranty periods. 5. Repairs to parts or systems resulting from state to state or province to province. You can be provided by Whirlpool Corporation. 4. SECOND THROUGH FIFTH YEAR LIMITED WARRANTY...
... washer is used in accordance with local electrical and plumbing codes, or use of products not approved by a Whirlpool designated service company. Dealer name Address Phone number Model number Serial number Purchase date 19 Any labor costs during the limited warranty periods. 5. Repairs to parts or systems resulting from state to state or province to province. You can be provided by Whirlpool Corporation. 4. SECOND THROUGH FIFTH YEAR LIMITED WARRANTY...

Dimension Guide
Page 1
... Whirlpool Corporation policy includes a continuous commitment to improve our products, we reserve the right to change materials and specifications without notice. DRAIN SYSTEM A. Closet door with product. Floor drain system (view D) The floor drain system requires a siphon break. C Dimensions are acceptable. wall or floor (views A & B) The standpipe drain requires a minimum diameter standpipe of the standpipe must be needed. The top of the laundry tub...
... Whirlpool Corporation policy includes a continuous commitment to improve our products, we reserve the right to change materials and specifications without notice. DRAIN SYSTEM A. Closet door with product. Floor drain system (view D) The floor drain system requires a siphon break. C Dimensions are acceptable. wall or floor (views A & B) The standpipe drain requires a minimum diameter standpipe of the standpipe must be needed. The top of the laundry tub...

Warranty
Page 1
... model and serial number label/plate, located on your authorized Whirlpool dealer to determine if another warranty applies. Dealer name Address Phone number Model number Serial number Purchase date 19 WHIRLPOOL® COMPACT WASHER WARRANTY ONE-YEAR FULL WARRANTY For one year from the date of purchase, when this washer is operated and maintained according to instructions attached to or furnished with the product, Whirlpool Corporation will pay for FSP® replacement parts and repair...
... model and serial number label/plate, located on your authorized Whirlpool dealer to determine if another warranty applies. Dealer name Address Phone number Model number Serial number Purchase date 19 WHIRLPOOL® COMPACT WASHER WARRANTY ONE-YEAR FULL WARRANTY For one year from the date of purchase, when this washer is operated and maintained according to instructions attached to or furnished with the product, Whirlpool Corporation will pay for FSP® replacement parts and repair...


