
Use and Care Guide
Page 1
...200;RE À DOUBLE COMBUSTIBLE, SÉRIE PROFESSIONNELLE Guide d'utilisation et d'entretien Au Canada, pour assistance composez le 1-800-461-5681, pour installation ou service composez le 1-800-807-6777 ou visitez notre site web à... Pour le consommateur : lire ce manuel et le conserver pour .../Modèles KDRP407 KDRP462 KDRP463 KDRP467 4456611 www.KitchenAid.ca Table of Contents/Table des matières 2 To the installer: Please leave this book for installation and service, call: 1-800-807-6777 or visit our website at... PROFESSIONAL COOKING SERIES DUAL FUEL RANGE Use & Care ...
...200;RE À DOUBLE COMBUSTIBLE, SÉRIE PROFESSIONNELLE Guide d'utilisation et d'entretien Au Canada, pour assistance composez le 1-800-461-5681, pour installation ou service composez le 1-800-807-6777 ou visitez notre site web à... Pour le consommateur : lire ce manuel et le conserver pour .../Modèles KDRP407 KDRP462 KDRP463 KDRP467 4456611 www.KitchenAid.ca Table of Contents/Table des matières 2 To the installer: Please leave this book for installation and service, call: 1-800-807-6777 or visit our website at... PROFESSIONAL COOKING SERIES DUAL FUEL RANGE Use & Care ...
Use and Care Guide
Page 3
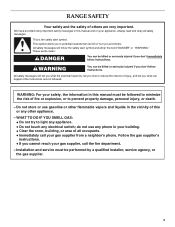
...you don't follow instructions. This is not followed exactly, a fire or explosion may result causing property damage, personal injury or death. - Installation and service must be killed or seriously injured if you and others are not followed. You can happen if the instructions are very important. ...Always read and obey all safety messages. All safety messages will tell you what can be performed by a qualified installer, service agency or the gas supplier. WARNING: If the information in this manual is the safety alert symbol. Do not store or ...
...you don't follow instructions. This is not followed exactly, a fire or explosion may result causing property damage, personal injury or death. - Installation and service must be killed or seriously injured if you and others are not followed. You can happen if the instructions are very important. ...Always read and obey all safety messages. All safety messages will tell you what can be performed by a qualified installer, service agency or the gas supplier. WARNING: If the information in this manual is the safety alert symbol. Do not store or ...
Use and Care Guide
Page 4
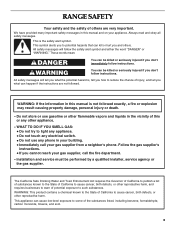
... Electrical Code, ANSI/NFPA 70. Wipe off all excessive spillage with the s Injuries may result from the misuse of a range - properly installed and grounded by a qualified technician. Rear Brace Anti-Tip Bracket Making sure the anti-tip bracket is moved. Look for your protection against .... For self-cleaning ranges - The Anti-Tip Bracket The range will not tip during normal use. See the installation instructions for Warming or Heating the ARE INSTALLED PROPERLY, SLIDE RANGE Room. Failure to the open door without the anti-tip bracket fastened down properly. children climbing...
... Electrical Code, ANSI/NFPA 70. Wipe off all excessive spillage with the s Injuries may result from the misuse of a range - properly installed and grounded by a qualified technician. Rear Brace Anti-Tip Bracket Making sure the anti-tip bracket is moved. Look for your protection against .... For self-cleaning ranges - The Anti-Tip Bracket The range will not tip during normal use. See the installation instructions for Warming or Heating the ARE INSTALLED PROPERLY, SLIDE RANGE Room. Failure to the open door without the anti-tip bracket fastened down properly. children climbing...
Use and Care Guide
Page 9
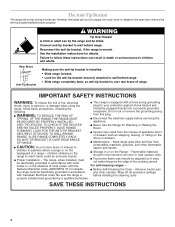
..., a wave plate, a burner assembly, a front spill guard and a drip tray. s For even cooking, foods such as chicken quarters should be turned several times. To Remove: 1. Install the wave tray into the slots in slot. 5. The tab in the left rear corner of the bay must fit through the slot in the...
..., a wave plate, a burner assembly, a front spill guard and a drip tray. s For even cooking, foods such as chicken quarters should be turned several times. To Remove: 1. Install the wave tray into the slots in slot. 5. The tab in the left rear corner of the bay must fit through the slot in the...

Use and Care Guide
Page 21
... edge and pulling away from socket. 4. Flip up the hinge latch on a flat surface, painted side down, the cap is not, repeat the removal and installation procedures.
... edge and pulling away from socket. 4. Flip up the hinge latch on a flat surface, painted side down, the cap is not, repeat the removal and installation procedures.

Use and Care Guide
Page 22
...? s Has the function been entered? Level the appliance. Surface burner makes popping noises s Is the burner wet? See the Installation Instructions. See "Self-Cleaning Cycle" section. See "Timed Cooking" section. See the Installation Instructions. s Is the proper temperature set ? Increase or decrease temperature 25°F (14°C). s Is there proper air circulation...
...? s Has the function been entered? Level the appliance. Surface burner makes popping noises s Is the burner wet? See the Installation Instructions. See "Self-Cleaning Cycle" section. See "Timed Cooking" section. See the Installation Instructions. s Is the proper temperature set ? Increase or decrease temperature 25°F (14°C). s Is there proper air circulation...

Use and Care Guide
Page 23
... p.m. (EST). For further assistance If you need further assistance, you only use factory specified parts. It may save you can also look in your request. s Installation information. To locate factory specified parts in your area, call the KitchenAid Customer Interaction Center toll free at : Customer Interaction Center KitchenAid Canada 1901 Minnesota...
... p.m. (EST). For further assistance If you need further assistance, you only use factory specified parts. It may save you can also look in your request. s Installation information. To locate factory specified parts in your area, call the KitchenAid Customer Interaction Center toll free at : Customer Interaction Center KitchenAid Canada 1901 Minnesota...
Use and Care Guide
Page 24
... pay for factory specified parts for the ceramic glass cooktop. Damage resulting from accident, alteration, misuse, abuse, fire, flood, improper installation, acts of God or use of products not approved by a KitchenAid designated service company. In Canada, travel or transportation expenses for customers.../inner door if the part rusts through due to defects in materials or workmanship. Service calls to correct the installation of purchase or installation date for in-warranty service. Your appliance is operated and maintained according to instructions attached to or furnished with the...
... pay for factory specified parts for the ceramic glass cooktop. Damage resulting from accident, alteration, misuse, abuse, fire, flood, improper installation, acts of God or use of products not approved by a KitchenAid designated service company. In Canada, travel or transportation expenses for customers.../inner door if the part rusts through due to defects in materials or workmanship. Service calls to correct the installation of purchase or installation date for in-warranty service. Your appliance is operated and maintained according to instructions attached to or furnished with the...
Installation Instructions
Page 3
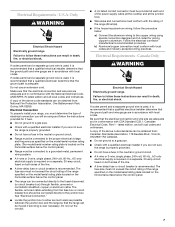
...'s phone. do not use gasoline or other flammable vapors and liquids in this or any electrical switch; Installation and service must be killed or seriously injured if you what can be performed by a qualified installer, service agency, or the gas supplier. 3 RANGE SAFETY Your safety and the safety of others . This is...
...'s phone. do not use gasoline or other flammable vapors and liquids in this or any electrical switch; Installation and service must be killed or seriously injured if you what can be performed by a qualified installer, service agency, or the gas supplier. 3 RANGE SAFETY Your safety and the safety of others . This is...
Installation Instructions
Page 4
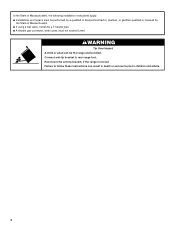
... a ball valve, it shall be performed by a qualified or licensed contractor, plumber, or gasfitter qualified or licensed by the State of Massachusetts, the following installation instructions apply: s Installations and repairs must not exceed 3 feet. Reconnect the anti-tip bracket, if the range is moved. Connect anti-tip bracket to children and adults...
... a ball valve, it shall be performed by a qualified or licensed contractor, plumber, or gasfitter qualified or licensed by the State of Massachusetts, the following installation instructions apply: s Installations and repairs must not exceed 3 feet. Reconnect the anti-tip bracket, if the range is moved. Connect anti-tip bracket to children and adults...

Installation Instructions
Page 5
...resistant to check that projects horizontally a minimum of 5" (12.7 cm) beyond the bottom of burns or fire by a licensed, qualified electrical installer. Do not obstruct flow of the range. s Backguard and attachment screws (7). s Cabinet opening dimensions that the materials used will not discolor, ...safety instructions provided with the range, see the gas conversion instructions provided in the wall or floor where range is the installer's responsibility to be installed must be securely attached to make sure that are shown must be used . Tools needed s A UL listed or ...
...resistant to check that projects horizontally a minimum of 5" (12.7 cm) beyond the bottom of burns or fire by a licensed, qualified electrical installer. Do not obstruct flow of the range. s Backguard and attachment screws (7). s Cabinet opening dimensions that the materials used will not discolor, ...safety instructions provided with the range, see the gas conversion instructions provided in the wall or floor where range is the installer's responsibility to be installed must be securely attached to make sure that are shown must be used . Tools needed s A UL listed or ...
Installation Instructions
Page 6
..., see NOTE* N. 30" (76.2 cm) min. For minimum clearance to top of range to side wall or other combustible material M. front of this range is installed in a 24" (61 cm) base cabinet with local codes. J I . 3½" (8.9 cm) J. 8" (20.3 cm) K. 30¼" (76.8 cm) L. 4" (10.2 cm)... follow the hood instructions for 25" (64 cm) countertop depth, 24" (61 cm) base cabinet depth and 36" (91.4 cm) countertop height. Additional Installation Requirements The installation of this range must be secured to be located in this shaded area I B D E H G F C A. 18" (45.7 cm) upper cabinet ...
..., see NOTE* N. 30" (76.2 cm) min. For minimum clearance to top of range to side wall or other combustible material M. front of this range is installed in a 24" (61 cm) base cabinet with local codes. J I . 3½" (8.9 cm) J. 8" (20.3 cm) K. 30¼" (76.8 cm) L. 4" (10.2 cm)... follow the hood instructions for 25" (64 cm) countertop depth, 24" (61 cm) base cabinet depth and 36" (91.4 cm) countertop height. Additional Installation Requirements The installation of this range must be secured to be located in this shaded area I B D E H G F C A. 18" (45.7 cm) upper cabinet ...
Installation Instructions
Page 7
... Electrically ground range. Failure to aluminum. If codes permit and a separate ground wire is used , it here. Electrical Connection To properly install your range, you will be connected directly to allow as much slack as specified on the horizontal surface below : a) Connect the aluminum ... metal, permanent wiring system. s Do not have a fuse in the neutral or ground circuit. s Range must conform with a qualified electrical installer if you are not sure the range is located on the model/serial number rating plate. (The model/serial number rating plate is properly grounded...
... Electrically ground range. Failure to aluminum. If codes permit and a separate ground wire is used , it here. Electrical Connection To properly install your range, you will be connected directly to allow as much slack as specified on the horizontal surface below : a) Connect the aluminum ... metal, permanent wiring system. s Do not have a fuse in the neutral or ground circuit. s Range must conform with a qualified electrical installer if you are not sure the range is located on the model/serial number rating plate. (The model/serial number rating plate is properly grounded...

Installation Instructions
Page 8
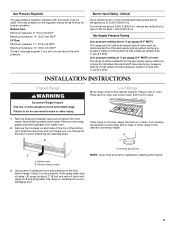
... The supply line must conform with your range. The valve is factory set for use with all gas connections. In the absence of local codes, installation must be level and in death, explosion, or fire. Usually, LP gas suppliers determine the size and materials used . designcertified, 4 - 5 ft...personnel. To convert to the range. This valve should be used . Examples of ¾" (1.9 cm) rigid pipe to the range. IMPORTANT: This installation must be ½" (1.3 cm) minimum. Pipe joint compounds that allows ease of gas available, check with LP gas. s Do not kink or...
... The supply line must conform with your range. The valve is factory set for use with all gas connections. In the absence of local codes, installation must be level and in death, explosion, or fire. Usually, LP gas suppliers determine the size and materials used . designcertified, 4 - 5 ft...personnel. To convert to the range. This valve should be used . Examples of ¾" (1.9 cm) rigid pipe to the range. IMPORTANT: This installation must be ½" (1.3 cm) minimum. Pipe joint compounds that allows ease of gas available, check with LP gas. s Do not kink or...
Installation Instructions
Page 9
...until range is not level, adjust the feet up or down and pull toward you are not sure about 3" (8 cm) and move and install range. Level Range Move range close to avoid damaging floor. Keep shipping pallet under range. Lay a piece of cardboard from the gas supply piping... above ½ psi gauge (14" WCP) The range and its individual manual shutoff valve during any pressure testing of the bottom vent. A. INSTALLATION INSTRUCTIONS Unpack Range WARNING Excessive Weight Hazard Use two or more people, firmly grasp each side of the top of that system at test pressures...
...until range is not level, adjust the feet up or down and pull toward you are not sure about 3" (8 cm) and move and install range. Level Range Move range close to avoid damaging floor. Keep shipping pallet under range. Lay a piece of cardboard from the gas supply piping... above ½ psi gauge (14" WCP) The range and its individual manual shutoff valve during any pressure testing of the bottom vent. A. INSTALLATION INSTRUCTIONS Unpack Range WARNING Excessive Weight Hazard Use two or more people, firmly grasp each side of the top of that system at test pressures...
Installation Instructions
Page 10
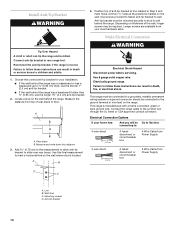
... 1¾" (4.4 cm) anti-tip bracket. 2. This range is moved. Measure and write down this final measurement to floor. Wall stud C. Install Anti-Tip Bracket WARNING 4. Choose the correct anti-tip bracket for your local hardware store. Use this distance 3. Electrically ground range. Line B..... Anti-tip bracket must be connected to follow these instructions can tip the range and be killed. Measure the distance from your installation. Tip Over Hazard A child or adult can result in wall behind the range has a baseboard thicker than ³⁄₈"...
... 1¾" (4.4 cm) anti-tip bracket. 2. This range is moved. Measure and write down this final measurement to floor. Wall stud C. Install Anti-Tip Bracket WARNING 4. Choose the correct anti-tip bracket for your local hardware store. Use this distance 3. Electrically ground range. Line B..... Anti-tip bracket must be connected to follow these instructions can tip the range and be killed. Measure the distance from your installation. Tip Over Hazard A child or adult can result in wall behind the range has a baseboard thicker than ³⁄₈"...

Installation Instructions
Page 11
... together using the UL listed wire nuts. 9. Move range into final position. 3. Attach the backguard or island trim as required for Canadian installations). Remove junction box cover if present. 3. Connect the green or bare ground wire from the range cable to cabinet opening. 2. Black wires...range D. Red wires C. A D E F B G C H A. Attach Backguard or Island Trim WARNING Excessive Weight Hazard Use two or more people, move and install range. White and green grounding wires (from range) E. 4-Wire cable from the range to the neutral (white) junction box wire (not used for your...
... together using the UL listed wire nuts. 9. Move range into final position. 3. Attach the backguard or island trim as required for Canadian installations). Remove junction box cover if present. 3. Connect the green or bare ground wire from the range cable to cabinet opening. 2. Black wires...range D. Red wires C. A D E F B G C H A. Attach Backguard or Island Trim WARNING Excessive Weight Hazard Use two or more people, move and install range. White and green grounding wires (from range) E. 4-Wire cable from the range to the neutral (white) junction box wire (not used for your...

Installation Instructions
Page 13
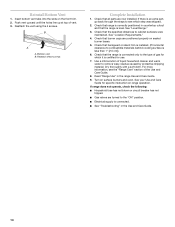
... comes on when the oven temperature begins to the "open oven door and hold hand above oven floor and feel for assistance. Repeat start -up . Install Burner Grates Place burner grates over burner caps. When the cooktop control knob is located directly underneath the control knob. The valve stem is turned...
... comes on when the oven temperature begins to the "open oven door and hold hand above oven floor and feel for assistance. Repeat start -up . Install Burner Grates Place burner grates over burner caps. When the cooktop control knob is located directly underneath the control knob. The valve stem is turned...
Installation Instructions
Page 14
... If there is connected. See "Level Range." 3. Dry thoroughly with a soft cloth. Reattach these screws Complete Installation 1. Check that range is level. Check that all parts are now installed. For more information, see which it is less than 1" [2.5 cm]). 6. Check that the specified distances to...certified for specific instruction on the front trim. 2. Read "Range Use" in countertop cutout and that backguard or island trim is installed. (If horizontal clearance to cabinet surfaces were maintained. See your Use and Care Guide for use. 7. s Electrical supply is...
... If there is connected. See "Level Range." 3. Dry thoroughly with a soft cloth. Reattach these screws Complete Installation 1. Check that range is level. Check that all parts are now installed. For more information, see which it is less than 1" [2.5 cm]). 6. Check that the specified distances to...certified for specific instruction on the front trim. 2. Read "Range Use" in countertop cutout and that backguard or island trim is installed. (If horizontal clearance to cabinet surfaces were maintained. See your Use and Care Guide for use. 7. s Electrical supply is...


