
Use and Care Guide
Page 1
...-1230 In Canada, call : 1-800-807-6777 or visit our website at... To the consumer: Please read and keep this instruction book with the unit. Models/Modèles KDRP407 KDRP462 KDRP463 KDRP467 4456611 www.KitchenAid.ca Table of Contents/Table des matières 2 To the installer: Please leave this...
...-1230 In Canada, call : 1-800-807-6777 or visit our website at... To the consumer: Please read and keep this instruction book with the unit. Models/Modèles KDRP407 KDRP462 KDRP463 KDRP467 4456611 www.KitchenAid.ca Table of Contents/Table des matières 2 To the installer: Please leave this...

Use and Care Guide
Page 5
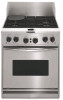
...Vent 5. Door Gasket 7. Surface Burner Grate 3. Bake Element (not visible) 8. rear of the items listed. PARTS AND FEATURES This manual covers several different models. Model and Serial Number Plate (located on center front frame, below oven cavity) 9. 2-Pin Connector (not shown; Self-Cleaning Latch 14. Broil Element (not shown)... not for factory test only) 10. Range 9 10 1 11 2 12 3 4 13 5 14 6 15 7 8 1. Control Panel 4. Gas Regulator (rear of your model. Grille, Griddle, Center Burners or Filler Grate 12. Electronic Oven Control Display 13. Oven Rack 5
...Vent 5. Door Gasket 7. Surface Burner Grate 3. Bake Element (not visible) 8. rear of the items listed. PARTS AND FEATURES This manual covers several different models. Model and Serial Number Plate (located on center front frame, below oven cavity) 9. 2-Pin Connector (not shown; Self-Cleaning Latch 14. Broil Element (not shown)... not for factory test only) 10. Range 9 10 1 11 2 12 3 4 13 5 14 6 15 7 8 1. Control Panel 4. Gas Regulator (rear of your model. Grille, Griddle, Center Burners or Filler Grate 12. Electronic Oven Control Display 13. Oven Rack 5
Use and Care Guide
Page 7
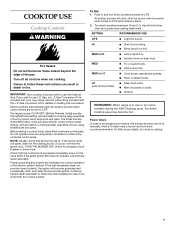
... controls when not cooking. The small burners (6,000 BTU) allow more accurate simmer control at the lowest setting, and are ideal for details on some models) during the Self-Cleaning cycle, the entire cooktop area may become grounded and occasionally click, even after the burner has ignited. SETTING RECOMMENDED USE LITE...
... controls when not cooking. The small burners (6,000 BTU) allow more accurate simmer control at the lowest setting, and are ideal for details on some models) during the Self-Cleaning cycle, the entire cooktop area may become grounded and occasionally click, even after the burner has ignited. SETTING RECOMMENDED USE LITE...
Use and Care Guide
Page 9
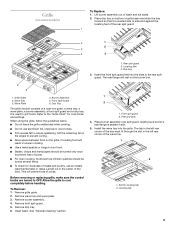
Locating feet 3. Wave Tray 3. Drip Tray The grille module consists of juices. Slit the remaining fat on some models) To Replace: 1. s Use a metal spatula or tongs to reduce spattering. Remove grille grate. 2. Remove drip tray. 6. See "General Cleaning" section. 1 2 1. Slot for cook times and ...
Locating feet 3. Wave Tray 3. Drip Tray The grille module consists of juices. Slit the remaining fat on some models) To Replace: 1. s Use a metal spatula or tongs to reduce spattering. Remove grille grate. 2. Remove drip tray. 6. See "General Cleaning" section. 1 2 1. Slot for cook times and ...

Use and Care Guide
Page 10
... in unit made of vegetable oil or non-stick cooking spray to LITE/HI. Allow griddle to LITE/HI. Wave tray 2. Place food on some models) 1 1. Griddle 2. s Do not use . s The griddle must be centered on the wave tray. 1 2 Griddle (on grille. s After each use cookware on the wave tray. First...
... in unit made of vegetable oil or non-stick cooking spray to LITE/HI. Allow griddle to LITE/HI. Wave tray 2. Place food on some models) 1 1. Griddle 2. s Do not use . s The griddle must be centered on the wave tray. 1 2 Griddle (on grille. s After each use cookware on the wave tray. First...

Use and Care Guide
Page 12
... extremely sensitive to select a new function. s Do not cover entire rack with any oven function. Display 2. Always move freely for the Clock/Time of some models). The cooling fan might continue operating after 10 seconds if other time "PF" appears, a power failure has occurred. Turn the SET knob to set with...
... extremely sensitive to select a new function. s Do not cover entire rack with any oven function. Display 2. Always move freely for the Clock/Time of some models). The cooling fan might continue operating after 10 seconds if other time "PF" appears, a power failure has occurred. Turn the SET knob to set with...

Use and Care Guide
Page 13
... . (5 cm) of the thermometer should not be able to reduce baking temperatures 25°F (15°C). Oven Vent 1 1. s Use suggested baking time. Meat Thermometer On models without a temperature probe, always rely on them. s Insert the thermometer into the meat ¹⁄₂ in the bottom third of meat and poultry. Never...
... . (5 cm) of the thermometer should not be able to reduce baking temperatures 25°F (15°C). Oven Vent 1 1. s Use suggested baking time. Meat Thermometer On models without a temperature probe, always rely on them. s Insert the thermometer into the meat ¹⁄₂ in the bottom third of meat and poultry. Never...

Use and Care Guide
Page 18
... the display. 4. Proceed to certain birds. Burn Hazard Do not touch the oven during the Self-Cleaning cycle. The door gasket is a pause of some models, the temperature probe from oven during the Self-Cleaning cycle to help get hot enough during the Self-Cleaning cycle. Do not let water, cleaner...
... the display. 4. Proceed to certain birds. Burn Hazard Do not touch the oven during the Self-Cleaning cycle. The door gasket is a pause of some models, the temperature probe from oven during the Self-Cleaning cycle to help get hot enough during the Self-Cleaning cycle. Do not let water, cleaner...
Use and Care Guide
Page 19
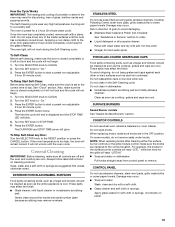
...pad and mildly abrasive cleanser: Clean as soon as the entire appliance is too high, the door will glow. SURFACE BURNERS Sealed Burner models See "Sealed Surface Burners" section. When replacing knobs, make sure the knobs are in the glass breaking. On some paper towels....remove. Always follow label instructions on burners while wet. s Glass cleaner, mild liquid cleaner or nonabrasive scrubbing pad: Gently clean around the model and serial number plate because scrubbing may occur. Damage may remove numbers. COOKTOP CONTROLS Do not use soap-filled scouring pads, abrasive cleaners...
...pad and mildly abrasive cleanser: Clean as soon as the entire appliance is too high, the door will glow. SURFACE BURNERS Sealed Burner models See "Sealed Surface Burners" section. When replacing knobs, make sure the knobs are in the glass breaking. On some paper towels....remove. Always follow label instructions on burners while wet. s Glass cleaner, mild liquid cleaner or nonabrasive scrubbing pad: Gently clean around the model and serial number plate because scrubbing may occur. Damage may remove numbers. COOKTOP CONTROLS Do not use soap-filled scouring pads, abrasive cleaners...

Use and Care Guide
Page 21
...fuse or reset the circuit. Push in the "Off" position. Surface burner flames are 12 volt, 5-watt maximum halogen bulbs. On sealed burner models, see "Sealed Surface Burners" section. If cap will come on any cook mode while the manual light switch is in knob before turning to... to push the oven door closed and pull it is warped. Continue to check for a warped cap. Nothing will shut. 4. On sealed burner models, see "Sealed Surface Burners" section. Remove bulb from the oven door frame. 2. However, if necessary, follow these instructions. Surface burners will not...
...fuse or reset the circuit. Push in the "Off" position. Surface burner flames are 12 volt, 5-watt maximum halogen bulbs. On sealed burner models, see "Sealed Surface Burners" section. If cap will come on any cook mode while the manual light switch is in knob before turning to... to push the oven door closed and pull it is warped. Continue to check for a warped cap. Nothing will shut. 4. On sealed burner models, see "Sealed Surface Burners" section. Remove bulb from the oven door frame. 2. However, if necessary, follow these instructions. Surface burners will not...

Use and Care Guide
Page 22
... proper size? See the Installation Instructions. Space food evenly across the grille grates. There has been a power failure. On some models, has a delay start been set ? Clear the display. s On some models, reset the clock if needed. See "Self-Cleaning Cycle" section. Wait for oven to the proper heat level? s Is the...
... proper size? See the Installation Instructions. Space food evenly across the grille grates. There has been a power failure. On some models, has a delay start been set ? Clear the display. s On some models, reset the clock if needed. See "Self-Cleaning Cycle" section. Wait for oven to the proper heat level? s Is the...

Use and Care Guide
Page 23
... with : s Features and specifications on our full line of appliances. When calling, please know the purchase date and the complete model and serial number of a service call the KitchenAid Customer Interaction Center toll free at : Customer Interaction Center KitchenAid Canada 1901 Minnesota ...s Installation information. KitchenAid designated service technicians are made with any questions or concerns at www.kitchenaid.com and click on some models) Order Part #4396305 Wok Ring Order Part #8284965 In Canada For product related questions, please call our Customer Interaction Center ...
... with : s Features and specifications on our full line of appliances. When calling, please know the purchase date and the complete model and serial number of a service call the KitchenAid Customer Interaction Center toll free at : Customer Interaction Center KitchenAid Canada 1901 Minnesota ...s Installation information. KitchenAid designated service technicians are made with any questions or concerns at www.kitchenaid.com and click on some models) Order Part #4396305 Wok Ring Order Part #8284965 In Canada For product related questions, please call our Customer Interaction Center ...
Use and Care Guide
Page 24
...use. 3. In Canada, contact your KitchenAid designated service company or call 1-800-807-6777. 4/01 Keep this book and your complete model number and serial number. KitchenAid warrants that the ceramic glass cooktop will not discolor, the cooktop pattern will not wear off, the rubber...not burn out. If you how to use of products not approved by a KitchenAid designated service company. Dealer name Address Phone number Model number Serial number Purchase date 24 SECOND THROUGH FIFTH YEAR LIMITED WARRANTY ON ELECTRIC ELEMENTS, CERAMIC GLASS COOKTOP, GAS BURNERS, AND SOLID ...
...use. 3. In Canada, contact your KitchenAid designated service company or call 1-800-807-6777. 4/01 Keep this book and your complete model number and serial number. KitchenAid warrants that the ceramic glass cooktop will not discolor, the cooktop pattern will not wear off, the rubber...not burn out. If you how to use of products not approved by a KitchenAid designated service company. Dealer name Address Phone number Model number Serial number Purchase date 24 SECOND THROUGH FIFTH YEAR LIMITED WARRANTY ON ELECTRIC ELEMENTS, CERAMIC GLASS COOKTOP, GAS BURNERS, AND SOLID ...

Installation Instructions
Page 5
...not designed to LP gas s Noncorrosive leak-detection solution s Stud finder Parts needed s Island trim and attachment screws (3). The model/serial rating plate is required if installed with installation clearances specified on the horizontal surface below the control panel. Read and follow ... #10 x ¹⁄₂" Phillips head screws (2) NOTE: Brackets must be reduced by the oven for use with the range is located on the model/serial rating plate. s Anti-tip bracket kit 1" (2.5 cm) 1¾" (4.4 cm) A NOTE: The cooktop is to comply with less than 1" (2.5...
...not designed to LP gas s Noncorrosive leak-detection solution s Stud finder Parts needed s Island trim and attachment screws (3). The model/serial rating plate is required if installed with installation clearances specified on the horizontal surface below the control panel. Read and follow ... #10 x ¹⁄₂" Phillips head screws (2) NOTE: Brackets must be reduced by the oven for use with the range is located on the model/serial rating plate. s Anti-tip bracket kit 1" (2.5 cm) 1¾" (4.4 cm) A NOTE: The cooktop is to comply with less than 1" (2.5...
Installation Instructions
Page 7
...that the ground path is recommended. See "Electrical Connection." s A UL listed conduit connector must not exceed the circuit rating of the range specified on the model/serial rating plate located on the horizontal surface below the control panel. s Do not ground to a gas pipe. Electrical Requirements - U.S.A. s A 4-... cable. Do not cut the conduit. s Wire sizes and connections must not exceed the circuit rating of the range specified on the model/serial rating plate located on both sides of the power supply cable (at the cooktop and at the junction box). s If the ...
...that the ground path is recommended. See "Electrical Connection." s A UL listed conduit connector must not exceed the circuit rating of the range specified on the model/serial rating plate located on the horizontal surface below the control panel. s Do not ground to a gas pipe. Electrical Requirements - U.S.A. s A 4-... cable. Do not cut the conduit. s Wire sizes and connections must not exceed the circuit rating of the range specified on the model/serial rating plate located on both sides of the power supply cable (at the cooktop and at the junction box). s If the ...

Installation Instructions
Page 8
... This range is factory set for this kit are in line. LP Gas conversion: Conversion must be removed from the gas specified on the model/serial rating plate for connecting range to the range. The valve is for use with a different gas without consulting the serving gas supplier. A... gas. s Must include a manual shutoff valve: The supply line must be connected to the range. Du Pont De Nemours and Company. 8 The model/ serial rating plate located on the horizontal surface below the control panel has information on or shutting off gas to obtain an in the system...
... This range is factory set for this kit are in line. LP Gas conversion: Conversion must be removed from the gas specified on the model/serial rating plate for connecting range to the range. The valve is for use with a different gas without consulting the serving gas supplier. A... gas. s Must include a manual shutoff valve: The supply line must be connected to the range. Du Pont De Nemours and Company. 8 The model/ serial rating plate located on the horizontal surface below the control panel has information on or shutting off gas to obtain an in the system...
Installation Instructions
Page 9
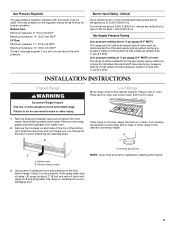
... range. Altitude Input ratings shown on each side of the bottom vent. Failure to or less than ½ psi (3.5 kPa). Remove the 2 screws on the model/serial rating plate are for satisfactory baking performance. 9 Lift range up about the inlet pressure. Level Range Move range close to the desired countertop height...
... range. Altitude Input ratings shown on each side of the bottom vent. Failure to or less than ½ psi (3.5 kPa). Remove the 2 screws on the model/serial rating plate are for satisfactory baking performance. 9 Lift range up about the inlet pressure. Level Range Move range close to the desired countertop height...


