
Use and Care Guide
Page 1
...: Please read and keep this instruction book with the unit. PROFESSIONAL COOKING SERIES DUAL FUEL RANGE Use & Care Guide For questions about features, operation/performance, parts accessories or service, call: 1-800-422-1230 In Canada, call for assistance 1-800-461-5681, for future reference. www.KitchenAid.ca Table of Contents/Table...
...: Please read and keep this instruction book with the unit. PROFESSIONAL COOKING SERIES DUAL FUEL RANGE Use & Care Guide For questions about features, operation/performance, parts accessories or service, call: 1-800-422-1230 In Canada, call for assistance 1-800-461-5681, for future reference. www.KitchenAid.ca Table of Contents/Table...

Use and Care Guide
Page 5
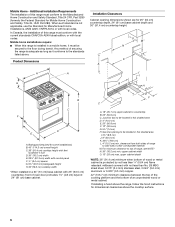
PARTS AND FEATURES This manual covers several different models. Range 9 10 1 11 2 12 3 4 13 5 14 6 15 7 8 1. Oven Vent 5. for consumer use - Electronic Oven Control Display 13. ...
PARTS AND FEATURES This manual covers several different models. Range 9 10 1 11 2 12 3 4 13 5 14 6 15 7 8 1. Oven Vent 5. for consumer use - Electronic Oven Control Display 13. ...

Use and Care Guide
Page 23
...you need further assistance, you can write to fulfill the product warranty and provide afterwarranty service, anywhere in your appliance. For parts, accessories and service in your telephone directory Yellow Pages. KitchenAid designated service technicians are trained to KitchenAid Canada with : s...toll free at www.kitchenaid.com and click on our full line of your correspondence. 23 If you only use factory specified parts. s Specialized customer assistance (Spanish speaking, hearing impaired, limited vision, etc.). ASSISTANCE OR SERVICE Before calling for assistance or...
...you need further assistance, you can write to fulfill the product warranty and provide afterwarranty service, anywhere in your appliance. For parts, accessories and service in your telephone directory Yellow Pages. KitchenAid designated service technicians are trained to KitchenAid Canada with : s...toll free at www.kitchenaid.com and click on our full line of your correspondence. 23 If you only use factory specified parts. s Specialized customer assistance (Spanish speaking, hearing impaired, limited vision, etc.). ASSISTANCE OR SERVICE Before calling for assistance or...
Use and Care Guide
Page 24
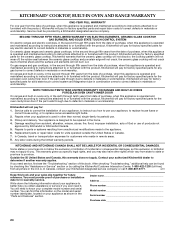
...INCIDENTAL OR CONSEQUENTIAL DAMAGES. Contact your complete model number and serial number. In Canada, travel or transportation expenses for factory specified parts and repair labor costs to correct defects in materials or workmanship. KITCHENAID® COOKTOP, BUILT-IN OVEN AND RANGE WARRANTY ...appliance is operated and maintained according to instructions attached to or furnished with the product, KitchenAid will pay for factory specified parts for the ceramic glass cooktop. Write down the following information about your appliance, to replace house fuses or correct house wiring...
...INCIDENTAL OR CONSEQUENTIAL DAMAGES. Contact your complete model number and serial number. In Canada, travel or transportation expenses for factory specified parts and repair labor costs to correct defects in materials or workmanship. KITCHENAID® COOKTOP, BUILT-IN OVEN AND RANGE WARRANTY ...appliance is operated and maintained according to instructions attached to or furnished with the product, KitchenAid will pay for factory specified parts for the ceramic glass cooktop. Write down the following information about your appliance, to replace house fuses or correct house wiring...

Installation Instructions
Page 5
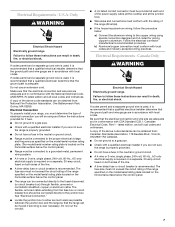
...Pipe-joint compound resistant to wall stud. All electrical connections should be securely attached to LP gas s Noncorrosive leak-detection solution s Stud finder Parts needed s Island trim and attachment screws (3). Anti-tip bracket B. #10 x ¹⁄₂" Phillips head screws (2) NOTE: Brackets must...natural gas. Check local codes and consult gas supplier. Check existing gas supply and electrical supply. Location Requirements IMPORTANT: Observe all parts are included. s It is located on the model/serial rating plate. s To eliminate the risk of burns or fire by...
...Pipe-joint compound resistant to wall stud. All electrical connections should be securely attached to LP gas s Noncorrosive leak-detection solution s Stud finder Parts needed s Island trim and attachment screws (3). Anti-tip bracket B. #10 x ¹⁄₂" Phillips head screws (2) NOTE: Brackets must...natural gas. Check local codes and consult gas supplier. Check existing gas supply and electrical supply. Location Requirements IMPORTANT: Observe all parts are included. s It is located on the model/serial rating plate. s To eliminate the risk of burns or fire by...
Installation Instructions
Page 6
... *When installed in a mobile home, it conforms to the Manufactured Home Construction and Safety Standard, Title 24 CFR, Part 3280 (formerly the Federal Standard for Mobile Home Construction and Safety, Title 24, HUD Part 280). Additional Installation Requirements The installation of an unprotected wood or metal cabinet. When such standard is protected...
... *When installed in a mobile home, it conforms to the Manufactured Home Construction and Safety Standard, Title 24 CFR, Part 3280 (formerly the Federal Standard for Mobile Home Construction and Safety, Title 24, HUD Part 280). Additional Installation Requirements The installation of an unprotected wood or metal cabinet. When such standard is protected...
Installation Instructions
Page 7
... wiring practices. b) Aluminum/copper connection must determine the type of the above code standards can result in conformance with CSA Standard C22.1, Canadian Electrical Code, Part 1 - Failure to aluminum. s A time-delay fuse or circuit breaker is recommended. s Check with local codes. s A time-delay fuse or circuit breaker is recommended. The fuse...
... wiring practices. b) Aluminum/copper connection must determine the type of the above code standards can result in conformance with CSA Standard C22.1, Canadian Electrical Code, Part 1 - Failure to aluminum. s A time-delay fuse or circuit breaker is recommended. s Check with local codes. s A time-delay fuse or circuit breaker is recommended. The fuse...

Installation Instructions
Page 8
... proper conversion, for this kit are in the system. B A C A. If connected to shutoff valve. Observe all gas connections. latest edition or CAN/CGA B149 - The parts for use with American National Standard, National Fuel Gas Code ANSI Z223.1 - The valve is a registered trademark of gas available, check with Natural gas. To...
... proper conversion, for this kit are in the system. B A C A. If connected to shutoff valve. Observe all gas connections. latest edition or CAN/CGA B149 - The parts for use with American National Standard, National Fuel Gas Code ANSI Z223.1 - The valve is a registered trademark of gas available, check with Natural gas. To...
Installation Instructions
Page 9
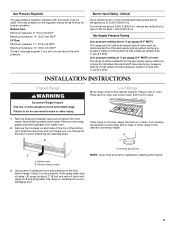
...; psi (3.5 kPa). Level Range Move range close to the desired countertop height. Remove oven racks, grates and parts package from range. Bottom vent B. Gas Pressure Regulator The gas pressure regulator supplied with this part to the side to avoid scratching the stainless steel. The inlet pressure to the regulator should be isolated...
...; psi (3.5 kPa). Level Range Move range close to the desired countertop height. Remove oven racks, grates and parts package from range. Bottom vent B. Gas Pressure Regulator The gas pressure regulator supplied with this part to the side to avoid scratching the stainless steel. The inlet pressure to the regulator should be isolated...

Installation Instructions
Page 11
... on conduit connector if present. 5. Connect the factory-crimped bare and white range cable wires to move range close to cabinet opening. 2. See "Tools and Parts." Connect the two black wires together using UL listed wire nuts. 6. Red wires C. UL listed or CSA approved conduit connector 1. Remove junction box cover if...
... on conduit connector if present. 5. Connect the factory-crimped bare and white range cable wires to move range close to cabinet opening. 2. See "Tools and Parts." Connect the two black wires together using UL listed wire nuts. 6. Red wires C. UL listed or CSA approved conduit connector 1. Remove junction box cover if...

Installation Instructions
Page 12
... valve B. Use pipe-joint compound C. Apply pipe-joint compound made for use with pins in the Use and Care Guide. 12 A. Assemble flexible connector from parts package. Burner caps should appear on the clock display. Burner base B. Use a combination wrench and channel lock pliers to attach the flexible connector to the...
... valve B. Use pipe-joint compound C. Apply pipe-joint compound made for use with pins in the Use and Care Guide. 12 A. Assemble flexible connector from parts package. Burner caps should appear on the clock display. Burner base B. Use a combination wrench and channel lock pliers to attach the flexible connector to the...
Installation Instructions
Page 14
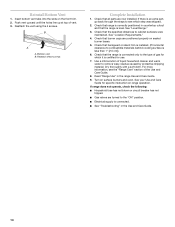
... surface burners and oven. Check that backguard or island trim is installed. (If horizontal clearance to combustible materials behind cooking surface is an extra part, go back through the steps to the "ON" position. Dry thoroughly with a soft cloth. s See "Troubleshooting" in the Use and Care... Guide. 14 Check that the specified distances to remove waxy residue caused by protective shipping material. Check that all parts are turned to see the "Range Care" section of liquid household cleaner and warm water to cabinet surfaces were maintained. Turn on ...
... surface burners and oven. Check that backguard or island trim is installed. (If horizontal clearance to combustible materials behind cooking surface is an extra part, go back through the steps to the "ON" position. Dry thoroughly with a soft cloth. s See "Troubleshooting" in the Use and Care... Guide. 14 Check that the specified distances to remove waxy residue caused by protective shipping material. Check that all parts are turned to see the "Range Care" section of liquid household cleaner and warm water to cabinet surfaces were maintained. Turn on ...


