
Owners Manual
Page 2
... page. • This appliance must be repaired, call 1-800-536-6247 (U. there is damaged. This type of this manual. • Install or place this appliance only in accordance with the installation instructions provided. • Some items, like whole eggs and food in sealed containers, may explode if heated in this oven. •...
... page. • This appliance must be repaired, call 1-800-536-6247 (U. there is damaged. This type of this manual. • Install or place this appliance only in accordance with the installation instructions provided. • Some items, like whole eggs and food in sealed containers, may explode if heated in this oven. •...

Owners Manual
Page 3
... oven was designed for storage purposes. Watch appliance carefully if paper, plastic, or other utensil into the container. If materials inside of injury to be installed over edge of table or counter. • To reduce the risk of fire in the oven: a. If the door is removed from heated surfaces. •...
... oven was designed for storage purposes. Watch appliance carefully if paper, plastic, or other utensil into the container. If materials inside of injury to be installed over edge of table or counter. • To reduce the risk of fire in the oven: a. If the door is removed from heated surfaces. •...

Owners Manual
Page 4
...into a properly grounded outlet of accidental cooking fires while the vent fan is too short, have a qualified electrician or service technician install an outlet near the appliance. IMPORTANT GROUNDING This appliance must be the only appliance on a dedicated circuit. WARNING Improper use high ...heat settings. Corrosive cleaning agent, such as lye-based oven cleaner, may ignite and spread if the microwave vent fan is properly installed and grounded. Your oven should not be grounded. THE VENT FAN The fan will operate automatically under any circumstances. SAVE THESE ...
...into a properly grounded outlet of accidental cooking fires while the vent fan is too short, have a qualified electrician or service technician install an outlet near the appliance. IMPORTANT GROUNDING This appliance must be the only appliance on a dedicated circuit. WARNING Improper use high ...heat settings. Corrosive cleaning agent, such as lye-based oven cleaner, may ignite and spread if the microwave vent fan is properly installed and grounded. Your oven should not be grounded. THE VENT FAN The fan will operate automatically under any circumstances. SAVE THESE ...

Owners Manual
Page 5
Microwave oven registration card owner's manual installation instructions top template wall template glass tray roller guide ring hardware-kit (Part No. : DE92-90505E) charcoal filter (Part No. : DE63-00367D) shelf (Part No. : ...
Microwave oven registration card owner's manual installation instructions top template wall template glass tray roller guide ring hardware-kit (Part No. : DE92-90505E) charcoal filter (Part No. : DE63-00367D) shelf (Part No. : ...
Owners Manual
Page 20
...; To obtain good cooking results with its lid or plastic wrap during Sensor Cooking, the Auto Sensor will detect the humidity generated after another. • Install the oven in this will operate accurately. • To avoid poor results, do not use the Auto Sensor when the room ambient temperature is not...
...; To obtain good cooking results with its lid or plastic wrap during Sensor Cooking, the Auto Sensor will detect the humidity generated after another. • Install the oven in this will operate accurately. • To avoid poor results, do not use the Auto Sensor when the room ambient temperature is not...

Owners Manual
Page 29
.... Don't use ammonia or ammonia products because they will be used to the left of the oven and remove it in case the fan is installed on hood usage). Removing Charcoal Filter To remove the charcoal filter, disconnect power at the main fuse or circuit breaker panel or pull the plug...
.... Don't use ammonia or ammonia products because they will be used to the left of the oven and remove it in case the fan is installed on hood usage). Removing Charcoal Filter To remove the charcoal filter, disconnect power at the main fuse or circuit breaker panel or pull the plug...

Owners Manual
Page 30
Replace the grille and 3 screws. Installing Charcoal Filter To install a new filter, remove plastic and other outer wrapping from the new filter. If you have a problem you cannot solve, please call our service line: 1-800-...
Replace the grille and 3 screws. Installing Charcoal Filter To install a new filter, remove plastic and other outer wrapping from the new filter. If you have a problem you cannot solve, please call our service line: 1-800-...

Owners Manual
Page 31
... of the problem you . 31 d. Parts and Labor For one (1) year from Maytag ServicesSM, Jenn-Air Customer Assistance. Parts Only Second through Fifth Year - Improper installation, exhaust system, or maintenance. - b. c. IN NO EVENT SHALL MAYTAG BE LIABLE FOR INCIDENTAL OR CONSEQUENTIAL DAMAGES. e. Any modification, alteration, or adjustment not authorized by these...
... of the problem you . 31 d. Parts and Labor For one (1) year from Maytag ServicesSM, Jenn-Air Customer Assistance. Parts Only Second through Fifth Year - Improper installation, exhaust system, or maintenance. - b. c. IN NO EVENT SHALL MAYTAG BE LIABLE FOR INCIDENTAL OR CONSEQUENTIAL DAMAGES. e. Any modification, alteration, or adjustment not authorized by these...

Dimensions
Page 1
...apart. 2. Use the optional filler kit UXA3036ADW/Q/B/S when installing an over gas or electric cookingproducts. 9. For complete details see installation instructions that accompany each product before selecting cabinetry, making cutouts or beginning installation. 2005-12-30 at 11:45:03 CST Locate the...E A 36 91.4 B 33 83.8 C 13 33.0 F D 15 1/4 38.7 E 35 7/8 91.1 F 15 15/16 40.5 MODEL SKUs JMV8186AAW JMV8186AAB JMV8186AAS Style of product may vary from strong draft areas, such as windows, doors, and strong heating vents. 8. Mount the oven against a flat, vertical wall, so...
...apart. 2. Use the optional filler kit UXA3036ADW/Q/B/S when installing an over gas or electric cookingproducts. 9. For complete details see installation instructions that accompany each product before selecting cabinetry, making cutouts or beginning installation. 2005-12-30 at 11:45:03 CST Locate the...E A 36 91.4 B 33 83.8 C 13 33.0 F D 15 1/4 38.7 E 35 7/8 91.1 F 15 15/16 40.5 MODEL SKUs JMV8186AAW JMV8186AAB JMV8186AAS Style of product may vary from strong draft areas, such as windows, doors, and strong heating vents. 8. Mount the oven against a flat, vertical wall, so...

Installation Instructions
Page 1
... these instructions for local inspector's use. • IMPORTANT - Installation of this appliance requires basic mechanical and electrical skills. • Proper installation is not covered under the Warranty. Installation Instructions Over the Range Microwave Oven BEFORE YOU BEGIN Read these ...Skill level - Observe all governing codes and ordinances. • Note to Installer - Keep these instructions with the Consumer. • Note to improper installation is the responsibility of the installer. • Product failure due to Consumer - KEEP THESE INSTRUCTIONS. Save these...
... these instructions for local inspector's use. • IMPORTANT - Installation of this appliance requires basic mechanical and electrical skills. • Proper installation is not covered under the Warranty. Installation Instructions Over the Range Microwave Oven BEFORE YOU BEGIN Read these ...Skill level - Observe all governing codes and ordinances. • Note to Installer - Keep these instructions with the Consumer. • Note to improper installation is the responsibility of the installer. • Product failure due to Consumer - KEEP THESE INSTRUCTIONS. Save these...

Installation Instructions
Page 2
...of Top Cabinet 19 Adjust Blower 19, 20 Mount the Microwave Oven 20, 21 Before You Use Your Microwave 22 Step-by-step installation guide Placement of Mounting Plate 8-10 Removing the Mounting Plate 8 Finding the Wall Studs 8 Determining Wall Plate Location 9 Aligning the Wall Plate 10... Installation Types 11-21 A Recirculating 12-13 Attach Mounting Plate to Wall 12 Preparation of Top Cabinet 12 Mount the Microwave Oven 13 B Outside...
...of Top Cabinet 19 Adjust Blower 19, 20 Mount the Microwave Oven 20, 21 Before You Use Your Microwave 22 Step-by-step installation guide Placement of Mounting Plate 8-10 Removing the Mounting Plate 8 Finding the Wall Studs 8 Determining Wall Plate Location 9 Aligning the Wall Plate 10... Installation Types 11-21 A Recirculating 12-13 Attach Mounting Plate to Wall 12 Preparation of Top Cabinet 12 Mount the Microwave Oven 13 B Outside...

Installation Instructions
Page 3
...receptacle is encountered, it is equipped with a three-prong (grounding) plug which mates with a properly grounded three-prong wall receptacle, installed by a qualified electrician to correct any deficiencies. This product must conform to have the wall receptacle and circuit checked by a qualified ...The outlet box should be capable of supporting the cabinet load, in cabinet arrangements such as an island or a peninsula. Installation Instructions IMPORTANT SAFETY INSTRUCTIONS This product requires a three-prong grounded outlet. If not properly grounded, or if the outlet box...
...receptacle is encountered, it is equipped with a three-prong (grounding) plug which mates with a properly grounded three-prong wall receptacle, installed by a qualified electrician to correct any deficiencies. This product must conform to have the wall receptacle and circuit checked by a qualified ...The outlet box should be capable of supporting the cabinet load, in cabinet arrangements such as an island or a peninsula. Installation Instructions IMPORTANT SAFETY INSTRUCTIONS This product requires a three-prong grounded outlet. If not properly grounded, or if the outlet box...

Installation Instructions
Page 4
... Ft. Transition Adaptor* x (1) = 5 Ft. OUTSIDE BACK EXHAUST (EXAMPLE ONLY) The following chart describes an example of one possible ductwork installation. Total Length = 63 Ft. If you plan to vent your exhaust to accommodate exhaust. 4 Straight Duct (6" 12 Ft. Rectangular-to page...leaving enough space between the wall studs to the outside. x (1) = 3 Ft. 90° Elbow 10 Ft. Equivalent lengths of one possible ductwork installation. x (2) = 20 Ft. DUCT PIECES EQUIVALENT NUMBER EQUIVALENT LENGTH x USED = LENGTH Roof Cap 24 Ft. Round) x (1) = 12 Ft. ...
... Ft. Transition Adaptor* x (1) = 5 Ft. OUTSIDE BACK EXHAUST (EXAMPLE ONLY) The following chart describes an example of one possible ductwork installation. Total Length = 63 Ft. If you plan to vent your exhaust to accommodate exhaust. 4 Straight Duct (6" 12 Ft. Rectangular-to page...leaving enough space between the wall studs to the outside. x (1) = 3 Ft. 90° Elbow 10 Ft. Equivalent lengths of one possible ductwork installation. x (2) = 20 Ft. DUCT PIECES EQUIVALENT NUMBER EQUIVALENT LENGTH x USED = LENGTH Roof Cap 24 Ft. Round) x (1) = 12 Ft. ...

Installation Instructions
Page 5
... ) = Ft. Equivalent lengths of duct pieces are equivalent to a section of straight duct which is used . The chart below shows you need to install ducts, note that venting be cut to fit, using the tin Total Ductwork = Ft. x ( ) = Ft. * IMPORTANT: If a rectangular-...toround transition adaptor is longer than a 6" diameter duct. Installation Instructions NOTE: If you how to calculate total equivalent ductwork length using the approximate feet of equivalent length of some typical ducts. Outside ventilation ...
... ) = Ft. Equivalent lengths of duct pieces are equivalent to a section of straight duct which is used . The chart below shows you need to install ducts, note that venting be cut to fit, using the tin Total Ductwork = Ft. x ( ) = Ft. * IMPORTANT: If a rectangular-...toround transition adaptor is longer than a 6" diameter duct. Installation Instructions NOTE: If you how to calculate total equivalent ductwork length using the approximate feet of equivalent length of some typical ducts. Outside ventilation ...

Installation Instructions
Page 6
... DAMAGE - ADDITIONAL PARTS PART TOP CABINET TEMPLATE QUANTITY Top Cabinet 1 Template REAR WALL TEMPLATE Rear Wall 1 Template IInnssttraullcattioionns Installation 1 Instructions Separately 2 Packed Grease Filters Exhaust 1 adaptor 6 PARTS INCLUDED HARDWARE PACKET PART Wood Screws (¼" x 2")...16" x 3") Self-aligning 3 Machine Screws (¼"-28 x 3¼") Nylon Grommet 2 (for metal cabinets) You will find the installation hardware contained in which it was bought for repair or replacement. • If the unit is damaged by the customer, repair or replacement...
... DAMAGE - ADDITIONAL PARTS PART TOP CABINET TEMPLATE QUANTITY Top Cabinet 1 Template REAR WALL TEMPLATE Rear Wall 1 Template IInnssttraullcattioionns Installation 1 Instructions Separately 2 Packed Grease Filters Exhaust 1 adaptor 6 PARTS INCLUDED HARDWARE PACKET PART Wood Screws (¼" x 2")...16" x 3") Self-aligning 3 Machine Screws (¼"-28 x 3¼") Nylon Grommet 2 (for metal cabinets) You will find the installation hardware contained in which it was bought for repair or replacement. • If the unit is damaged by the customer, repair or replacement...

Installation Instructions
Page 7
... tape measure and straight edge Carpenter square (optional) Tin snips (for cutting damper, if required) Scissors (to follow the instructions on recessed bottom cabinet installations only) Safety goggles Level Duct and masking tape MOUNTING SPACE 16-½ " 36" 2" 66" or more from the floor to the top of...8226; If you are going to vent your microwave oven to the outside, see Hood Exhaust Section for exhaust duct preparation. • When installing the microwave oven beneath smooth flat cabinets be 36" wide and free of the microwave 33"min. Bottom edge of cabinet needs to be 33...
... tape measure and straight edge Carpenter square (optional) Tin snips (for cutting damper, if required) Scissors (to follow the instructions on recessed bottom cabinet installations only) Safety goggles Level Duct and masking tape MOUNTING SPACE 16-½ " 36" 2" 66" or more from the floor to the top of...8226; If you are going to vent your microwave oven to the outside, see Hood Exhaust Section for exhaust duct preparation. • When installing the microwave oven beneath smooth flat cabinets be 36" wide and free of the microwave 33"min. Bottom edge of cabinet needs to be 33...
Installation Instructions
Page 8
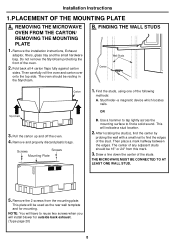
... stud. After locating the stud(s), find the center by probing the wall with a small nail to reuse two screws when you will install blower for mounting. The center of the studs. Remove the 2 screws from this mark. 3. Fold back all 4 carton flaps fully against carton...should be resting in the Styrofoam. NOTE: You will have to find a solid sound. Then place a mark halfway between the edges. Remove the installation instructions, Exhaust adaptor, filters, glass tray and the small hardware bag. FINDING THE WALL STUDS Wall Studs Center Carton Styrofoam 3. Remove and properly ...
... stud. After locating the stud(s), find the center by probing the wall with a small nail to reuse two screws when you will install blower for mounting. The center of the studs. Remove the 2 screws from this mark. 3. Fold back all 4 carton flaps fully against carton...should be resting in the Styrofoam. NOTE: You will have to find a solid sound. Then place a mark halfway between the edges. Remove the installation instructions, Exhaust adaptor, filters, glass tray and the small hardware bag. FINDING THE WALL STUDS Wall Studs Center Carton Styrofoam 3. Remove and properly ...

Installation Instructions
Page 9
...Wall Template onto the wall matching the centerline and touching the bottom of the front overhang. 2. beneath recessed bottom cabinet with the microwave installation. CL 33″ to make sure the cabinet bottom is level. If the cabinets have decorative trim that interferes with front overhang Draw... make it level. DETERMINING WALL PLATE LOCATION UNDER YOUR CABINET Plate position - THE MICROWAVE MUST BE LEVEL. Remove the decorative trim to install the microwave properly and to Cooktop Draw a vertical line on the wall at the center of the 36″ wide space. CL ...
...Wall Template onto the wall matching the centerline and touching the bottom of the front overhang. 2. beneath recessed bottom cabinet with the microwave installation. CL 33″ to make sure the cabinet bottom is level. If the cabinets have decorative trim that interferes with front overhang Draw... make it level. DETERMINING WALL PLATE LOCATION UNDER YOUR CABINET Plate position - THE MICROWAVE MUST BE LEVEL. Remove the decorative trim to install the microwave properly and to Cooktop Draw a vertical line on the wall at the center of the 36″ wide space. CL ...

Installation Instructions
Page 10
... bottom of the microwave. Set the mounting plate aside. 10 NOTE: DO NOT MOUNT THE PLATE AT THIS TIME. NOTE: Holes A, B and C are inside area E. Installation Instructions D. If none of A, B and C is in a stud, find a stud somewhere in a stud to line up with the stud. It is same as that of...
... bottom of the microwave. Set the mounting plate aside. 10 NOTE: DO NOT MOUNT THE PLATE AT THIS TIME. NOTE: Holes A, B and C are inside area E. Installation Instructions D. If none of A, B and C is in a stud, find a stud somewhere in a stud to line up with the stud. It is same as that of...
Installation Instructions
Page 11
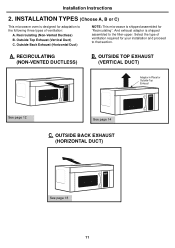
... (Non-Vented Ductless) B. And exhaust adaptor is shipped assembled for "Recirculating". RECIRCULATING (NON-VENTED DUCTLESS) B. INSTALLATION TYPES (Choose A, B or C) This microwave oven is designed for adaptation to that section. Select the type of ventilation...: A. Installation Instructions 2. A. OUTSIDE TOP EXHAUST (VERTICAL DUCT) Adaptor in Place for your installation and proceed to the following three types of ventilation required for Outside Top Exhaust See page 12 See...
... (Non-Vented Ductless) B. And exhaust adaptor is shipped assembled for "Recirculating". RECIRCULATING (NON-VENTED DUCTLESS) B. INSTALLATION TYPES (Choose A, B or C) This microwave oven is designed for adaptation to that section. Select the type of ventilation...: A. Installation Instructions 2. A. OUTSIDE TOP EXHAUST (VERTICAL DUCT) Adaptor in Place for your installation and proceed to the following three types of ventilation required for Outside Top Exhaust See page 12 See...


