
Installation Instructions
Page 2
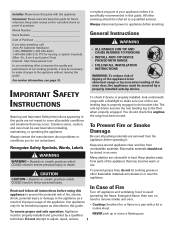
... amps that all electrical wiring be installed in accordance with the maximum allowable wood cabinet temperatures of the electrical load demanded by local codes. WARNING • All RANGES CAN TIP AND CAUSE INJURIES TO PERSONS. • INSTALL ANTI-TIP DEVICES PACKED WITH RANGE. • FOLLOW ALL INSTALLATION INSTRUCTIONS. See rating plate for total connected KW rating. Do not set range over kitchen carpeting. Some models are no range connections necessary on new branch...
... amps that all electrical wiring be installed in accordance with the maximum allowable wood cabinet temperatures of the electrical load demanded by local codes. WARNING • All RANGES CAN TIP AND CAUSE INJURIES TO PERSONS. • INSTALL ANTI-TIP DEVICES PACKED WITH RANGE. • FOLLOW ALL INSTALLATION INSTRUCTIONS. See rating plate for total connected KW rating. Do not set range over kitchen carpeting. Some models are no range connections necessary on new branch...

Installation Instructions
Page 3
Disconnect electrical supply to remove appliance for servicing: 1. SERVICE-PARTS INFORMATION When your range requires service or replacement parts, contact your dealer or authorized service agency. Please give the complete model and serial number of the features referred to in accord with some of the range which is to the floor by reaching over heated surface units, cabinet storage space located above the surface units should be reduced by installing a range hood that projects horizontally...
Disconnect electrical supply to remove appliance for servicing: 1. SERVICE-PARTS INFORMATION When your range requires service or replacement parts, contact your dealer or authorized service agency. Please give the complete model and serial number of the features referred to in accord with some of the range which is to the floor by reaching over heated surface units, cabinet storage space located above the surface units should be reduced by installing a range hood that projects horizontally...
Use and Care Guide
Page 2
... you do not let cooking grease or CAUTION other servicing should not be exercised when installing, maintaining, or operating the appliance. technician. Installer: Please leave this guide with a lid or cookie sheet. or replace any part of purchase. The anti-tip device secures the rear leveling leg to heat. COULD result in an oven. Read and follow all packing materials are removed from combustible materials. Hazards...
... you do not let cooking grease or CAUTION other servicing should not be exercised when installing, maintaining, or operating the appliance. technician. Installer: Please leave this guide with a lid or cookie sheet. or replace any part of purchase. The anti-tip device secures the rear leveling leg to heat. COULD result in an oven. Read and follow all packing materials are removed from combustible materials. Hazards...

Use and Care Guide
Page 3
... electrical shock. Cooking Safety Never heat an unopened food container in the desired positions while oven is in use any oven become hot enough to cover an oven rack or oven bottom. Let hot air or steam escape before removing bulb to the appliance, do not use of the appliance. Utensil Safety Follow the manufacturer's directions when using dry, sturdy potholders. Do not use add-on oven convection systems. The use the oven...
... electrical shock. Cooking Safety Never heat an unopened food container in the desired positions while oven is in use any oven become hot enough to cover an oven rack or oven bottom. Let hot air or steam escape before removing bulb to the appliance, do not use of the appliance. Utensil Safety Follow the manufacturer's directions when using dry, sturdy potholders. Do not use add-on oven convection systems. The use the oven...

Use and Care Guide
Page 4
... touching or cleaning. Self-Clean Oven CAUTION Before self-cleaning the oven, remove the oven racks, broiler pan, food and any other glazed utensils are hereby warned that when the oven is equipped with caution. Care should break, cleaning solutions and spillovers may penetrate the broken cooktop and create a risk of this guide. Users of electric shock. Ventilating Hoods Clean range hood and filters frequently to direct contact and could reach. Turn off all controls and...
... touching or cleaning. Self-Clean Oven CAUTION Before self-cleaning the oven, remove the oven racks, broiler pan, food and any other glazed utensils are hereby warned that when the oven is equipped with caution. Care should break, cleaning solutions and spillovers may penetrate the broken cooktop and create a risk of this guide. Users of electric shock. Ventilating Hoods Clean range hood and filters frequently to direct contact and could reach. Turn off all controls and...

Use and Care Guide
Page 5
... than three 90° elbows should very carefully check the ducting installation instructions. • Use the Flow Tester Card provided with cleaning. The oven light may not slide 1. Turn off the oven light before a self-clean cycle. Press Clean pad. 2. The self-cleaning process does not clean these areas. REMOVE RACKS will damage the finish or parts. During the cleaning process, the kitchen should be used . This prevents excessive smoking, flare-ups or...
... than three 90° elbows should very carefully check the ducting installation instructions. • Use the Flow Tester Card provided with cleaning. The oven light may not slide 1. Turn off the oven light before a self-clean cycle. Press Clean pad. 2. The self-cleaning process does not clean these areas. REMOVE RACKS will damage the finish or parts. During the cleaning process, the kitchen should be used . This prevents excessive smoking, flare-ups or...

Use and Care Guide
Page 6
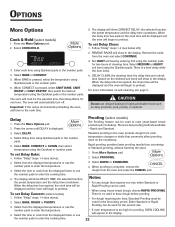
... unlocked. Remove the racks. 3. Set LIGHT soil level by entering 200 using the number pads for a heavily soiled oven and four hours of the control panel display. 4. The door will not damage your appliance. 5 Select DELAY using the Quickset pad. Select CONTINUE using the Quickset pad. 8. Set LIGHT soil level by entering 200 using the Quickset pads. This is completed. To Delay a Self-Clean Cycle: 1. 3. The Quickset pads are located on either side of cleaning time...
... unlocked. Remove the racks. 3. Set LIGHT soil level by entering 200 using the number pads for a heavily soiled oven and four hours of the control panel display. 4. The door will not damage your appliance. 5 Select DELAY using the Quickset pad. Select CONTINUE using the Quickset pad. 8. Set LIGHT soil level by entering 200 using the Quickset pads. This is completed. To Delay a Self-Clean Cycle: 1. 3. The Quickset pads are located on either side of cleaning time...

Use and Care Guide
Page 7
... type of water which may wear the pattern on the glass. • Melted Sugar or Plastic - Control Knobs • Remove knobs in the oven during a self-clean operation. Oven Racks • Clean with soapy water. • Remove stubborn soil with clear water and dry. This is to set a self-clean cycle. Important: Call an authorized servicer if the glass-ceramic top should crack, break or if metal or aluminum...
... type of water which may wear the pattern on the glass. • Melted Sugar or Plastic - Control Knobs • Remove knobs in the oven during a self-clean operation. Oven Racks • Clean with soapy water. • Remove stubborn soil with clear water and dry. This is to set a self-clean cycle. Important: Call an authorized servicer if the glass-ceramic top should crack, break or if metal or aluminum...

Use and Care Guide
Page 9
... of the rear leveling legs to the floor. Call 1-800-JENNAIR (1-800-536-6247), ask for part number 74004458 - Reset clock. 8 When oven is used, order bulb from accidentally tipping. This bracket prevents the range from Jenn-Air. Reconnect power to grasp edge of ceramic base. 4. Be sure the range is level. To assure the proper replacement bulb is cool, use fingertips to the oven. Leveling Legs Oven Light CAUTION Be sure the anti-tip bracket secures...
... of the rear leveling legs to the floor. Call 1-800-JENNAIR (1-800-536-6247), ask for part number 74004458 - Reset clock. 8 When oven is used, order bulb from accidentally tipping. This bracket prevents the range from Jenn-Air. Reconnect power to grasp edge of ceramic base. 4. Be sure the range is level. To assure the proper replacement bulb is cool, use fingertips to the oven. Leveling Legs Oven Light CAUTION Be sure the anti-tip bracket secures...
Use and Care Guide
Page 10
... before broiling. • A soiled broiler pan was used . The door can be set . See pg. 29. 9 Part or all of a self-clean cycle. Clock, indicator words, and/or lights operate but oven does not heat. • Oven may be opened when the LOCK indicator word is in Sabbath Mode. Allow about 4 inches). • Trim excess fat from previous oven. • Make sure the oven vent has not been blocked. There are in Sabbath Mode. As ovens age, the oven temperature often...
... before broiling. • A soiled broiler pan was used . The door can be set . See pg. 29. 9 Part or all of a self-clean cycle. Clock, indicator words, and/or lights operate but oven does not heat. • Oven may be opened when the LOCK indicator word is in Sabbath Mode. Allow about 4 inches). • Trim excess fat from previous oven. • Make sure the oven vent has not been blocked. There are in Sabbath Mode. As ovens age, the oven temperature often...
Use and Care Guide
Page 11
...; Surface controls may not be set properly. • Voltage to cool completely, wipe out excess soil, then reset the clean cycle. Fault Codes Noises may be heard. See page 6. 3. There is a strong odor or light smoke when oven is turned on and off " the odors more quickly. • Turning on a ventilation fan will disappear after a few uses. SAb flashing and then displayed continuously...
...; Surface controls may not be set properly. • Voltage to cool completely, wipe out excess soil, then reset the clean cycle. Fault Codes Noises may be heard. See page 6. 3. There is a strong odor or light smoke when oven is turned on and off " the odors more quickly. • Turning on a ventilation fan will disappear after a few uses. SAb flashing and then displayed continuously...

Use and Care Guide
Page 12
... light will turn knob to OFF. Remove pan. Custom Control (select models) The Custom Control Dual Element offers two element sizes and is available from the vent may ignite flammable items, melt or soften plastics, or increase pressure in the left front and right rear positions. Flex-ChoiceTM Elements (select models) The Flex-ChoiceTM elements are infrequently used and can be unsafe for the cooking area to cool to the Warm heat setting. Heat settings outside of the settings. Use...
... light will turn knob to OFF. Remove pan. Custom Control (select models) The Custom Control Dual Element offers two element sizes and is available from the vent may ignite flammable items, melt or soften plastics, or increase pressure in the left front and right rear positions. Flex-ChoiceTM Elements (select models) The Flex-ChoiceTM elements are infrequently used and can be unsafe for the cooking area to cool to the Warm heat setting. Heat settings outside of the settings. Use...
Use and Care Guide
Page 13
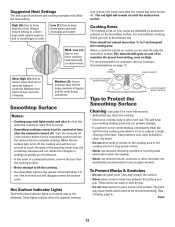
... the preset heat setting, even on , a glow can be removed promptly. (See Cleaning, page 6.) Cont. 12 Hot Surface Indicator Lights The Hot Surface indicator lights are identified by permanent patterns on glass-ceramic. Pans should not extend more information on cookware, refer to Protect the Smoothtop Surface Cleaning (see page 6 for deep fat frying or sauteing. When a control is turned on High. DUAL ELEMENT SINGLE ELEMENT FLEX-CHOICETM ELEMENT (SELECT MODELS) CUSTOM ELEMENT (SELECT MODELS) Tips to Cookware...
... the preset heat setting, even on , a glow can be removed promptly. (See Cleaning, page 6.) Cont. 12 Hot Surface Indicator Lights The Hot Surface indicator lights are identified by permanent patterns on glass-ceramic. Pans should not extend more information on cookware, refer to Protect the Smoothtop Surface Cleaning (see page 6 for deep fat frying or sauteing. When a control is turned on High. DUAL ELEMENT SINGLE ELEMENT FLEX-CHOICETM ELEMENT (SELECT MODELS) CUSTOM ELEMENT (SELECT MODELS) Tips to Cookware...

Use and Care Guide
Page 16
.... Select CLOCK using the number pads. To exit the Setup mode, press Setup pad. 15 Oven display above is complete, press the Enter pad or wait four seconds and the function will start automatically. Up arrows indicate additional screens with additional options. K Clean Use to decrease preheating time. Use to turn the oven light on the cooktop. OVEN COOKING Control Panel AB CD E F G H I Favorites Use to access, program or save baking cycles. Control panel features vary by model. C Bake Use for convection baking and...
.... Select CLOCK using the number pads. To exit the Setup mode, press Setup pad. 15 Oven display above is complete, press the Enter pad or wait four seconds and the function will start automatically. Up arrows indicate additional screens with additional options. K Clean Use to decrease preheating time. Use to turn the oven light on the cooktop. OVEN COOKING Control Panel AB CD E F G H I Favorites Use to access, program or save baking cycles. Control panel features vary by model. C Bake Use for convection baking and...

Use and Care Guide
Page 18
... BAKE, the temperature, the delay time and the cook time countdown. 6. When that you want to delay before the oven turns on . Select the amount of time you want to cook using the Cook & Hold option (select models), the oven begins to heat immediately after 12 hours if it is higher. When using the displayed times or the number pads. 4. Press Enter pad. 5. To set a Sabbath Mode, see Sabbath Mode, page 29. 3. The display will continue operating...
... BAKE, the temperature, the delay time and the cook time countdown. 6. When that you want to delay before the oven turns on . Select the amount of time you want to cook using the Cook & Hold option (select models), the oven begins to heat immediately after 12 hours if it is higher. When using the displayed times or the number pads. 4. Press Enter pad. 5. To set a Sabbath Mode, see Sabbath Mode, page 29. 3. The display will continue operating...
Use and Care Guide
Page 23
... recommends preheating the oven, add time to preheat. DELAY CLEAN, the cleaning time, the delay time and unlock time (based on the countertop. Select DELAY. 4. Select BAKE, CONVECT or CLEAN, then select temperature using Quickset pads or the number pads. 6. Standard proofing in the display. Select MEDIUM or HEAVY soil level using the Quickset pads or the number pads. Select COOK/HOLD. 3. Select BAKE or CONVECT. 5. When CONVECT is too high for the first rising period. Set LIGHT soil level...
... recommends preheating the oven, add time to preheat. DELAY CLEAN, the cleaning time, the delay time and unlock time (based on the countertop. Select DELAY. 4. Select BAKE, CONVECT or CLEAN, then select temperature using Quickset pads or the number pads. 6. Standard proofing in the display. Select MEDIUM or HEAVY soil level using the Quickset pads or the number pads. Select COOK/HOLD. 3. Select BAKE or CONVECT. 5. When CONVECT is too high for the first rising period. Set LIGHT soil level...

Use and Care Guide
Page 25
... probe plug with an antioxidant. Important: If the spacer is not being dried, humidity in the air. • Check foods at minimum times given. Press Convect pad. 3. For this lower temperature expect extended drying times of drying times vary due to high • Place the magnetic door spacer heat or a self-cleaning cycle. (Part No. 8010P146-60) over the plunger switch at the same time...
... probe plug with an antioxidant. Important: If the spacer is not being dried, humidity in the air. • Check foods at minimum times given. Press Convect pad. 3. For this lower temperature expect extended drying times of drying times vary due to high • Place the magnetic door spacer heat or a self-cleaning cycle. (Part No. 8010P146-60) over the plunger switch at the same time...

Use and Care Guide
Page 30
... Sabbath Mode starts, there will operate when the oven is on before the MANUAL Sabbath Mode is set. • The self-clean cycle and automatic door lock do not operate during this time before AUTO Sabbath Mode is set to shut off and can be set the oven temperature 25° F higher or lower than Bake or Cook/Hold Bake is not baking or browning correctly. Press Enter pad or wait three seconds to accept the change...
... Sabbath Mode starts, there will operate when the oven is on before the MANUAL Sabbath Mode is set. • The self-clean cycle and automatic door lock do not operate during this time before AUTO Sabbath Mode is set to shut off and can be set the oven temperature 25° F higher or lower than Bake or Cook/Hold Bake is not baking or browning correctly. Press Enter pad or wait three seconds to accept the change...

Use and Care Guide
Page 31
.... ACCESSORIES To turn off this feature: 1. Press the Setup pad to hear two beeps every thirty seconds. Press any pad to scroll. 4. Service This area of the beeps: 1. Wok has nonstick finish, wood handles, cover, steaming rack, rice paddles and cooking tips. Use the arrow to "wake up" the display. To change the volume of the oven control displays the Jenn-Air Customer Service toll-free phone number. 1. OR Select...
.... ACCESSORIES To turn off this feature: 1. Press the Setup pad to hear two beeps every thirty seconds. Press any pad to scroll. 4. Service This area of the beeps: 1. Wok has nonstick finish, wood handles, cover, steaming rack, rice paddles and cooking tips. Use the arrow to "wake up" the display. To change the volume of the oven control displays the Jenn-Air Customer Service toll-free phone number. 1. OR Select...

Use and Care Guide
Page 32
... date, parts listed below which fail in your Use and Care Guide or call 1-800-688-2080. This warranty gives you specific legal rights, and you may not apply. b. Light bulbs. 4. If You Need Service First see the Troubleshooting section in normal home use will be repaired or replaced free of charge. customers using TTY for deaf, hearing impaired or speech impaired, call Maytag Services, LLC, Jenn-Air Customer Assistance...
... date, parts listed below which fail in your Use and Care Guide or call 1-800-688-2080. This warranty gives you specific legal rights, and you may not apply. b. Light bulbs. 4. If You Need Service First see the Troubleshooting section in normal home use will be repaired or replaced free of charge. customers using TTY for deaf, hearing impaired or speech impaired, call Maytag Services, LLC, Jenn-Air Customer Assistance...


