Installation Guide
Page 3
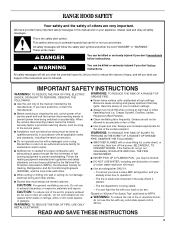
RANGE HOOD SAFETY Your safety and the safety of fire and to properly exhaust air, be sure to duct air outside - IMPORTANT SAFETY INSTRUCTIONS WARNING: TO REDUCE ...." BE CAREFUL TO PREVENT BURNS. These words mean: DANGER You can fight the fire with a close fitting lid, cookie sheet, or metal tray, then turn hood ON when cooking at high settings. When the service disconnecting means cannot be locked, securely fasten a prominent warning device, such as those published by qualified...
RANGE HOOD SAFETY Your safety and the safety of fire and to properly exhaust air, be sure to duct air outside - IMPORTANT SAFETY INSTRUCTIONS WARNING: TO REDUCE ...." BE CAREFUL TO PREVENT BURNS. These words mean: DANGER You can fight the fire with a close fitting lid, cookie sheet, or metal tray, then turn hood ON when cooking at high settings. When the service disconnecting means cannot be locked, securely fasten a prominent warning device, such as those published by qualified...
Installation Guide
Page 4
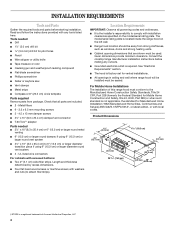
... ■ It is the installer's responsibility to comply with installation clearances specified on the left wall. ■ Range hood location should be used. Location Requirements IMPORTANT: Observe all parts are shown must be sealed. The model/serial rating plate ... manufacturer installation instructions before starting installation. UL listed wire connectors For cabinets with any cutouts. ■ Grounded electrical outlet is located inside the range hood on the model/serial rating plate. Product Dimensions 1³⁄₄" (4.4 cm) 4³⁄₄" (12.1 cm) 4 10.3 cm)...
... ■ It is the installer's responsibility to comply with installation clearances specified on the left wall. ■ Range hood location should be used. Location Requirements IMPORTANT: Observe all parts are shown must be sealed. The model/serial rating plate ... manufacturer installation instructions before starting installation. UL listed wire connectors For cabinets with any cutouts. ■ Grounded electrical outlet is located inside the range hood on the model/serial rating plate. Product Dimensions 1³⁄₄" (4.4 cm) 4³⁄₄" (12.1 cm) 4 10.3 cm)...
Installation Guide
Page 5
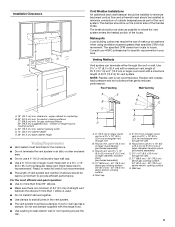
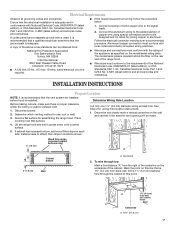
... cooking surfaces 27" (68.6 cm) min. Round vent: use of 35 ft (10.7 m) or 6" (15.2 cm) or larger round vent with the range hood. ■ Use caulking to seal exterior wall or roof opening width D. 13" (33.0 cm) cabinet depth E. 36" (91.4 cm) base cabinet height Venting Requirements... is recommended. upper cabinet to seal all joints in your HVAC professional for vent system. Round vent: use damper supplied with a maximum length of range hood to locale. Venting Methods Vent system can terminate either through the wall D. 27" (68.6 cm) - 30" (76.2 cm) above gas cooking surface ...
... cooking surfaces 27" (68.6 cm) min. Round vent: use of 35 ft (10.7 m) or 6" (15.2 cm) or larger round vent with the range hood. ■ Use caulking to seal exterior wall or roof opening width D. 13" (33.0 cm) cabinet depth E. 36" (91.4 cm) base cabinet height Venting Requirements... is recommended. upper cabinet to seal all joints in your HVAC professional for vent system. Round vent: use damper supplied with a maximum length of range hood to locale. Venting Methods Vent system can terminate either through the wall D. 27" (68.6 cm) - 30" (76.2 cm) above gas cooking surface ...
Installation Guide
Page 7
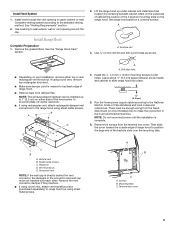
...location instructions. 1. Determine Wiring Hole Location Before making cutouts, make sure there is located behind the filter on the rear wall of the range hood. ■ Wire sizes must conform with local codes and industry accepted wiring practices. See Step 2 for exhaust vent. 1. Ensure that the ...solid copper wire to the requirements of copper wire using special connectors and/or tools designed and UL listed for assembling the range hood. Connect the aluminum wiring to attach filler strips in conformance with the rating of the above code standards can be made. 4. ...
...location instructions. 1. Determine Wiring Hole Location Before making cutouts, make sure there is located behind the filter on the rear wall of the range hood. ■ Wire sizes must conform with local codes and industry accepted wiring practices. See Step 2 for exhaust vent. 1. Ensure that the ...solid copper wire to the requirements of copper wire using special connectors and/or tools designed and UL listed for assembling the range hood. Connect the aluminum wiring to attach filler strips in conformance with the rating of the above code standards can be made. 4. ...
Installation Guide
Page 9
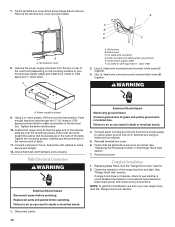
...is directly behind the vent connector, the dampers in upper cabinet or wall. Screws B. Install vent through the vent opening around the cap. Install Range Hood Complete Preparation 1. Vent knockouts E. A B C A. Mounting tabs C. Complete venting system according to the National Electric Code or CSA standards and local ... Vent System 1. Remove the screws from the fused disconnect (or circuit breaker) box to position the large end of range hood to make the connection in pilot holes. Remove the vent connector damper if they interfere. ■ If using round vent,...
...is directly behind the vent connector, the dampers in upper cabinet or wall. Screws B. Install vent through the vent opening around the cap. Install Range Hood Complete Preparation 1. Vent knockouts E. A B C A. Mounting tabs C. Complete venting system according to the National Electric Code or CSA standards and local ... Vent System 1. Remove the screws from the fused disconnect (or circuit breaker) box to position the large end of range hood to make the connection in pilot holes. Remove the vent connector damper if they interfere. ■ If using round vent,...
Installation Guide
Page 10
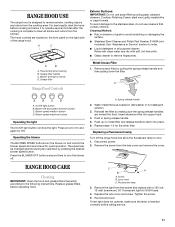
... that the light bulb is secure in the narrow neck of the keyhole slots are in its socket. Disconnect power. Replace grease filters. If range hood does not operate, check to remove. A B C D E F A A. Black wires C. UL listed or CSA approved ½" strain relief 2. Power ... connections. Terminal box cover 8. Use UL listed wire connectors and connect black wires (B) together. Using 2 or more people, lift the hood into final position. Electrical Shock Hazard Electrically ground blower. Connect ground wire to yellow-green ground wire (C) in death or electrical shock. ...
... that the light bulb is secure in the narrow neck of the keyhole slots are in its socket. Disconnect power. Replace grease filters. If range hood does not operate, check to remove. A B C D E F A A. Black wires C. UL listed or CSA approved ½" strain relief 2. Power ... connections. Terminal box cover 8. Use UL listed wire connectors and connect black wires (B) together. Using 2 or more people, lift the hood into final position. Electrical Shock Hazard Electrically ground blower. Connect ground wire to yellow-green ground wire (C) in death or electrical shock. ...
Installation Guide
Page 11
... Repeat steps 1-5 for Off. Disconnect power. 2. C A B A. Remove the light from the lens cover and remove the cover. The hood controls are toward the front. To avoid damage to the stainless steel, do not use soap-filled scouring pads, abrasive cleaners, Cooktop Polishing Creme...a Fluorescent Lamp Turn off . A C D B A. Insert aluminum filter into place. 6. Replace the lens cover and screw. Grease filter Range Hood Controls Exterior Surfaces: IMPORTANT: Do not use cleaners that contain chlorine. If new light does not operate, make sure the lamp is complete to clear...
... Repeat steps 1-5 for Off. Disconnect power. 2. C A B A. Remove the light from the lens cover and remove the cover. The hood controls are toward the front. To avoid damage to the stainless steel, do not use soap-filled scouring pads, abrasive cleaners, Cooktop Polishing Creme...a Fluorescent Lamp Turn off . A C D B A. Insert aluminum filter into place. 6. Replace the lens cover and screw. Grease filter Range Hood Controls Exterior Surfaces: IMPORTANT: Do not use cleaners that contain chlorine. If new light does not operate, make sure the lamp is complete to clear...
Dimension Guide
Page 1
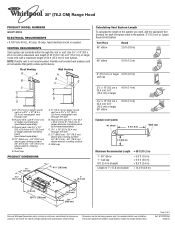
® 30" (76.2 CM) Range Hood PRODUCT MODEL NUMBERS GXU7130DX ELECTRICAL REQUIREMENTS • A 120 Volt, 60 Hz., AC only, 15-amp, fused electrical circuit is not recommended. Round vent: use 3¹⁄&#... ft (1.5 m) = 0.0 ft (0.0 m) = 8.0 ft (2.4 m) = 13.0 ft (3.9 m) ³⁄₄" (2.0 cm) 29 76.0 cm) 9" (22.9 cm) 1¹⁄₂" (3.8 cm) 20" (50.8 cm) Because Whirlpool Corporation policy includes a continuous commitment to 6" (15.2 cm) or larger 90° elbow 5.0 ft (1.5 m) Example vent system 90˚ elbow 6 ft (1.8 m) Wall cap 2 ft (0.6 m) Maximum...
® 30" (76.2 CM) Range Hood PRODUCT MODEL NUMBERS GXU7130DX ELECTRICAL REQUIREMENTS • A 120 Volt, 60 Hz., AC only, 15-amp, fused electrical circuit is not recommended. Round vent: use 3¹⁄&#... ft (1.5 m) = 0.0 ft (0.0 m) = 8.0 ft (2.4 m) = 13.0 ft (3.9 m) ³⁄₄" (2.0 cm) 29 76.0 cm) 9" (22.9 cm) 1¹⁄₂" (3.8 cm) 20" (50.8 cm) Because Whirlpool Corporation policy includes a continuous commitment to 6" (15.2 cm) or larger 90° elbow 5.0 ft (1.5 m) Example vent system 90˚ elbow 6 ft (1.8 m) Wall cap 2 ft (0.6 m) Maximum...

Dimension Guide
Page 2
...176; elbow 8 ft (2.4 m) straight 1 - cabinet opening width D. 13" (33.0 cm) cabinet depth E. 36" (91.4 cm) base cabinet height Because Whirlpool Corporation policy includes a continuous commitment to countertop B. 24" (61.0 cm) min. W10320576A 10/20/10 clearance - bottom of 3¹⁄₄" x 10"... change materials and specifications without notice. wall cap = 5.0 ft (1.5 m) = 8.0 ft (2.4 m) = 0.0 ft (0.0 m) Length of range hood to change without notice. Page 2 of 2 Ref. For complete details, see Installation our products, we reserve the right to cooking surface C. 30...
...176; elbow 8 ft (2.4 m) straight 1 - cabinet opening width D. 13" (33.0 cm) cabinet depth E. 36" (91.4 cm) base cabinet height Because Whirlpool Corporation policy includes a continuous commitment to countertop B. 24" (61.0 cm) min. W10320576A 10/20/10 clearance - bottom of 3¹⁄₄" x 10"... change materials and specifications without notice. wall cap = 5.0 ft (1.5 m) = 8.0 ft (2.4 m) = 0.0 ft (0.0 m) Length of range hood to change without notice. Page 2 of 2 Ref. For complete details, see Installation our products, we reserve the right to cooking surface C. 30...


