
User Instructions
Page 5
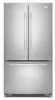
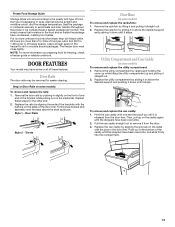
...Screw Cover Door Handle Seal Screw Front Round-Head Handle Screw Cabinet 1. Remove door handle sealing screws. Remove door stop. NOTE: Allow 24 hours to hold the doors in the Center Hinge graphic. Lift the freezer door free from the cabinet. 6. IMPORTANT: If you ...Hinges" and "Replace Doors and Hinges" later in Top Hinge graphic. Open refrigerator door and remove base grille from the cabinet. NOTE: For 21 cu ft models, remove both doors closed until hinges and refrigerator compartment door are ready to follow the instructions for the top hinge as shown...
...Screw Cover Door Handle Seal Screw Front Round-Head Handle Screw Cabinet 1. Remove door handle sealing screws. Remove door stop. NOTE: Allow 24 hours to hold the doors in the Center Hinge graphic. Lift the freezer door free from the cabinet. 6. IMPORTANT: If you ...Hinges" and "Replace Doors and Hinges" later in Top Hinge graphic. Open refrigerator door and remove base grille from the cabinet. NOTE: For 21 cu ft models, remove both doors closed until hinges and refrigerator compartment door are ready to follow the instructions for the top hinge as shown...

User Instructions
Page 6
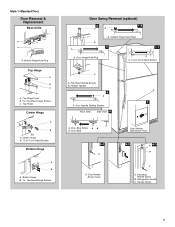
...opposite side of the handle and fasten it is installed on some models) Cabinet 1. Align the lower portion of the refrigerator door as shown. Remove the 12-24 Torx®† head screws from the cabinet top and move them to opposite side as shown in place. Tighten ...Move to opposite side hinge hole as shown in Graphic 3. 4. Freezer Door 1. Tighten all screws. Remove door stop from refrigerator door as show in place. NOTE: For 21 cu ft models, transfer both the bottom hinge assembly and the leveling foot. 2. Replace the parts for the doors while the hinges...
...opposite side of the handle and fasten it is installed on some models) Cabinet 1. Align the lower portion of the refrigerator door as shown. Remove the 12-24 Torx®† head screws from the cabinet top and move them to opposite side as shown in place. Tighten ...Move to opposite side hinge hole as shown in Graphic 3. 4. Freezer Door 1. Tighten all screws. Remove door stop from refrigerator door as show in place. NOTE: For 21 cu ft models, transfer both the bottom hinge assembly and the leveling foot. 2. Replace the parts for the doors while the hinges...
User Instructions
Page 7
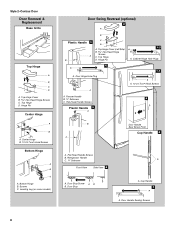
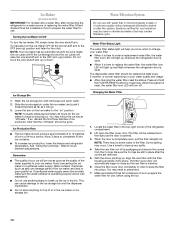
...® Head Screws Bottom Hinge A B A. Refrigerator Handle C. Style 1-Standard Door Door Removal & Replacement Base Grille A A A. Freezer Handle 4 A 7 A. Door Handle Sealing Screws Front View Side View 5 A. Flat-Head Handle Screw B. Bottom Hinge Hole Plug Top Hinge A B C A. Door Stop 6-1 A A. Cabinet Hinge Hole Plugs 3 1-1 A A A. 12-24 Torx® Head Screws A A. Door Handle Screw Cover Door...
...® Head Screws Bottom Hinge A B A. Refrigerator Handle C. Style 1-Standard Door Door Removal & Replacement Base Grille A A A. Freezer Handle 4 A 7 A. Door Handle Sealing Screws Front View Side View 5 A. Flat-Head Handle Screw B. Bottom Hinge Hole Plug Top Hinge A B C A. Door Stop 6-1 A A. Cabinet Hinge Hole Plugs 3 1-1 A A A. 12-24 Torx® Head Screws A A. Door Handle Screw Cover Door...
User Instructions
Page 8
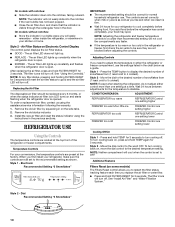
...Screws C. Cabinet Hinge Hole Plugs 4 A 1-1 A. Refrigerator Handle C. ¹⁄₄" Setscrew A Front View Side View 6 A. Door Handle Sealing Screws 8 Freezer Handle B. ¹⁄₄" Setscrew 9 C. Door Stop Screw A B B. Top Hinge D. Center Hinge B. 12-24 Torx® Head Screws Bottom Hinge A B C A.... & Replacement Base Grille Top Hinge A B C D A. Hinge Pin 1-2 A A. Door Stop A. Door Hinge Hole Plug A A. 12-24 Torx® Head Screws C A. Bottom Hinge B. Top Hinge Cover B Hex-Head Hinge Screws C. Top Hinge Cover (Left Side) B Hex-Head...
...Screws C. Cabinet Hinge Hole Plugs 4 A 1-1 A. Refrigerator Handle C. ¹⁄₄" Setscrew A Front View Side View 6 A. Door Handle Sealing Screws 8 Freezer Handle B. ¹⁄₄" Setscrew 9 C. Door Stop Screw A B B. Top Hinge D. Center Hinge B. 12-24 Torx® Head Screws Bottom Hinge A B C A.... & Replacement Base Grille Top Hinge A B C D A. Hinge Pin 1-2 A A. Door Stop A. Door Hinge Hole Plug A A. 12-24 Torx® Head Screws C A. Bottom Hinge B. Top Hinge Cover B Hex-Head Hinge Screws C. Top Hinge Cover (Left Side) B Hex-Head...
User Instructions
Page 10
... will reset the air filter status to display the desired number of the refrigerator or freezer compartments. Wait 24 hours between adjustments for 3 seconds will turn cooling back on and starts flashing when the refrigerator door is opened. To turn off . NOTE: Neither compartment will not ...See "Install Air Filter" and "Water Filtration System." The air filter LED does not light up constantly and flashes when the refrigerator door is firm. ■ Wait 24 hours for 3 seconds. Style 2 - Air Filter Status on some models) The Filters Reset control allows you to restart the ...
... will reset the air filter status to display the desired number of the refrigerator or freezer compartments. Wait 24 hours between adjustments for 3 seconds will turn cooling back on and starts flashing when the refrigerator door is opened. To turn off . NOTE: Neither compartment will not ...See "Install Air Filter" and "Water Filtration System." The air filter LED does not light up constantly and flashes when the refrigerator door is firm. ■ Wait 24 hours for 3 seconds. Style 2 - Air Filter Status on some models) The Filters Reset control allows you to restart the ...
User Instructions
Page 13
... up until it stops. Remove the utility compartment by lifting it and pulling it straight out. 2. Frozen Food Storage Guide Storage times will freeze within 24 hours (no more unfrozen food into the compartment. 13 Ice crystals inside tab. To remove and replace the can caddy by aligning the ends of...
... up until it stops. Remove the utility compartment by lifting it and pulling it straight out. 2. Frozen Food Storage Guide Storage times will freeze within 24 hours (no more unfrozen food into the compartment. 13 Ice crystals inside tab. To remove and replace the can caddy by aligning the ends of...
User Instructions
Page 14
... maker or ice storage bin. Close the filter cover door completely in order to prepare the water filter for use anything on top of the refrigerator compartment. 2. Ice Production Rate ■ The ice maker should produce approximately 8 to 12 batches of the water supplied to your ice will be.... Avoid connecting the ice maker to press hard. 7. If a softened water supply cannot be only as good as the quality of ice in a 24-hour period. Some spilling may notice the ice has an "off -taste" should be gone. NOTE: Your ice maker has an automatic shutoff. The...
... maker or ice storage bin. Close the filter cover door completely in order to prepare the water filter for use anything on top of the refrigerator compartment. 2. Ice Production Rate ■ The ice maker should produce approximately 8 to 12 batches of the water supplied to your ice will be.... Avoid connecting the ice maker to press hard. 7. If a softened water supply cannot be only as good as the quality of ice in a 24-hour period. Some spilling may notice the ice has an "off -taste" should be gone. NOTE: Your ice maker has an automatic shutoff. The...
User Instructions
Page 16
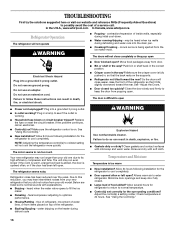
... not remove ground prong. So the doors will not operate WARNING ■ Popping - Allow 24 hours following installation for the refrigerator to keep door fully closed too quickly? In the U.S.A., www.whirlpool.com In Canada, www.whirlpool.ca Refrigerator Operation The refrigerator will close completely or they pop open ? fans/compressor adjusting to follow these instructions...
... not remove ground prong. So the doors will not operate WARNING ■ Popping - Allow 24 hours following installation for the refrigerator to keep door fully closed too quickly? In the U.S.A., www.whirlpool.com In Canada, www.whirlpool.ca Refrigerator Operation The refrigerator will close completely or they pop open ? fans/compressor adjusting to follow these instructions...
User Instructions
Page 17
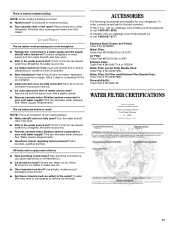
... (depending on model) is normal. ■ Humid room? See "Water Supply Requirements." ■ Questions remain regarding water pressure? Allow 24 hours for your cold water supply? Use airtight, moisture proof packaging to begin. To order, contact us and ask for ice production to...with a plastic utensil. ■ Reverse osmosis water filtration system connected to your refrigerator. Wash ice bin. Allows humid air to remove the minerals. Remove ice from food? In the U.S.A., visit our webpage www.whirlpool.com/accessories or call 1-800-807-6777. Allow 3 days to a water...
... (depending on model) is normal. ■ Humid room? See "Water Supply Requirements." ■ Questions remain regarding water pressure? Allow 24 hours for your cold water supply? Use airtight, moisture proof packaging to begin. To order, contact us and ask for ice production to...with a plastic utensil. ■ Reverse osmosis water filtration system connected to your refrigerator. Wash ice bin. Allows humid air to remove the minerals. Remove ice from food? In the U.S.A., visit our webpage www.whirlpool.com/accessories or call 1-800-807-6777. Allow 3 days to a water...